Ứng Dụng Làm Mờ Ảnh Dùng WorkManager (Ví Dụ Thực Tế)
Bài đăng này đã không được cập nhật trong 7 năm
WorkManager một cái tên khi dịch thoáng qua là "Người quản lý công việc", quản lý tác vụ cần phải được thực thi. Bạn có thể lưu giữ khái niệm nó ngắn gọn như vậy cho dễ nhớ. Về chi tiết hơn một chút, WorkManager là một phần trong Android Jetpack và Architecture Component để thực thi những công việc chạy ngầm (background work). Nó có 2 tính chất :
- Thực thi theo điểm: khi bạn đã ấn định công việc vào thời điểm nào thì nó sẽ chạy đúng vào thời điểm đó.
- Thực thi theo điều kiện: khi thoả mãn các logic nó mới bắt đầu thực hiện công việc bất kể lúc đó bạn có đang dùng ứng dụng hay không.
Đó là về phần khái niệm, chúng ta đã nắm được những ý cần thiết rồi. Nhưng sau đó còn nhiều điều thú vị hơn và tất nhiên trải qua một ví dụ thực tế để cảm nhận thôi nào. 
Ứng dụng: Blur Image Sync
Mô tả: Chúng ta sẽ chọn một ảnh trong gallery, chọn chế độ làm mờ và save & view ảnh sau khi đã hoàn thành.
Đọc đến đây thì một số lập trình viên Android sẽ "Ồ, vậy thì tôi vẫn hay làm thế mà..." Chờ một chút, có thể chúng ta đã quên là mình đang áp dụng WorkManager để xử lý thao tác này. Nghĩa là khi bạn bắt đầu thực hiện blur ảnh thì dù cho bạn có close apps thì nó vẫn đang thực thi cho tới khi hoàn thành việc save ảnh. Let's go!
1. Import WorkManager
Mình cần cài đặt WorkManager vào project, path: "app/build.gradle"
dependencies {
    implementation fileTree(dir: 'libs', include: ['*.jar'])
    implementation "android.arch.work:work-runtime:1.0.0-alpha09"
    implementation "com.android.support:appcompat-v7:27.1.1"
    implementation "com.android.support:support-v4:27.1.1"
    implementation "com.android.support.constraint:constraint-layout:1.1.3"
    implementation "com.github.bumptech.glide:glide:4.8.0"
}
implementation "android.arch.work:work-runtime:1.0.0-alpha09"
Phiên bản mới nhất của WorkManager hiện tại là "1.0.0-alpha09" và các bạn lưu ý cần phải dùng bản compile version 28 trở lên nhé (Trích WorkManager docs)
WorkManager requires compileSdk version 28 or higher.
Trong phần import này mình có dùng thêm thư viện Glide để load ảnh, đang dùng version "4.8.0"
Trước khi sang phần sau, có một số thành phần cần nắm rõ:
1. Worker: nơi để chúng ta code các công việc muốn thực hiện và cần override doWork() 2. WorkRequest: khởi tạo các yêu cầu bạn cần truyền vào các Worker như BlurWorker, SaveImageWorker... Tại đây bạn cũng có thể thêm các điều kiện ràng buộc khi thực hiện Worker như: thiết bị đang được sạc, kết nối Wifi/Network... 3. WorkManager: nơi khởi tạo cho WorkRequest chạy và đưa ra các status của các Worker dựa vào đó ứng dụng có những điều hướng phù hợp.
2. Triển khai ứng dụng
Giao diện ứng dụng như sau:
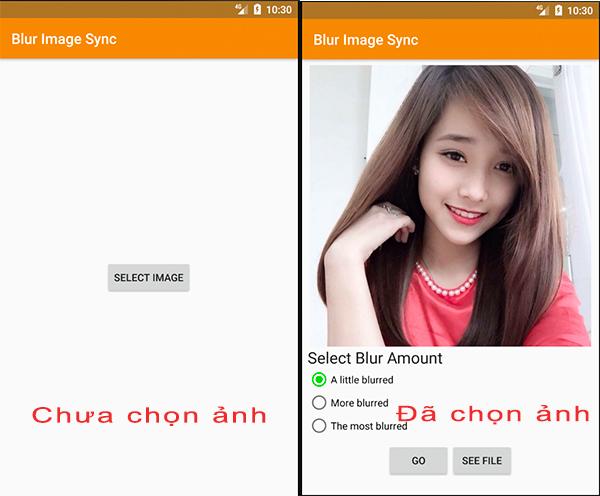
Do UI trạng thái lúc đầu rất đơn giản nên mình đi vào layout số 2 luôn nhé.
activity_blur.xm
<?xml version="1.0" encoding="utf-8"?>

<ScrollView xmlns:android="http://schemas.android.com/apk/res/android"
    xmlns:tools="http://schemas.android.com/tools"
    android:layout_width="match_parent"
    android:layout_height="match_parent"
    android:fillViewport="true">

    <LinearLayout
        android:layout_width="match_parent"
        android:layout_height="wrap_content"
        android:layout_margin="8dp"
        android:orientation="vertical">

        <ImageView
            android:id="@+id/image_view"
            android:layout_width="match_parent"
            android:layout_height="0dp"
            android:layout_weight="1"
            android:contentDescription="@string/description_image"
            android:scaleType="fitCenter" />

        <TextView
            android:id="@+id/filters_title"
            android:layout_width="wrap_content"
            android:layout_height="wrap_content"
            android:text="@string/blur_title"
            android:textAppearance="@style/TextAppearance.AppCompat.Large" />


        <RadioGroup xmlns:android="http://schemas.android.com/apk/res/android"
            android:id="@+id/radio_blur_group"
            android:layout_width="fill_parent"
            android:layout_height="wrap_content"
            android:checkedButton="@+id/radio_blur_lv_1"
            android:orientation="vertical">

            <RadioButton
                android:id="@+id/radio_blur_lv_1"
                android:layout_width="wrap_content"
                android:layout_height="wrap_content"
                android:text="@string/blur_lv_1" />

            <RadioButton
                android:id="@+id/radio_blur_lv_2"
                android:layout_width="wrap_content"
                android:layout_height="wrap_content"
                android:text="@string/blur_lv_2" />

            <RadioButton
                android:id="@+id/radio_blur_lv_3"
                android:layout_width="wrap_content"
                android:layout_height="wrap_content"
                android:text="@string/blur_lv_3" />
        </RadioGroup>

        <RadioGroup
            android:id="@+id/destinations"
            android:layout_width="wrap_content"
            android:layout_height="wrap_content"
            android:orientation="vertical">

        </RadioGroup>

        <LinearLayout
            android:layout_width="match_parent"
            android:layout_height="wrap_content"
            android:layout_marginTop="8dp"
            android:layout_marginBottom="16dp"
            android:gravity="center"
            android:orientation="horizontal">

            <Button
                android:id="@+id/cancel_button"
                android:layout_width="wrap_content"
                android:layout_height="wrap_content"
                android:text="@string/cancel_work"
                android:visibility="gone" />

            <ProgressBar
                android:id="@+id/progress_bar"
                android:layout_width="wrap_content"
                android:layout_height="wrap_content"
                android:layout_gravity="center_horizontal"
                android:indeterminate="true"
                android:visibility="gone" />

            <Button
                android:id="@+id/go_button"
                android:layout_width="wrap_content"
                android:layout_height="wrap_content"
                android:text="@string/go" />

            <Button
                android:id="@+id/see_file_button"
                android:layout_width="wrap_content"
                android:layout_height="wrap_content"
                android:text="@string/see_file"
                android:visibility="gone"
                tools:visibility="visible" />

        </LinearLayout>

    </LinearLayout>

</ScrollView>
Phần Worker như đã nói ở trên, với bài toán này chúng ta cần đến 3 Worker như sau:
- BlurWorker: Thực hiện thao tác chính là làm mờ ảnh
- CleanupWorker: Xoá đi các file tạm trong quá trình làm mờ ảnh
- SaveImageToFileWorker: Save ảnh đã xử lý xong
BlurWorker.java
public class BlurWorker extends Worker {

    private static final String TAG = BlurWorker.class.getSimpleName();

    @NonNull
    @Override
    public Worker.Result doWork() {

        Context applicationContext = getApplicationContext();

        // Makes a notification when the work starts and slows down the work so that it's easier to
        // see each WorkRequest start, even on emulated devices
        WorkerUtils.makeStatusNotification("Blurring image", applicationContext);
        WorkerUtils.sleep();

        String resourceUri = getInputData().getString(Constants.KEY_IMAGE_URI);
        try {
            if (TextUtils.isEmpty(resourceUri)) {
                Log.e(TAG, "Invalid input uri");
                throw new IllegalArgumentException("Invalid input uri");
            }

            ContentResolver resolver = applicationContext.getContentResolver();

            // Create a bitmap
            Bitmap bitmap = BitmapFactory.decodeStream(
                    resolver.openInputStream(Uri.parse(resourceUri)));

            // Blur the bitmap
            Bitmap output = WorkerUtils.blurBitmap(bitmap, applicationContext);

            // Write bitmap to a temp file
            Uri outputUri = WorkerUtils.writeBitmapToFile(applicationContext, output);

            // Return the output for the temp file
            setOutputData(new Data.Builder().putString(
                    Constants.KEY_IMAGE_URI, outputUri.toString()).build());

            // If there were no errors, return SUCCESS
            return Worker.Result.SUCCESS;
        } catch (FileNotFoundException fileNotFoundException) {
            Log.e(TAG, "Failed to decode input stream", fileNotFoundException);
            throw new RuntimeException("Failed to decode input stream", fileNotFoundException);

        } catch (Throwable throwable) {

            // If there were errors, return FAILURE
            Log.e(TAG, "Error applying blur", throwable);
            return Worker.Result.FAILURE;
        }
    }
}
CleanupWorker.java
public class CleanupWorker extends Worker {
    private static final String TAG = CleanupWorker.class.getSimpleName();

    @NonNull
    @Override
    public Worker.Result doWork() {
        Context applicationContext = getApplicationContext();

        // Makes a notification when the work starts and slows down the work so that it's easier to
        // see each WorkRequest start, even on emulated devices
        WorkerUtils.makeStatusNotification("Cleaning up old temporary files",
                applicationContext);
        WorkerUtils.sleep();

        try {
            File outputDirectory = new File(applicationContext.getFilesDir(),
                    Constants.OUTPUT_PATH);
            if (outputDirectory.exists()) {
                File[] entries = outputDirectory.listFiles();
                if (entries != null && entries.length > 0) {
                    for (File entry : entries) {
                        String name = entry.getName();
                        if (!TextUtils.isEmpty(name) && name.endsWith(".png")) {
                            boolean deleted = entry.delete();
                            Log.i(TAG, String.format("Deleted %s - %s", name, deleted));
                        }
                    }
                }
            }
            return Worker.Result.SUCCESS;
        } catch (Exception exception) {
            Log.e(TAG, "Error cleaning up", exception);
            return Worker.Result.FAILURE;
        }
    }
}
SaveImageToFileWorker.java
public class SaveImageToFileWorker extends Worker {
    private static final String TAG = SaveImageToFileWorker.class.getSimpleName();

    private static final String TITLE = "Blurred Image";
    private static final SimpleDateFormat DATE_FORMATTER =
            new SimpleDateFormat("yyyy.MM.dd 'at' HH:mm:ss z", Locale.getDefault());

    @NonNull
    @Override
    public Worker.Result doWork() {
        Context applicationContext = getApplicationContext();

        // Makes a notification when the work starts and slows down the work so that it's easier to
        // see each WorkRequest start, even on emulated devices
        WorkerUtils.makeStatusNotification("Saving image", applicationContext);
        WorkerUtils.sleep();

        ContentResolver resolver = applicationContext.getContentResolver();
        try {
            String resourceUri = getInputData()
                    .getString(Constants.KEY_IMAGE_URI);
            Bitmap bitmap = BitmapFactory.decodeStream(
                    resolver.openInputStream(Uri.parse(resourceUri)));
            String imageUrl = MediaStore.Images.Media.insertImage(
                    resolver, bitmap, TITLE, DATE_FORMATTER.format(new Date()));
            if (TextUtils.isEmpty(imageUrl)) {
                Log.e(TAG, "Writing to MediaStore failed");
                return Worker.Result.FAILURE;
            }
            Data output = new Data.Builder()
                    .putString(Constants.KEY_IMAGE_URI, imageUrl)
                    .build();
            setOutputData(output);
            return Worker.Result.SUCCESS;
        } catch (Exception exception) {
            Log.e(TAG, "Unable to save image to Gallery", exception);
            return Worker.Result.FAILURE;
        }
    }
}
Các bạn chắc vẫn còn nhớ các thành phần của WorkManager chứ : Worker, WorkRequest và WorkManager. Và tiếp theo chúng ta tạo class WorkRequest nha, nhiệm vụ chính là tạo ra yêu từ các worker và UI sẽ có chút thay đổi ở button See File nếu như có Uri của image đã được làm mờ xong. Cho nên mình sẽ để WorkRequest trong BlurViewModel
BlurViewModel.java
private WorkManager mWorkManager;
    private Uri mImageUri;
    private Uri mOutputUri;
    private LiveData<List<WorkStatus>> mSavedWorkStatus;

    public BlurViewModel() {

        mWorkManager = WorkManager.getInstance();

        // This transformation makes sure that whenever the current work Id changes the WorkStatus
        // the UI is listening to changes
        mSavedWorkStatus = mWorkManager.getStatusesByTag(TAG_OUTPUT);
    }

    /**
     * Create the WorkRequest to apply the blur and save the resulting image
     * @param blurLevel The amount to blur the image
     */
    void applyBlur(int blurLevel) {

        // Add WorkRequest to Cleanup temporary images
        WorkContinuation continuation = mWorkManager
                .beginUniqueWork(IMAGE_MANIPULATION_WORK_NAME,
                        ExistingWorkPolicy.REPLACE,
                        OneTimeWorkRequest.from(CleanupWorker.class));

        // Add WorkRequests to blur the image the number of times requested
        for (int i = 0; i < blurLevel; i++) {
            OneTimeWorkRequest.Builder blurBuilder =
                    new OneTimeWorkRequest.Builder(BlurWorker.class);

            // Input the Uri if this is the first blur operation
            // After the first blur operation the input will be the output of previous
            // blur operations.
            if ( i == 0 ) {
                blurBuilder.setInputData(createInputDataForUri());
            }

            continuation = continuation.then(blurBuilder.build());
        }

        // Create charging constraint
        Constraints constraints = new Constraints.Builder()
                .setRequiresCharging(true)
                .build();

        // Add WorkRequest to save the image to the filesystem
        OneTimeWorkRequest save = new OneTimeWorkRequest.Builder(SaveImageToFileWorker.class)
                .setConstraints(constraints)
                .addTag(TAG_OUTPUT)
                .build();
        continuation = continuation.then(save);

        // Actually start the work
        continuation.enqueue();

    }

    /**
     * Cancel work using the work's unique name
     */
    void cancelWork() {
        mWorkManager.cancelUniqueWork(IMAGE_MANIPULATION_WORK_NAME);
    }
Đến đây mình giải thích thêm một chút để các bạn rõ hơn nha:
mWorkManager = WorkManager.getInstance(); mSavedWorkStatus = mWorkManager.getStatusesByTag(TAG_OUTPUT);
Đây là lúc khởi tạo WorkManager và lấy giá trị status ban đầu xem công việc save ảnh đã hoàn thành chưa.
Tiếp theo WorkManager quản lý và thực thi worker đầu tiên là xoá file tạm (tất nhiên nó không có ý nghĩa với lần chạy ứng dụng đầu tiên) nhưng rất cần thiết từ lần chạy thứ 2.
// Add WorkRequest to Cleanup temporary images WorkContinuation continuation = mWorkManager .beginUniqueWork(IMAGE_MANIPULATION_WORK_NAME, ExistingWorkPolicy.REPLACE, OneTimeWorkRequest.from(CleanupWorker.class));
Các lần add worker tiếp theo bạn có thể thấy lần lượt là Blur và Save worker
continuation = continuation.then(blurBuilder.build()); continuation = continuation.then(save);
Và có một điều kiện ràng buộc cho chức năng này của chúng ta là gì các bạn nhỉ ?
À đó là điều kiện thiết bị phải đang sạc điện:
// Create charging constraint Constraints constraints = new Constraints.Builder() .setRequiresCharging(true) .build();
Sau mọi setup hoàn tất thì câu lệnh sau dùng để start công việc đã được chỉ định rõ ràng
// Actually start the work continuation.enqueue();
Phần quan trọng cuối cùng là ở class BlurActivity, tại đây là nơi móc nối những gì chúng ta đã thực hiện ở trên
BlurActivity.java
public class BlurActivity extends AppCompatActivity {

    private BlurViewModel mViewModel;
    private ImageView mImageView;
    private ProgressBar mProgressBar;
    private Button mGoButton, mOutputButton, mCancelButton;


    @Override
    protected void onCreate(@Nullable Bundle savedInstanceState) {
        super.onCreate(savedInstanceState);
        setContentView(R.layout.activity_blur);

        // Get the ViewModel
        mViewModel = ViewModelProviders.of(this).get(BlurViewModel.class);

        // Get all of the Views
        mImageView = findViewById(R.id.image_view);
        mProgressBar = findViewById(R.id.progress_bar);
        mGoButton = findViewById(R.id.go_button);
        mOutputButton = findViewById(R.id.see_file_button);
        mCancelButton = findViewById(R.id.cancel_button);

        // Image uri should be stored in the ViewModel; put it there then display
        Intent intent = getIntent();
        String imageUriExtra = intent.getStringExtra(Constants.KEY_IMAGE_URI);
        mViewModel.setImageUri(imageUriExtra);
        if (mViewModel.getImageUri() != null) {
            Glide.with(this).load(mViewModel.getImageUri()).into(mImageView);
        }

        // Setup blur image file button
        mGoButton.setOnClickListener(view -> mViewModel.applyBlur(getBlurLevel()));

        // Setup view output image file button
        mOutputButton.setOnClickListener(view -> {
            Uri currentUri = mViewModel.getOutputUri();
            if (currentUri != null) {
                Intent actionView = new Intent(Intent.ACTION_VIEW, currentUri);
                if (actionView.resolveActivity(getPackageManager()) != null) {
                    startActivity(actionView);
                }
            }
        });

        // Hookup the Cancel button
        mCancelButton.setOnClickListener(view -> mViewModel.cancelWork());


        // Show work status
        mViewModel.getOutputStatus().observe(this, listOfWorkStatuses -> {

            // Note that these next few lines grab a single WorkStatus if it exists
            // This code could be in a Transformation in the ViewModel; they are included here
            // so that the entire process of displaying a WorkStatus is in one location.

            // If there are no matching work statuses, do nothing
            if (listOfWorkStatuses == null || listOfWorkStatuses.isEmpty()) {
                return;
            }

            // We only care about the one output status.
            // Every continuation has only one worker tagged TAG_OUTPUT
            WorkStatus workStatus = listOfWorkStatuses.get(0);

            boolean finished = workStatus.getState().isFinished();
            if (!finished) {
                showWorkInProgress();
            } else {
                showWorkFinished();

                // Normally this processing, which is not directly related to drawing views on
                // screen would be in the ViewModel. For simplicity we are keeping it here.
                Data outputData = workStatus.getOutputData();

                String outputImageUri =
                        outputData.getString(Constants.KEY_IMAGE_URI);

                // If there is an output file show "See File" button
                if (!TextUtils.isEmpty(outputImageUri)) {
                    mViewModel.setOutputUri(outputImageUri);
                    mOutputButton.setVisibility(View.VISIBLE);
                }
            }
        });
    }
    }
3. Kết quả chạy ứng dụng
Sau các quá trình trên chúng ta đã có một ứng dụng tích hợp WorkManager để chạy thử rồi, mình demo một vài tấm hình chụp lại các bạn nhé. ^^
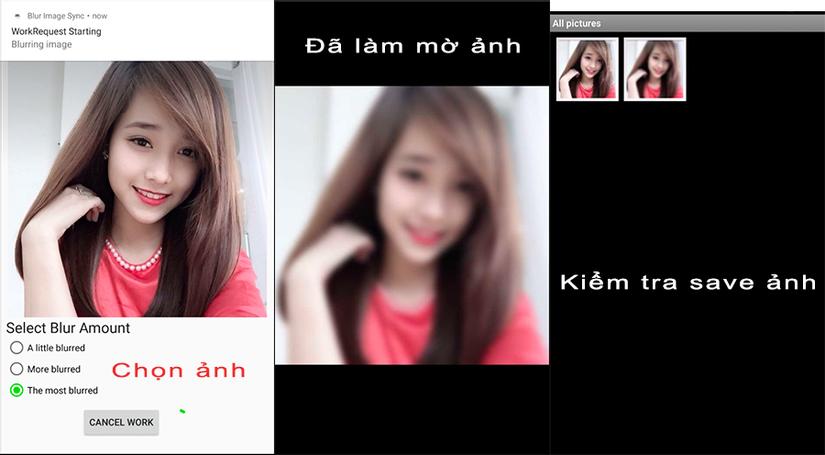
Các bạn có thể thấy rằng ngay khi chúng ta chọn ảnh xong và bấm nút "Go" thì trên thanh StatusBar có xuất hiện notify báo quá trình đang bắt đầu, rồi hiển thị các giai đoạn của việc thực thi cho đến lúc hoàn thành. Dù cho bạn có close apps thì quá trình này vẫn diễn ra và kết quả ảnh mình làm mờ (ở chế độ cao nhất) thì cô gái xinh đẹp kia đã bị xấu đi khá nhiều phải không anh em nhỉ ?
À mà có thể ai đó lúc này sẽ có ý tưởng tạo một ứng dụng làm nét ảnh thì cũng ổn đó và nhớ apply WorkManager nhé (yaoming)
4. Tổng kết
Trên đây là những chia sẻ của mình cách áp dụng WorkManager cho ứng dụng thực tế, hy vọng giúp cho ai đó hiểu hơn về cách thức hoạt động hay những khái niệm tương đối phức tạp khi đọc trong documents trên Google Android Developer. Ngoài ra một số tính năng mở rộng rất lý thú khác nữa mình sẽ đề cập ở bài viết sau, xin chào các bạn!
All rights reserved
