Triển khai Repository trong Laravel
Bài đăng này đã không được cập nhật trong 4 năm
1. Design Pattern là gì?
Design Pattern là các mẫu thiết kế chuẩn, được đúc kết và tạo ra sau quá trình làm việc và nghiên cứu lâu dài của các chuyên gia.
Design Pattern là một giải pháp tổng thể, một khuôn mẫu cho các vấn đề chung trong thiết kế phần mềm.
Trong hướng đối tượng, Design Pattern cho thấy mối quan hệ và tương tác giữa các lớp hoặc các đối tượng mà không cần chỉ rõ đối tượng cụ thể.
Lợi ích của Design Pattern:
- Dễ bảo trì, nâng cấp và mở rộng dự án
- Hạn chế được các lỗi tiềm ẩn
- Code dễ đọc, dễ hiểu và dễ phát triển
2. Repository là gì?
Repository là một mẫu thiết kế trong Design Pattern.
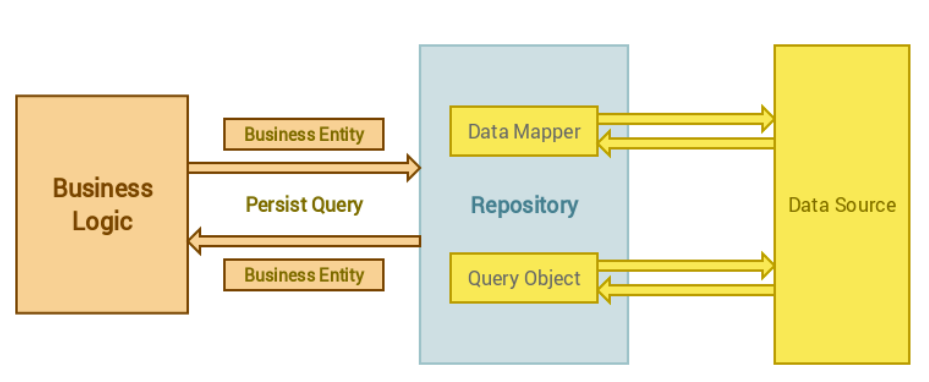
Repository là phần trung gian, ở giữa phần dữ liệu và phần xử lý logic.
Repository là nơi lưu trữ logic truy vấn dữ liệu. Các lệnh truy vẫn dữ liệu vốn được viết trực tiếp ở controller sẽ được đưa vào Repository. Khi đó, Controller sẽ dùng Repository để tương tác với dữ liệu thay vì sử dụng trực tiếp. Việc truy cập dữ liệu được giấu kín trong Repository.
Thông thường trong Laravel, các phương thức như find, create, update, delete,... được viết khá giống nhau, chỉ khác nhau ở tên Model (đối tượng) cần tương tác. Vì vậy, các đoạn code này nên đưa ra Repository để tiết kiệm việc viết code.
Lợi ích của Repository:
- Code dễ đọc, dễ phát triển sản phẩm trong làm việc nhóm
- Giảm thay đổi code khi phần mềm có thay đổi cấu trúc dữ liệu
- Tránh việc lặp code
- Hạn chế lỗi trong truy vấn
- Dễ dàng thực hiện test
3. Ví dụ
Bước 1:
Trong thư mục apptrong ứng dụng Laravel của bạn, tạo 1 thư mục có tên là Repositories. Trong thư mục sẽ có:
- RepositoryInterface: interface khuôn mẫu, khai báo các phương thức chung cho các Models.
- BaseRepository: implements RepositoryInterface, triển khai các phương thức chung cho các Model
- Các thư mục riêng tương ứng với các Model. (Ở đây mình ví dụ là Product). Trong thư mục này chứa:
- ProductRepositoryInterface: interface chứa các phương thức riêng của Model Product.
- ProductRepository: implements ProductRepositoryInterface
Trong ProductController, thay vì viết trực tiếp truy vẫn, chúng ta sẽ khởi tạo controller có thuộc tính $productRepo để truy vấn dữ liệu qua nó.
Bước 2: Đăng kí trong app/Providers/AppServiceProvider.php
Khi khởi tạo controller, chúng ta sẽ gán thuộc tính $productRepo có kiểu là ProductRepositoryInterface. Tại sao không phải là ProductRepository?
Mục đích là để khi các logic làm việc với dữ liệu thay đổi hay để dễ hiểu, các bạn nghĩ đến khi database thay đổi (ví dụ chuyển từ MySQL sang Redis), các lệnh truy vấn dữ liệu sẽ thay đổi. Khi đó, ta sẽ phải tạo thêm 1 class ProductRepository khác (ví dụ RedisProductRepository). Để dễ dàng cho các thay đổi như vậy, không cần sửa lại các controller đang dùng repository cũ, ta đăng kí và sau đó chỉ cần thay đổi repository ở file app/Providers/AppServiceProvider.php.
public function register()
{
    $this->app->singleton(
        \App\Repositories\Product\ProductRepositoryInterface::class,
        \App\Repositories\Product\ProductRepository::class
    );
}
Bước 3: Tạo RepositoryInterface và BaseRepository
RepositoryInterface
<?php

namespace App\Repositories;

interface RepositoryInterface
{
    /**
     * Get all
     * @return mixed
     */
    public function getAll();

    /**
     * Get one
     * @param $id
     * @return mixed
     */
    public function find($id);

    /**
     * Create
     * @param array $attributes
     * @return mixed
     */
    public function create($attributes = []);

    /**
     * Update
     * @param $id
     * @param array $attributes
     * @return mixed
     */
    public function update($id, $attributes = []);

    /**
     * Delete
     * @param $id
     * @return mixed
     */
    public function delete($id);
}
BaseRepository
<?php

namespace App\Repositories;

use App\Repositories\RepositoryInterface;

abstract class BaseRepository implements RepositoryInterface
{
    //model muốn tương tác
    protected $model;

   //khởi tạo
    public function __construct()
    {
        $this->setModel();
    }

    //lấy model tương ứng
    abstract public function getModel();

    /**
     * Set model
     */
    public function setModel()
    {
        $this->model = app()->make(
            $this->getModel()
        );
    }

    public function getAll()
    {
        return $this->model->all();
    }

    public function find($id)
    {
        $result = $this->model->find($id);

        return $result;
    }

    public function create($attributes = [])
    {
        return $this->model->create($attributes);
    }

    public function update($id, $attributes = [])
    {
        $result = $this->find($id);
        if ($result) {
            $result->update($attributes);
            return $result;
        }

        return false;
    }

    public function delete($id)
    {
        $result = $this->find($id);
        if ($result) {
            $result->delete();

            return true;
        }

        return false;
    }
}
Bước 4: Viết Interface và Repository cho Model tương ứng.
ProductRepositoryInterface
<?php
namespace App\Repositories\Product;

use App\Repositories\RepositoryInterface;

interface ProductRepositoryInterface extends RepositoryInterface
{
    //ví dụ: lấy 5 sản phầm đầu tiên
    public function getProduct();
}
ProductRepository
<?php
namespace App\Repositories\Post;

use App\Repositories\BaseRepository;

class ProductRepository extends BaseRepository implements ProductRepositoryInterface
{
    //lấy model tương ứng
    public function getModel()
    {
        return \App\Models\Product::class;
    }

    public function getProduct()
    {
        return $this->model->select('product_name')->take(5)->get();
    }
}
Bước 5: Tạo ProductController
<?php

namespace App\Http\Controllers;

use Illuminate\Http\Request;
use App\Repositories\Product\ProductRepositoryInterface;

class ProductController extends Controller
{
    /**
     * @var PostRepositoryInterface|\App\Repositories\Repository
     */
    protected $productRepo;

    public function __construct(ProductRepositoryInterface $productRepo)
    {
        $this->productRepo = $productRepo;
    }

    public function index()
    {
        $products = $this->productRepo->getAll();

        return view('home.products', ['products' => $products]);
    }

    public function show($id)
    {
        $product = $this->productRepo->find($id);

        return view('home.product', ['product' => $product]);
    }

    public function store(Request $request)
    {
        $data = $request->all();

        //... Validation here

        $product = $this->productRepo->create($data);

        return view('home.products');
    }

    public function update(Request $request, $id)
    {
        $data = $request->all();

        //... Validation here

        $product = $this->productRepo->update($id, $data);

        return view('home.products');
    }

    public function destroy($id)
    {
        $this->productRepo->delete($id);

        return view('home.products');
    }
}
Tài liệu tham khảo:
https://www.larashout.com/how-to-use-repository-pattern-in-laravel
https://medium.com/employbl/use-the-repository-design-pattern-in-a-laravel-application-13f0b46a3dce
https://viblo.asia/p/repository-pattern-trong-laravel-gGJ59jPaKX2
Để hiểu thêm, các bạn đọc cả Dependency Injection nha :3
All rights reserved
