The React Context API
Bài đăng này đã không được cập nhật trong 7 năm
Despite having debuted before but under the disguise of a behind-the-scene feature that most developers either knew little about, or avoided using, React Context API has recently evoluted into a first-class citizen in React 16.3, open to all.
As soon as the version was released, there were ongoing rumors across the Internet proclaiming the death of Redux due to this new Context API. If Redux could communicate verbally, its human form manifestation would say “Chill. The reports of my death are just an exaggeration.”
Today, in this article, I would like to cover all of the following things:
- How the new Context API works.
- How it is similar to Redux.
- When/where you might prefer the Context rather than using Redux.
- Why Context doesn't "steal the show" of Redux in every scene.

1. The app's requirement
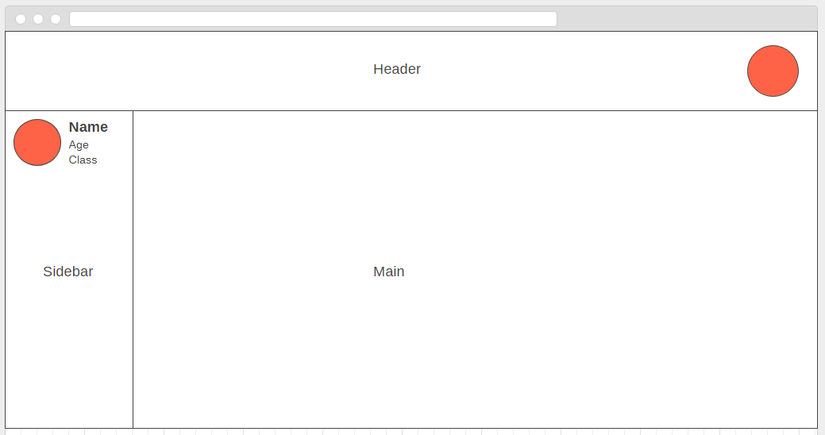
Assume that we need to build an application for teachers to manage student database. The web displays the student's information after successful authentication. The info is distributed across 2 places: in the <Header /> component at the top-right, and in the <Sidebar /> component on the leftside of the <MainContent /> component.
2. The props drilling approach
With pure React, the keeper of student info must be high enough in the hierarchy so that the data can be passed down as props attribute to the children components that need it, which, in this case, is App:
Apppasses it along toHeaderandBody.- They, in turn, pass it down again, to
StudentAvatarandSidebar. - Finally,
Sidebarpasses it down toStudentInfo.
One single prop is passed down from parent component to children, then from children to grandchildrent in the component hierarchy thoroughly like a drill digging deeply into the wall structure, hence the name props drilling.
import React from 'react';
import ReactDOM from 'react-dom';

const StudentAvatar = ({ student, size }) => (
  <img
    className={`student-avatar ${size || ''}`}
    alt="student avatar"
    src={student.avatar}
  />
);

const StudentInfo = ({ student }) => (
  <div className="student-info">
    <div>
      <StudentAvatar student={student} />
      {student.name}
    </div>
    <div className="info">
      <div>{student.gender}</div>
      <div>Grade: {student.grade}</div>
    </div>
  </div>
);

const Header = ({ student }) => (
  <div className="main-header">
    <StudentAvatar student={student} size="small" />
  </div>
);

const Content = () => <div className="content">...</div>;

const Sidebar = ({ student }) => (
  <div className="sidebar">
    <StudentInfo student={student} />
  </div>
);

const Body = ({ student }) => (
  <div className="body">
    <Sidebar student={student} />
    <Content student={student} />
  </div>
);

class App extends React.Component {
  state = {
    student: {
      avatar: 'https://lh3.googleusercontent.com/-4rElFw0sdsY/AAAAAAAAAAI/AAAAAAAAAA8/TieQ-Ya9NLQ/s640-il/photo.jpg',
      name: 'Jack Frost'
      gender: 'Male',
      grade: 11
    }
  };

  render() {
    const { student } = this.state;

    return (
      <div className="app">
        <Header student={student} />
        <Body student={student} />
      </div>
    );
  }
}

ReactDOM.render(<App />, document.querySelector('#root'));
In terms of prop drilling, this is not a terrible workaround. Prop drilling is not discouraged by any means; it’s a perfectly valid pattern and core to the way React works. But deep drilling might be a bit annoying to write and extremely annoying when you have a lot of props to pass down.
Furthermore, prop drilling strategy has one colossal downside: it creates coupling between components that would otherwise be decoupled. In the example above, Header needs to accept a student prop and pass it down to StudentAvatar, even though it has no need for the student. Such tightly-coupled components have no reusability, because you’ve gotta wire them up with their new parents whenever you plop one down in a new location.
3. Improving with children props
Still sticking with pure React, the children prop is a better solution for components serving as generic placeholders like Header, Sidebar, and Body. Just so you know, you can pass JSX elements into any prop and render them as-is. No more worry about passing down specific pieces of data that the component needs.
import React from 'react';
import ReactDOM from 'react-dom';
import "./styles.css";

const StudentAvatar = ({ student, size }) => (
  <img
    className={`student-avatar ${size || ''}`}
    alt="student avatar"
    src={student.avatar}
  />
);

const StudentInfo = ({ student }) => (
  <div className="student-info">
    <div>
      <StudentAvatar student={student} />
      {student.name}
    </div>
    <div className="info">
      <div>{student.gender}</div>
      <div>Grade: {student.grade}</div>
    </div>
  </div>
);

const Header = ({ children }) => (
  <div className="main-header">
    {children}
  </div>
);

const Content = () => (
  <div className="content">...</div>
);

const Sidebar = ({ children }) => (
  <div className="sidebar">
    {children}
  </div>
);

const Body = ({ sidebar, content }) => (
  <div className="body">
    <Sidebar>{sidebar}</Sidebar>
    {content}
  </div>
);

class App extends React.Component {
  state = {
    student: {
      avatar: 'https://lh3.googleusercontent.com/-4rElFw0sdsY/AAAAAAAAAAI/AAAAAAAAAA8/TieQ-Ya9NLQ/s640-il/photo.jpg',
      name: 'Jack Frost'
      gender: 'Male',
      grade: 11
    }
  };

  render() {
    const { student } = this.state;

    return (
      <div className="app">
        <Header>
          <StudentAvatar student={student} size="small" />
        </Header>
        <Body
          sidebar={<StudentInfo student={student} />}
          content={<Content />}
        />
      </div>
    );
  }
}

ReactDOM.render(<App />, document.querySelector('#root'));
Nevertheless, it will be tough to figure out how to adapt the children pattern if your app is too complex so let's see how you might replace the prop drilling with Redux in the following section.
4. Redux comes to the rescue
Here’s the React app from above, refactored to use Redux. The student info has been moved to the Redux store, which means we can use react-redux’s connect function to directly inject the student prop into any components.
This is a big win in terms of decoupling. Take a look at the new Header, Body, and Sidebar, which no loger accept and pass down the student prop. No more playing hot potato with props. No more needless coupling.
import React from 'react';
import ReactDOM from 'react-dom';

// We need createStore, connect, and Provider:
import { createStore } from "redux";
import { connect, Provider } from "react-redux";

const initialState = {};
function reducer(state = initialState, action) {
  switch (action.type) {
    // Respond to the SET_STUDENT action and update
    // the state accordingly
    case 'SET_STUDENT':
      return {
        ...state,
        student: action.student
      };
    default:
      return state;
  }
}

const store = createStore(reducer);

store.dispatch({
  type: 'SET_STUDENT',
  student: {
    avatar: 'https://lh3.googleusercontent.com/-4rElFw0sdsY/AAAAAAAAAAI/AAAAAAAAAA8/TieQ-Ya9NLQ/s640-il/photo.jpg',
    name: 'Jack Frost'
    followers: 1234,
    following: 123
  }
});

const mapStateToProps = state => ({
  student: state.student
});

const StudentAvatar = connect(mapStateToProps)(({ student, size }) => (
  <img
    className={`student-avatar ${size || ''}`}
    alt="student avatar"
    src={student.avatar}
  />
));

const StudentInfo = connect(mapStateToProps)(({ student }) => (
  <div className="student-info">
    <div>
      <StudentAvatar />
      {student.name}
    </div>
    <div className="info">
      <div>{student.gender}</div>
      <div>Grade: {student.grade}</div>
    </div>
  </div>
));

// Header doesn't need to know about `student` anymore
const Header = () => (
  <div className="main-header">
    <StudentAvatar size="small" />
  </div>
);

const Content = () => (
  <div className="content">...</div>
);

// Sidebar doesn't need to know about `student` anymore
const Sidebar = () => (
  <div className="sidebar">
    <StudentInfo />
  </div>
);

// Body doesn't need to know about `student` anymore
const Body = () => (
  <div className="body">
    <Sidebar />
    <Content />
  </div>
);

// App doesn't hold state anymore, so it can be a stateless function
const App = () => (
  <div className="app">
    <Header />
    <Body />
  </div>
);

ReactDOM.render(
  <Provider store={store}>
    <App />
  </Provider>,
  document.querySelector('#root')
);
Although curiosity is not intrinsically good, it's a good thing to wonder how Redux achieves this magic trick. How come Redux is able to do it while React is unable to overcome the limitation of supporting passing porps down multiple levels?
The answer is, Redux does use React’s context feature. Not the modern Context API (not yet) – the old one, which the documents said not to use unless you were writing a library or knew what you were doing. Context is like an electrical bus running behind every component: to receive the power (data) passing through it, you need only plug in. And (React-)Redux’s connect function does just that.
This feature of Redux is just the tip of the iceberg, though. Passing data around all over the place is just the most apparent of Redux’s features. Here are a few other benefits you get out of the box:
Automatic performance improvement
connect automatically makes connected components “pure,” meaning they will only re-render when their props change – a.k.a. when their slice of the Redux state changes. This prevents needless re-renders and keeps your app running fast.
Easy Debugging
Another great feature the Redux DevTools enable is time travel debugging a.k.a. you can click on any past action and jump to that point in time, basically replaying every action up to and including that one (but no further).
Middleware Customization Support
Redux supports the concept of middleware, which is a fancy alias for “a function that runs every time an action is dispatched”. You can customize your own middleware as it isn't difficult as it seems and Redux middlewares often enable powerful stuff.
5. React Context API
But there might be a day that you don't need all those fancy features of Redux. I mean, why do I have to care about the easy debugging, the middleware cutomization or the automatic performance improvements while all I want to do it just pass data around easily and get the job done.
React’s new Context API will probably fit the bill. Let’s see how it works.
5.1. Implement Context API
There are 3 important pieces to the context API:
The React.createContext function, which creates the context
The Provider, which establishes the “electrical bus” running through a component tree. The Provider is very similar in its nature in comparison with React-redux's Provider. It takes the form of an object containing your data and any actions you want to be able to perform on the data.
The Consumer, which taps into the “electrical bus” to extract the data. The Consumer functions a little bit like React-Redux’s connect function, tapping into the data and making it available to the components.
const StudentAvatar = ({ size }) => (
  <StudentContext.Consumer>
    {student => (
      <img
        className={`student-avatar ${size || ''}`}
        alt="student avatar"
        src={student.avatar}
      />
    )}
  </StudentContext.Consumer>
);

const StudentInfo = () => (
  <StudentContext.Consumer>
    {student => (
      <div className="student-info">
        <div>
          <StudentAvatar student={student} />
          {student.name}
        </div>
        <div className="info">
          <div>{student.gender}</div>
          <div>Grade: {student.grade}</div>
        </div>
      </div>
    )}
  </StudentContext.Consumer>
);

class App extends React.Component {
  state = {
    student: {
      avatar: 'https://lh3.googleusercontent.com/-4rElFw0sdsY/AAAAAAAAAAI/AAAAAAAAAA8/TieQ-Ya9NLQ/s640-il/photo.jpg',
      name: 'Jack Frost'
      gender: 'Male',
      grade: 11
    }
  };

  render() {
    return (
      <div className="app">
        <StudentContext.Provider value={this.state.student}>
          <Header />
          <Body />
        </StudentContext.Provider>
      </div>
    );
  }
}
Let’s review this work process:
ProviderandConsumerare an inseperable buddies
The Provider and Consumer are bound together. Inseperable. And they only know how to talk to each other. Therefore, if you created two separate contexts, say “Context1” and “Context2”, then Context1’s Provider and Consumer would not be able to communicate with Context2’s Provider and Consumer.
Contextholds no state
The Context acts merely as a conduit for you data and does not have its own state. Data value is passed to the Provider, and in turn, gets passed down to any Consumers that know how to look for it.
When you create the context, you can pass in a “default value” like this:
const Ctx = React.createContext(defaultValue);
This default value is what the Consumer will receive when it is placed in a tree with no Provider above it. If you don’t pass one, the value will just be undefined. Note, though, that this is a default value, not an initial value. Due to having no state, a context doesn’t retain anything; it is only in charge of distributing the data you pass in.
Consumer Uses the Render Props Pattern
Redux’s connect function is a higher-order component (or HoC for short). It wraps another component and passes props into it.
The context Consumer, by contrast, expects the child component to be a function. It then calls that function at render time, passing in the value that it got from the Provider somewhere above it (or the context’s default value, or undefined if you didn’t pass a default).
Provider Accepts One Value
Just a single value, as the value prop. But remember that the value can be anything. In practice, if you want to pass multiple values down, you’d create an object with all the values and pass that object down.
That’s pretty much the nuts and bolts of the Context API.
Context API is Flexible
Since creating a context gives us two components to work with (Provider and Consumer), we’re free to use them however we want. Here are a couple ideas.
5.2. Turn the Consumer into a Higher-Order Component
Not fond of the idea of adding the StudentContext.Consumer around every place that needs it? Well, it’s your code! You can do what you want. You’re an adult.
If you’d rather receive the value as a prop, you could write a little wrapper around the Consumer like this:
function withUser(Component) {
  return function ConnectedComponent(props) {
    return (
      <StudentContext.Consumer>
        {student => <Component {...props} student={student}/>}
      </StudentContext.Consumer>
    );
  }
}
And then you could rewrite, say, StudentAvatar to use this new withUser function:
const StudentAvatar = withUser(({ size, student }) => (
  <img
    className={`student-avatar ${size || ''}`}
    alt="student avatar"
    src={student.avatar}
  />
));
And BOOM, context can work just like Redux’s connect. Minus the automatic purity.
Hold State in the Provider
The context’s Provider is just a conduit, remember. It doesn’t retain any data. But that doesn’t stop you from making your own wrapper to hold the data.
In the example above, I left App holding the data, so that the only new thing you’d need to understand was the Provider + Consumer components. But maybe you want to make your own “store”, of sorts. You could create a component to hold the state and pass them through context:
class UserStore extends React.Component {
  state = {
    student: {
      avatar: 'https://lh3.googleusercontent.com/-4rElFw0sdsY/AAAAAAAAAAI/AAAAAAAAAA8/TieQ-Ya9NLQ/s640-il/photo.jpg',
      name: 'Jack Frost'
      gender: 'Male',
      grade: 11
    }
  };

  render() {
    return (
      <StudentContext.Provider value={this.state.student}>
        {this.props.children}
      </StudentContext.Provider>
    );
  }
}

// ... skip the middle stuff ...

const App = () => (
  <div className="app">
    <Header />
    <Body />
  </div>
);

ReactDOM.render(
  <UserStore>
    <App />
  </UserStore>,
  document.querySelector('#root')
);
6. So who emerged victorious in the end?
Now that you've seen both ways, this is the part where you might be wondering which one is better. Sorry to say this but the answer is "it depends". It depends on serveral factors like how big your app is, or will scale in the future; how comfortable and experienced you/your team are with each respective technical solution. The only bright side here is: it is you/your team that take control of decision making and order to turn your app better (or not...)
A better approach is to look into this wonderful array of alternatives like a toolbox. Try imagining the choice between using a screwdriver or an impact driver. For 80% of the jobs, the impact driver is gonna put the screw in faster than the screwdriver. But for the other 20%, the screwdriver is actually the better choice – maybe because the space is tight, or the item is delicate. The fact that I acquire an impact driver doesn't mean that I have to throw away my screwdriver immediately, or other non-impact drills. The impact driver didn’t replace them, it simply gave me another option. Another way to solve a problem. The screwdriver never became redundant in the first place.
Similarly, Context doesn’t “replace” Redux any more than React “replaced” Angular or jQuery. Sometimes React is more than you need for the task at hand. Sometimes Redux is more than you need.
Today, when Redux is more than you need, don't hesitate to reach for Context.
All rights reserved
