Thao tác nhanh trên Home Screen với SwiftUI
Bài đăng này đã không được cập nhật trong 5 năm
Các thao tác nhanh trên Home Screen được giới thiệu trong iOS 12. Một nút tắt điều hướng người dùng đến một vị trí cụ thể trong ứng dụng. Ngày nay, nhiều ứng dụng đang ra mắt với tác nhanh này.
Trong bài viết này, mình sẽ hướng dẫn cách thực hiện Thao tác nhanh trên Home Screen sử dụng SwiftUI.
Let's go!!!
1. Type
Có hai kiểu thao tác nhanh:
- Static (Thao tác nhanh tĩnh)
- Dynamic (Thao tác nhanh động)
2. Chuẩn bị project
Mình sẽ tạo một project đặt tên là DemoQuickAction. Và tất nhiên mình sẽ chọn Interface là SwiftUI

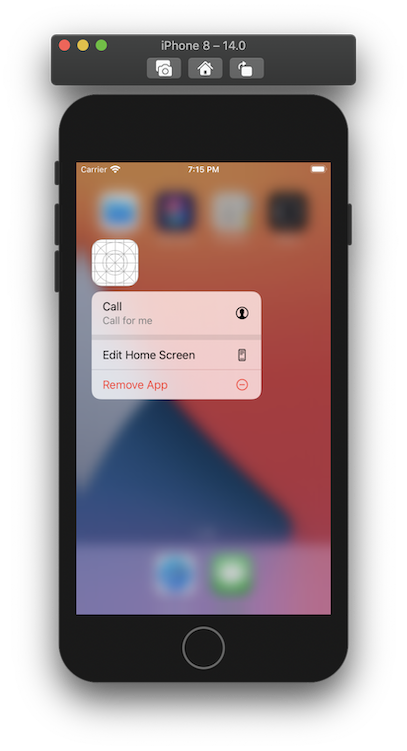
3. Tạo thao tác nhanh tĩnh
Các thao tác nhanh tĩnh được xác định khi build ứng dụng. Các thao tác này là hành động không bao giờ thay đổi. Nó được xác định trong tệp Info.plist của dự án.
Để thêm bạn mở Info.split và thêm các hành động. Ví dụ:
<key>UIApplicationShortcutItems</key>
    <array>
        <dict>
            <key>UIApplicationShortcutItemType</key>
            <string>CallAction</string>
            <key>UIApplicationShortcutItemIconType</key>
            <string>UIApplicationShortcutIconTypeContact</string>
            <key>UIApplicationShortcutItemTitle</key>
            <string>Call</string>
            <key>UIApplicationShortcutItemSubtitle</key>
            <string>Call for me</string>
        </dict>
    </array>
Ở đoạn code trên ta thấy UIApplicationShortcutItems được sử dụng để thêm các nút tắt nhanh tĩnh. Đây là mảng dictionary. Trong mỗi dictionary, UIApplicationShortcutItemType và UIApplicationShortcutItemTitle là các trường bắt buộc.
- UIApplicationShortcutItemType: Chuỗi duy nhất làm key cho Thao tác nhanh.
- UIApplicationShortcutItemTitle: Tiêu đề của nút Thao tác nhanh.
Chạy thử ứng dụng và nhấn giữ vào icon ừng dụng ta sẽ được kết qủa.
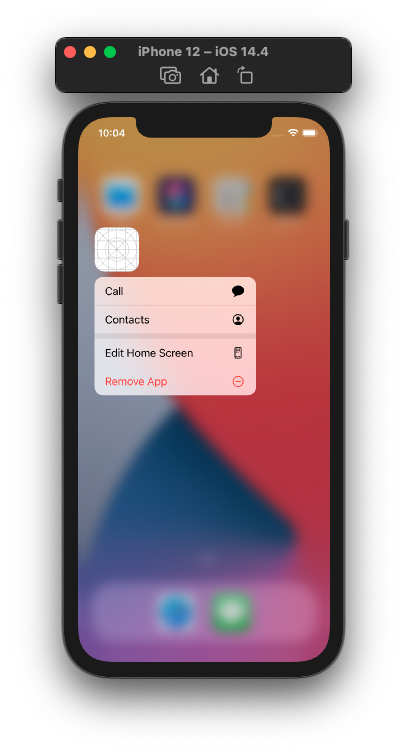
4. Tạo thao tác nhanh động
Các thao tác nhanh động được thêm vào ứng dụng khi chạy ứng dụng. Các thao tác nhanh này là một mảng UIApplicationShortcutItem được gán cho instance của UIApplication.
Mình sẽ thêm 2 phím tắt là Call, Contact.
@main
struct Quick_ActionsApp: App {
    @Environment(\.scenePhase) var phase

    var body: some Scene {
        WindowGroup {
            ListView()
        }
        .onChange(of: phase) { (newPhase) in
            switch newPhase {
            case .active :
                print("App in active")
            case .inactive:
                 print("App is inactive")
            case .background:
                print("App in Back ground")
                addQuickActions()
            @unknown default:
                print("default")
            }
        }
    }

    func addQuickActions() {
        UIApplication.shared.shortcutItems = [
            UIApplicationShortcutItem(type: "Call", localizedTitle: "Call"),
            UIApplicationShortcutItem(type: "Contacts", localizedTitle: "Contacts"),
        ]
    }
}
Mình gọi phương thức này khi ứng dụng chuyển sang trạng thái background, nên mình sử dụng biến môi trường @Enosystem (. ScenePhase) và lắng nghe onChange (of :_) để nắm bắt trạng thái của ứng dụng.
Theo Apple nói: Trong quá trình chuyển đổi sang trạng thái background là thời điểm tốt để cập nhật bất kỳ thao tác nhanh động nào vì mã này luôn được thực thi trước khi người dùng quay lại Home Screen.
Truyền dữ liệu vào Thao tác nhanh
Để truyền dữ liệu vào Thao tác nhanh, chúng ta sử dụng hàm tạo của UIApplicationShortcutItem.
UIApplicationShortcutItem(type: String, localizedTitle: String, localizedSubtitle: String?, icon: UIApplicationShortcutIcon?, userInfo: [String : NSSecureCoding]?)
Ở hàm tạo trên, các bạn có thể thấy mình sẽ truyền dữ liệu thông qua thuộc tính userInfo là một dictionary.
Hàm addQuickActions sẽ được chỉnh sửa như sau:
func addQuickActions() {
        var calluserInfo: [String: NSSecureCoding] {
            return ["name" : "call" as NSSecureCoding]
        }
        var contactuserInfo: [String: NSSecureCoding] {
            return ["name" : "contact" as NSSecureCoding]
        }

        UIApplication.shared.shortcutItems = [
            UIApplicationShortcutItem(type: "Call", localizedTitle: "Call", localizedSubtitle: "", icon: UIApplicationShortcutIcon(type: .message), userInfo: calluserInfo),
            UIApplicationShortcutItem(type: "Contacts", localizedTitle: "Contacts", localizedSubtitle: "", icon: UIApplicationShortcutIcon(type: .contact), userInfo: contactuserInfo),
        ]
    }
Chạy thử ứng dụng ta sẽ được như sau:
Thực thi Thao tác nhanh
Có 2 chỗ chúng ta cần xử lý khi người dùng sử dụng Thao tác nhanh:
- Khi ứng dụng đang ở chế độ nền, người dùng sử dụng Thao tác nhanh.
- Khi ứng dụng đóng hoàn toàn, người dùng mở lại ứng dụng.
Để thực hiện điều đó, chúng ta cần xử lý ở 2 method:
- application(_:configurationForConnecting:options:) — AppDelegate
- application(_:performActionFor:completionHandler:) — SceneDelegate
Tuy nhiên, vòng đời SwiftUI không có AppDelegate và SceneDelegate, nên chúng ta cần tạo lại nó.
class AppDelegate: NSObject, UIApplicationDelegate {
    func application(_ application: UIApplication, configurationForConnecting connectingSceneSession: UISceneSession, options: UIScene.ConnectionOptions) -> UISceneConfiguration {
        if let shortcutItem = options.shortcutItem {
            shortcutItemToProcess = shortcutItem
        }

        let sceneConfiguration = UISceneConfiguration(name: "Custom Configuration", sessionRole: connectingSceneSession.role)
        sceneConfiguration.delegateClass = CustomSceneDelegate.self

        return sceneConfiguration
    }
}

class CustomSceneDelegate: UIResponder, UIWindowSceneDelegate {
    func windowScene(_ windowScene: UIWindowScene, performActionFor shortcutItem: UIApplicationShortcutItem, completionHandler: @escaping (Bool) -> Void) {
        shortcutItemToProcess = shortcutItem
    }
}
Quay trở lại với struct Quick_ActionsApp, chúng ta khai báo appDelegate:
@UIApplicationDelegateAdaptor(AppDelegate.self) var appDelegate
Chúng ta cần khai báo một biến toàn cục UIApplicationShortcutItem nằm ngoài Quick_ActionsApp, AppDelegate, CustomSceneDelegate để mỗi lần thao tác, mình sẽ gán một shortcutItem cho nó, hoặc trong Quick_ActionsApp thì có thể lấy nó ra để sử dụng.
var shortcutItemToProcess: UIApplicationShortcutItem?
Mỗi lần, người dùng nhấn vào một ứng dụng tác vụ nhanh sẽ mở ra. Vì vậy, chúng ta cần xử lý trong action .active như sau:
var body: some Scene {
        WindowGroup {
            ListView()
        }
        .onChange(of: phase) { (newPhase) in
            switch newPhase {
            case .active :
                print("App in active")
                guard let name = shortcutItemToProcess?.userInfo?["name"] as? String else {
                    return
                }
            case .inactive:
                // inactive
                 print("App is inactive")
            case .background:
                print("App in Back ground")
                addQuickActions()
            @unknown default:
                print("default")
            }
        }
    }
Điều hướng đến màn hình chỉ định
Ở Quick_ActionsApp các bạn thấy mình để WindowGroup { ListView() } mà chẳng biết ListView là cái gì cả, thực ra đó chỉ là một lớp do mình tạo ra để hiển thị một danh sách các nội dung trong ứng dụng.
Mình tạo một lớp ListView như sau:
struct ListView: View {
    @EnvironmentObject var quickActionSettings: QuickActionSettings
    @State var selectedAction: Int?

    var body: some View {
        NavigationView {
            List {
                ForEach(0..<allQuickActions.count) { index in
                    NavigationLink(destination: DetailView(name: allQuickActions[index].name), tag: allQuickActions[index].tag, selection: $quickActionSettings.quickAction) {
                        Text(allQuickActions[index].name)
                    }
                }
            }
            .listStyle(SidebarListStyle())
            .navigationBarTitle("Quick Actions")
        }
    }
}

struct ListView_Previews: PreviewProvider {
    static var previews: some View {
        ListView()
    }
}

struct QuickActionModel : Identifiable {
    let id = UUID()
    let name: String
    let tag: QuickActionSettings.QuickAction
}

let allQuickActions = [
    QuickActionModel(name: "Contacts", tag: .details(name: "contact")),
    QuickActionModel(name: "Calls", tag: .details(name: "call")),
]
Điều hướng đến DetailView.
struct DetailView: View {

    var name: String

    var body: some View {
        Text("\(name) View")
            .navigationBarTitle(name)
    }
}
và một ObservableObject class QuickActionSettings.
class QuickActionSettings: ObservableObject {

    enum QuickAction: Hashable {
        case home
        case details(name: String)
    }

    @Published var quickAction: QuickAction? = nil
}
Nếu giá trị enum QuickAction (quickAction) thay đổi thì NavigationLink sẽ được gọi vì nó là một biến Binding trong ListView. Vì thế, chúng ta chỉ cần thay đổi giá trị của quickAction dự trên QuickAction đã được chọn.
Tạo một đối tượng cho QuickActionSetttings bên ngoài App Struct giống như biến shortcutItemToProcess.
let quickActionSettings = QuickActionSettings()
Sau đó, thêm đối tượng quickActionSettings làm EnvironmentObject trong ListView của Quick_ActionsApp. Và thực hiện gán giá trị cho quickAction khi app đang chuyển vào chế độ .active.
var body: some Scene {
        WindowGroup {
            ListView()
                .environmentObject(quickActionSettings)
        }
        .onChange(of: phase) { (newPhase) in
            switch newPhase {
            case .active :
                print("App in active")
                guard let name = shortcutItemToProcess?.userInfo?["name"] as? String else {
                    return
                }
                switch name {
                case "call":
                    print("call is selected")
                    quickActionSettings.quickAction = .details(name: name)
                case "contact":
                    print("contct is selected")
                    quickActionSettings.quickAction = .details(name: name)
                default:
                    print("default ")
                }
            case .inactive:
                // inactive
                 print("App is inactive")
            case .background:
                print("App in Back ground")
                addQuickActions()
            @unknown default:
                print("default")
            }
        }
    }
Chạy ứng dụng và xem kết quả. Chúc các bạn thành công.
All rights reserved
