Tản mạn một chút về Pose Classification
Bài đăng này đã không được cập nhật trong 5 năm
Lời mở đầu
Chào các bạn, hôm nay tôi sẽ lảm nhảm một chút về Pose Classification. Như các bạn đã biết hiện giờ bài toán về chuyển động của cơ thể hay phát hiện các điểm trên cơ thể người là một bài toán quan trọng trong ngành ML này, do tính ứng dụng của bài toán này khá đa dạng: như phát hiện động tác trong siêu thị, mô phỏng các bài tập vật lý trị liệu trong y tế, hỗ trợ PT trong các bài tập gym, bla...bla...
Tôi viết bài này cũng để tổng kết lại những gì mình đã tìm hiểu, nếu có thiếu sót mong m.n bỏ qua cho 
Bài viết này xoay quanh thư viện Mediapipe của Google, nếu còn thời gian tôi sẽ đề cập tới các thư viện khác sau.
Pose Detection and Pose Tracking
Trước khi đi vào phần Pose Classification, chúng ta nhìn qua một chút bên google làm thế nào detect các điểm trên cơ thể người.
Giải pháp của họ dựa trên một paper mà họ đề xuất, keyword: BlazePose (https://export.arxiv.org/pdf/2006.10204). Dựa trên giải pháp này, họ sẽ bóc tách ra 33 điểm tương ứng 33 bộ phận của cơ thể người hoặc 25 điểm tương ứng phần trên của cơ thể trong không gian 3 chiều (x, y, z) từ một RGB video.
Giải thích sơ qua về BlazePose, về cơ bản BlazePose là bản cải tiến của mạng Stacked Hourglass (https://export.arxiv.org/pdf/1603.06937)
Stacked Hourglass Network
Cấu trúc mạng Stacked Hourglass:
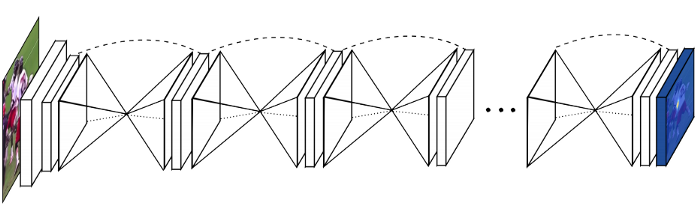
Ý tưởng của mạng này thay vì ta có một bộ encoder-decoder siêu to thì mỗi Hourglass (đồng hồ cát) có nhiệm vụ trả về một heat-map dự đoán các phần trên cơ thể. Do đây là mô hình chồng lên nhau nên thằng Hourglass sau có thể học hỏi kết quả của thằng trước.
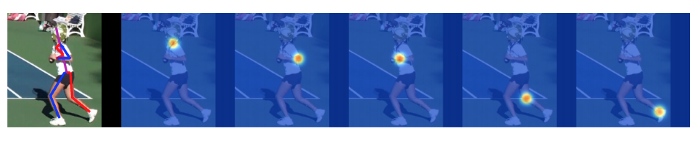
Làm thế nào để phát hiện chuyển động người qua heat-map (bản đồ nhiệt) ? Khác với dữ liệu về khuôn mặt con người (72 landmark keypoint, ...) thì dữ liệu về chuyển động của người đa dạng hơn nên rất khó tìm các điểm trên cơ thể người dựa vào tọa độ. Các nhà khoa học đã nghĩ ra phương thức sử dụng heat-map để đại diện cho một vùng trên ảnh. Heat-map giúp giữ lại thông tin vùng đó và việc của chúng ta là tìm ra cao điểm (điểm sáng nhất) trong vùng. Lấy ví dụ với một ảnh 256x256 thì heat-map có thể có kích thước 64x64. Bạn xem hình cho dễ hiểu:
Theo như tác giả paper nói qua thì họ sẽ tính loss ở mỗi lần predict, điều này giúp họ giám sát không chỉ kết quả trả về cuối cùng mà còn giám sát đầu ra của mỗi Hourglass. Lấy ví dụ, trong khi chuyển động cơ thể sẽ có các bộ phận bị che đi trước camera, rất khó để phân biệt cánh tay hướng bên trái hay bên phải. Với việc sử dụng kết quả dự đoán vị trí của thằng trước làm input, mô hình không chỉ chú ý các vị trí này mà trong lúc đó còn dự đoán thêm vị trí mới.
Hourglass Module
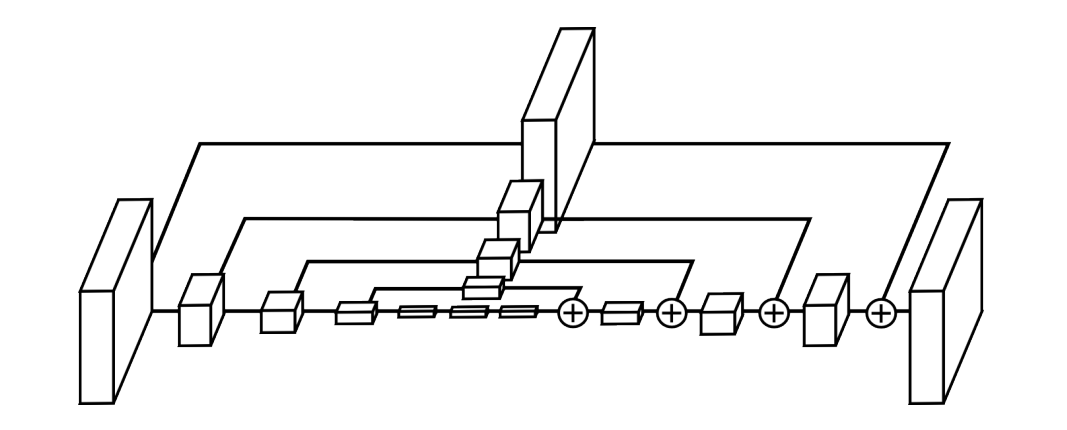
Giờ chúng ta nhìn qua cấu trúc của một Hourglass
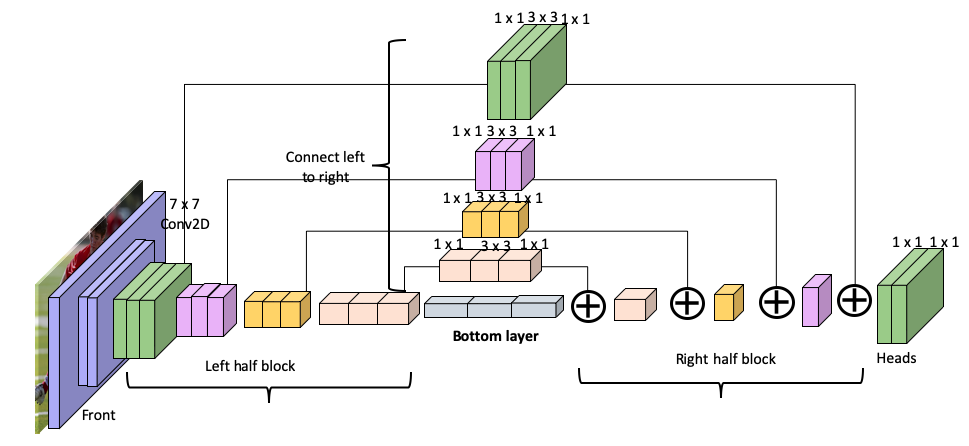
Thông qua hình vẽ chắc các bạn cũng thấy đây là kiến trúc encode-decoder có nhiệm vụ downsample các features trước rồi upsample để hồi phục thông tin và chuyển thành heat-map. Mỗi một layer của encoder kết nối với một layer của decoder tương ứng. Còn mỗi layer xây dựng dựa trên kiến trúc residual block và bottleneck của resnet, bạn nào chưa biết về residual block thì vào link này đọc nhé (https://towardsdatascience.com/residual-blocks-building-blocks-of-resnet-fd90ca15d6ec).
Bên trái: Residual Layer. Bên phải: Bottleneck Block
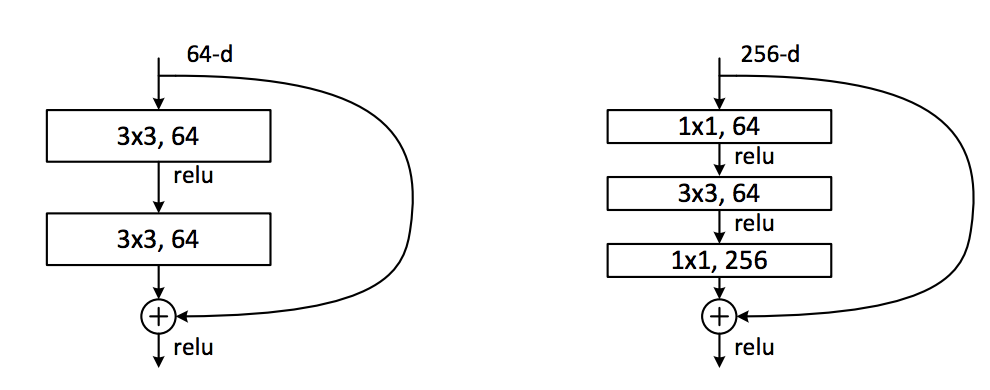
Bottleneck giúp cho việc tính toán dễ dàng hơn, tương ứng với việc tiết kiệm bộ nhớ.
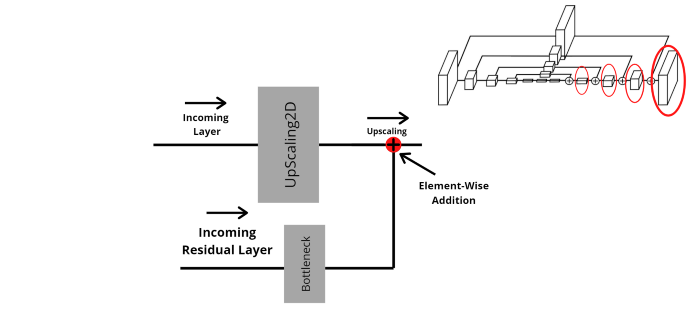
Giờ chúng ta thử phóng to một hộp trong hình trên
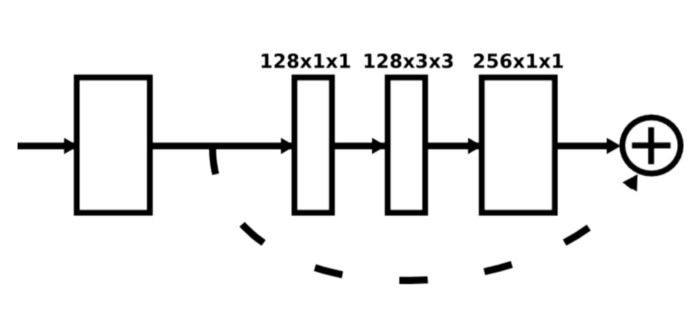
Mỗi hộp trong hình là lớp bottleneck mà tôi đã nhắc đến. Sau mỗi bottleneck sẽ có một lớp pooling để loại bỏ các feature không cần thiết.
Tuy nhiên, lớp đầu tiên có một chút khác biệt, lớp này dùng Convolution 7x7 chứ không phải 3x3.
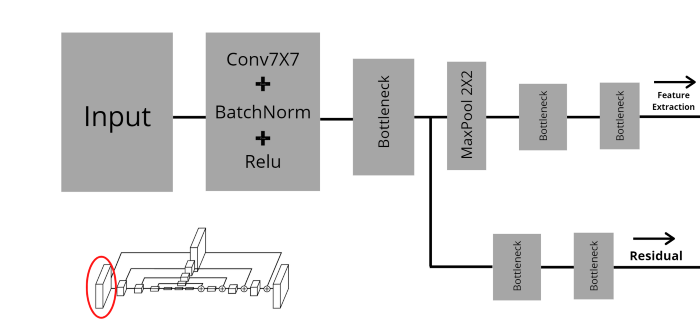
Như hình trên, ở lớp đầu tiên, input đầu tiên đi qua tổ hợp giữa Convolution 7x7, BatchNorm, Activation Relu, tiếp tục đi qua lớp bottleneck. Ở đây output từ lớp bottleneck sẽ di qua 2 nhánh song song. Một cái đi lớp MaxPooling và thực hiện việc trích xuất đặc trưng, cái còn lại sẽ kết nối với lớp tương ứng ở phần decoder.
Các hộp 2, 3, 4 khác có cấu tạo giống nhau và khác hộp đầu tiên.
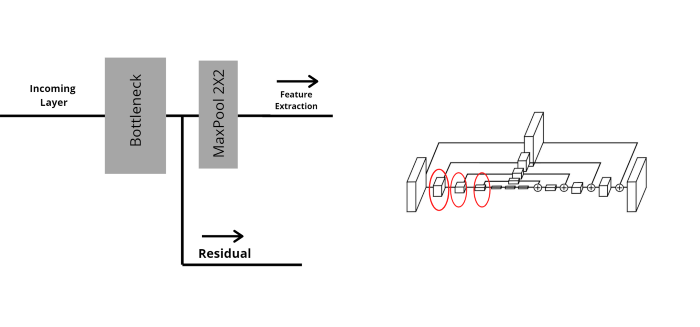
Mục đích cuối cùng của việc trích xuất đặc trưng là tạo ra feature maps, chứa thông tin đặc trưng của ảnh nhiều nhất nhưng thông tin không gian thấp nhất. Phần này chính là 3 cái hộp nhỏ nằm giữa encode và decoder.

Input sau khi đi qua 4 lớp của encoder và một lớp bottom trả về feature maps đã sẵn sàng đi qua decoder.
Như tôi đã nhắc tới trên kia thì nhánh còn lại sẽ đi qua lớp bottleneck và thực hiện việc cộng element-wise với output của lớp upsample của nhánh chính. Việc này lặp đi lặp lại khoảng 4 lần cho tới khi kết thúc.
Ở lớp cuối cùng, chúng ta có thể quan sát độ chính xác của mỗi dự đoán (prediction of Hourglass module). Cái này còn gọi là immediate supervision, bạn tính toán loss ở cuối mỗi Hourglass stage thay vì tính loss của cả mô hình.
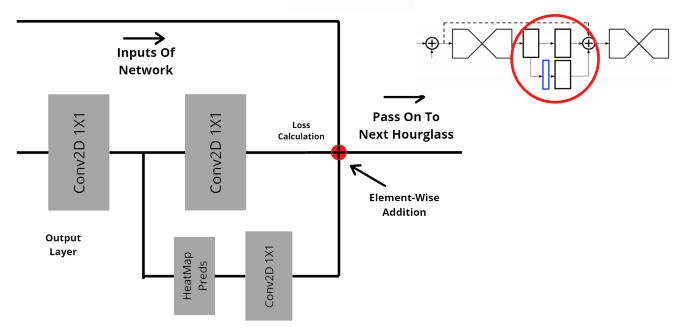
Output của một Hourglass module đi qua Convolution 1x1, sau đó chia làm 2 nhánh song song. Một dùng để dự đoán và một trả về kết quả sẽ làm đầu vào cho Hourglass module tiếp theo. Cuối cùng, chúng ta thực hiện việc cộng từng phần tử (element-wise addition) giữa đầu vào của network (heatmap) và cả 2 đầu ra của Hourglass module. P/S: kết quả dự đoán đi qua Convolution 1x1 để cho đúng shape thì mới cộng từng phần tử được.
Cuối cùng để xây dựng Stacked Hourglass Network, chúng ta cần thực hiện lặp đi lặp lại các Hourglass module này.
BlazePose
Ok quay lại thuật toán BlazePose của Google, các bạn có thể tìm hiểu bằng cách đọc bài "Tìm hiểu về BlazePose" của tác giả Phạm Văn Toàn
(https://viblo.asia/p/b5-tim-hieu-ve-blazepose-on-device-real-time-body-pose-tracking-XL6lADpJZek). Không phải tôi lười đâu các bạn, chỉ là có người viết trước rồi thôi  .
.
Pose classification
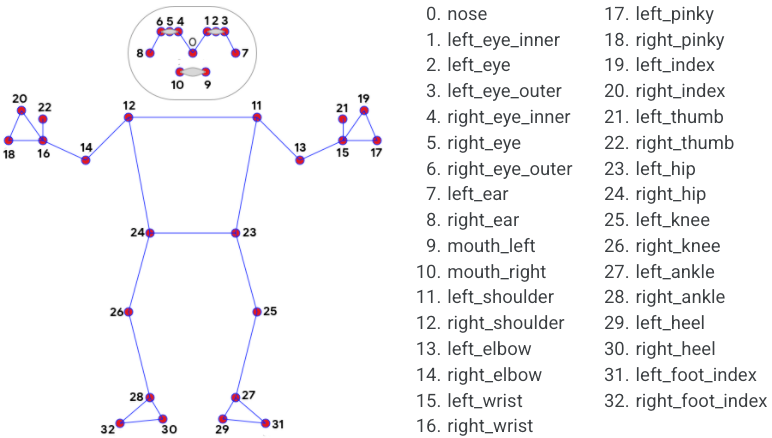
Ok, coi như các bạn đã hiểu BlazePose rồi. Sau khi dùng Pose Landmark Model (BlazePose GHUM 3D) để detect chuyển động trên một ảnh sẽ trả về 33 điểm trên cơ thể như hình dưới đây:
Python Solution API
Rất may Google cung cấp giải pháp Python API mà bạn chỉ cần import thư viện mediapipe, code vài dòng là chạy được. Mediapipe cung cấp giải pháp detect pose trên ảnh tĩnh và trên video. Dưới đây là code dành cho ảnh tĩnh
import cv2
import mediapipe as mp
mp_drawing = mp.solutions.drawing_utils
mp_pose = mp.solutions.pose

# For static images:
with mp_pose.Pose(
    static_image_mode=True, min_detection_confidence=0.5) as pose:
  for idx, file in enumerate(file_list):
    image = cv2.imread(file)
    image_height, image_width, _ = image.shape
    # Convert the BGR image to RGB before processing.
    results = pose.process(cv2.cvtColor(image, cv2.COLOR_BGR2RGB))

    if not results.pose_landmarks:
      continue
    print(
        f'Nose coordinates: ('
        f'{results.pose_landmarks.landmark[mp_pose.PoseLandmark.NOSE].x * image_width}, '
        f'{results.pose_landmarks.landmark[mp_pose.PoseLandmark.NOSE].y * image_height})'
    )
    # Draw pose landmarks on the image.
    annotated_image = image.copy()
    # Use mp_pose.UPPER_BODY_POSE_CONNECTIONS for drawing below when
    # upper_body_only is set to True.
    mp_drawing.draw_landmarks(
        annotated_image, results.pose_landmarks, mp_pose.POSE_CONNECTIONS)
    cv2.imwrite('/tmp/annotated_image' + str(idx) + '.png', annotated_image)
Import thư viện dùng để xử lý ảnh opencv và thư viện mediapipe. Sau đó đặt 2 biến để dùng các hàm của mediapipe
mp_drawing = mp.solutions.drawing_utils # instance vẽ line và point lên ảnh
mp_pose = mp.solutions.pose # instance detect pose
Với ảnh tĩnh, các bạn phải chỉnh lại tham số cho class Pose như sau
mp_pose.Pose(static_image_mode=True, min_detection_confidence=0.5)
Trong thư viện của mediapipe có sẵn model nên bạn không cần train lại.
results = pose.process(cv2.cvtColor(image, cv2.COLOR_BGR2RGB))
Nếu bạn muốn in giá trị detect ra thì hãy nhớ mediapose trả về tọa độ dưới dạng tỉ lệ so với ảnh nên bạn cần phải nhân với chiều cao và chiều rộng để vẽ đúng tọa độ trên ảnh.
print(
        f'Nose coordinates: ('
            f'{results.pose_landmarks.landmark[mp_pose.PoseLandmark.NOSE].x * image_width}, '
            f'{results.pose_landmarks.landmark[mp_pose.PoseLandmark.NOSE].y * image_height}
        )'
)
Nếu bạn muốn vẽ point hoặc line lên ảnh thì dùng hàm draw_landmarks()
mp_drawing.draw_landmarks(annotated_image, results.pose_landmarks, mp_pose.POSE_CONNECTIONS)
Ok đối với video thì dùng cv2 (opencv) để capture video, tạo vòng lặp while True để xử lý từng frame một, ai làm việc nhiều với opencv chắc là quen rồi.
# For webcam input:
cap = cv2.VideoCapture(0)
with mp_pose.Pose(
    min_detection_confidence=0.5,
    min_tracking_confidence=0.5) as pose:
  while cap.isOpened():
    success, image = cap.read()
    if not success:
      print("Ignoring empty camera frame.")
      # If loading a video, use 'break' instead of 'continue'.
      continue

    # Flip the image horizontally for a later selfie-view display, and convert
    # the BGR image to RGB.
    image = cv2.cvtColor(cv2.flip(image, 1), cv2.COLOR_BGR2RGB)
    # To improve performance, optionally mark the image as not writeable to
    # pass by reference.
    image.flags.writeable = False
    results = pose.process(image)

    # Draw the pose annotation on the image.
    image.flags.writeable = True
    image = cv2.cvtColor(image, cv2.COLOR_RGB2BGR)
    mp_drawing.draw_landmarks(
        image, results.pose_landmarks, mp_pose.POSE_CONNECTIONS)
    cv2.imshow('MediaPipe Pose', image)
    if cv2.waitKey(5) & 0xFF == 27:
      break
cap.release()
Về cơ bản cũng không khác gì nhiều với việc xử lý ảnh tĩnh, chỉ có cái khi gọi instance của mediapipe pose thì không cần param static_image_mode. Ngược lại có thêm param min_tracking_confidence dùng để tracking người từng frame, giá trị trong khoảng từ 0 đến 1, càng cao thì càng bắt đúng nhưng tăng độ trễ (tốn thời gian xử lý hơn).
Dựa trên BlazaPose, mediapipe trả về một điểm có tọa độ x, y, z. x, y thì như tôi nói ở trên được trả về dưới dạng tỉ lệ của chiều rộng và chiều cao còn z là độ sâu của điểm trọng tâm cơ thể. Giá trị càng nhỏ càng gần camera, z được trả về dưới dạng tỉ lệ với chiều rộng như x. z chỉ dự đoán được trong cơ chế full-body (33 điểm) còn cơ chế upper-body (25 điểm) thì không hỗ trợ.
Link colab của Pose Classification: https://colab.research.google.com/drive/19txHpN8exWhstO6WVkfmYYVC6uug_oVR
Prepare dataset
Ok quay lại về Pose Classification, đơn giản là họ dùng KNN (K-nearest neightbors) để group lại các động tác giống nhau. Về phần KNN là gì mời bạn đọc (https://machinelearningcoban.com/2017/01/08/knn/).
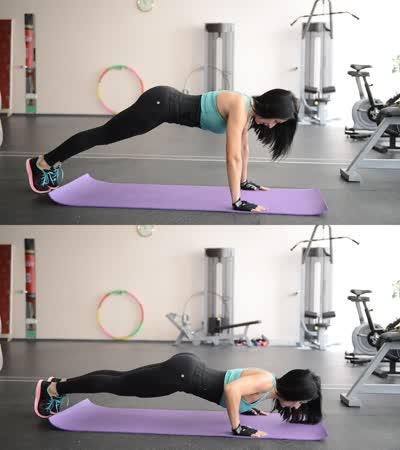
Đầu tiên cần chuẩn bị dữ liệu huấn luyện đã. Giả dụ trong động tác chống đẩy có 2 trạng thái: lên và xuống như hình dưới. Như vậy tôi cần chuẩn bị ảnh của cả 2 trạng thái này.
Google hỗ trợ code để gen dữ liệu, việc còn lại của các bạn là hiểu nó .
Bạn cần tạo 1 folder có cấu trúc như sau:
fitness_poses_images_in/
  pushups_up/
    image_001.jpg
    image_002.jpg
    ...
  pushups_down/
    image_001.jpg
    image_002.jpg
    ...
fitness_poses_images_out/
fitness_poses_csvs_out/
Ảnh ở đây là ảnh của trạng thái chống đẩy lên và trạng thái chống đẩy xuống.
Gọi instance bootstrap_helper từ class BootstrapHelper(). Class này có nhiệm vụ detect 33 điểm trên cơ thể, vẽ các điểm và nối thành đường lên ảnh, xuất ra file csv.
bootstrap_images_in_folder = 'fitness_poses_images_in'

# Output folders for bootstrapped images and CSVs.
bootstrap_images_out_folder = 'fitness_poses_images_out'
bootstrap_csvs_out_folder = 'fitness_poses_csvs_out'

bootstrap_helper = BootstrapHelper(
    images_in_folder=bootstrap_images_in_folder,
    images_out_folder=bootstrap_images_out_folder,
    csvs_out_folder=bootstrap_csvs_out_folder,
)
Kiểm tra trạng thái các folder này
bootstrap_instance.print_images_in_statistics()
bootstrap_instance.print_images_out_statistics()
Xóa đi các động tác bị detect lỗi bằng cách so ảnh với file csv
bootstrap_instance.align_images_and_csvs(print_removed_items=False)
bootstrap_instance.print_images_out_statistics()
Pose Embedding
Embed 33 điểm trên cơ thể bằng cách tính khoảng cách giữa các điểm như: khoảng cách vai trái - hông trái, vai phải - hông phải, đầu gối trái - gót chân trái, đầu gối phải - gót chân phải, ...
def _get_pose_distance_embedding(self, landmarks):
        """Converts pose landmarks into 3D embedding.

        We use several pairwise 3D distances to form pose embedding. All distances
        include X and Y components with sign. We differnt types of pairs to cover
        different pose classes. Feel free to remove some or add new.

        Args:
          landmarks - NumPy array with 3D landmarks of shape (N, 3).

        Result:
          Numpy array with pose embedding of shape (M, 3) where `M` is the number of
          pairwise distances.
        """
        embedding = np.array([
            # One joint.

            self._get_distance(
                self._get_average_by_names(landmarks, 'left_hip', 'right_hip'),
                self._get_average_by_names(landmarks, 'left_shoulder', 'right_shoulder')),

            self._get_distance_by_names(
                landmarks, 'left_shoulder', 'left_elbow'),
            self._get_distance_by_names(
                landmarks, 'right_shoulder', 'right_elbow'),

            self._get_distance_by_names(landmarks, 'left_elbow', 'left_wrist'),
            self._get_distance_by_names(
                landmarks, 'right_elbow', 'right_wrist'),

            self._get_distance_by_names(landmarks, 'left_hip', 'left_knee'),
            self._get_distance_by_names(landmarks, 'right_hip', 'right_knee'),

            self._get_distance_by_names(landmarks, 'left_knee', 'left_ankle'),
            self._get_distance_by_names(
                landmarks, 'right_knee', 'right_ankle'),

            # Two joints.

            self._get_distance_by_names(
                landmarks, 'left_shoulder', 'left_wrist'),
            self._get_distance_by_names(
                landmarks, 'right_shoulder', 'right_wrist'),

            self._get_distance_by_names(landmarks, 'left_hip', 'left_ankle'),
            self._get_distance_by_names(landmarks, 'right_hip', 'right_ankle'),

            # Four joints.

            self._get_distance_by_names(landmarks, 'left_hip', 'left_wrist'),
            self._get_distance_by_names(landmarks, 'right_hip', 'right_wrist'),

            # Five joints.

            self._get_distance_by_names(
                landmarks, 'left_shoulder', 'left_ankle'),
            self._get_distance_by_names(
                landmarks, 'right_shoulder', 'right_ankle'),

            self._get_distance_by_names(landmarks, 'left_hip', 'left_wrist'),
            self._get_distance_by_names(landmarks, 'right_hip', 'right_wrist'),

            # Cross body.

            self._get_distance_by_names(
                landmarks, 'left_elbow', 'right_elbow'),
            self._get_distance_by_names(landmarks, 'left_knee', 'right_knee'),

            self._get_distance_by_names(
                landmarks, 'left_wrist', 'right_wrist'),
            self._get_distance_by_names(
                landmarks, 'left_ankle', 'right_ankle'),

        return embedding
Pose Classifier
Gọi instance của class PoseClassifier(), có tác dụng phân loại class bằng cách so sánh độ tương đồng giữa chiều dài các điểm trên cơ thể người của ảnh và database.
pose_classifier_instance = PoseClassifier(
    pose_samples_folder=bootstrap_csvs_out_folder,
    pose_embedder=pose_embed_instance,
    top_n_by_max_distance=30,
    top_n_by_mean_distance=10)
Pose Smoothing
Khi detect 33 điểm trên cơ thể, các điểm sẽ dịch chuyển rất loạn ở từng frame dù cho nhìn bằng mắt thường không thấy có gì khác biệt, vì vậy tôi cần làm mịn dữ liệu dự đoán ở các frame bằng thuật toán EMA (Exponential moving average). Lý thuyết các bạn có thể tham khảo ở đây: (https://www.tohaitrieu.net/exponential-moving-average-ema/).
class EMADictSmoothing(object):
    """Smoothes pose classification."""

    def __init__(self, window_size=10, alpha=0.2):
        self._window_size = window_size
        self._alpha = alpha

        self._data_in_window = []

    def __call__(self, data):
        """Smoothes given pose classification.

        Smoothing is done by computing Exponential Moving Average for every pose
        class observed in the given time window. Missed pose classes arre replaced
        with 0.

        Args:
          data: Dictionary with pose classification. Sample:
              {
                'pushups_down': 8,
                'pushups_up': 2,
              }

        Result:
          Dictionary in the same format but with smoothed and float instead of
          integer values. Sample:
            {
              'pushups_down': 8.3,
              'pushups_up': 1.7,
            }
        """
        # Add new data to the beginning of the window for simpler code.
        self._data_in_window.insert(0, data)
        self._data_in_window = self._data_in_window[:self._window_size]

        # Get all keys.
        keys = set([key for data in self._data_in_window for key, _ in data.items()])

        # Get smoothed values.
        smoothed_data = dict()
        for key in keys:
            factor = 1.0
            top_sum = 0.0
            bottom_sum = 0.0
            for data in self._data_in_window:
                value = data[key] if key in data else 0.0

                top_sum += factor * value
                bottom_sum += factor

                # Update factor.
                factor *= (1.0 - self._alpha)

            smoothed_data[key] = top_sum / bottom_sum

        return smoothed_data
Test
Ok, test với một video không có trong bộ dữ liệu hiện tại bằng cách tổng hợp tất cả các đoạn code ở trên. Code bên dưới tôi đã loại bỏ các phần repetition counter và visualizer để dễ nhìn. Các bạn có thể thêm vào để kết quả trả về trực quan nhất.
# Run classification on a video.
import os
import tqdm

from mediapipe.python.solutions import drawing_utils as mp_drawing

# Open output video.
out_video = cv2.VideoWriter(out_video_path, cv2.VideoWriter_fourcc(*'mp4v'), video_fps, (video_width, video_height))

frame_idx = 0
output_frame = None
with tqdm.tqdm(total=video_n_frames, position=0, leave=True) as pbar:
  while True:
    # Get next frame of the video.
    success, input_frame = video_cap.read()
    if not success:
      break

    # Run pose tracker.
    input_frame = cv2.cvtColor(input_frame, cv2.COLOR_BGR2RGB)
    result = pose_tracker.process(image=input_frame)
    pose_landmarks = result.pose_landmarks

    # Draw pose prediction.
    output_frame = input_frame.copy()
    if pose_landmarks is not None:
      mp_drawing.draw_landmarks(
          image=output_frame,
          landmark_list=pose_landmarks,
          connections=mp_pose.POSE_CONNECTIONS)

    if pose_landmarks is not None:
      # Get landmarks.
      frame_height, frame_width = output_frame.shape[0], output_frame.shape[1]
      pose_landmarks = np.array([[lmk.x * frame_width, lmk.y * frame_height, lmk.z * frame_width]
                                 for lmk in pose_landmarks.landmark], dtype=np.float32)
      assert pose_landmarks.shape == (33, 3), 'Unexpected landmarks shape: {}'.format(pose_landmarks.shape)

      # Classify the pose on the current frame.
      pose_classification = pose_classifier(pose_landmarks)

      # Smooth classification using EMA.
      pose_classification_filtered = pose_classification_filter(pose_classification)

    else:
      # No pose => no classification on current frame.
      pose_classification = None

      # Still add empty classification to the filter to maintaing correct
      # smoothing for future frames.
      pose_classification_filtered = pose_classification_filter(dict())
      pose_classification_filtered = None

    # Draw classification plot and repetition counter.
    output_frame = pose_classification_visualizer(
        frame=output_frame,
        pose_classification=pose_classification,
        pose_classification_filtered=pose_classification_filtered,
        repetitions_count=repetitions_count)

    # Save the output frame.
    out_video.write(cv2.cvtColor(np.array(output_frame), cv2.COLOR_RGB2BGR))

    # Show intermediate frames of the video to track progress.
    if frame_idx % 50 == 0:
      show_image(output_frame)

    frame_idx += 1
    pbar.update()

# Close output video.
out_video.release()

# Release MediaPipe resources.
pose_tracker.close()

# Show the last frame of the video.
if output_frame is not None:
  show_image(output_frame)
Lời kết
Thôi ngừng, lười rồi, không viết nữa. Cám ơn các bạn đã đọc đến đây
Link tham khảo
https://export.arxiv.org/pdf/2006.10204
https://export.arxiv.org/pdf/1603.06937
https://towardsdatascience.com/using-hourglass-networks-to-understand-human-poses-1e40e349fa15
https://colab.research.google.com/drive/19txHpN8exWhstO6WVkfmYYVC6uug_oVR#scrollTo=4lXymkneOjgZ
https://google.github.io/mediapipe/solutions/pose_classification.html
https://ai.googleblog.com/2020/08/on-device-real-time-body-pose-tracking.html
https://www.tohaitrieu.net/exponential-moving-average-ema/
...
All rights reserved
