[Swift] Tạo custom Template Xcode
Bài đăng này đã không được cập nhật trong 5 năm
Xcode Templates là gì?
XCode Templates là một công cụ để tạo các file chứa đoạn mã giúp tối ưu hiệu suất làm việc. Trong hướng dẫn này, tôi sẽ hướng dẫn bạn cách chuẩn bị một custom templates cho cấu trúc MVVM.
Thường thì chúng ta cần tạo từ đầu cấu trúc và tệp cho một mô-đun mới, và quá trình này mỗi lần diễn ra đều giống nhau. Ví dụ - trong mẫu MVVM, để tạo mô-đun Login, chúng ta cần tạo các thư mục ít nhất 4 class sau:
- LoginModule Folder
- LoginView
- LoginViewModel
- LoginViewController
- LoginModel
Việc thêm từng class và setup code rất tốn thời gian. Với template XCode, chúng ta có thể tăng tốc quá trình thêm chúng vào dự án.
Tôi sẽ chỉ cho bạn cách cấu hình template để tạo chúng nhanh nhất với mô-đun MVVM mới.
Cài đặt Xcode Templates
Để cài đặt các template trong XCode, chúng ta cần thêm một thư mục mới chứa các template tùy chỉnh.
Vị trí templates XCode iOS
Tất cả các template tùy chỉnh Xcode đều nằm trong ~/Library/Developer/Xcode/Templates/ và được nhóm thành các phần theo tên thư mục. Bạn có thể thêm nó theo cách thủ công hoặc sử dụng terminal bằng cách chạy lệnh sau:
mkdir ~/Library/Developer/Xcode/Templates/Custom Templates
Cấu trúc Template file
Thư mục chính của template
Mỗi Template XCode file là một thư mục riêng biệt với phần mở rộng là .xctemplate.
Nếu bạn muốn tạo một template có tên là “View, Model & ViewModel”, bạn phải tạo một thư mục có tên “View, Model & ViewModel.xctemplate” trong ~/Library/Developer/Xcode/Templates/File Templates/Custom Templates.
Các thư mục template và file nội bộ
Tệp TemplateInfo.plist chứa mô tả template cơ bản. Việc triển khai bên dưới cung cấp cho chúng ta khả năng nhập tên Mô-đun trong khi tạo các template ứng dụng XCode.
<?xml version="1.0" encoding="UTF-8"?>
<!DOCTYPE plist PUBLIC "-//Apple//DTD PLIST 1.0//EN" "http://www.apple.com/DTDs/PropertyList-1.0.dtd">
<plist version="1.0">
<dict>
	<key>Kind</key>
	<string>Xcode.IDEKit.TextSubstitutionFileTemplateKind</string>
	<key>Platforms</key>
	<array>
		<string>com.apple.platform.iphoneos</string>
	</array>
	<key>Options</key>
	<array>
		<dict>
			<key>Identifier</key>
			<string>productName</string>
			<key>Required</key>
			<true/>
			<key>Name</key>
<string>Module Name</string>
			<key>Description</key>
			<string>The name of the Model, View and ViewModel to create</string>
			<key>Type</key>
			<string>text</string>
			<key>Default</key>
			<string>Module1</string>
		</dict>
	</array>
</dict>
</plist>
Bạn có thể sử dụng macro văn bản như FILEBASENAME để tham chiếu tên file.
Implement và cấu trúc
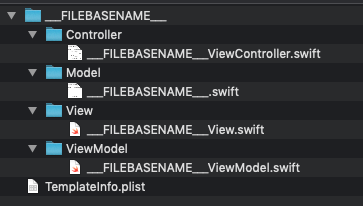
Cấu trúc thư mục của template và các lớp Swift trông như thế này:
Bước 1. Đây là cách triển khai ViewController:
import UIKit

class ___FILEBASENAMEASIDENTIFIER___: UIViewController {

    let viewModel: ___VARIABLE_productName___ViewModel
    let mainView: ___VARIABLE_productName___View

    init() {
        viewModel = ___VARIABLE_productName___ViewModel(withModel: ___VARIABLE_productName___())
        mainView = ___VARIABLE_productName___View()
        super.init(nibName: nil, bundle: nil)

        mainView.configure(withViewModel: viewModel)
    }

    required init?(coder _: NSCoder) {
        fatalError("init(coder:) has not been implemented")
    }

    override func viewDidLoad() {
        super.viewDidLoad()
        setupView()
    }

    private func setupView() {
        view.addSubview(mainView)
        mainView.snp.makeConstraints { make in
            make.top.leading.trailing.bottom.equalToSuperview()
        }
    }
}
Chúng tôi đã triển khai như sau:
- Khai báo các biến viewModel và mainView. Nó sẽ chứa productName từ TemplateInfo.plist.
- Khởi tạo các biến
- Khởi tạo bắt buộc (sử dụng ViewControllers từ mã, không phải Storyboards)
- Implement viewDidLoad
- Chức năng setupView sẽ thêm mainView và thiết lập các constraint SnapKit
Step 2. Implement Model:
import Foundation

class ___FILEBASENAMEASIDENTIFIER___ {

}
Tên class Model sẽ được tạo tự động bởi XCode nên phần trên chỉ là một ví dụ.
Bước 3. Implement View:
import UIKit

class ___FILEBASENAMEASIDENTIFIER___: UIView {

    init() {
        super.init(frame: CGRect.zero)
    }

    required init?(coder _: NSCoder) {
        fatalError("init(coder:) has not been implemented")
    }

    func configure(with viewModel: ___VARIABLE_productName:identifier___ViewModel) {
        // configure the view with a ___VARIABLE_productName:identifier___ViewModel
    }
}
Bước 4. Implement ViewModel:
import Foundation

class ___FILEBASENAMEASIDENTIFIER___ {

    private let model: ___VARIABLE_productName:identifier___

    init(withModel model: ___VARIABLE_productName:identifier___) {
        self.model = model
    }
}
Sử dụng
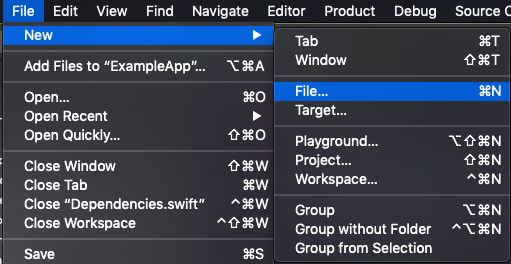
Bạn nhấp vào File -> New -> File…
Kéo xuống phần Template:

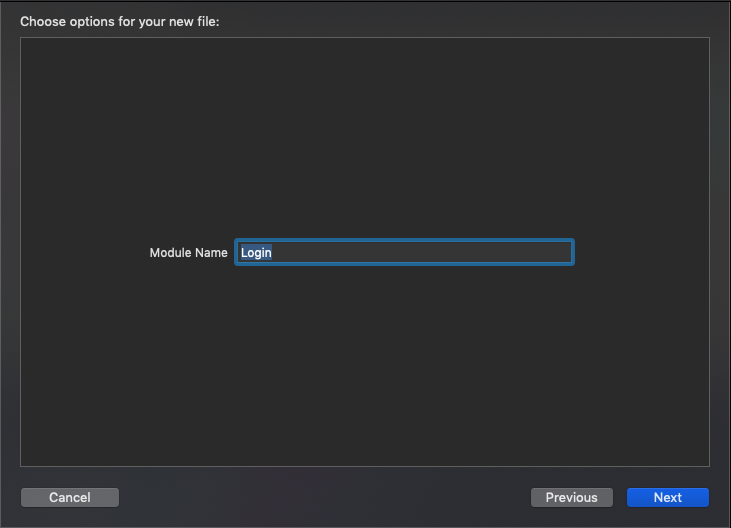
Nhập name cho module:
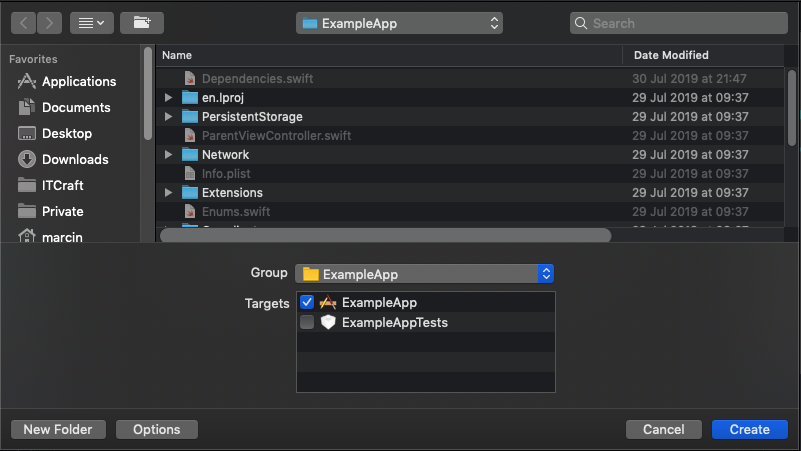
Thêm nó vào project:
Bạn hoàn toàn có thể custom các đoạn code từng file cho phù hợp với dự án của mình, mong nó có ích với các bạn!
All rights reserved
