Swagger – Công cụ document cho RESTfull APIs
Bài đăng này đã không được cập nhật trong 5 năm
Tản mạn
Đối với 1 dự án lớn, mà viết API, thì việc tạo Document cho dự án không phải là một chuyện đơn giản. Đối với trường hợp update requirement liên tục từ khách hàng, thì nó càng trở nên mất thời gian.
Nhưng nếu không update liên tục thì sẽ gây rất nhiều khó khăn cho các lập trình viên khác khi sử dụng API của chúng ta, cũng như khó khắn trong việc test API.
Hiện nay có rất nhiều công cụ mã nguồn mở để giúp cho lập trình viên có thể viết document rõ ràng và có thể test endpoint trực tiếp mà k cần sử dụng đến các công cụ như postman để có thể test API.Hai mã nguồn phổ biến hiện nay là Swagger và API Blue Print.
Bài này, mình xin gới thiệu 1 công cụ đó là SWAGGER, nó giúp chúng ta viết document chuẩn restfull 1 cách dễ dàng cho dự án của mình. Và lưu ý xin xò là nó hỗ trợ cho nhiều loại ngôn ngữ chứ ko chỉ Ruby.
Triển khai
Mình sẽ viết API với ngôn ngữ Ruby on Rails
1. Xây dụng API
Các bạn có thể tham khảo tài liệu: http://apionrails.icalialabs.com/book/ để tạo ra Project cho riêng mình. Hoặc có thể tạo nhanh một rails project để test như sau:
rails new swagger-rails

cd swagger-rails

rails g model User name:string email:string age:integer

rails db:migrate
Sau đó add 2 gem sau vào Gemfile:
gem "swagger-blocks"
gem "swagger_ui_engine"
rồi chạy bundle install.
2. Document cho API
2.1 Swagger là gì?
-
Là một bộ công cụ mã nguồn mở để xây dựng OpenAPI specifications giúp chúng ta có thể thiết kế, xây dựng tài liệu và sử dụng REST APIs.
-
Swagger cung cấp 3 tools chính cho các developers :
Swagger-Editor dùng để design lên các APIs hoàn toàn mới hoặc edit lại các APIs có sẵn thông qua 1 file config.
Swagger-Codegen dùng để generate ra code từ các file config có sẵn.
Swagger-UI dùng để generate ra file html,css,… từ 1 file config.
-
Việc viết document cho Swagger có hai cách tiếp cận chính như sau:
Top-down approach: thiết kế các API trước khi code.
Bottom-up approach: từ các API có sẵ thiết kế file config để mô tả chúng
-
Để dễ hiểu, các bạn có thể truy cập đường link demo với Swagger UI http://petstore.swagger.io/ .
-
Với mỗi API chúng ta có thể biết được chi tiết input và output cũng như trường nào bắt buộc gửi lên, kết quả trả về có thể nhận những status nào. Đặc biệt, ta có thể input data để thử kiểm tra kết quả.
2.2 Cài đặt Swagger UI
-
Config wagger block:
Mỗi doc sẽ đi liền với nhau theo dạng 1 action - 1 controller Swagger Block cung cấp 1 method là: Swagger::Blocks.build_root_json có nhiệm vụ nhận vào các class chưa thông tin về API
Nếu như thực hiện theo step hướng dẫn của gem swagger-block, chúng ta có thể config ở controller, nhưng vấn đề là controller sẽ phình rất to nếu như đặt doc ở đó.
Ngoài ra, nếu các bạn đã biết về mô hình MVC, hay nguyên lý SOLID thì đặt config ở Controller là không nên. Vì thế, mình sẽ tạo 1 folder swagger để lưu trữ các file liên quan tới request của swagger
# app/controllers/concerns/swagger/users_api.rb

module  Swagger::UsersApi
   extend  ActiveSupport :: Concern
   include  Swagger :: Blocks

   included do
     swagger_path '/users/{id}' do  #link path request to server
       operation :get do # method get
         key :summary, 'Find User by ID' # summary
         key :description, 'Returns a single user if the user has access'  # description
         # định nghĩa params
         parameter do
           key :name, :id # name hiển thị là id
           key :in, :path # phương thức add params vào path. VD: lúc request lên sẽ là users/1
           key :description, 'ID of user to fetch'
           key :required, true # validate
           key :type, :integer # type params
           key :format, :int64 # format params
         end
         response 200 do
           # when get user succes
           key :description, 'user response'
           schema do
             key :'$ref', :user_info
           end
         end
         response :bad_request do
           # when get user failed
           key :description, 'unexpected error'
           schema do
             key :'$ref', :ErrorModel
           end
         end
       end
       # ...

     end
   end
 end
Sau đó include nó vào trong controller:
# app/controllers/users_controller.rb class UsersController < ApplicationControllers include Swagger::UsersApi # ... end -
Response và Parameters:
Response và parameters sẽ rất hay bị trùng trong các API. Ví dụ: API login xong, bạn sẽ phải trả về thông tin User. Trong API show/edit thông tin user, bạn cũng sẽ phải trả về thông tin User, … Chúng ta sẽ phải tìm cách để sao cho có thể tái sử dụng code.
-
Response:
Trong SwaggerUI, chúng ta có thể sử dụng $ref để gọi tới 1 schema đã được định nghĩa sẵn. Hình dung nó như 1 cái link để trỏ tới 1 Schema JSON khác.
# app/models/concerns/swagger/user_schema.rb

module Swagger::UserSchema
  extend ActiveSupport::Concern
  include Swagger::Blocks

  included do
    swagger_schema :User do
      key :required, [:name, :email]
      property :name do
        key :type, :string
      end
      property :email do
        key :type, :string
      end
    end
  end
end
Sau đó, bạn cần include nó vào trong model user.rb
# app/models/user.rb

class User < ApplicationRecord
  include Swagger::UserSchema
end
Ngoài ra, thông thường chúng ta sẽ có 1schema ErrorSchema - nó sẽ được dùng khi API trả về thông tin lỗi.
# app/models/concerns/swagger/error_schema.rb

module Swagger::ErrorSchema
  extend ActiveSupport::Concern
  include Swagger::Blocks

  included do
    swagger_schema :ErrorOutput do
      key :required, [:errors]
      property :errors do
        key :type, :array
        items do
          key :type, :string
        end
      end
    end
  end
end
Tiếp theo, chúng ta cần tạo file common_response để sử dụng schema trên
module Swagger::ErrorResponses
  module NotFoundError
    def self.extended(base)
      base.response 404 do
        key :description, "404 - Resource not found"
        schema do
          key :'$ref', :ErrorOutput
        end
      end
    end
  end

  # ...
end
-
Parameters:
Cũng giống như phần Response, thì Parameter cũng sẽ được dùng chung bởi nhiều API, vì vậy, chúng ta cũng sẽ tiến hành định nghĩa riêng chỗ cho các parameter này. Ví dụ như các token authentication hay các fields id
# app/controllers/concerns/swagger/parameters.rb

module Swagger::Parameters
  def self.extended(base)
    base.parameter :user_id do
      key :in, :path
      key :description, 'User ID'
      key :required, true
      key :type, :integer
      key :format, :int64
    end
  end
end
Tiếp theo, chúng ta khai báo nó vào trong file root của swagger
# app/controllers/concerns/swagger/sample_app_root.rb

module Swagger::SampleAppRoot
  extend ActiveSupport::Concern
  include Swagger::Blocks

  included do
    swagger_root do
      # ...

      extend Swagger::Parameters
    end
  end
end
Cuối cùng cũng xong việc setting, còn lại bây giờ chỉ là sử dụng swagger vào trong các API
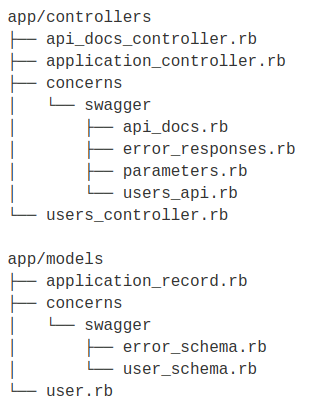
# app/controllers/concerns/swagger/users_api.rb

module  Swagger :: UsersApi
  extend  ActiveSupport :: Concern
  include  Swagger :: Blocks

  included do
    include Swagger::ErrorSchema

    swagger_path  "/ users / {id}"  do
      operation :get do
        key :description, "Returns the specified user"
        key :operationId, :find_user_by_id

        parameters  :user_id  # Include parameters defined by root

        response 200 do
          key :description, "User specified by its ID"
          schema do
            key :"$ref", :User
          end
        end

        # Captures the error response which is separately defined
        extend  Swagger :: ErrorResponses :: NotFoundError
      end
    end
  end
end
Bây giờ, cùng nhau nhìn lại cấu trúc project của chúng ta:
![]()
-
2.3 Setup Swagger UI
Kết quả bên trên, chúng ta đã có 1 file json chứa đầy đủ thông tin rồi. Nhiệm vụ bây giờ chỉ còn là làm thế nào để show nó ra cho bên client có thể xem một cách dễ dàng được. Chúng ta sẽ sử dụng gem "swagger_ui_engine"
Thực hiện add gem trên vào gem file, run bundle và cuối cùng là bước config nó trong file config/routes.rb
mount SwaggerUiEngine::Engine, at: "/api_docs"
# config/initialize/swagger_ui_engine.rb

if Rails.env.development? || Rails.env.staging?
  SwaggerUiEngine.configure do |config|
    config.swagger_url = {
      v1: "/api/v1/api_doc"
    }

    config.validator_enabled = true
    config.json_editor = true
    config.request_headers = true
  end
end
Bây giờ, chúng ta start server và truy cập vào đường link: /api_docs, bạn sẽ thấy được thành quả của mình.
All rights reserved
