Service Mesh on Kubernetes - Chapter 1 - Installing Istio in Kubernetes (English)
Bài viết tiếng Việt - Bài 1 - Cài đặt Istio vào Kubernetes
In the previous article, we learned about the concept of Service Mesh and What is Isito. From this article we will go into practice, in the first lesson we will learn how to install Istio into Kubernetes.
I refer to this series from the book Istio In Action, you can read it first without having to wait for my series.
How to install Istio?
To install Istio into Kubernetes we can use one of three ways:
- Using the
istioctl - Using
istio-operator - Use Helm to install Istio Helm Chart
In this article we will use istioctl.
Install istioctl
Visit release page https://github.com/istio/istio/releases and check latest version.
Run this handy script to download:
curl -L https://istio.io/downloadIstio | ISTIO_VERSION=1.15.1 sh -
mv istio-1.15.1/bin/istioctl /user/local/bin
Run the istioctl to verify that everything works:
istioctl version
let’s verify that any prerequisites have been met in our Kubernetes cluster before we begin installation.
istioctl x precheck
✔ No issues found when checking the cluster. Istio is safe to install or upgrade!
  To get started, check out https://istio.io/latest/docs/setup/getting-started/
Installing the Istio components into Kubernetes
We can use istioctl, istio-operator, or Helm to install Istio. In this tutorial, we use istioctl.
To perform the demo install, use the istioctl CLI tool as shown next:
istioctl install --set profile=demo -y
✔ Istio core installed
✔ Istiod installed
✔ Egress gateways installed
✔ Ingress gateways installed
✔ Installation complete
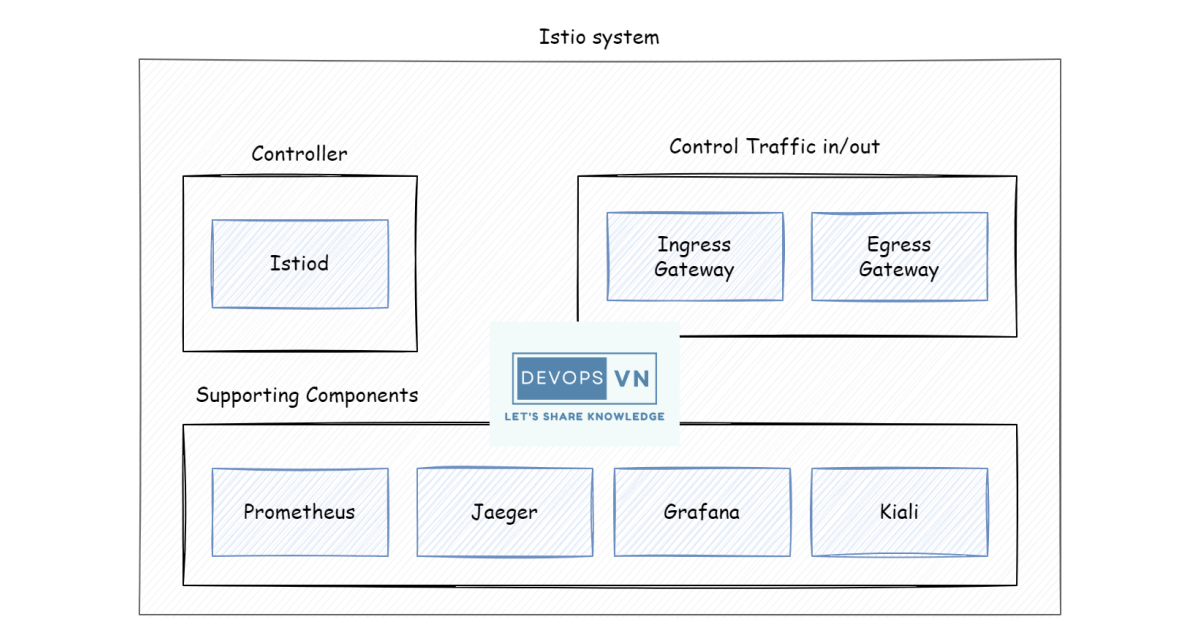
After done, we can run the kubectl to list all of the Pods in the istio-system namespace.
kubectl get pod -n istio-system
NAME                                    READY   STATUS    RESTARTS   AGE
istio-egressgateway-65b6c9d675-4gf7d    1/1     Running   0          2m45s
istio-ingressgateway-6984cfd6ff-b7tql   1/1     Running   0          2m45s
istiod-74bd9b9864-t7sn9                 1/1     Running   0          3m11s
You notice the Istio control plane there is only a single replica or instance. “This appears to be a single point of failure. What happens if these components fail or go down?”
The Istio control plane is intended to be deployed in a highly available architecture.
We can run the verify-install command post install to verify that it has completed successfully:
istioctl verify-install
Istio control-plane has some addons, for example, Grafana and Jaeger. For demo purposes only.
Install Prometheus
kubectl apply -f https://raw.githubusercontent.com/istio/istio/release-1.15/samples/addons/prometheus.yaml
Install Grafana
kubectl apply -f https://raw.githubusercontent.com/istio/istio/release-1.15/samples/addons/grafana.yaml
Install Jaeger
kubectl apply -f https://raw.githubusercontent.com/istio/istio/release-1.15/samples/addons/jaeger.yaml
After the installation is complete, the architecture of Istio will be as shown below.
Now we can write a configuration file to create Istio resources, for example VirtualService in Istio:
apiVersion: networking.istio.io/v1alpha3
kind: VirtualService
metadata:
  name: reviews-route
spec:
  hosts:
  - reviews.prod.svc.cluster.local
  http:
  - headers:
      request:
        set:
          test: "true"
    route:
    - destination:
        host: reviews.prod.svc.cluster.local
        subset: v2
      weight: 25
    - destination:
        host: reviews.prod.svc.cluster.local
        subset: v1
      headers:
        response:
          remove:
          - foo
      weight: 75
Site Reliability Engineering
Đây là quyển sách mình viết với những gì học được ở Vikki Digital Bank: "On-Call In Action."
Trong quá trình xây dựng hệ thống thì ngoài việc thiết kế hệ thống có thể mở rộng, đáp ứng được lượng truy cập cao, luôn luôn sẵn sàng để đáp ứng người dùng. Thì vấn đề cũng quang trọng không kém là phát hiện được hệ thống đang gặp vấn đề gì. Để làm được này thì ta phải định nghĩa được hệ thống thế nào là ổn định bằng các chỉ số, sau đó nếu hệ thống vượt quá chỉ số này thì ta cần phải bắn cảnh cáo, đó là công việc của Site Reliability Engineering và DevOps. Đối với hệ thống ngân hàng thì việc này lại càng quan trọng, khách hàng luôn cần chuyển tiền và hệ thống phải luôn sẵn sàng để đáp ứng.
Việc định nghĩa hệ thống không ổn định không phải chỉ dựa vào các chỉ số như CPU và Memory, đây là cái sai mà mình thấy nhiều bạn mắc phải nhất. Trong quyển sách này mình có hướng dẫn làm thế nào để xây dựng một hệ thống luôn sẵn sàng cho người dùng, cuốn sách không nói về thiết kế hệ thống mà hướng dẫn cách phát hiện sự bất ổn trong hệ thống và sửa, đây là vấn đề thực tế hơn.
Banking Infrastructure on Cloud
Loạt bài viết ngắn chia sẻ về kiến trúc hạ tầng của hệ thống ngân hàng trên Cloud (AWS): Vikki Digital Bank
All rights reserved
