Serverless Series (Golang) - Bài 5 - Authentication with Amazon Cognito - Part 1
Giới thiệu
Chào các bạn tới với series về Serverless, ở bài trước chúng ta đã nói về cách sử dụng S3 để hosting một trang Single Page Application và lưu trữ hình ảnh, cách sử dụng Lambda để upload file lên trên S3. Và do tất cả url của ta đều là public nên bất cứ ai cũng có thể vào trang create để tạo dữ liệu và upload file lên trên S3 cả, mà ta sẽ không muốn như vậy. Nên ở bài này chúng ta sẽ tìm hiểu về một thành phần tiếp theo được sử dụng để thực hiện việc authentication và quản lý user, là AWS Cognito.
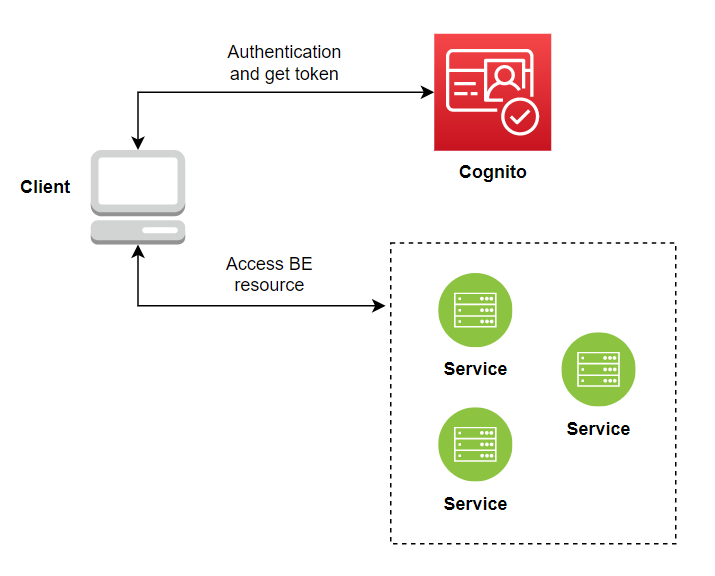
Hệ thống mà ta sẽ xây dựng như sau.
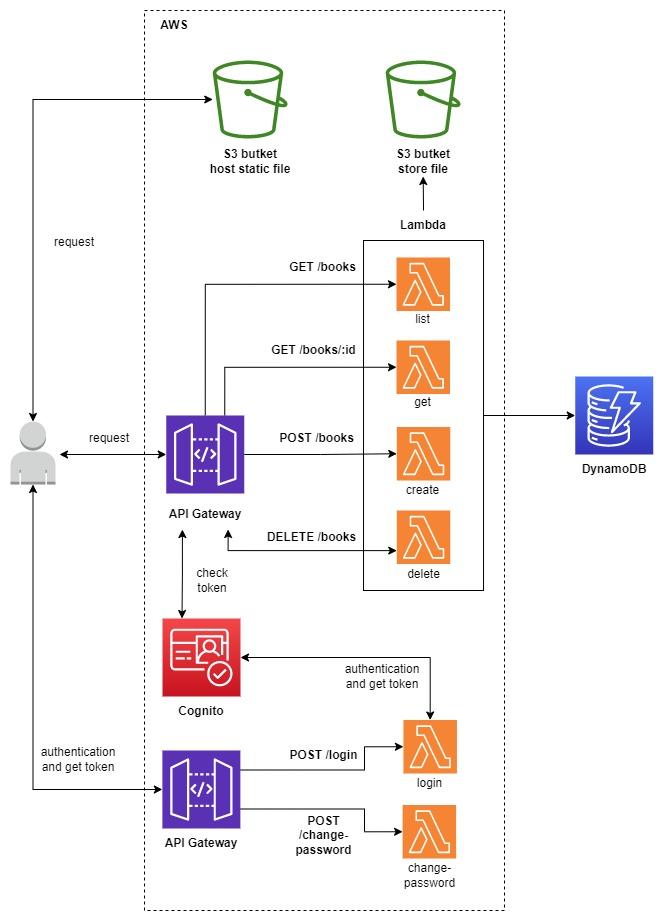
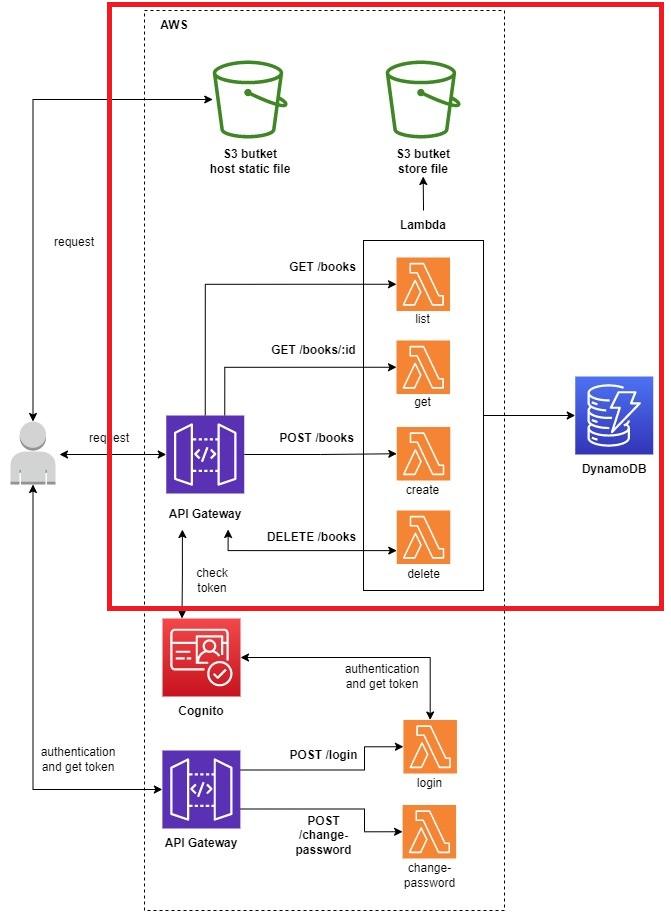
Ở bài trước, ta đã dựng được phần API Gateway + Lambda + DynamoDB + S3.
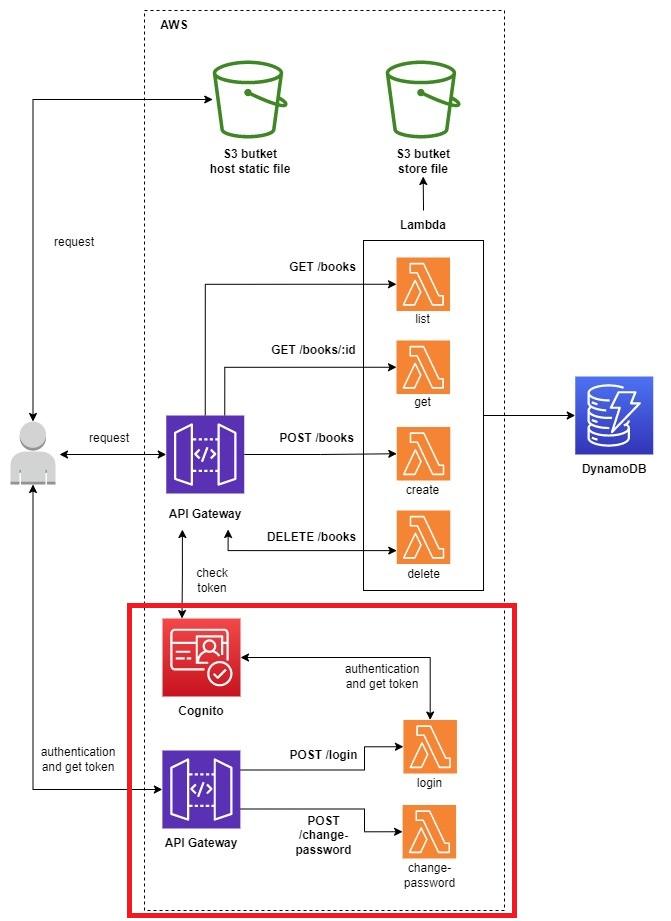
Ở bài này ta sẽ thêm vào AWS Cognito.
AWS Cognito
AWS Cognito là một dịch vụ của AWS mà được sử dụng cho việc chứng thực (authentication) user. Sử dụng nó sẽ giúp ta trong việc xây dựng luồng sign-in, sign-up, verify email, change password, restart password, v...v... một cách dễ dàng hơn, thay vì ta phải tự xây dựng DB cho user và tự làm nhiều thứ như JWT, hash password, send mail verify, v...v...
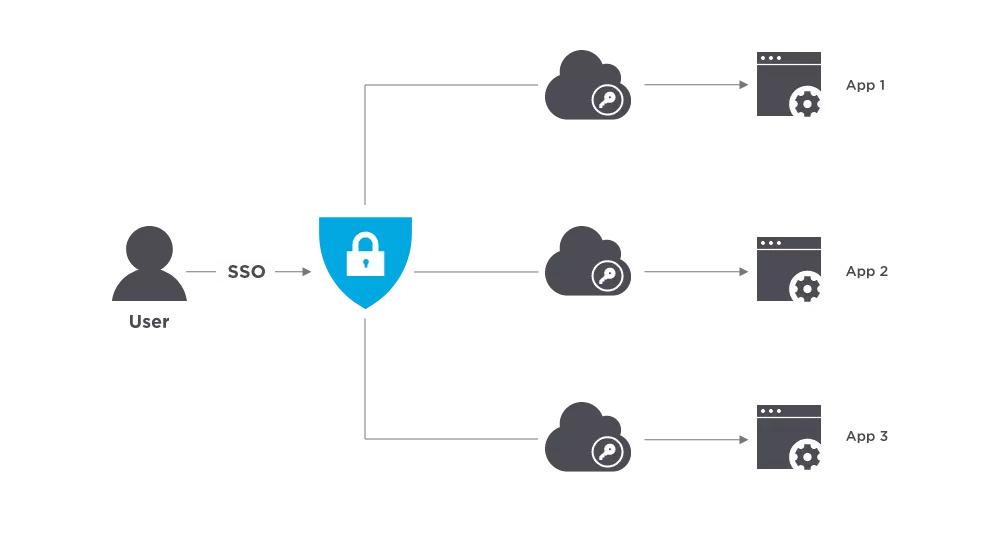
Một usecase phổ biến của AWS Cognito là sử dụng cho hệ thống SSO (single sign-on). Ví dụ là hệ thống của ta có 3 dịch vụ khác nhau, mỗi dịch vụ đều có một trang đăng nhập và DB user riêng, khi hệ thống ta phát triển lên tới mấy chục dịch vụ, việc xây dựng mỗi hệ thống đều sử dụng thằng authentication của riêng nó sẽ khiến ta rất khó để quản lý user. Giải pháp là ta sẽ xậy dựng hệ thống SSO, ta chỉ quản lý user ở một chỗ, sau khi đăng nhập vào hệ thống SSO này, token của nó sẽ được sử dụng cho nhiều dịch vụ khác nhau đằng sau.
AWS Cognito sẽ có hai thành phần chính: user pool với identity pool.
- User pool thì giống như là một DB chứa user của chúng ta, ta sẽ thực hiện việc sign-up, sign-in với user pool này và nó sẽ trả cho ta một token, ở bài này ta sẽ sử dụng user pool.
- Identity pool thì cũng giống với user pool là đều dùng để chứa user, nhưng có một điểm khác biệt là token được trả về từ identity pool có được dùng để truy cập vào các dịch vụ khác của AWS.
Một số cách triển khai Cognito
Front-end + AWS Cognito
Ở cách này FE sẽ tương tác trực tiếp với AWS Cognito sử dụng Aws Amplify framework.
Ưu điểm:
- Chỉ cần tạo AWS Cognito trên AWS, DevOps không cần phải operation gì cả.
- AWS sẽ quản lý việc scale theo workload của user.
- Chỉ cần code FE.
Nhược điểm:
- AWS Cognito phải tạo với public mode.
- Hoặc tạo với private mode thì secret key để kết nối với AWS Cognito phải lưu dưới source code của FE.
- Bảo mật kém.
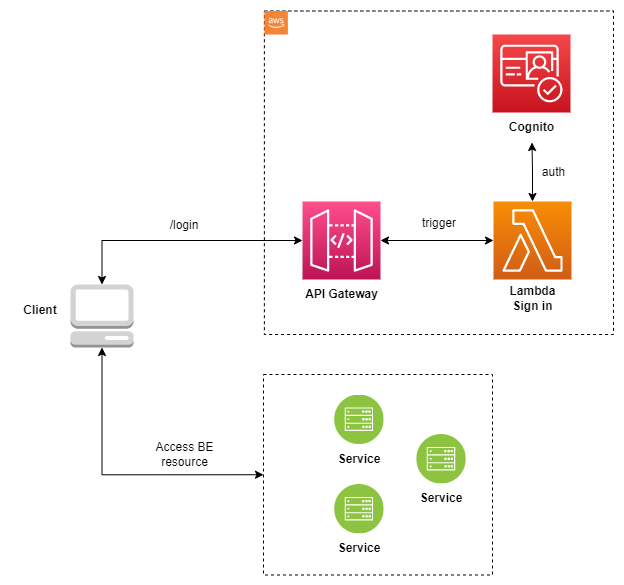
Front-end + API Gateway + AWS Lambda + AWS Cognito
Ở cách này ta sẽ dùng lambda để tương tác với AWS Cognito, nếu có secret key thì ta sẽ lưu trên AWS và truyền vào Lambda như một biến env để đảm bảo security.
Ưu điểm:
- Bảo mật hơn so với mô hình FE + AWS Cognito.
- Ít phải operation, chỉ cần quản lý một function là login.
Nhược điểm:
- AWS Lambda ở Region Singapore chỉ thực hiện tối đa được 500 concurrency một phút.
- Không tự control được vấn đề scale.
Sẽ có một vài cách khác nữa nhưng mình sẽ không nói ở đây. Ở bài này vì ta đang học về Lambda nên ta sẽ xài cách Front-end + API Gateway + AWS Lambda + AWS Cognito 😂.
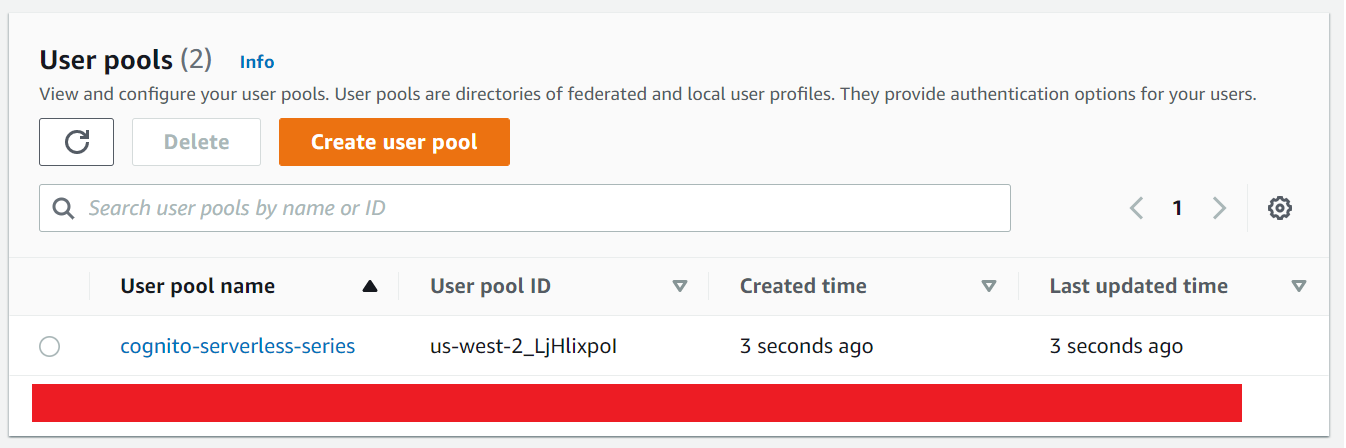
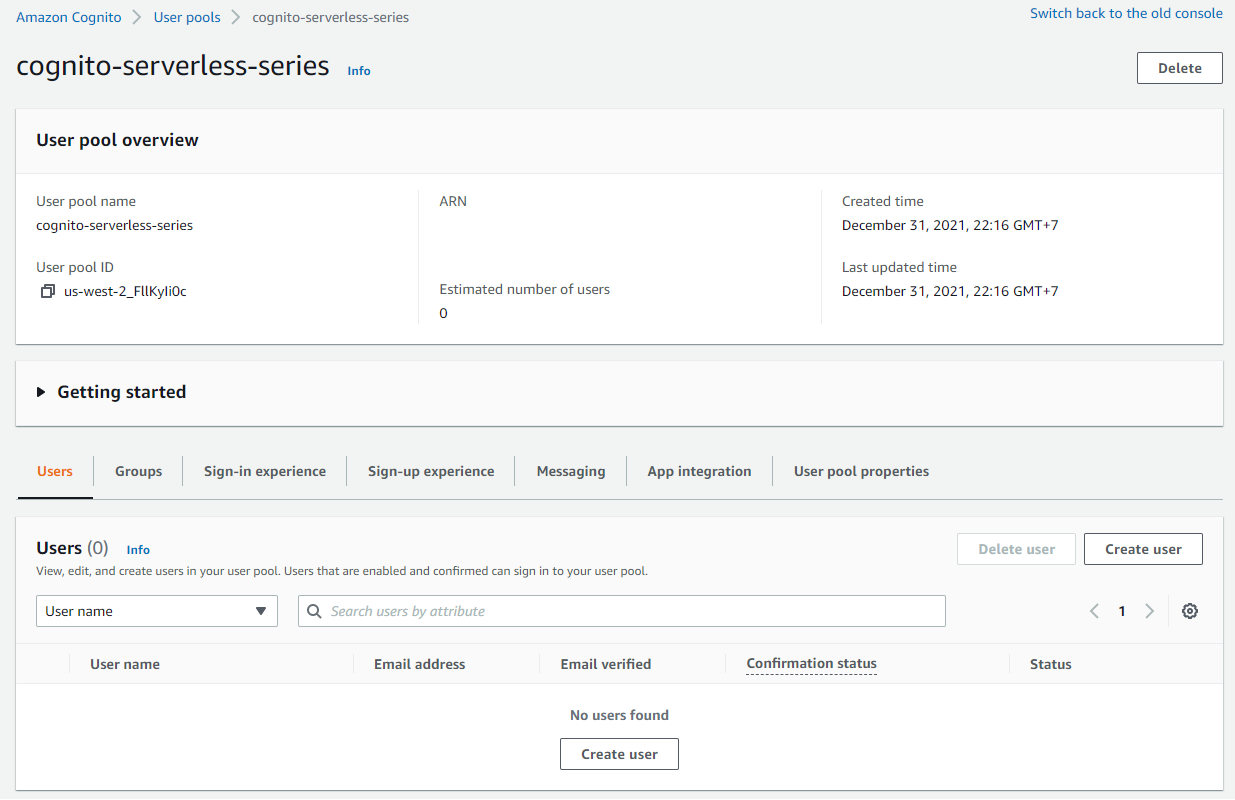
Tạo user pool
Truy cập AWS Console, tìm kiếm Cognito, bấm vào Cognito và bấm create user pool. Ta sẽ thấy UI như sau.
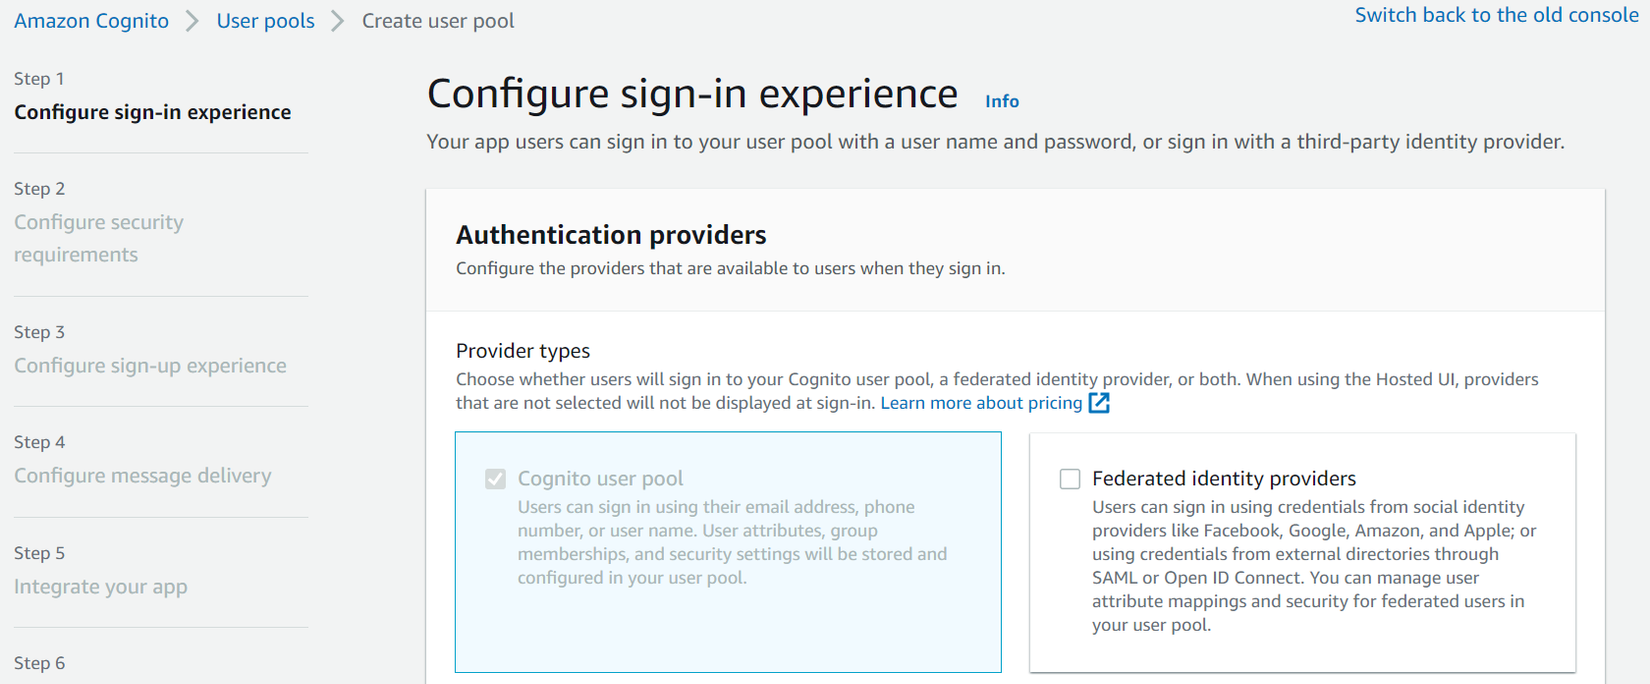
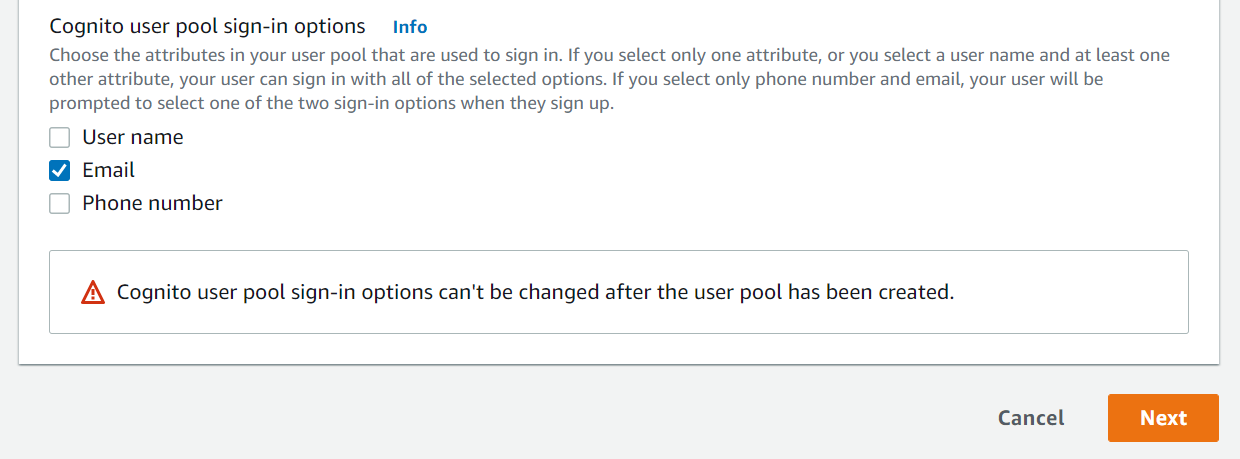
Chỉ check vào Cognito user pool. Kéo xuống ở mục Cognito user pool sign-in options, check chọn email, bấm Next.
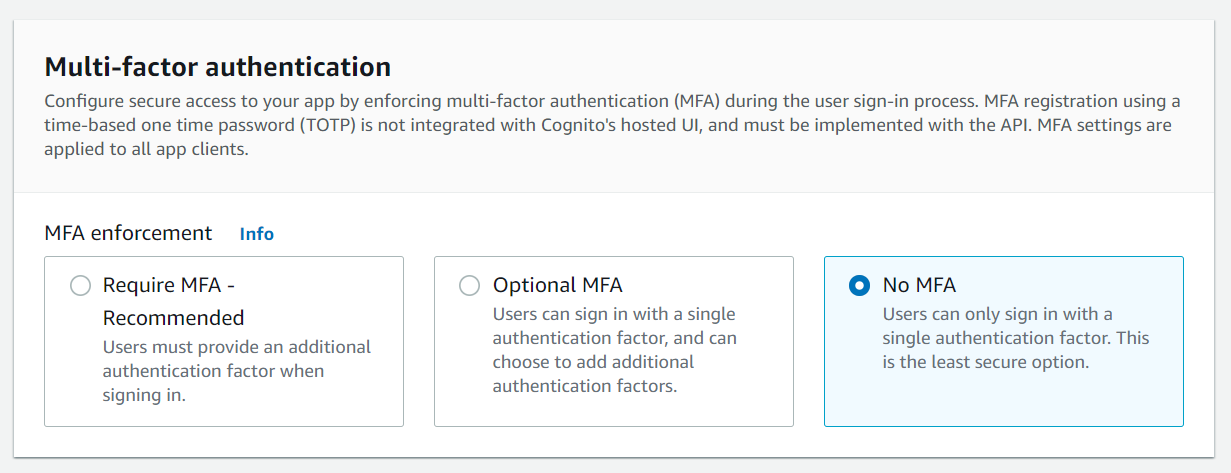
Qua bước 2, ở phần Multi-factor authentication, chọn No MFA. Mấy mục còn lại để mặc định.
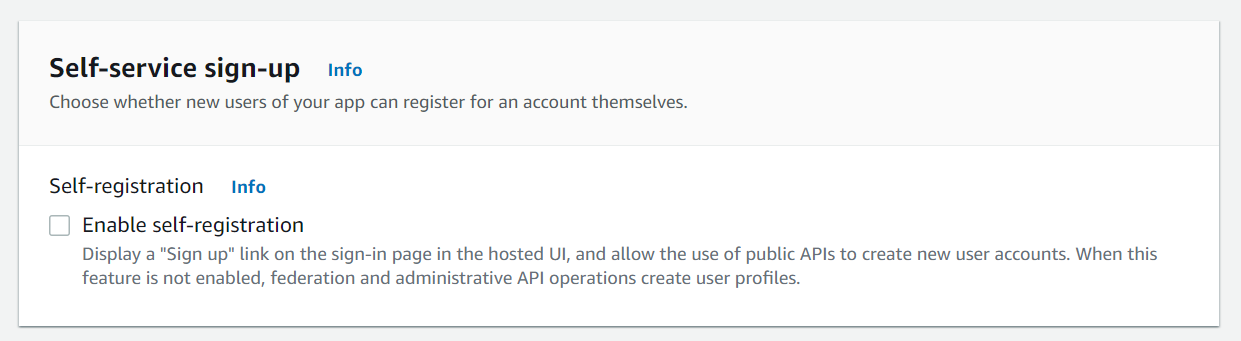
Bước 3, bỏ check Enable self-registration, mấy mục còn lại để mặc định, bấm Next.
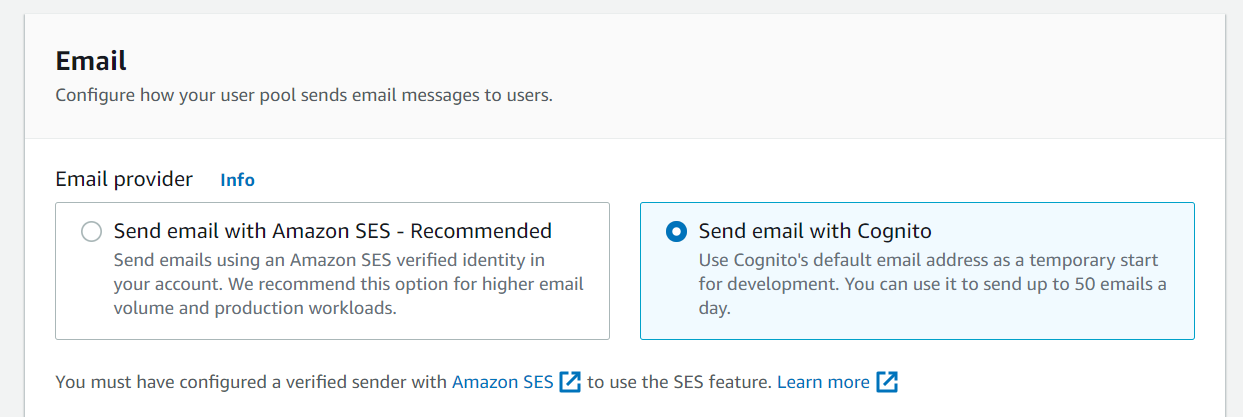
Bước 4, ở mục Email chọn Send mail with Cognito.
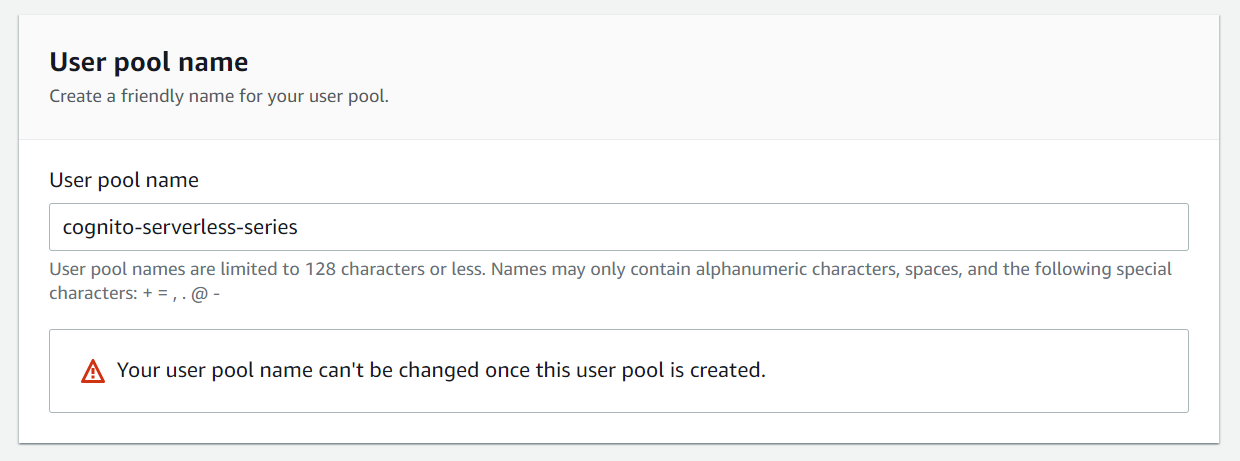
Bước 5, ở mục User pool name và App client name, bạn điền gì cũng được, mình điền tên là cognito-serverless-series.
Ở mục Initial app client điền vào cognito-serverless-series.
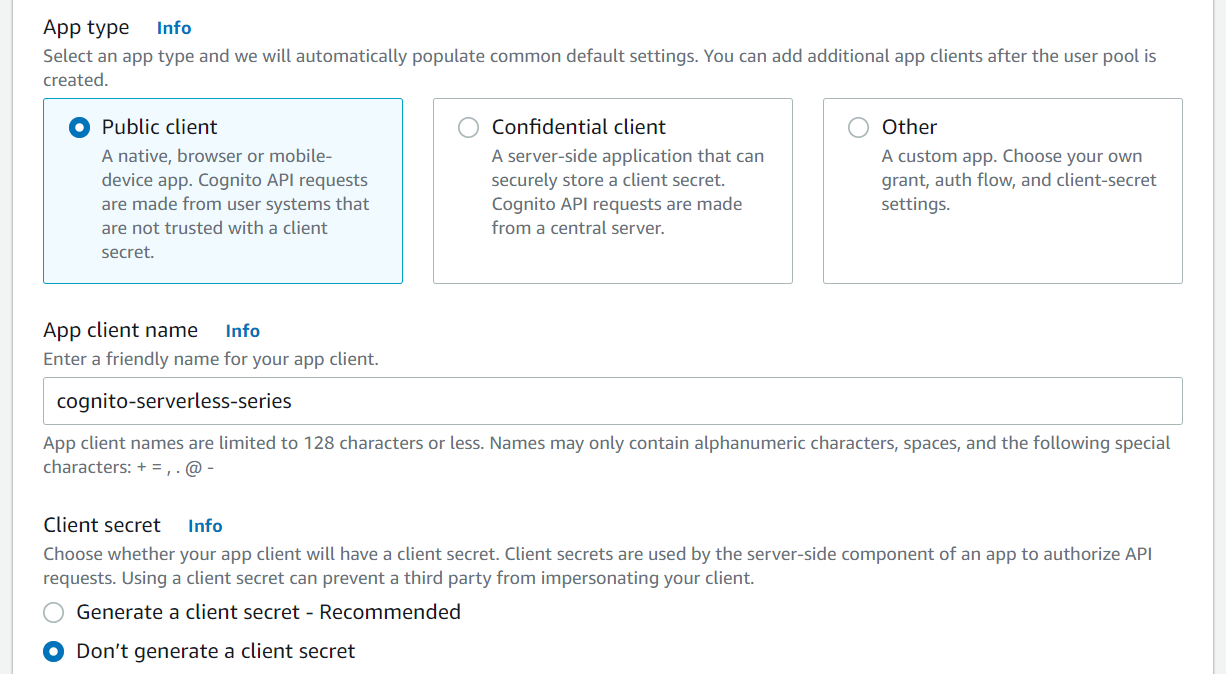
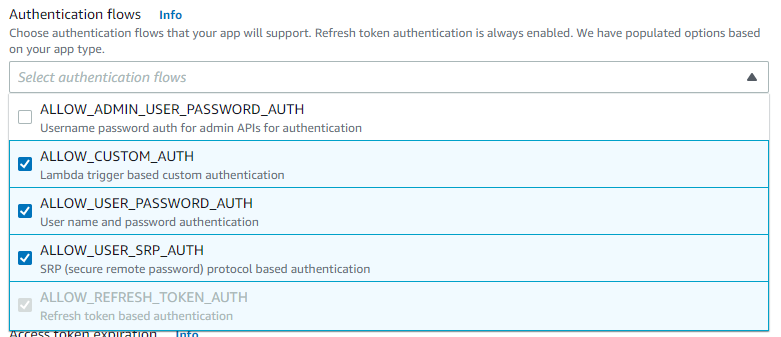
Ở mục Authentication flows, nhớ chọn thêm mục ALLOW_USER_PASSWORD_AUTH.
Sau khi điền xong bạn bấm Next để qua bước 6. Review và bấm Create user pool.
Ok, sau khi ta tạo xong user pool, bước tiếp theo ta sẽ dựng lại hệ thống ở bài trước và viết code cho Lambda login function, thêm vào API Gateway đường dẫn login, cập nhật lại đường dẫn create books cần phải có authentication.
Provisioning previous system
Mình sẽ dùng terraform để tạo lại hệ thống, nếu các bạn muốn biết cách tạo bằng tay từng bước thì các bạn xem từ bài 2 nhé. Các bạn tải source code ở git repo này https://github.com/hoalongnatsu/serverless-series.git.
Di chuyển tới folder bai-5/terraform-start. Ở file policies/lambda_policy.json, dòng "Resource": "arn:aws:dynamodb:us-west-2:<ACCOUNT_ID>:table/books", cập nhật lại <ACCOUNT_ID> với account id của bạn. Xong sau đó chạy câu lệnh.
terraform init
terraform apply -auto-approve
Sau khi Terraform chạy xong, nó sẽ in ra terminal API Gateway URL và Website URL.
base_url = {
  "api" = "https://kvpspx1bw0.execute-api.us-west-2.amazonaws.com/staging"
  "web" = "http://serverless-series-spa.s3-website-us-west-2.amazonaws.com"
}
Sau khi Terraform chạy xong ta sẽ có các resource sau đây.


Tiếp theo ta copy dường dẫn api ở terminal trên, di chuyển tới thư mục bai-5/front-end, ở file .env-cmdrc, cập nhật lại trường staging.REACT_APP_API_URL: https://kvpspx1bw0.execute-api.us-west-2.amazonaws.com/staging. Sau đó chạy câu lệnh.
yarn install
yarn build:staging
Nó sẽ build code FE và tạo ra folder build, ta upload build folder lên trên S3 serverless-series-spa bucket.
aws s3 cp build s3://serverless-series-spa/ --recursive
Oke, giờ ta truy cập http://serverless-series-spa.s3-website-us-west-2.amazonaws.com thì sẽ thấy được trang SPA của ta ở bài trước. Các bạn nên đọc các bài trước đó để hiểu rõ về từng resource ở trên.
Integrate Cognito
Create user
Trước tiên để tương tác với Cognito thì ta sẽ tạo một user cho Cognito user pool, ta có thể viết một Lambda để thực hiện việc tạo user này, ở đây thì ta sẽ dùng AWS Console Web để tạo user cho nhanh. Truy cập Cognito, ở mục Users, bấm Create user.
Ta sẽ thấy UI như sau.
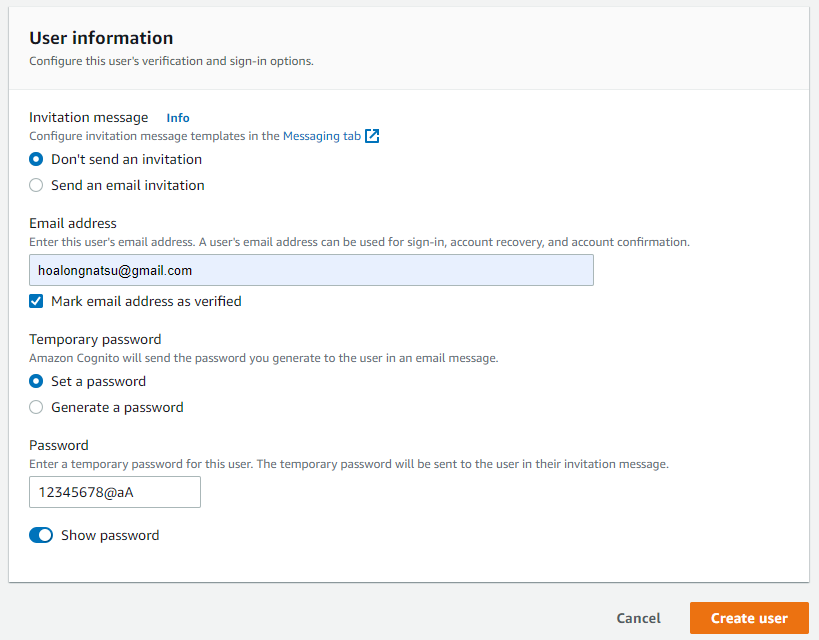
Chọn như trong hình, và điền vào email và password của user, xong bấm tạo.

Ta sẽ thấy có dòng chữ màu xanh là Force change password, user được tạo trong Cognito bắt buộc khi đăng nhập lần đầu tiên thì ta phải thay đổi password của nó, vì vậy ta mới có hàm change-password. Oke, sau khi tạo user xong thì bây giờ ta sẽ tiến hành viết code.
Implement Lambda change-password
Ta viết code cho hàm change-password, di chuyển tới folder bai-5/code.
├── change-password
│   ├── build.sh
│   ├── go.mod
│   ├── go.sum
│   └── main.go
└── login
    ├── build.sh
    ├── go.mod
    ├── go.sum
    └── main.go
Cập nhật lại file change-password/main.go như sau.
package main

import (
	"context"
	"encoding/json"
	"net/http"

	"github.com/aws/aws-lambda-go/events"
	"github.com/aws/aws-lambda-go/lambda"
	"github.com/aws/aws-sdk-go-v2/aws"
	"github.com/aws/aws-sdk-go-v2/config"
	"github.com/aws/aws-sdk-go-v2/service/cognitoidentityprovider"
)

type Body struct {
	Username    string `json:"username"`
	OldPassword string `json:"old_password"`
	NewPassword string `json:"new_password"`
}

func ChangePassword(req events.APIGatewayProxyRequest) (events.APIGatewayProxyResponse, error) {
	var body Body
	b64String, _ := base64.StdEncoding.DecodeString(req.Body)
	rawIn := json.RawMessage(b64String)
	bodyBytes, err := rawIn.MarshalJSON()
	if err != nil {
		return events.APIGatewayProxyResponse{
			StatusCode: http.StatusBadRequest,
			Body:       err.Error(),
		}, nil
	}

	json.Unmarshal(bodyBytes, &body)
	if err != nil {
		return events.APIGatewayProxyResponse{
			StatusCode: http.StatusBadRequest,
			Body:       err.Error(),
		}, nil
	}

	cfg, err := config.LoadDefaultConfig(context.TODO())
	if err != nil {
		return events.APIGatewayProxyResponse{
			StatusCode: http.StatusInternalServerError,
			Body:       "Error while retrieving AWS credentials",
		}, nil
	}

	cip := cognitoidentityprovider.NewFromConfig(cfg)
	authInput := &cognitoidentityprovider.InitiateAuthInput{
		AuthFlow: "USER_PASSWORD_AUTH",
		ClientId: aws.String("6jk1bh3me5h1onmbjhqalmtpp8"), // Should os.Getenv("CLIENT_ID")
		AuthParameters: map[string]string{
			"USERNAME": body.Username,
			"PASSWORD": body.OldPassword,
		},
	}
	authResp, err := cip.InitiateAuth(context.TODO(), authInput)
	if err != nil {
		return events.APIGatewayProxyResponse{
			StatusCode: http.StatusInternalServerError,
			Body:       err.Error(),
		}, nil
	}

	challengeInput := &cognitoidentityprovider.RespondToAuthChallengeInput{
		ChallengeName: "NEW_PASSWORD_REQUIRED",
		ClientId:      aws.String("6jk1bh3me5h1onmbjhqalmtpp8"),
		ChallengeResponses: map[string]string{
			"USERNAME":     body.Username,
			"NEW_PASSWORD": body.NewPassword,
		},
		Session: authResp.Session,
	}
	challengeResp, err := cip.RespondToAuthChallenge(context.TODO(), challengeInput)
	if err != nil {
		return events.APIGatewayProxyResponse{
			StatusCode: http.StatusInternalServerError,
			Body:       err.Error(),
		}, nil
	}

	res, _ := json.Marshal(challengeResp)
	return events.APIGatewayProxyResponse{
		StatusCode: http.StatusOK,
		Headers: map[string]string{
			"Content-Type":                "application/json",
			"Access-Control-Allow-Origin": "*",
		},
		Body: string(res),
	}, nil
}

func main() {
	lambda.Start(ChangePassword)
}
Đầu tiên, vì ở bài trước ta đã thêm vào Binary Media Types giá trị */*.

Nên request sẽ được encoded và ta không thể lấy req.body ra bằng hàm json.Unmarshal([]byte(req.Body), &body) được, mà ta phải làm như sau.
var body Body
b64String, _ := base64.StdEncoding.DecodeString(req.Body)
rawIn := json.RawMessage(b64String)
bodyBytes, err := rawIn.MarshalJSON()
if err != nil {
    return events.APIGatewayProxyResponse{
        StatusCode: http.StatusBadRequest,
        Body:       err.Error(),
    }, nil
}

json.Unmarshal(bodyBytes, &body)
if err != nil {
    return events.APIGatewayProxyResponse{
        StatusCode: http.StatusBadRequest,
        Body:       err.Error(),
    }, nil
}
Để tương tác với Cognito, trước hết ta sẽ tạo cognito client bằng hàm cip := cognitoidentityprovider.NewFromConfig(cfg). Sau đó, ta tiến hành lấy thông tin chứng thực của user bằng đoạn code.
authInput := &cognitoidentityprovider.InitiateAuthInput{
    AuthFlow: "USER_PASSWORD_AUTH",
    ClientId: aws.String("6jk1bh3me5h1onmbjhqalmtpp8"), // Should os.Getenv("CLIENT_ID")
    AuthParameters: map[string]string{
        "USERNAME": body.Username,
        "PASSWORD": body.OldPassword,
    },
}
authResp, err := cip.InitiateAuth(context.TODO(), authInput)
if err != nil {
    return events.APIGatewayProxyResponse{
        StatusCode: http.StatusInternalServerError,
        Body:       err.Error(),
    }, nil
}
Sau khi lấy được thông tin của user rồi, ta sẽ tiến hành đổi mật khẩu bằng đoạn code.
challengeInput := &cognitoidentityprovider.RespondToAuthChallengeInput{
    ChallengeName: "NEW_PASSWORD_REQUIRED",
    ClientId:      aws.String("6jk1bh3me5h1onmbjhqalmtpp8"),
    ChallengeResponses: map[string]string{
        "USERNAME":     body.Username,
        "NEW_PASSWORD": body.NewPassword,
    },
    Session: authResp.Session,
}
challengeResp, err := cip.RespondToAuthChallenge(context.TODO(), challengeInput)
if err != nil {
    return events.APIGatewayProxyResponse{
        StatusCode: http.StatusInternalServerError,
        Body:       err.Error(),
    }, nil
}
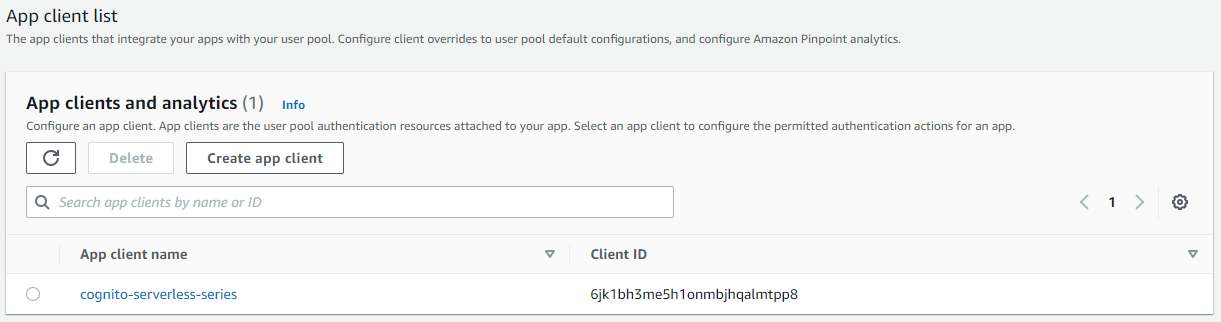
Sau đó ta trả về kết quả chứng thực của user cho client. Giá trị ClientId, ta lấy ở phần App integration trong Cognito.
Khi làm thực tế các bạn nên dùng os.Getenv("CLIENT_ID") thay vì điền trực tiếp trong function. Sau khi viết code xong thì ta init package và update lại AWS Lambda function.
go get
sh build.sh
aws lambda update-function-code --function-name change_password --zip-file fileb://change-password.zip --region us-west-2
Giờ ta sẽ kiểm tra thử hàm change-password của ta chạy đúng không.
curl -sX POST -d '{"username":"hoalongnatsu@gmail.com", "old_password": "12345678@aA", "new_password": "87654321@bB"}' https://kvpspx1bw0.execute-api.us-west-2.amazonaws.com/staging/change-password
Kết quả trả về.
{
    "AuthenticationResult": {
        "AccessToken": "eyJ...",
        "ExpiresIn": 3600,
        "IdToken": "eyJ...",
        "NewDeviceMetadata": null,
        "RefreshToken": "eyJ...",
        "TokenType": "Bearer"
    },
    "ChallengeName": "",
    "ChallengeParameters": {},
    "Session": null,
    "ResultMetadata": {}
}
Nếu bạn thấy kết quả trên thì hàm của ta đã chạy đúng
Implement Lambda login
Tiếp theo ta sẽ viết code cho hàm login, cập nhật lại file login/main.go như sau.
package main

import (
	"context"
	"encoding/json"
	"net/http"

	"github.com/aws/aws-lambda-go/events"
	"github.com/aws/aws-lambda-go/lambda"
	"github.com/aws/aws-sdk-go-v2/aws"
	"github.com/aws/aws-sdk-go-v2/config"
	"github.com/aws/aws-sdk-go-v2/service/cognitoidentityprovider"
)

type Body struct {
	Username string `json:"username"`
	Password string `json:"password"`
}

func login(req events.APIGatewayProxyRequest) (events.APIGatewayProxyResponse, error) {
	var body Body
	b64String, _ := base64.StdEncoding.DecodeString(req.Body)
	rawIn := json.RawMessage(b64String)
	bodyBytes, err := rawIn.MarshalJSON()
	if err != nil {
		return events.APIGatewayProxyResponse{
			StatusCode: http.StatusBadRequest,
			Body:       err.Error(),
		}, nil
	}

	json.Unmarshal(bodyBytes, &body)
	if err != nil {
		return events.APIGatewayProxyResponse{
			StatusCode: http.StatusBadRequest,
			Body:       err.Error(),
		}, nil
	}

	cfg, err := config.LoadDefaultConfig(context.TODO())
	if err != nil {
		return events.APIGatewayProxyResponse{
			StatusCode: http.StatusInternalServerError,
			Body:       "Error while retrieving AWS credentials",
		}, nil
	}

	cip := cognitoidentityprovider.NewFromConfig(cfg)
	authInput := &cognitoidentityprovider.InitiateAuthInput{
		AuthFlow: "USER_PASSWORD_AUTH",
		ClientId: aws.String("6jk1bh3me5h1onmbjhqalmtpp8"), // Should os.Getenv("CLIENT_ID")
		AuthParameters: map[string]string{
			"USERNAME": body.Username,
			"PASSWORD": body.Password,
		},
	}
	authResp, err := cip.InitiateAuth(context.TODO(), authInput)
	if err != nil {
		return events.APIGatewayProxyResponse{
			StatusCode: http.StatusInternalServerError,
			Body:       err.Error(),
		}, nil
	}

	res, _ := json.Marshal(authResp)
	return events.APIGatewayProxyResponse{
		StatusCode: http.StatusOK,
		Headers: map[string]string{
			"Content-Type":                "application/json",
			"Access-Control-Allow-Origin": "*",
		},
		Body: string(res),
	}, nil
}

func main() {
	lambda.Start(login)
}
Hàm login thì tương tự với hàm change-password. Sau khi cập nhật code xong thì ta init package và update lại AWS Lambda function.
go get
sh build.sh
aws lambda update-function-code --function-name login --zip-file fileb://login.zip --region us-west-2
Ta kiểm tra thử hàm login của ta.
curl -sX POST -d '{"username":"hoalongnatsu@gmail.com", "password": "87654321@bB"}' https://kvpspx1bw0.execute-api.us-west-2.amazonaws.com/staging/login
Kết quả.
{
    "AuthenticationResult": {
        "AccessToken": "eyJ...",
        "ExpiresIn": 3600,
        "IdToken": "eyJ...",
        "NewDeviceMetadata": null,
        "RefreshToken": "eyJ...",
        "TokenType": "Bearer"
    },
    "ChallengeName": "",
    "ChallengeParameters": {},
    "Session": null,
    "ResultMetadata": {}
}
Oke, hàm của ta đã chạy được 😁. Giá trị ở trong trường AuthenticationResult sẽ được sử dụng khi ta cần gọi API mà có authentication. Ở phần này thì ta chỉ làm tới đoạn login và change-password.
Kết luận
Vậy là ta đã tìm hiểu xong Cognito là gì, và cách integrate Lambda với nó. Sử dụng Cognito sẽ giúp ta đơn giản hơn nhiều trong việc quản lý và chứng thực user. Nếu có thắc mắc hoặc cần giải thích rõ thêm chỗ nào thì các bạn có thể hỏi dưới phần comment. Ở phần hai mình sẽ nói tiếp về cách integrate API Gateway với Cognito để nó tự động xác thực user cho ta. Hẹn gặp mọi người ở phần hai của bài này.
Site Reliability Engineering
Đây là quyển sách mình viết với những gì học được ở Vikki Digital Bank: "On-Call In Action."
Trong quá trình xây dựng hệ thống thì ngoài việc thiết kế hệ thống có thể mở rộng, đáp ứng được lượng truy cập cao, luôn luôn sẵn sàng để đáp ứng người dùng. Thì vấn đề cũng quang trọng không kém là phát hiện được hệ thống đang gặp vấn đề gì. Để làm được này thì ta phải định nghĩa được hệ thống thế nào là ổn định bằng các chỉ số, sau đó nếu hệ thống vượt quá chỉ số này thì ta cần phải bắn cảnh cáo, đó là công việc của Site Reliability Engineering và DevOps. Đối với hệ thống ngân hàng thì việc này lại càng quan trọng, khách hàng luôn cần chuyển tiền và hệ thống phải luôn sẵn sàng để đáp ứng.
Việc định nghĩa hệ thống không ổn định không phải chỉ dựa vào các chỉ số như CPU và Memory, đây là cái sai mà mình thấy nhiều bạn mắc phải nhất. Trong quyển sách này mình có hướng dẫn làm thế nào để xây dựng một hệ thống luôn sẵn sàng cho người dùng, cuốn sách không nói về thiết kế hệ thống mà hướng dẫn cách phát hiện sự bất ổn trong hệ thống và sửa, đây là vấn đề thực tế hơn.
Banking Infrastructure on Cloud
Loạt bài viết ngắn chia sẻ về kiến trúc hạ tầng của hệ thống ngân hàng trên Cloud (AWS): Vikki Digital Bank
All rights reserved
