Sequelize + Typescript = Purrrrfect
Bài đăng này đã không được cập nhật trong 4 năm
Xin chào mọi người, nay mình sẽ chia sẻ chút về kinh nghiệm mò mẫm được của mình về cặp đôi Sequelize và TypeScript nhé.
Mở lời
Quảng cáo tí là mình có viết một cái tool để auto review PR Github (https://github.com/datlm-1340/gitgud) với một bộ checklist được sync với Google Sheet thông qua sheety.co.
Tiện thì tiện thật vì nó giúp mình không phải code một hệ thông API nào để trích xuất data cho tool, coi như dùng Google Sheet làm DB luôn. Nhưng dở một cái là cái ông sheety kia đòi nhiều quyền truy cập file Spreadsheet quá, mà dùng gmail công ty thì sợ vấn đề bảo mật nên dự án nào dùng cũng ngại, toàn phải sử dụng mail cá nhân.
Cho nên mình quyết định thiết kế một app riêng để quản lý cái checklist này với stack sau:
- Express/NodeJS + Typescript (Backend)
- MySQL (Database)
- Sequelize (ORM)
Mình thì cũng chẳng có mấy kinh nghiệm với NodeJS hay Typescript, nên cũng coi như là một project để tự học hỏi thêm. Cũng là một cái project làm boilerplate để sau này mình có thể sử dụng lại cho các project trong tương lai.
Dài dòng thế đủ rồi, sau đây là kinh nghiệm setup Sequelize với Typescript của mình - 1 beginner nhé.
Cài đặt Sequelize
Ở đây mình sử dụng tool sequelize-cli để generate ra cấu trúc thư mục và các config của Sequelize dựa theo file .sequelizerc như sau:
const path = require('path')

module.exports = {
  config: path.resolve('src/config', 'database.ts'),
  'models-path': path.resolve('src', 'models'),
  'seeders-path': path.resolve('src/db', 'seeders'),
  'migrations-path': path.resolve('src/db', 'migrations'),
}
Sau đó chạy npx sequelize-cli init và chúng ta sẽ có cấu trúc thư mục như sau
- src
    - config
        - database.ts
    - db
        - migrations
        - seeders
    - models
        - index.js
Đây là file database.ts:
require('dotenv').config()

const host = process.env.DB_HOST
const username = process.env.DB_USER
const password = process.env.DB_PASSWORD
const database = process.env.DB_NAME

module.exports = {
  development: {
    username,
    password,
    database,
    host,
    port: 3306,
    dialect: 'mysql',
  },
}
File models/index.js của chúng ta lúc mới generate thì sẽ trông như thế này:
'use strict';

const fs = require('fs');
const path = require('path');
const Sequelize = require('sequelize');

const basename = path.basename(__filename);
const env = process.env.NODE_ENV || 'development';
const config = require('../../app/config')[env];
const db = {};

let sequelize;
if (config.url) {
  sequelize = new Sequelize(config.url, config);
} else {
  // another sequelize configuration
}

fs.readdirSync(__dirname)
  .filter(file => {
    return (
      file.indexOf('.') !== 0 && file !== basename && file.slice(-3) === '.js'
    );
  })
  .forEach(file => {
    const model = sequelize['import'](path.join(__dirname, file));
    db[model.name] = model;
  });

Object.keys(db).forEach(modelName => {
  if (db[modelName].associate) {
    db[modelName].associate(db);
  }
});

db.sequelize = sequelize;
db.Sequelize = Sequelize;

module.exports = db;
Yê, nhiều code thật, tuy nhiên đoạn code này đảm bảo cho việc dễ sử dụng lại các model và giảm được việc sử dụng các câu require/import ở các model trong tương lai.
Nhưng mình code TypeScript mà !! Ok Ok, đầu tiên chúng ta đổi tên file từ index.js sang index.ts và sửa "một chút" như sau nhé:
import { Sequelize } from 'sequelize'

const env = process.env.NODE_ENV || 'development'
const config = require('../config/database.ts')[env]

const sequelize = config.url
  ? new Sequelize(config.url, config)
  : new Sequelize(config.database, config.username, config.password, config)

export { Sequelize, sequelize }
Chỉ thể thôi, để mình giải thích tại sao lại phải xoá một đống code đi nhé. Lý do ngắn gọn là bởi vì đây là TypeScript  . Dài dòng hơn thì mình không muốn lúc nào cũng phải gõ
 db.X, db.Y ... do ở file cũ đang export ra object db. Do đó mình sẽ bỏ đi toàn bộ đoạn code đó và chỉ export class Sequelize và instance sequelize. Instance sequelize vốn đã có refer tới database connection rồi nên khi tạo model chúng ta có thể dùng nó để giao tiếp qua lại giữa model và database.
Bước một đã xong, tiếp nhé !
Migration
Sau khi init và tạo được file database.ts và các thư mục khác thì đến lúc chạy migration rồi.
Có hai cách để tạo một bảng mới bằng migration.
1, model:generate
Một là sử dụng câu lệnh model:generate để tạo ra một file migration mới. Câu lệnh này có hai option:
name: tên modelattributes: danh sách các attribute của model đó.
Ví dụ với model tên là User nhé:
npx sequelize-cli model:generate --name User --attributes firstName:string,lastName:string,email:string
Câu trên sẽ làm hai việc:
- Tạo model
usertrong thư mụcmodelscủa chúng ta. - Tạo một file có tên dạng
[timestamp]-create-user.jstrong thư mụcdb/migrations
2, Sử dụng migration skeleton
Chúng ta sử dụng câu lệnh sau để tạo một migration tạo bảng user.
npx sequelize-cli migration:generate --name create-user
Nó sẽ sinh ra một file có tên dạng [timestamp]-create-user.js trong thư mục db/migrations và file này sẽ có nội dung sau:
module.exports = {
  up: async (queryInterface, Sequelize) => {
    /**
     * Add altering commands here.
     *
     * Example:
     * await queryInterface.createTable('users', { id: Sequelize.INTEGER });
     */
  },

  down: async (queryInterface, Sequelize) => {
    /**
     * Add reverting commands here.
     *
     * Example:
     * await queryInterface.dropTable('users');
     */
  }
};
Để tạo bảng hoặc thêm sửa xoá cột thì chung ta sẽ dùng tham số queryInterface để xử lý các thay đổi ở cấu trúc DB. Ví dụ để tạo một bảng User như ví dụ trên thì ta có thể viết như sau:
module.exports = {
  up: async (queryInterface, Sequelize) => {
    return await queryInterface.createTable('users', {
      id: {
        allowNull: false,
        autoIncrement: true,
        primaryKey: true,
        type: Sequelize.INTEGER,
      },
      name: Sequelize.STRING,
    });
  },
  down: async (queryInterface, Sequelize) => {
    return await queryInterface.dropTable('users');
  }
};
Note: Như mình thì mình sẽ không làm theo cách 1 vì mình muốn kiểm soát việc tạo file và chủ động hơn trong file migration của mình
Sau đó ta có thể chạy migrate bằng lệnh:
npx sequelize-cli db:migrate
và undo bằng lệnh:
npx sequelize-cli db:migrate:undo
Cụ thể hơn thì mọi người có thể đọc docs của sequelize
Tạo Model
Note: Ở đây mình sẽ sử dụng hai ví dụ thực tế ở project của mình: Repository và Checklist
Model Repository sử dụng Typescript + Sequelize của mình sẽ có phần khai báo các interface như sau:
// models/repository.model.ts

import {
  Model,
  Optional,
} from 'sequelize'

export interface RepositoryAttributes {
  id: number
  name: string
  url: string
}

/*
    Ở đây mình cần khai báo RepositoryCreationAttributes để cho Sequelize và Typescript
    hiểu rằng property id sẽ là optional trong lúc create
*/

export interface RepositoryCreationAttributes
  extends Optional<RepositoryAttributes, 'id'> {}
Tiếp tục định nghĩa model Repository của chúng ta nhé:
// models/repository.model.ts

import { sequelize } from '.'

const RepositoryDefinition = {
  id: {
    allowNull: false,
    autoIncrement: true,
    primaryKey: true,
    type: DataTypes.INTEGER,
  },
  name: {
    allowNull: false,
    unique: true,
    type: DataTypes.STRING,
  },
  url: {
    allowNull: false,
    type: DataTypes.STRING,
  },
}

/*
    code interface
*/

export class Repository
  extends Model<RepositoryAttributes, RepositoryCreationAttributes>
  implements RepositoryAttributes
{
  public id: number
  public name: string
  public url: string

  static readonly scopes: ModelScopeOptions = {
    /*
      nơi khai báo scope
    */
  }

  static readonly validations: ModelValidateOptions = {
    /*
      nơi khai báo validation
    */
  }
}

// Initialization
Repository.init(RepositoryDefinition, {
  sequelize,
  tableName: 'repositories', // tên bảng trong MySQL
  underscored: true, // chuyển tên cột từ camelCase thành underscored
  updatedAt: true, // mặc định thêm các cột updated_at
  createdAt: true, // và created_at
  scopes: Repository.scopes,
  validate: Repository.validations,
})
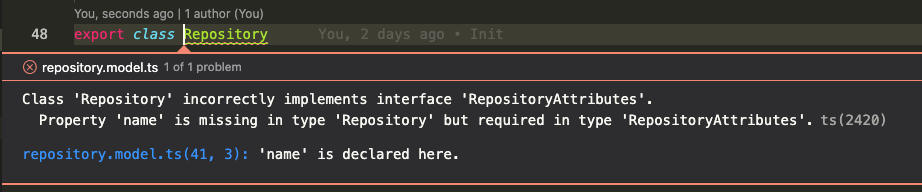
Tại sao lại phải viết đi viết lại đến 3 lần các property nhỉ ? đơn giản thôi, vì một khi bạn đã khai báo các interface trong TypeScript (TS) và implement chúng thì TS sẽ bắt các bạn phải sử dụng đầy đủ những gì đã khai báo. Viết sai tên bị TS chửi , thiếu hay thừa property cũng bị nó chửi nốt. Cho nên đây là một cái lợi thế của TS, bạn sẽ phát hiện ra lỗi ngay trong khi code vì TS bắt được lỗi thì sẽ không để bạn yên đâu. Cứ như là code Java vậy
Áp dụng những cái bên trên vào thì chúng ta sẽ có model Checklist như sau:
import {
  Model,
  DataTypes,
  Optional,
  ModelScopeOptions,
  ModelValidateOptions,
  BelongsToGetAssociationMixin,
} from 'sequelize'
import { sequelize } from '.'
import { Repository } from './repository.model'

const ChecklistDefinition = {
  id: {
    allowNull: false,
    autoIncrement: true,
    primaryKey: true,
    type: DataTypes.INTEGER,
  },
  repositoryId: {
    allowNull: false,
    type: DataTypes.INTEGER,
  },
  type: {
    allowNull: false,
    type: DataTypes.INTEGER,
  },
  pattern: {
    allowNull: false,
    type: DataTypes.STRING,
  },
  note: {
    allowNull: false,
    type: DataTypes.TEXT,
  },
  file: {
    allowNull: false,
    type: DataTypes.STRING,
  },
  regex: {
    allowNull: false,
    type: DataTypes.BOOLEAN,
  },
}

export interface ChecklistAttributes {
  id: number
  repositoryId: number
  type: number
  pattern: string
  note: string
  file: string
  regex: boolean
}

export interface ChecklistCreationAttributes
  extends Optional<ChecklistAttributes, 'id'> {}

export class Checklist
  extends Model<ChecklistAttributes, ChecklistCreationAttributes>
  implements ChecklistAttributes
{
  public id: number
  public repositoryId: number
  public type: number
  public pattern: string
  public note: string
  public file: string
  public regex: boolean

  static readonly scopes: ModelScopeOptions = {}

  static readonly validations: ModelValidateOptions = {}
}

// Initialization
Checklist.init(ChecklistDefinition, {
  sequelize,
  tableName: 'checklists',
  underscored: true,
  updatedAt: true,
  createdAt: true,
  scopes: Checklist.scopes,
  validate: Checklist.validations,
})
Đơn giản vậy thôi.
Liên kết bảng
Nếu muốn thêm liên kết bảng ví dụ Repository HAS MANY Checklists thì trong model chúng ta thêm như sau vào 2 model trên của chúng ta.
// models/repository.model.ts
import { Checklist } from './checklist.model'

// code, code, code x 3,14

Repository.hasMany(Checklist, { as: 'checklists' });
// models/checklist.model.ts
import { Repository } from './repository.model'

// một đống code gì đó, ai biết đâu ...

Checklist.belongsTo(Repository, { as: 'repository', foreignKey: 'repositoryId' });
Nhưng mà no no no no, ban đầu mình cũng nghĩ là sẽ dễ dàng như vây thôi, nhưng ai ngờ :
throw new Error("${source.name}.${_.lowerFirst(Type.name)} called with something that's not a subclass of Sequelize.Model");
      ^
"Error: Checklist.belongsTo called with something that's not a subclass of Sequelize.Model"
Vò đầu bứt tai mãi, thì hoá ra là mình phải nhét chung hai câu khai báo kia vào cùng 1 file để nó cùng được khởi tạo. Hmmm! Mình cũng chưa rõ tại sao, nhưng sau khi mình đưa câu Repository.hasMany vào trong file models/checklist.model.ts thì mọi thứ đều đã ngon lành (mọi người ai có kinh nghiệm phần này thì có thể comment gỡ rối giúp mình nha (bow)) :
// models/checklist.model.ts
import { Repository } from './repository.model'

// hmmm, vẫn toàn là code gì gì đâu

Repository.hasMany(Checklist, { as: 'checklists' });
Checklist.belongsTo(Repository, { as: 'repository', foreignKey: 'repositoryId' });
Thử query xem.
await Repository.findAll({
    include: { model: Checklist, as: 'checklists' },
})
Voilà, xịn sò luôn:
[
  {
      "id": 1,
      "userId": 1,
      "name": "XXXXX",
      "url": "https://github.com/XXXX/XXXXX",
      "createdAt": "2021-07-18T08:38:16.000Z",
      "updatedAt": "2021-07-18T11:11:43.000Z",
      "checklists": [
          {
              "id": 1,
              "repositoryId": 1,
              "type": 0,
              "pattern": "debugger",
              "note": "X",
              "file": "js,jsx,vue,ts,tsx",
              "regex": false,
              "createdAt": "2021-07-18T13:02:50.000Z",
              "updatedAt": "2021-07-18T13:02:50.000Z",
              "RepositoryId": 1
          },
          ...
      ]
  }
]
Tổng kết
Trên đây là những gì mình đúc kết được khi tự học NodeJS + Sequelize + TypeScript. Qua trải nghiệm cá nhân của một "nông dân" như mình thì mình thấy combo này thật sự thú vị và chứa nhiều điều mới mẻ để học.
Cảm ơn mọi người đã bỏ chút thời gian đọc bài của mình ạ. Chào và hẹn gặp lại (bow)
All rights reserved
