React Native Animations sử dụng Animated API
Bài đăng này đã không được cập nhật trong 5 năm
Animations rất quan trọng cho trải nghiệm của người dùng, nên hầu như ứng dụng nào cũng cần phải có. React Native cung cấp 2 hệ thống animations là Animatedvà LayoutAnimationnhưng hôm nay mình sẽ chỉ giới thiệu cho các bạn về Animated.
Animated
Animated API được thiết kế để thể hiện chính xác các animation với các tương tác rất hiệu quả. Animated tập trung vào mối quan hệ khai báo giữa đầu vào và đầu ra, sử dụng các phương thức start/stop để kiểm soát thực thi animation dựa trên thời gian.
Animated có 6 loại animatable component: View, Text, Image, ScrollView, FlatListandSectionList, tuy nhiên bạn cũng có thể tự tạo bằng cách sử dụng Animated.createAnimatedComponent().
Có 3 method chính mà bạn có thể sử dụng để tạo animation:
- Animated.timing() : Ánh xạ với phạm vi thời gian để easing value
- Animated.decay() : Bắt đầu với một vận tốc ban đầu và dần dần dừng lại
- Animated.spring() : Cung cấp một mô hình vật lý spring cơ bản
Cùng với các method Animated trên, có các composing method để kết hợp lại các animation theo các cách phức tạp:
- Animated.parallel() : Thực hiện các animation cùng một thời điểm
- Animated.sequence() : Thực hiện các animation một cách tuần tự
- Animated.stagger() : Thực hiện các animation với sự kết hợp cả tuần tự và song song
Animated.timing()
Animation đầu tiên chúng ta sẽ tạo đó chính là animation xoay tròn ( spinning) sử dụng Animated.timing().
// Example implementation:
Animated.timing(
  someValue,
  {
    toValue: number,
    duration: number,
    easing: easingFunction,
    delay: number
  }
)
Để tạo animation trên, trước tiên ta cần import Animated, Image, và Easing từ react-native.
import {
  AppRegistry,
  StyleSheet,
  Text,
  View,
  Animated,
  Image,
  Easing
} from 'react-native'
Easing là module cho phép chúng ta sử dụng các method để easing như linear, ease, quad, cubic, sin, elastic, bounce, back, bezier, in, out, inout...
Đầu tiên ta cần khởi tạo một animated value cho spinning value, ta sẽ set value ở constructor:
constructor () {
  super()
  this.spinValue = new Animated.Value(0)
}
Tiếp theo, ta sẽ tạo ra spin method để thực hiện animation xoay tròn và gọi nó ở componentDidMount để thực hiện ngay sau khi mở màn hình.
componentDidMount () {
  this.spin()
}
spin () {
  this.spinValue.setValue(0)
  Animated.timing(
    this.spinValue,
    {
      toValue: 1,
      duration: 4000,
      easing: Easing.linear
    }
  ).start(() => this.spin())
}
Hàm spin() sẽ gọi hàm Animated.timing để thức thi animation từ value 0 -> 1, với thời lượng 4 giây. Hàm Animated.timing cần truyền vào một value và một config object, config object có thể lấy toValue, duration, easing, delay. Ta gọi hàm start() và truyền vào callback spin() nó sẽ được gọi ngay sau khi animation hoàn thành.
Khi đã có các method ta sẽ cần render các animation ở UI:
render () {
  const spin = this.spinValue.interpolate({
    inputRange: [0, 1],
    outputRange: ['0deg', '360deg']
  })
  return (
    <View style={styles.container}>
      <Animated.Image
        style={{
          width: 227,
          height: 200,
          transform: [{rotate: spin}] }}
          source={{uri: 'https://example.com/example.png'}}
      />
    </View>
  )
}
Ở trên ta tạo một biến spin và sử dụng hàm interpolate, đây chính là hàm giúp chúng ta ánh xạ value từ 0 -> 1 thì output nó sẽ từ 0 độ-> 360 độ. Trong styles của Animated.Image ta có thêm thuộc tính transfrom và gắn spin value vào thuộc tính rotate
transform: [{rotate: spin}]
Như vậy là chúng ta đã thực hiện được một animation rồi đấy !
Animated.parallel()
Animated.parallel() sẽ thực thi một mảng animation trong cùng một thời điểm.
// API
Animated.parallel(arrayOfAnimations)
// In use:
Animated.parallel([
  Animated.spring(
    animatedValue,
    {
      //config options
    }
  ),
  Animated.timing(
     animatedValue2,
     {
       //config options
     }
  )
])
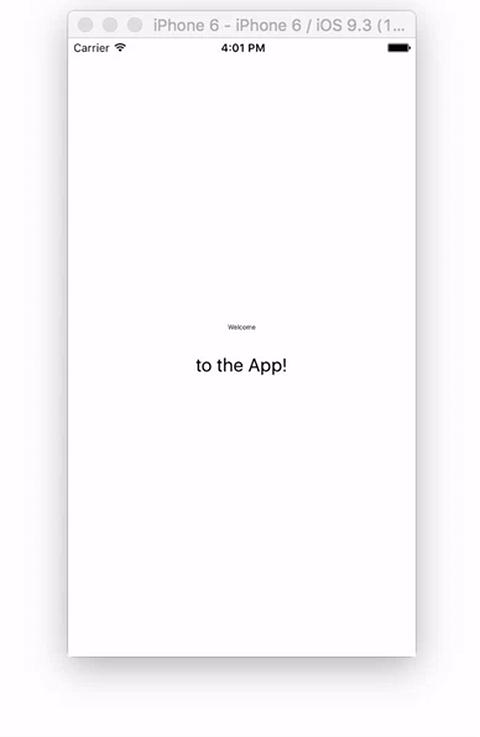
Để tạo animation như hình với Animated.parallel , trước tiên ta sẽ tạo 3 animated value ở constructor:
constructor () {
  super()
  this.animatedValue1 = new Animated.Value(0)
  this.animatedValue2 = new Animated.Value(0)
  this.animatedValue3 = new Animated.Value(0)
}
Tiếp theo, ta sẽ tạo method để thực thi animation và goị nó ở componentDidMount
componentDidMount () {
  this.animate()
}

animate () {
  this.animatedValue1.setValue(0)
  this.animatedValue2.setValue(0)
  this.animatedValue3.setValue(0)

  Animated.parallel([
    this.createAnimation(this.animatedValue1, 2000, Easing.ease),
    this.createAnimation(this.animatedValue2, 1000, Easing.ease, 1000),
    this.createAnimation(this.animatedValue3, 1000, Easing.ease, 2000)
  ]).start()
}

createAnimation = (value, duration, easing, delay = 0) => {
   return Animated.timing(
     value,
     {
       toValue: 1,
       duration,
       easing,
       delay
     }
   )
 }
Ở method render chúng ta sẽ tạo ra các interpolate value:
render () {
  const scaleText = this.animatedValue1.interpolate({
    inputRange: [0, 1],
    outputRange: [0.5, 2]
  })
  const spinText = this.animatedValue2.interpolate({
    inputRange: [0, 1],
    outputRange: ['0deg', '720deg']
  })
  const introButton = this.animatedValue3.interpolate({
    inputRange: [0, 1],
    outputRange: [-100, 400]
  })
  ...
}
Cuối cùng, chúng ta sẽ render các Animated.View:
<View style={[styles.container]}>
  <Animated.View
    style={{ transform: [{scale: scaleText}] }}>
    <Text>Welcome</Text>
  </Animated.View>
  <Animated.View
    style={{ marginTop: 20, transform: [{rotate: spinText}] }}>
    <Text
      style={{fontSize: 20}}>
      to the App!
    </Text>
  </Animated.View>
  <Animated.View
    style={{top: introButton, position: 'absolute'}}>
    <TouchableHighlight
      onPress={this.animate.bind(this)}
      style={styles.button}>
      <Text
        style={{color: 'white', fontSize: 20}}>
        Click Here To Start
      </Text>
   </TouchableHighlight>
  </Animated.View>
</View>
Chúng ta dùng scaleText để scale View đầu tiên, spinText để xoay View thứ 2, và introButton để thay đổi marginTop của View thứ 3. Khi hàm animate() được gọi, tất cả animation này sẽ được thực hiện cùng lúc.
Kết luận
Bài viết này mình chỉ hướng dẫn cho các bạn về Animated.timing() cho việc thực hiện animation đơn và Animated.parallel() để kết hợp thực hiện các animation. Các bạn có thể tham khảo thêm tại:
https://reactnative.dev/docs/animated
https://reactnative.dev/docs/animations
https://medium.com/react-native-training/react-native-animations-using-the-animated-api-ebe8e0669fae
All rights reserved
