Phần 2 - Cấu hình phiên bản Android SDK và chạy Gradle
Bài đăng này đã không được cập nhật trong 4 năm
Ở Phần 1, chúng ta đã tìm hiểu về các file .gradle chính trong một project Android. Hôm nay chúng ta sẽ tiếp tục tìm hiểu kĩ hơn về cách cấu hình trong app/build.gradle cụ thể là trong khối android {} và tiến hành run Gradle.
Cấu hình phiên bản Android SDK
Vấn đề
Bạn muốn chỉ định phiên bản tối thiểu hoặc phiên bản target của hệ điều hành Android mà có thể cài đặt sử dụng app của bạn.
Cách giải quyết
Trong file app/build.gradle, khai báo các giá trị trong android {}.
Thảo luận và thực hành
Khi một project android được tạo mới, trong android {} của file app/build.gradle đã được tạo sẵn, chúng ta có thể chỉ định nhiều thuộc tính của project, cụ thể như sau
apply plugin: 'com.android.application'

android {
  compileSdkVersion 26
  buildToolsVersion "26.0.2"
  defaultConfig {
    applicationId "com.simple.training"
    minSdkVersion 14
    targetSdkVersion 26
    versionCode 1
    versionName "1.0"
  }
}
Khối android {} là một entry point cho Android DSL. Ở đây chúng ta phải chỉ định phiên bản compile với thuộc tính compileSdkVersion và build tools version với thuộc tính buildToolsVersion. Cả hai giá trị trên nên được chỉ định là phiên bản mới và ổn định nhất để tránh các lỗi của các bản trước đó.
Trong khối defaultConfig {} của android {} thể hiện một số thuộc tính
- applicationId: đây là thuộc tính thể hiện tên
packagecủa project, chú ý là tênpackagenày phải là duy nhất trên hệ thống Google Play Store của Google. Điều này có nghĩa là giá trị trên không được thay đổi trong suốt vòng đời của project, việc thay đổi giá trị trên sẽ tạo ra một project mới và những người dùng hiện tại sẽ không thấy được bản cập nhật của ứng dụng. Trước đây, khi chưa sử dụng gradle. tênpackageđược định nghĩa trongAndroidManifest.xml, nhưng hiện nay chúng ta hoàn toàn có thể tách ra. - minSdkVersion: thuộc tính thể hiện phiên bản Android SDK thấp nhất được hỗ trợ hay cài đặt và sử dụng từ ứng dụng của chúng ta. Các thiết bị có Android SDK thấp hơn giá trị này sẽ không thể thấy ứng dụng của chúng ta trên Google Play Store.
- targetSdkVersion: chỉ định phiên bản Android ổn định, thông thường Google cảnh báo nên sử dụng phiên bản mới nhất, tuy nhiên chúng ta có thể sử dụng bất kỳ phiên bản nào mà chúng ta thích (chú ý là không được thấp hơn
minSdkVersion). - versionCode: chỉ định phiên bản của ứng dụng hiện tại, giá trị được sử dụng để nâng cấp phiên bản trên Google Play Store sau mỗi lần chúng ta release ứng dụng.
- versionName: chỉ định tên phiên bản của ứng dụng, thông thường form đặt tên sẽ là
<major>.<minor>.<version>.
Trước khi sử dụng Gradle thì hai thuộc tính minSdkVersion và buildToolsVersion được chỉ định trong AndroidManifest.xml file với cặp <uses-sdk> tag. Cách làm này hiện nay đã deprecated, các giá trị đó đã được override từ các khai báo trong Gradle file.
Một cách khác để cấu hình phiên bản Android SDK, chúng ta có thể vào File/Project Structure và cấu hình bằng tool như hình sau
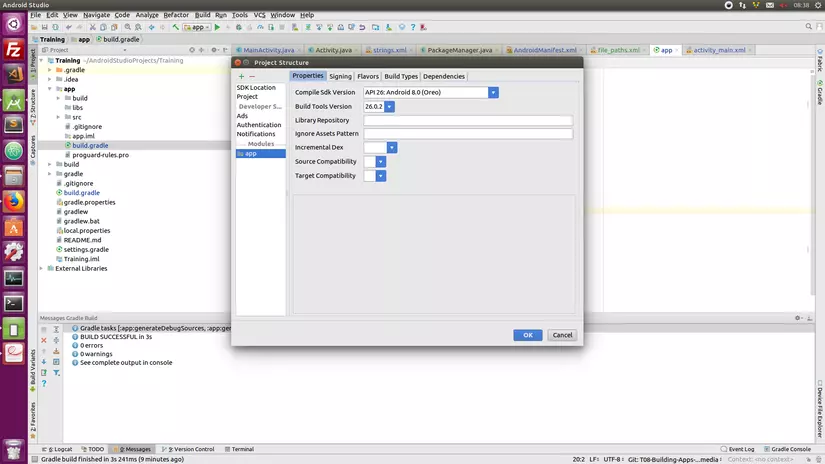
Như vậy chúng ta đã hiểu cơ bản về cách cấu hình phiên bản Android SDK cho project của mình, phần tiếp theo chúng ta sẽ tiến hành chạy Gradle.
Chạy Gradle bằng command line
Android Studio sử dụng Gradle Wrapper với câu lệnh gradlew script cho Unix và gradlew.bat script trong thư mục gốc của một Android project. Chữ w đằng sau gradle là viết tắt của wrapper nhé 
Mục đích của Gradle Wrapper là cho phép chúng ta chạy gradle mà không cần cài gradle. Wrapper sử dụng gradle-wrapper.jar và gradle-wrapper.properties files trong thư mục gradle/wrapper để thực thi. Dưới đây là ví dụ về properties files
#Tue Nov 28 08:25:32 ICT 2017
distributionBase=GRADLE_USER_HOME
distributionPath=wrapper/dists
zipStoreBase=GRADLE_USER_HOME
zipStorePath=wrapper/dists
distributionUrl=https\://services.gradle.org/distributions/gradle-4.1-all.zip
Thuộc tính distributionUrl thể hiện wrapper sẽ download và cài đặt phiên bản gradle 4.1. Sau khi download và cài đặt gradle distribution sẽ được cache tại thư mục zipStoreBase/zipStorePath. Wrapper sử dụng câu lệnh ./gradlew với hệ điều hành Unix (ubuntu) và gradlew.bat với hệ điều hành Window. Ở bài viết này mình sẽ thực hiện ví dụ trên ubuntu nhé
Chúng ta thử với câu lệnh đầu tiên ./gradlew build, ta có kêt quả như sau
> Task :app:lint
Ran lint on variant release: 2 issues found
Ran lint on variant debug: 2 issues found
Wrote HTML report to file:///home/nguyen.thanh.tuan/AndroidStudioProjects/Empty/app/build/reports/lint-results.html
Wrote XML report to file:///home/nguyen.thanh.tuan/AndroidStudioProjects/Empty/app/build/reports/lint-results.xml


BUILD SUCCESSFUL in 4s
57 actionable tasks: 57 executed
Sau khi chạy xong câu lệnh trên, tất cả compiled code sẽ được lưu lại trong thư mục app/build, file apk sẽ được generate ở thư mục app/build/output/apk.
Để xem tất cả các task hiện có, chúng ta dùng lệnh ./gradlew tasks, ta thu được kết quả ouput
> Task :tasks

------------------------------------------------------------
All tasks runnable from root project
------------------------------------------------------------

Android tasks
-------------
androidDependencies - Displays the Android dependencies of the project.
signingReport - Displays the signing info for each variant.
sourceSets - Prints out all the source sets defined in this project.

Build tasks
-----------
assemble - Assembles all variants of all applications and secondary packages.
assembleAndroidTest - Assembles all the Test applications.
assembleDebug - Assembles all Debug builds.
assembleRelease - Assembles all Release builds.
build - Assembles and tests this project.
buildDependents - Assembles and tests this project and all projects that depend on it.
buildNeeded - Assembles and tests this project and all projects it depends on.
clean - Deletes the build directory.
cleanBuildCache - Deletes the build cache directory.
compileDebugAndroidTestSources
compileDebugSources
compileDebugUnitTestSources
compileReleaseSources
compileReleaseUnitTestSources
mockableAndroidJar - Creates a version of android.jar that's suitable for unit tests.

Build Setup tasks
-----------------
init - Initializes a new Gradle build.
wrapper - Generates Gradle wrapper files.

Help tasks
----------
buildEnvironment - Displays all buildscript dependencies declared in root project 'Empty'.
components - Displays the components produced by root project 'Empty'. [incubating]
dependencies - Displays all dependencies declared in root project 'Empty'.
dependencyInsight - Displays the insight into a specific dependency in root project 'Empty'.
dependentComponents - Displays the dependent components of components in root project 'Empty'. [incubating]
help - Displays a help message.
model - Displays the configuration model of root project 'Empty'. [incubating]
projects - Displays the sub-projects of root project 'Empty'.
properties - Displays the properties of root project 'Empty'.
tasks - Displays the tasks runnable from root project 'Empty' (some of the displayed tasks may belong to subprojects).

Install tasks
-------------
installDebug - Installs the Debug build.
installDebugAndroidTest - Installs the android (on device) tests for the Debug build.
uninstallAll - Uninstall all applications.
uninstallDebug - Uninstalls the Debug build.
uninstallDebugAndroidTest - Uninstalls the android (on device) tests for the Debug build.
uninstallRelease - Uninstalls the Release build.

Verification tasks
------------------
check - Runs all checks.
connectedAndroidTest - Installs and runs instrumentation tests for all flavors on connected devices.
connectedCheck - Runs all device checks on currently connected devices.
connectedDebugAndroidTest - Installs and runs the tests for debug on connected devices.
deviceAndroidTest - Installs and runs instrumentation tests using all Device Providers.
deviceCheck - Runs all device checks using Device Providers and Test Servers.
lint - Runs lint on all variants.
lintDebug - Runs lint on the Debug build.
lintRelease - Runs lint on the Release build.
lintVitalRelease - Runs lint on just the fatal issues in the release build.
test - Run unit tests for all variants.
testDebugUnitTest - Run unit tests for the debug build.
testReleaseUnitTest - Run unit tests for the release build.

To see all tasks and more detail, run gradlew tasks --all

To see more detail about a task, run gradlew help --task <task>


BUILD SUCCESSFUL in 0s
1 actionable task: 1 executed
Ngoài ra chúng ta có thể chạy multitask bằng cách ./gradlew lint assembleDebug. Chú ý nếu bạn viết hai task cùng tên thì gradlew cũng chỉ chạy task đó một lần thôi nhé. Chúng ta có thể loại trừ một task bằng option -x, ví dụ ./gradlew assembleDebug -x lintDebug (loại trừ task lintDebug).
Chúng ta có thể viết tắt tên của task trong câu lệnh ./gradlew bằng việc cung cấp đủ ký tự để xác định được duy nhất một task đó trong tất cả task của project. Ví dụ ./gradlew androidDependencies có thể viết gọn thành ./gradlew anDep. Chú ý chúng ta cần cung cấp đủ ký tự, ví dụ sau sẽ thấy gradlew thực hiện bị lỗi ./gradlew pro, kết quả
FAILURE: Build failed with an exception.

* What went wrong:
Task 'pro' is ambiguous in root project 'Empty'. Candidates are: 'projects', 'properties'.

* Try:
Run gradlew tasks to get a list of available tasks. Run with --stacktrace option to get the stack trace. Run with --info or --debug option to get more log output.

* Get more help at https://help.gradle.org

BUILD FAILED in 0s
Như vậy 3 ký tự pro không xác định được 1 task duy nhất mà nó match với hai task là projects và properties, chúng ta chỉ cần sửa proj nếu muốn chạy task projects hoặc prop nếu muốn chạy task properties.
Chạy Gradle bằng Android Studio
Nếu không muốn sử dụng command line thì chúng ta có thể sử dụng tool trong Android Studio như hình sau
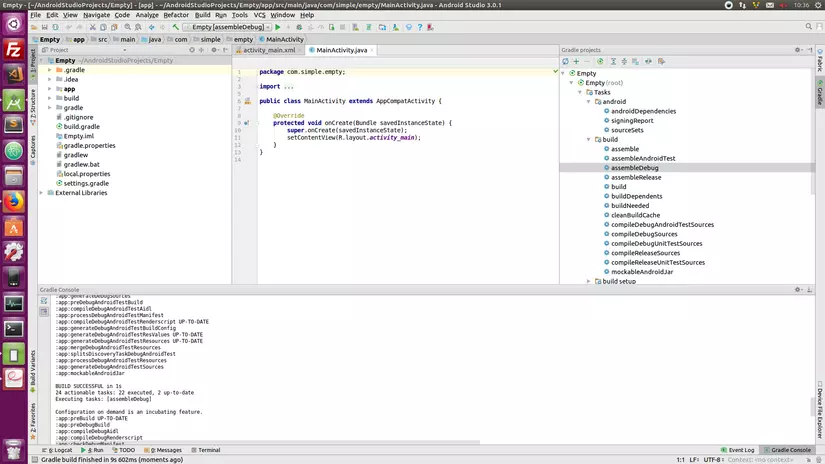
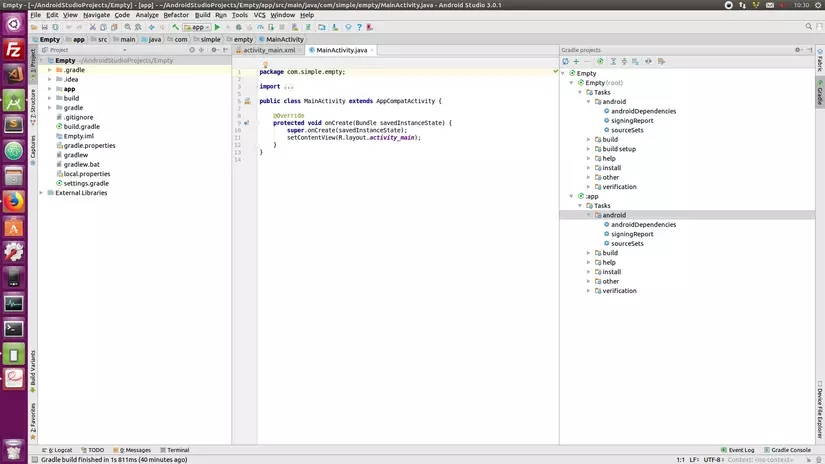 Tất cả các gradle task đã được sắp xếp thành từng nhóm ví dụ như android, build, tool, ... Để chạy một gradle task, chúng ta chỉ cần double click và task mong muốn, kết quả output vẫn sẽ xuất hiện trên Gradle Console như hình sau
Như vậy chúng ta đã biết cách cấu hình phiên bản Android SDK và 2 cách để thực hiện chạy gradle trong project Android. Ở bài viết sau, mình sẽ hướng dẫn các bạn cách để thêm các thư viện, module của bên thứ 3 vào project của mình nhé.
Cảm ơn các bạn đã đọc bài viết. Happy coding!!!
All rights reserved
