Android View initializer and click listener using Annotation and Java Reflection
Bài đăng này đã không được cập nhật trong 7 năm
Hiện nay trong Android, Data Binding được sử dụng khá rộng rãi vì nhiều tính năng của nó giúp việc coding của chúng ta nhẹ nhàng hơn. Về cơ bản Data Binding hoạt động dựa trên việc tự động sinh ra những đoạn code để map những gì mà chúng ta đã khai báo trong layout. Điều này có phần khiến mình ko thích thú cho lắm, mình muốn kiểm soát toàn bộ code của mình chứ ko phụ thuộc vào phần code được tự động sinh ra. Ngoài ra có thể chúng ta chỉ dùng một số tính năng của Data Binding, điều này gây lãng phí tài nguyên khá nhiều.
Trường hợp chúng ta hay dùng nhiều nhất chính là FindView và SetOnClick. Có thể chúng ta sẽ nghĩ đến một thư viện mà trước khi có Data Binding đc sử dụng nhiều là Butterknife. Tuy nhiên thư viện này cũng hoạt động tương tự bằng việc sinh code tự động. Các bạn có thể tham khảo bài viết về cách hoạt động của thư viện trên https://viblo.asia/p/how-butterknife-library-works-GrLZDbv35k0 .
Do đó, trong bài viết lần này, chúng ta sẽ cùng nhau xây dựng một thư viện hoặc một package nhỏ trong project để có thể FindView (thay thế findViewById()) và SetOnClick cho view một cách đơn giản mà chúng ta hoàn toàn kiểm soát được nó.
Trước hết chúng ta cần có kiến thức về Annotation và Java Reflection, các bạn có thể tham khảo tại đây: http://o7planning.org/vi/10197/huong-dan-su-dung-java-annotation .
Đầu tiên chúng ta sẽ tạo một project nhỏ tương tự như sau:
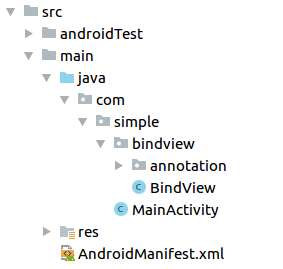
Các bạn tạo thư mục như mình hoặc tương tự nhé 
Tạo Annotation
Trong ví dụ này, chúng ta sẽ làm hai phần chính là FindView và OnClick, do đó cần tạo hai annotation tương ứng
- FindView
@Retention(RetentionPolicy.RUNTIME)
@Target(ElementType.FIELD)
public @interface FindView {
    int value();
}
- OnClick
@Retention(RetentionPolicy.RUNTIME)
@Target(ElementType.METHOD)
public @interface OnClick {
    int value();
}
- @Retention(RetentionPolicy.RUNTIME): khai báo để annotation này có thể được sử dụng khi chạy chương trình (runtime)
- @Target(ElementType.METHOD): chỉ áp dụng cho
method. - @Target(ElementType.FIELD): chỉ áp dụng cho
field.
Tạo class BindView để xử lý các Annotaion
Xử lý annotation FindView
    private static void findViews(final Object obj, Field[] fields, View rootView){
        for(final Field field : fields) {
            Annotation annotation = field.getAnnotation(FindView.class);
            if (annotation != null) {
                FindView findView = (FindView) annotation;
                int id = findView.value();
                View view = rootView.findViewById(id);
                try {
                    field.setAccessible(true);
                    field.set(obj, view);
                } catch (IllegalAccessException e) {
                    e.printStackTrace();
                }
            }
        }
    }
Như vật method trên cần 3 tham số:
objchính là đối tượng mà bao gồm cácfieldfieldchính là các trường trongobjrootViewchính là view được inflate hoặc là activity View
Để lấy được annotation từ field, chúng ta sử dụng
Annotation annotation = field.getAnnotation(FindView.class);
Vì trong tất cả các field của object, không phải field nào cũng có annotation, do đó chúng ta nên check null trước nhé
Bước tiếp theo chính là lấy giá trị của annotation và findViewById
FindView findView = (FindView) annotation;
int id = findView.value();
View view = rootView.findViewById(id);
Để xử lý được các private field, chúng ta cần
field.setAccessible(true);
Cuối cùng, chúng ta sẽ set lại field với giá trị mới là view cho object
field.set(obj, view);
Xử lý annotation OnClick
Vì phần này tương tự như xử lý trên nên mình sẽ ko giải thích chi tiết nữa nhé
private static void createOnClick(final Object obj, Method[] methods, View rootView){
        for(final Method method : methods){
            Annotation annotation = method.getAnnotation(OnClick.class);
            if(annotation != null){
                OnClick onClick = (OnClick) annotation;
                int id = onClick.value();
                View view =  rootView.findViewById(id);
                view.setOnClickListener(new View.OnClickListener() {
                    @Override
                    public void onClick(View v) {
                        try {
                            method.setAccessible(true); // xử lý private method
                            method.invoke(obj); // invoke method từ obj
                        } catch (IllegalAccessException e){
                            e.printStackTrace();
                        } catch (InvocationTargetException e){
                            e.printStackTrace();
                        }
                    }
                });
            }
        }
    }
Xây dựng các public function
Chúng ta thường gặp 2 trường hợp chính, một là activity và một loại view được inflate layout từ XML
- Activity
public static void bind(final Activity target){
        findViews(target, target.getClass().getDeclaredFields(), target.findViewById(android.R.id.content));
        createOnClick(target, target.getClass().getDeclaredMethods(), target.findViewById(android.R.id.content));
}
- Inflate view
    public static void bind(final Object obj, View promptsView){
        findViews(obj, obj.getClass().getDeclaredFields(), promptsView);
        createOnClick(obj, obj.getClass().getDeclaredMethods(), promptsView);
    }
- Để get field chúng ta dùng:
obj.getClass().getDeclaredFields() - Để get method chúng ta dùng:
obj.getClass().getDeclaredMethods() - Đối với activity thì để lấy được rootView chúng ta có thể sử dụng
findViewById(android.R.id.content)
Sử dụng BindView
- Ví dụ Activity
public class MainActivity extends AppCompatActivity {

    @FindView(R.id.text_view)
    private TextView mTextView;

    @Override
    protected void onCreate(Bundle savedInstanceState) {
        super.onCreate(savedInstanceState);
        setContentView(R.layout.activity_main);
        BindView.bind(this);
        mTextView.setText("Tuan");
    }

    @OnClick(R.id.text_view)
    private void setColor() {
        mTextView.setTextColor(Color.BLUE);
    }
}
- Ví dụ Fragment
public class MyFragment extends Fragment {

    @FindView(R.id.txtView)
    public TextView txtView;

    @Override
    public View onCreateView(LayoutInflater inflater, ViewGroup container, Bundle savedInstanceState) {
        View promptsView = inflater.inflate(R.layout.my_fragment, container, false);
        BindView.bind(this, promptsView);
        return promptsView;
    }

    @OnClick(R.id.txtView)
    public void onTextViewClick(){
        txtView.setText("textView is clicked");
    }
}
Như vậy chúng ta đã hoàn toàn xây dựng xong thư viện (hoặc package) đơn giản và ngắn gọn nhưng cũng hiệu quả của riêng mình, chúng ta hoàn toàn có thể kiểm soát được code của mình
Cảm ơn các bạn đã đọc bài viết! Happy coding!
All rights reserved
