NestJS Coding Practice: Một vài cách triển khai Comments Feature với MongoDB 📰
Bài đăng này đã không được cập nhật trong 2 năm
Đây là bài viết nằm trong Series NestJS thực chiến, các bạn có thể xem toàn bộ bài viết ở link: https://viblo.asia/s/nestjs-thuc-chien-MkNLr3kaVgA
Đặt vấn đề 📜
Comments/Đánh giá là một chức năng quan trọng và không thể thiếu với các dự án liên quan đến sự tương tác của users với hệ thống hoặc giữa các users với nhau. Tùy theo yêu cầu mà các hệ thống sẽ có cách triển khai khác nhau, ví dụ như:
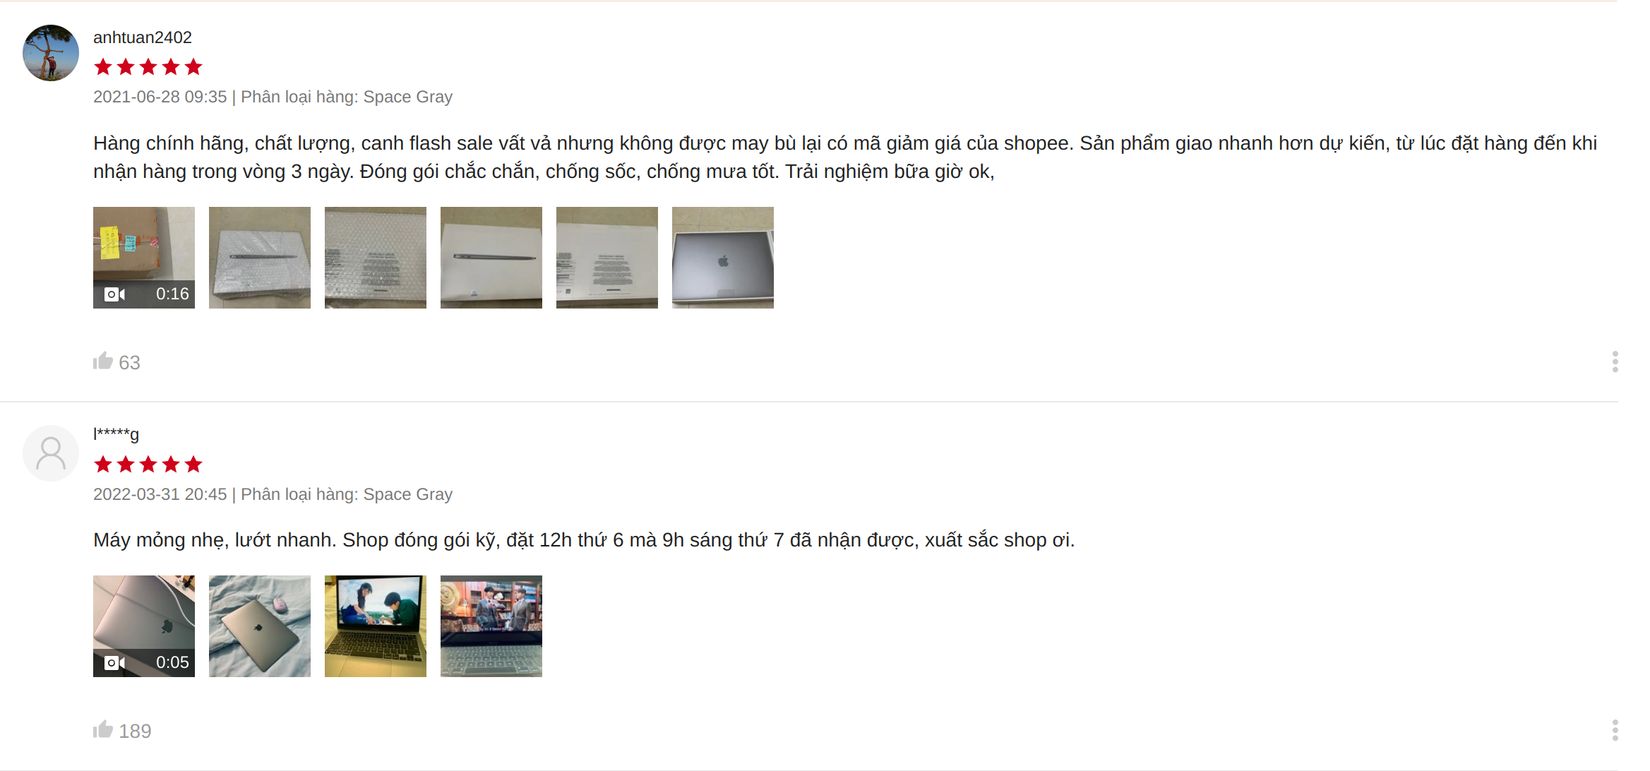
- Shopee: độ sâu 0 level, chỉ có người dùng đánh giá sản phẩm.
![image.png]()
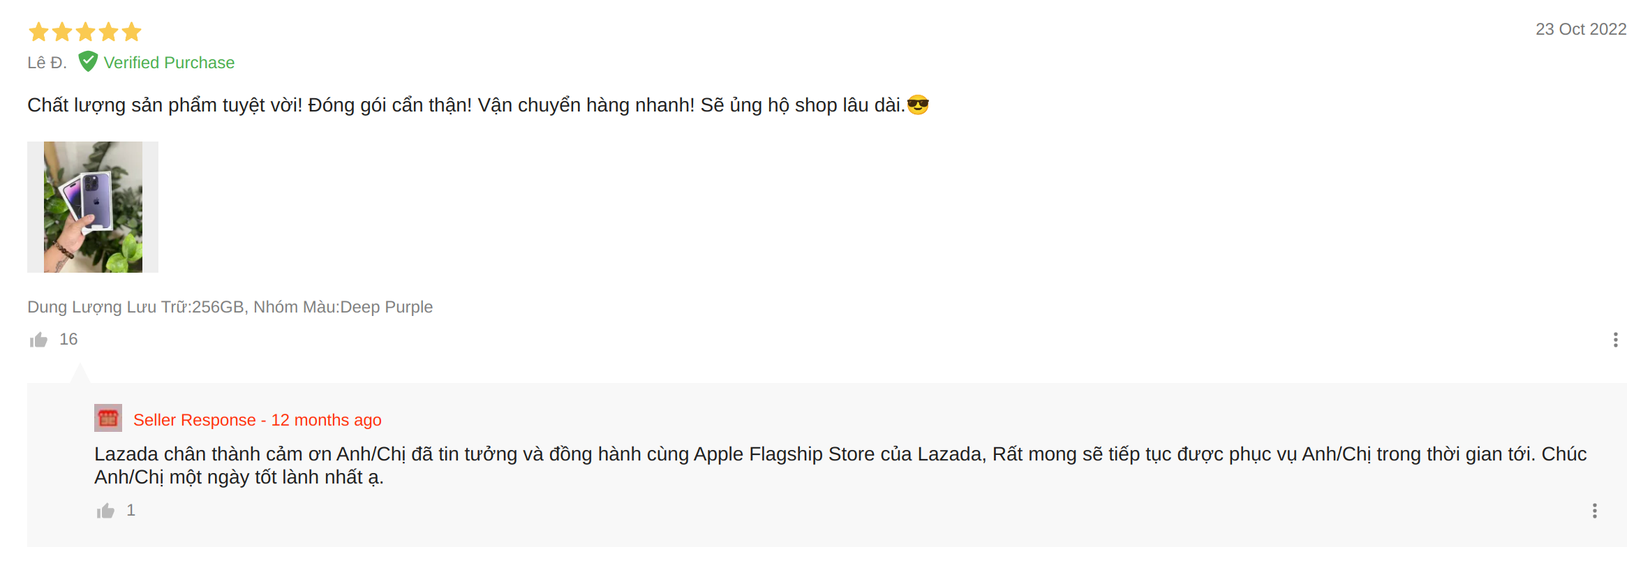
- Lazada: độ sâu 1 level, người dùng đánh giá và chủ shop có thể vào trả lời.
![image.png]()
- Facebook: độ sâu 2 level, người dùng có thể reply độ sâu tối đa là 2.
![image.png]()
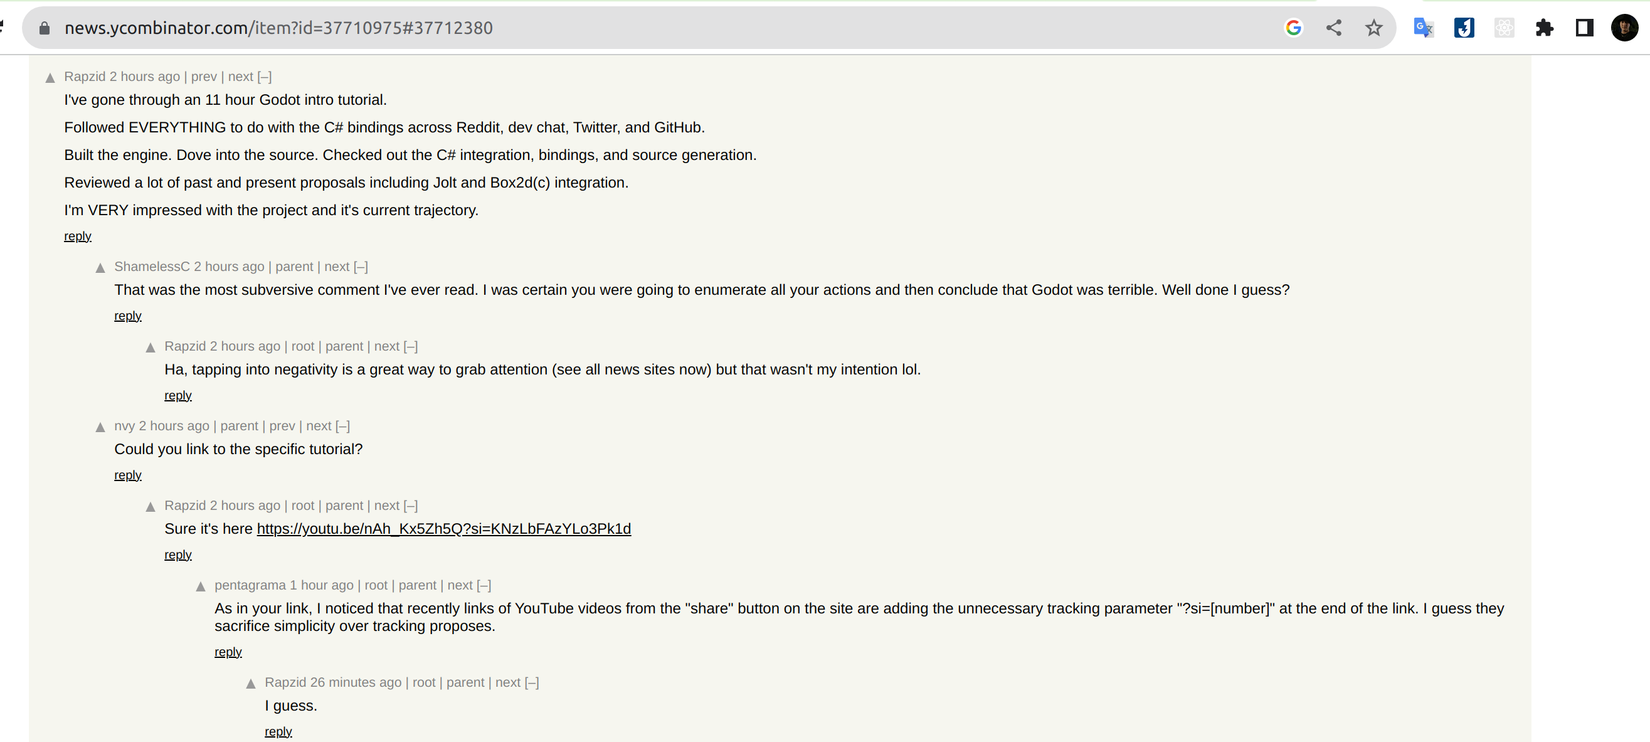
- Hacknews: độ sâu infinite, người dùng có thể reply độ sâu vô hạn.
![image.png]()

Để chọn được cách triển khai hệ thống comment phù hợp với dự án chúng ta cần xem xét nhiều yếu tố như:
- Số lượng người dùng.
- Khối lượng comment.
- Mức độ phục vụ trải nghiệm người dùng.
Cho nên tùy vào dự án mà chúng ta có cách triển khai riêng không có cách nào là tối ưu nhất. Hôm nay chúng ta sẽ cùng tìm hiểu và triển khai hệ thống comment mô phỏng theo một vài trang ở trên áp dụng vào dự án Flash Card để làm ví dụ cho những ai sau này cần implement tính năng này.
Thông tin package 📦️
- MongoDB: ^6
- NestJS: ^9.0.0
Source code:
- Comment độ sâu 1 level mức độ đơn giản
- Comment độ sâu 1 level mức độ nâng cao
- Comment độ sâu infinite level
Triển khai 🚀
Chúng ta sẽ lần lượt triển khai hệ thống comment độ sâu 1 level (Lazada) và độ sâu không giới hạn (Hacknews). Hệ thống comment 0 level như Shopee thì không quá phức tạp nên mình sẽ không đề cập tới để tránh bài viết dài dòng. Bổ sung thêm thông tin, chức năng này cho phép người dùng để lại comment trong các Flash card và Collection.
Trước tiên chúng ta sẽ dùng NestCLI để tạo module comments chung cấp folder với các module còn lại.
1. Hệ thống comment 1 level (Lazada) 1️⃣
Chúng ta sẽ cùng lần lượt triển khai theo các mức độ từ đơn giản đến phức tạp để có cái nhìn tổng quan.
- Mức độ đơn giản: số lượng người dùng không nhiều, khối lượng comment chỉ từ 1 đến 100 cho mỗi Flash card/Collection hoặc reply trong comment.
- Mức độ phức đạp: số lượng người dùng lớn, khối lượng comment có thể lên đến hàng ngàn hoặc hơn thế nữa.
Ở ví dụ của mức độ phức tạp chúng ta sẽ mở rộng thêm một tí, thay vì chỉ cho 1 người reply 1 comment như trên Lazada, chúng ta sẽ cho phép nhiều người được reply để ví dụ trực quan hơn.
Mức độ đơn giản 🔷
Khi nhắc đến comment có deep level là 1, có thể chúng ta sẽ ngay lập tức nghĩ đến cách triển khai schema như sau:
class Comment {
    _id: string;
    content: string; // Nội dung comment
    parent_id: string; // Id được reply
    created_at: Date; // Ngày comment
    created_by: User; // Người comment
    total_liked: number; // Số lượng like của comment
}
Vì hiện tại series chưa đến phần upload file nên mình sẽ không thêm attachment cho comment trong phạm vi bài viết này. Chúng ta sẽ quay lại sau khi đến bài viết đó.
Đây là cách thông dụng nhất mà mọi người hay dùng, thường được gọi là Adjacency List. Tuy nhiên đối với trường hợp này chúng ta có cách đơn giản hơn nhiều, đó là tận dụng Embeded Document trong MongoDB, giúp triển khai nhanh gọn hơn. Schema sẽ thay đổi thành dạng như bên dưới:
Schema
class Comment {
    _id: string;
    content: string; // Nội dung comment
    parent_id: string; // Id được reply
    children_ids: Array<Comment>; // Danh sách các comment reply
    created_at: Date; // Ngày comment
    created_by: User; // Người comment
    total_liked: number; // Số lượng like của comment
}
Sở dĩ chúng ta vẫn giữ parent_id để tránh trường hợp khi vừa vào trang và get comment data sẽ không phân biệt được với reply comment.
⚠️ Mức độ này mình sẽ chỉ nói ngắn gọn về cách làm chứ không đưa ra ví dụ chi tiết để tập trung vào những phần phức tạp hơn. Các bạn có thể tự triển khai để luyện tập hoặc tham khảo source code ở đây.
API tạo comment 📝
Logic của quá trình tạo comment sẽ là tạo và sau đó dùng $push để đẩy comment mới tạo vào mảng children_ids của comment được reply.
    async addReplyComment(parent_id: string, reply_id: string) {
		return await this.comment_model.findByIdAndUpdate(parent_id, {
			$push: {
				children_ids: reply_id,
			},
		});
	}
API get comments 📃
Để get comment kèm với các reply của nó, chúng ta chỉ cần dùng populate để lấy thông tin reply comments và trả về cho user.
    async findAll(filter: { target_id: string }, { offset, limit, sort_type }) {
		return await this.comments_repository.findAll(
			{
				...filter,
				parent_id: null,
			},
			{
				offset,
				limit,
				sort_type,
				populate: ['children_ids'],
			},
		);
	}
API xóa comment 🧹
Để có thể xóa comment chúng ta cần xét các trường hợp:
- TH1: Comment có reply comment bên trong.
- TH2: Comment đang reply comment khác.
- TH3: Comment không có comment reply cũng không reply comment.
Trường hợp comment đang reply comment khác thì chúng ta cần loại nó khỏi mảng để tránh khi get ra vẫn hiển thị. $pull sẽ giúp chúng ta giải quyết vấn đề này:
    async removeReplyComment(parent_id: string, reply_id: string) {
		return await this.comment_model.findByIdAndUpdate(parent_id, {
			$pull: {
				children_ids: reply_id,
			},
		});
	}

    async softDeleteMany(ids: Array<string>): Promise<boolean> {
		const response = await this.comment_model.updateMany(
			{
				_id: {
					$in: ids,
				},
			},
			{
				deleted_at: new Date(),
			},
		);

		return response.modifiedCount !== 0;
	}
Service để handle các trường hợp trên sẽ có dạng như sau:
    async remove(id: string): Promise<boolean> {
		const comment = await this.comments_repository.findOneById(id);
		if (!comment) {
			return false;
		}
        // TH1: Comment có reply comment bên trong 1️⃣
		if (comment.children_ids.length) {
			return await this.comments_repository.softDeleteMany([
				...(comment.children_ids as unknown as Array<string>),
				id,
			]);
		}
        // TH2: Comment đang reply comment khác 2️⃣
		if (comment.parent_id) {
			await this.comments_repository.removeReplyComment(
				comment.parent_id.toString(),
				id,
			);
		}
        // TH3: Comment không có comment reply cũng không reply comment 3️⃣
		return await this.comments_repository.softDelete(comment._id.toString());
	}
Mức độ phức tạp 💠
Khi số lượng người dùng tăng lên quá nhiều thì việc dùng embeded document sẽ không còn là một lựa chọn tốt vì chúng ta thì không biết trước được sẽ có tối đa bao nhiêu comment cho một Flash card. Bên cạnh đó, chúng ta cũng biết được giới hạn tối đa cho một document trong collection theo như MongoDB đưa ra là 16MB. Sẽ có 2 vấn đề có thể xảy ra:
- Dữ liệu trả về lớn dẫn đến ảnh hưởng hiệu năng.
- Lượng comment quá nhiều dẫn đến vượt quá 16MB limit.
Schema
Quay lại cách dùng Adjacency List với schema dựa theo những gì chúng ta liệt kê ở trên:
import * as mongoose from 'mongoose';
import { Prop, Schema, SchemaFactory } from '@nestjs/mongoose';

// OUTER
import { BaseEntity } from '@modules/shared/base/base.entity';
import { Collection } from '@modules/collections/entities/collection.entity';
import { FlashCard } from '@modules/flash-cards/entities/flash-card.entity';
import { User } from '@modules/users/entities/user.entity';

export enum COMMENT_TYPE {
	FLASH_CARD = 'FLASH_CARD',
	COLLECTION = 'COLLECTION',
}

export type CommentDocument = mongoose.HydratedDocument<Comment>;
@Schema({
	timestamps: {
		createdAt: 'created_at',
		updatedAt: 'updated_at',
	},
	collection: 'comments',
})
export class Comment extends BaseEntity {
	@Prop({
		type: mongoose.Types.ObjectId,
		required: true,
	})
	target_id: mongoose.Types.ObjectId | FlashCard | Collection;

	@Prop({
		enum: COMMENT_TYPE,
		required: true,
	})
	comment_type: COMMENT_TYPE;

	@Prop({
		required: true,
	})
	content: string;

	@Prop({
		type: mongoose.Types.ObjectId,
		ref: Comment.name,
	})
	parent_id: mongoose.Types.ObjectId | Comment;

	@Prop({ default: 0 })
	total_liked: number;

	@Prop({
		type: mongoose.Types.ObjectId,
		required: true,
	})
	created_by: mongoose.Types.ObjectId | User;
}

const schema = SchemaFactory.createForClass(Comment);

// 💡 Convert string sang object id trước khi lưu vào database
schema.pre('save', function (next: NextFunction) {
	if (this.parent_id) {
		this.parent_id = new mongoose.Types.ObjectId(
			this.parent_id as mongoose.Types.ObjectId,
		);
	}
	next();
});

export const CommentSchema = schema;
API tạo comment 📝
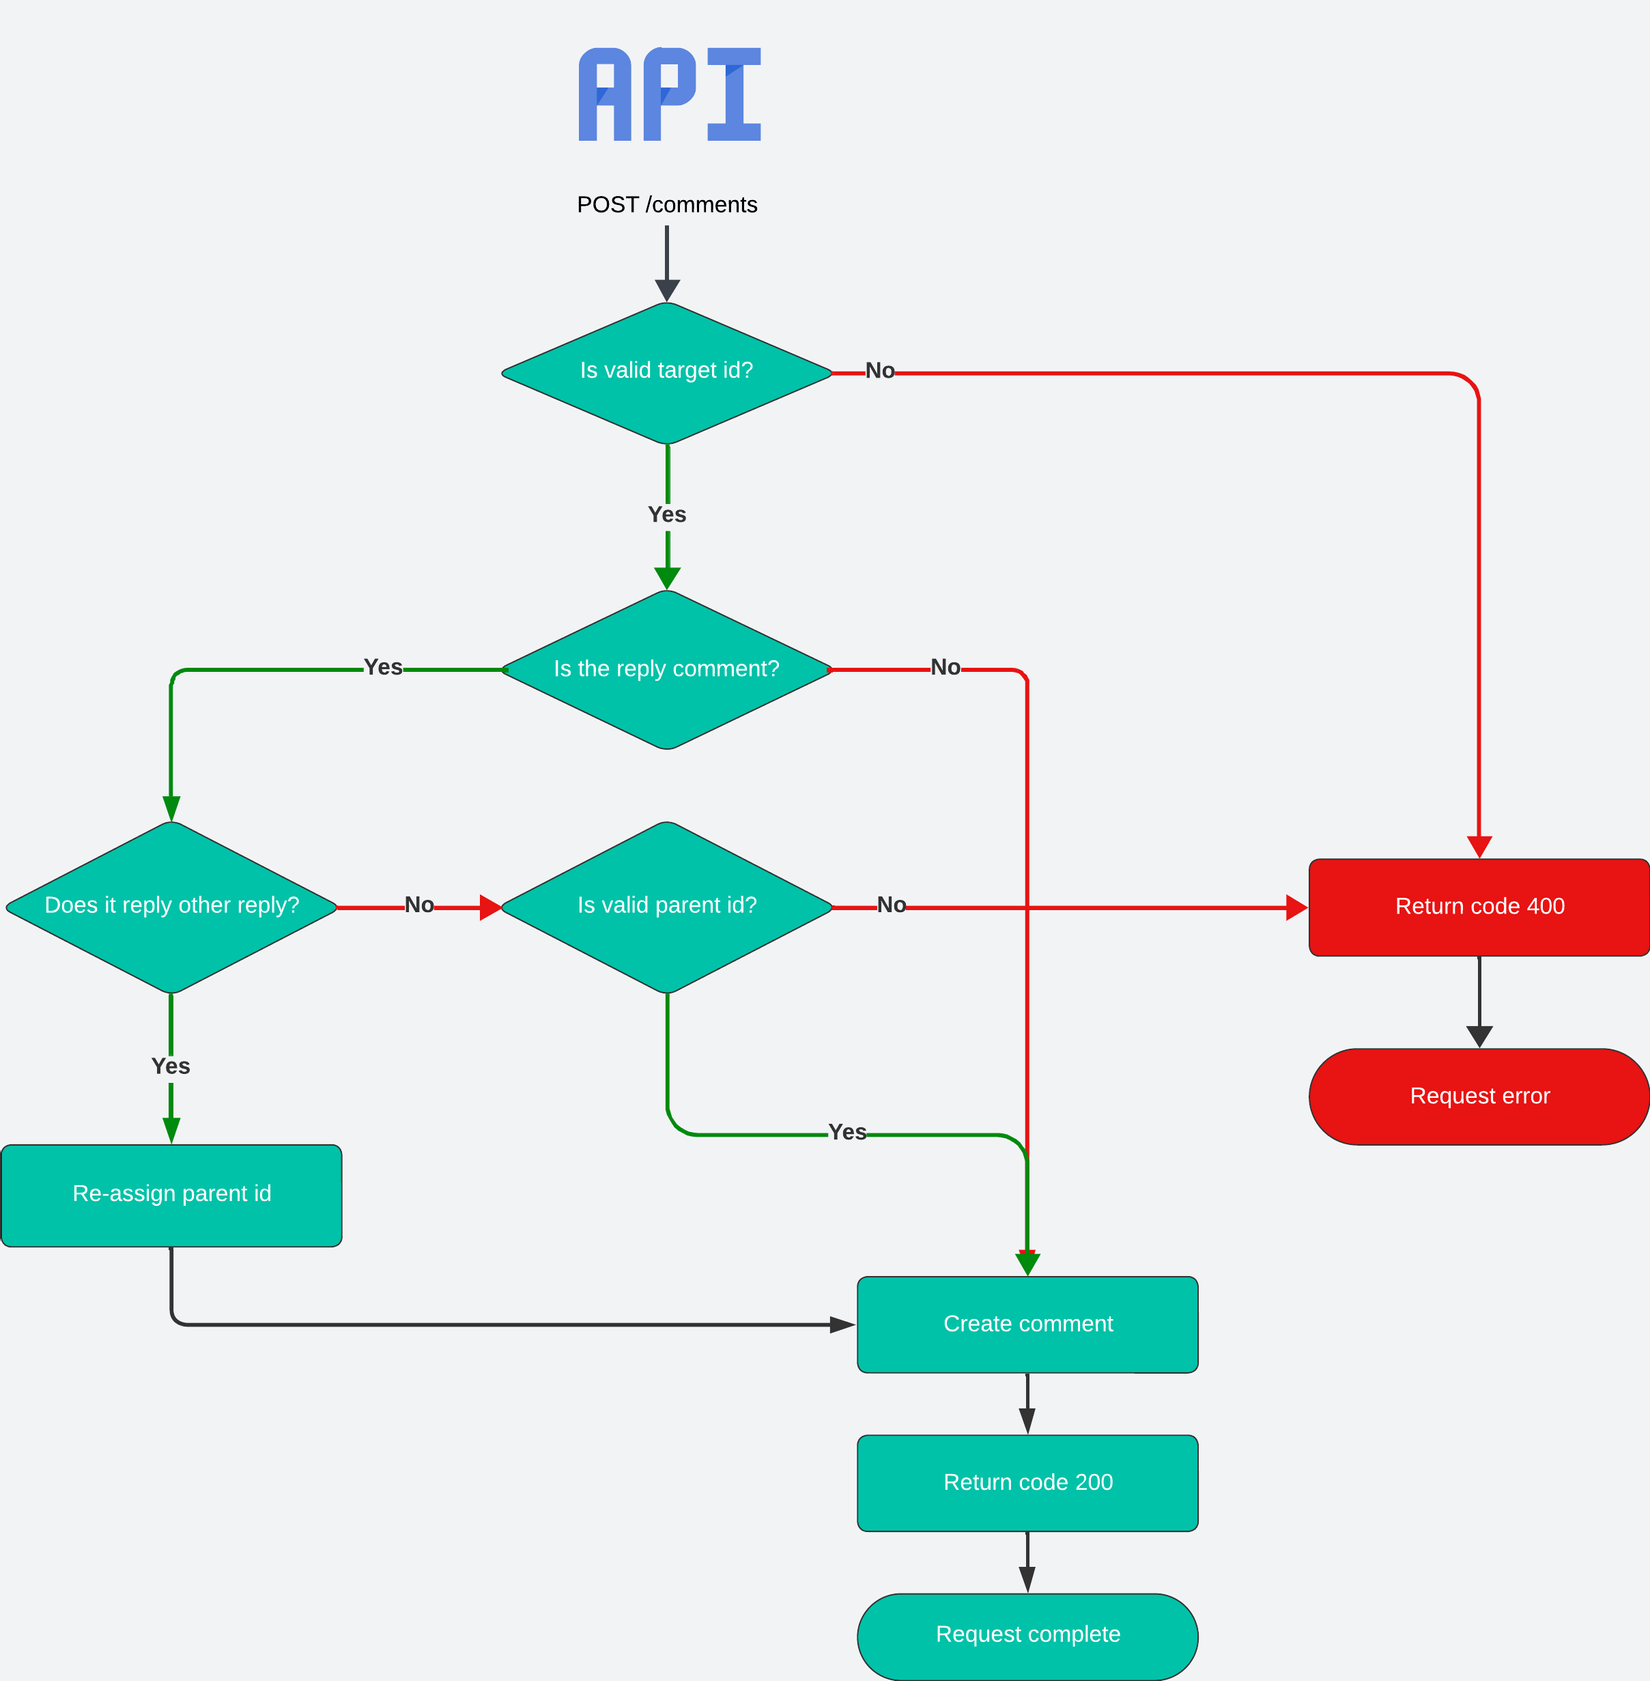
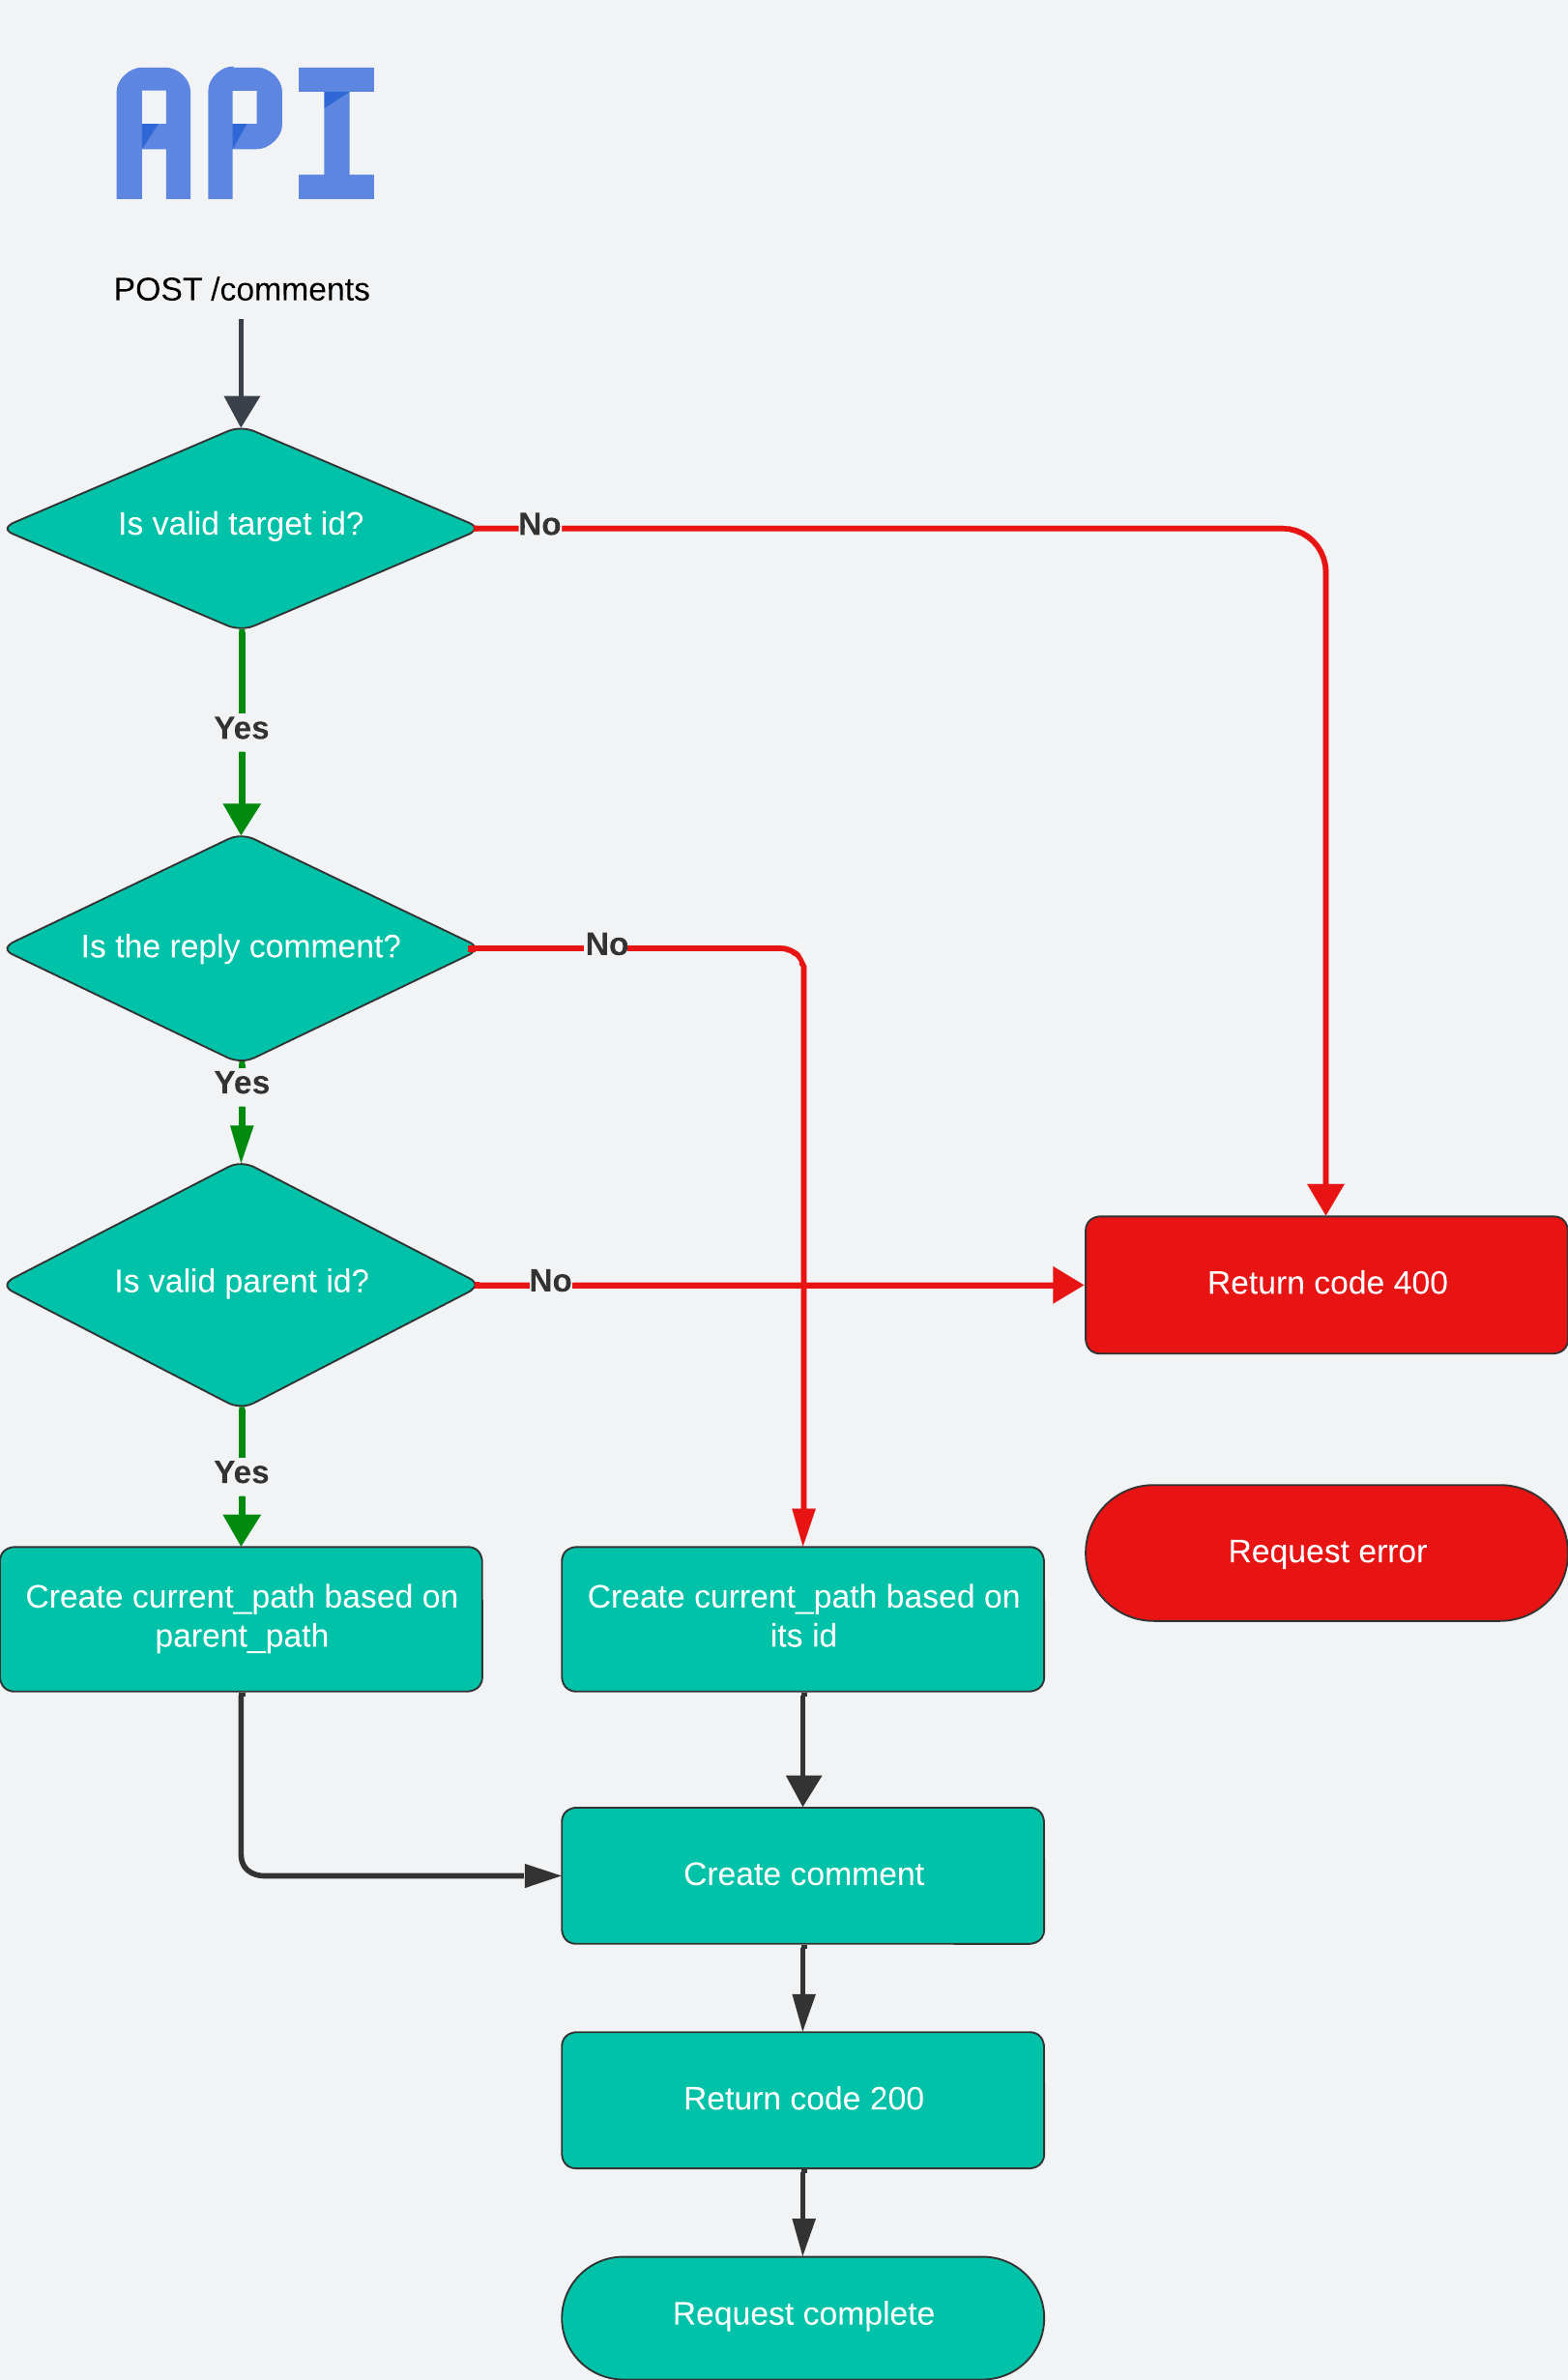
Tương tự như bài viết trước, phần này chúng ta cũng sẽ dùng TDD, nhưng ở đây mình chỉ vẽ flow, phần unit test các bạn có thể tự triển khai hoặc tải về từ source code:
Sau khi đã có schema, tiếp theo sẽ tiến hành tạo DTO và Router
import { IsEnum, IsMongoId, IsNotEmpty, IsOptional, MaxLength, MinLength } from 'class-validator';
import { COMMENT_TYPE } from '../entities/comment.entity';

export class CreateCommentDto {
	@IsNotEmpty()
	@IsMongoId()
	target_id: string;

	@IsEnum(COMMENT_TYPE) // FLASH_CARD hoặc COLLECTION
	comment_type: COMMENT_TYPE;

	@IsOptional()
	parent_id: string | null;

	@IsNotEmpty()
	@MinLength(1)
	@MaxLength(2000)
	content: string;

    created_by: string;
import { Controller,	Post, Body,	Req, UseGuards } from '@nestjs/common';
import { ApiBearerAuth, ApiTags } from '@nestjs/swagger';
// INNER
import { CommentsService } from './comments.service';
import { CreateCommentDto } from './dto/create-comment.dto';
//OUTER
import { RequestWithUser } from 'src/types/requests.type';
import { JwtAccessTokenGuard } from '@modules/auth/guards/jwt-access-token.guard';

@Controller('comments')
@ApiTags('comments')
@ApiBearerAuth('token')
export class CommentsController {
	constructor(private readonly comments_service: CommentsService) {}

	@Post()
	@UseGuards(JwtAccessTokenGuard)
	async create(
		@Req() { user }: RequestWithUser,
		@Body() create_comment_dto: CreateCommentDto,
	) {
		return await this.comments_service.create({
			...create_comment_dto,
			created_by: user._id.toString(),
		});
	}
}
Service sẽ xử lý độ sâu của comment trước khi lưu vào database. Repository thì sẽ khởi tạo tương tự các module khác (bạn nào không nhớ có thể tham khảo source code ở đây):
import { Inject, Injectable } from '@nestjs/common';
// INNER
import { CreateCommentDto } from './dto/create-comment.dto';
import { CommentsRepositoryInterface } from './interfaces/comments.interface';
import { Comment } from './entities/comment.entity';
// OUTER
import { BaseServiceAbstract } from 'src/services/base/base.abstract.service';

@Injectable()
export class CommentsService extends BaseServiceAbstract<Comment> {
	constructor(
		@Inject('CommentsRepositoryInterface')
		private readonly comments_repository: CommentsRepositoryInterface,
	) {
		super(comments_repository);
	}
    async create(create_comment_dto: CreateCommentDto) {
		const parent = await this.comments_repository.findOneById(
			create_comment_dto.parent_id,
		);
        // 📝 Chỉ cho phép comment có độ sâu 1 level vì thế chúng ta sẽ làm theo như facebook,
        // các reply cho comment đã có parent sẽ được chuyển thành con của parent đó.
		if (create_comment_dto.parent_id) {
			const parent = await this.comments_repository.findOneById(
				create_comment_dto.parent_id,
			);
			return this.comments_repository.create({
				...create_comment_dto,
				parent_id: parent.parent_id ? parent.parent_id : parent._id,
			});
		}
		return this.comments_repository.create(create_comment_dto);
	}
}
Sau khi đã config xong chúng ta sẽ gọi API để tạo một vài comment theo mẫu bên dưới để làm ví dụ:
- Comment 1
    - Comment 1.1
- Comment 2
- Comment 3
    - Comment 3.1
    - Comment 3.2
    - Comment 3.3
Kết quả sẽ tương tự như hình sau:
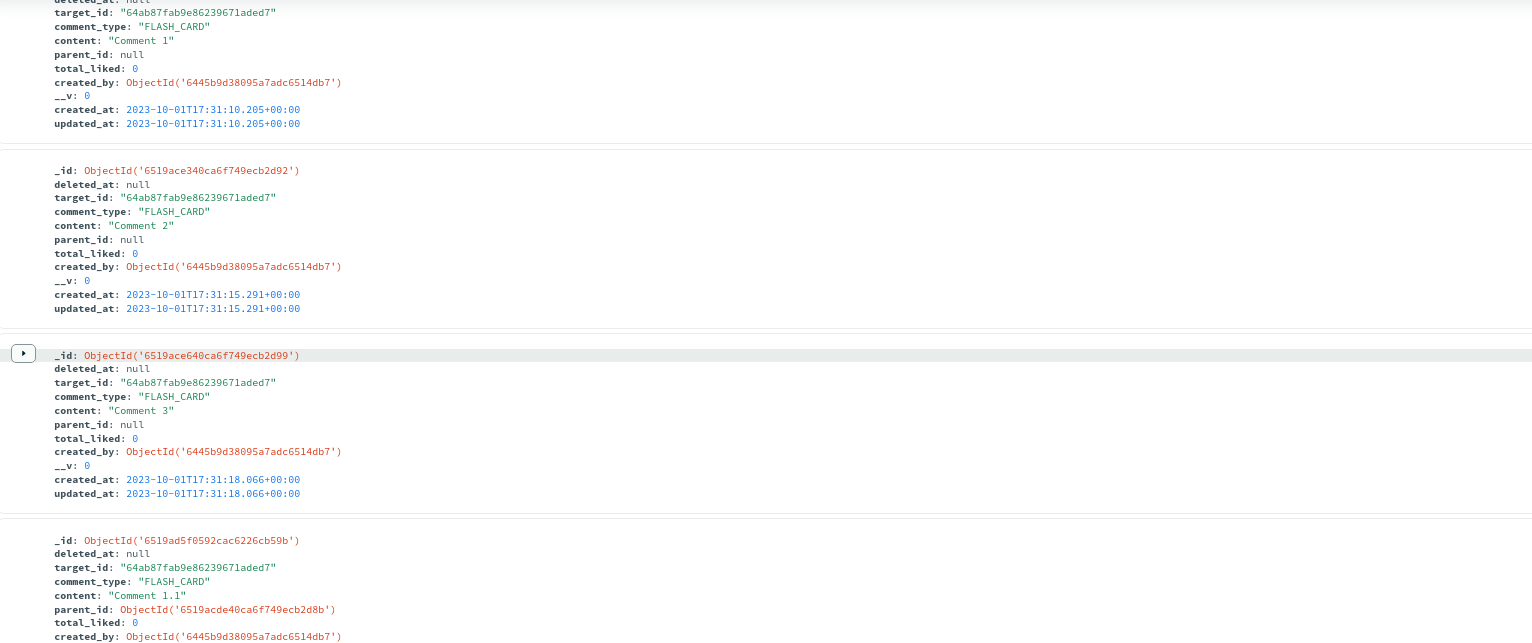
Quá trình tạo comment cho dạng này thì khá đơn giản, tiếp theo chúng ta sẽ triển khai API lấy ra các comments.
API get comments 📃
Bắt đầu bằng việc thêm route mới ở Controller, API này cũng sẽ có tham số tương tự như các API get all khác như pagination và sort:
...
export class CommentsController {
    ...
    @Get()
	async getCommentsWithHierarchy(
		@Query('target_id') target_id: string,
		@Query('offset', ParseIntPipe) offset: number,
		@Query('limit', ParseIntPipe) limit: number,
		@Query('sort_type') sort_type: SORT_TYPE,
	) {
		return this.comments_service.getCommentsWithHierarchy(
			{ target_id },
			{ offset, limit, sort_type },
		);
        ...
Nếu dự án có lượng comments lớn thì các bạn có thể xem xét dùng keyset pagination như bài trước chúng ta đã làm. Để cho đơn giản ở đây mình dùng cách thông thường.
Logic để lấy ra comments bao gồm cả các reply bên trong có nhiều cách, ở đây mình sẽ chọn cách dùng $graphLookup của MongoDB. Vì đây là feature của database engine nên chúng ta sẽ tạo method xử lí ở Repository layer nhằm tránh việc Database logic xuất hiện ở Service layer.
Trước tiên là tạo Interface:
import { BaseRepositoryInterface } from '@repositories/base/base.interface.repository';
import { Comment } from '../entities/comment.entity';
import { FindAllResponse } from 'src/types/common.type';

export interface CommentsRepositoryInterface
	extends BaseRepositoryInterface<Comment> {
	getCommentsWithHierarchy(
		filter: object,
		options: object,
	): Promise<FindAllResponse<Comment>>;
}
Giành cho bạn nào chưa đọc qua series của mình thì dự án Flash Card này đang triển khai theo hướng loose coupling nên một số thành phần sẽ có gateway. Giúp cho việc update sau này trở nên dễ dàng hơn so.
Do $graphLookup là Aggregation Pipeline nên chúng ta cần dùng aggregate. Triển khai logic như bên dưới, mình sẽ giải thích chi tiết từng stage trong comment:
import { Injectable } from '@nestjs/common';
import { InjectModel } from '@nestjs/mongoose';
import mongoose, { Model } from 'mongoose';

// INNER
import {
	Comment,
	CommentDocument,
} from '@modules/comments/entities/comment.entity';
import { CommentsRepositoryInterface } from '@modules/comments/interfaces/comments.interface';

// OUTER
import { BaseRepositoryAbstract } from './base/base.abstract.repository';
import { FindAllResponse, SORT_TYPE } from 'src/types/common.type';

@Injectable()
export class CommentRepository
	extends BaseRepositoryAbstract<CommentDocument>
	implements CommentsRepositoryInterface
{
	constructor(
		@InjectModel(Comment.name)
		private readonly comment_model: Model<CommentDocument>,
	) {
		super(comment_model);
	}
	async getCommentsWithHierarchy(
		filter: { target_id: string; parent_id: null | string },
		{
			offset,
			limit,
			sort_type,
		}: { offset: number; limit: number; sort_type: SORT_TYPE },
		limit_child = 1,
	): Promise<FindAllResponse<Comment>> {
		console.log(sort_type);
		const response = await this.comment_model.aggregate<{
			items: object;
			count: { total: number };
		}>([
			{
                // Lọc ra các comment thuộc target và search theo input nếu có
				$match: {
					...filter,
					target_id: new mongoose.Types.ObjectId(filter.target_id),
				},
			},
			{
                // Sắp xếp lại comment
				$sort: {
					created_at: sort_type === SORT_TYPE.DESC ? -1 : 1,
				},
			},
			{
                // Chia ra làm 2 phần: 1 phần để count tổng số comment, 1 phần để get comments
				$facet: {
					count: [
                        // Đếm tổng số comment và lưu vào biến `total`
						{
							$count: 'total',
						},
					],
					items: [
						{
                            // Pagination skip
							$skip: offset,
						},
						{
							$limit: limit,
						},
						// Find reply comment
						{
                            // GraphLookup giúp chúng ta lấy ra tất cả các con của document
							$graphLookup: {
								from: 'comments', // Tìm trong `comments` collection
								startWith: '$_id',
								connectFromField: '_id', // Khai báo field để khi parent tìm tới sẽ lấy ra so sánh
								connectToField: 'parent_id', // Khai báo field dùng so sánh để tìm các children
								maxDepth: 0, // Độ sâu mà chúng ta cần lấy dữ liệu, ví dụ ở đây đang lấy reply comment độ sâu level 1
								as: 'replies', // Khai báo tên field để thêm vào các children
							},
						},
						{
                            // Loại bỏ 1 vài field không cần thiết
							$project: {
								content: 1,
								created_by: 1,
								total_liked: 1,
								created_at: 1,
                                // Ở đây logic của chúng ta là lấy ra 5 children gần nhất,
                                // khi muốn lấy thêm thì sẽ gọi API tương tự như cách facebook làm.
                                // `$sort` và `$slice` là sự kết hợp hiệu quả cho yêu cầu này
								replies: {
                                    // Sau khi có được kết quả sort từ `$sortArray` chúng ta dùng `$slice` cắt bỏ các document còn lại
									$slice: [
										{
                                            // Vì các children tìm được không theo thứ tự nên chúng ta cần sort trước
											$sortArray: {
												input: '$replies',
												sortBy: { created_at: -1 },
											},
										},
                                        // Control số lượng children hiển thị, mặc định ở trên mình set là 1
										limit_child,
									],
								},
                                // Vì đã cắt bớt children nên khi trả về FE không biết comment đó còn có các reply khác hay không
                                // vì thế chúng ta sẽ tạo thêm field và dùng `$size` để đếm tổng số reply.
								total_replies: {
									$size: '$replies',
								},
							},
						},
						{
                            // Vì hiện tại `created_by` chỉ là id nên chúng ta cần `$lookup` để lấy thêm thông tin
							$lookup: {
								from: 'users',
								localField: 'created_by',
								foreignField: '_id',
								pipeline: [
									{
										$project: {
											first_name: 1,
											last_name: 1,
											email: 1,
											avatar: 1,
										},
									},
								],
								as: 'created_by',
							},
						},
						{
                            // Chúng ta cũng cần thêm thông tin cho `created_by` trong reply vì thế
                            // cần phải dùng `$unwind` để tách mảng `replies` ra
							$unwind: {
								path: '$replies',
								preserveNullAndEmptyArrays: true,
							},
						},
                        {
							// Loại bỏ các reply comment đã bị xóa
							$match: {
								'replies.deleted_at': null,
							},
						},
						{
                            // Tương tự như trên sẽ lookup theo `created_by` bên trong `replies`
							$lookup: {
								from: 'users',
								localField: 'replies.created_by',
								foreignField: '_id',
								pipeline: [
									{
										$project: {
											first_name: 1,
											last_name: 1,
											email: 1,
											avatar: 1,
										},
									},
								],
								as: 'replies.created_by',
							},
						},
						{
                            // Sau khi đã thêm thông tin chúng ta cần gộp lại như ban đầu
                            // theo cấu trúc comment chứa mảng replies
							$group: {
								_id: '$_id',
								content: {
									$first: '$content',
								},
								created_by: {
									$first: {
                                        // Kết quả của quá trình lookup trước là array nên chúng ta phải đưa về dạng object
										$arrayElemAt: ['$created_by', 0],
									},
								},
								created_at: {
									$first: '$created_at',
								},
								total_replies: {
									$first: '$total_replies',
								},
								total_liked: {
									$first: '$total_liked',
								},
								replies: {
                                    // Dùng `$push` để push các children lại vào trong mảng replies
									$push: {
                                        // Kết quả của `$lookup` là array nên chúng ta cần đưa về object,
                                        // Thông thường sẽ dùng `$unwind` nhưng ở đây mình dùng `$mergeObject` và
                                        // `$arrayElemAt` để đỡ phải tách ra 2 stage
										$mergeObjects: [
											'$replies',
											{
												created_by: {
													$arrayElemAt: ['$replies.created_by', 0],
												},
											},
										],
									},
								},
							},
						},
						{
                            // Quá trình unwind ở trên làm cho thứ tự bị xáo trộn nên chúng ta cần sort lại
							$sort: {
								created_at: sort_type === SORT_TYPE.DESC ? -1 : 1,
							},
						},
					],
				},
			},
			{
                // Kết quả của `$count` ở trên là array nên mình sẽ đưa về object cho dễ nhìn
				$unwind: {
					path: '$count',
				},
			},
		]);

		return {
			items: (response[0]?.items as Array<Comment>) || [],
			count: response[0]?.count.total || 0,
		};
	}
}
Mặc dù dùng Aggregate pipeline khi nhìn vào thì code hơi dài dòng, nhưng logic sẽ được phân chia theo từng stage riêng biệt giúp chúng ta dễ dàng control data hơn. Chúng ta sẽ thử gọi API để kiểm tra kết quả, đầu tiên là lấy ra comments của Flash card:
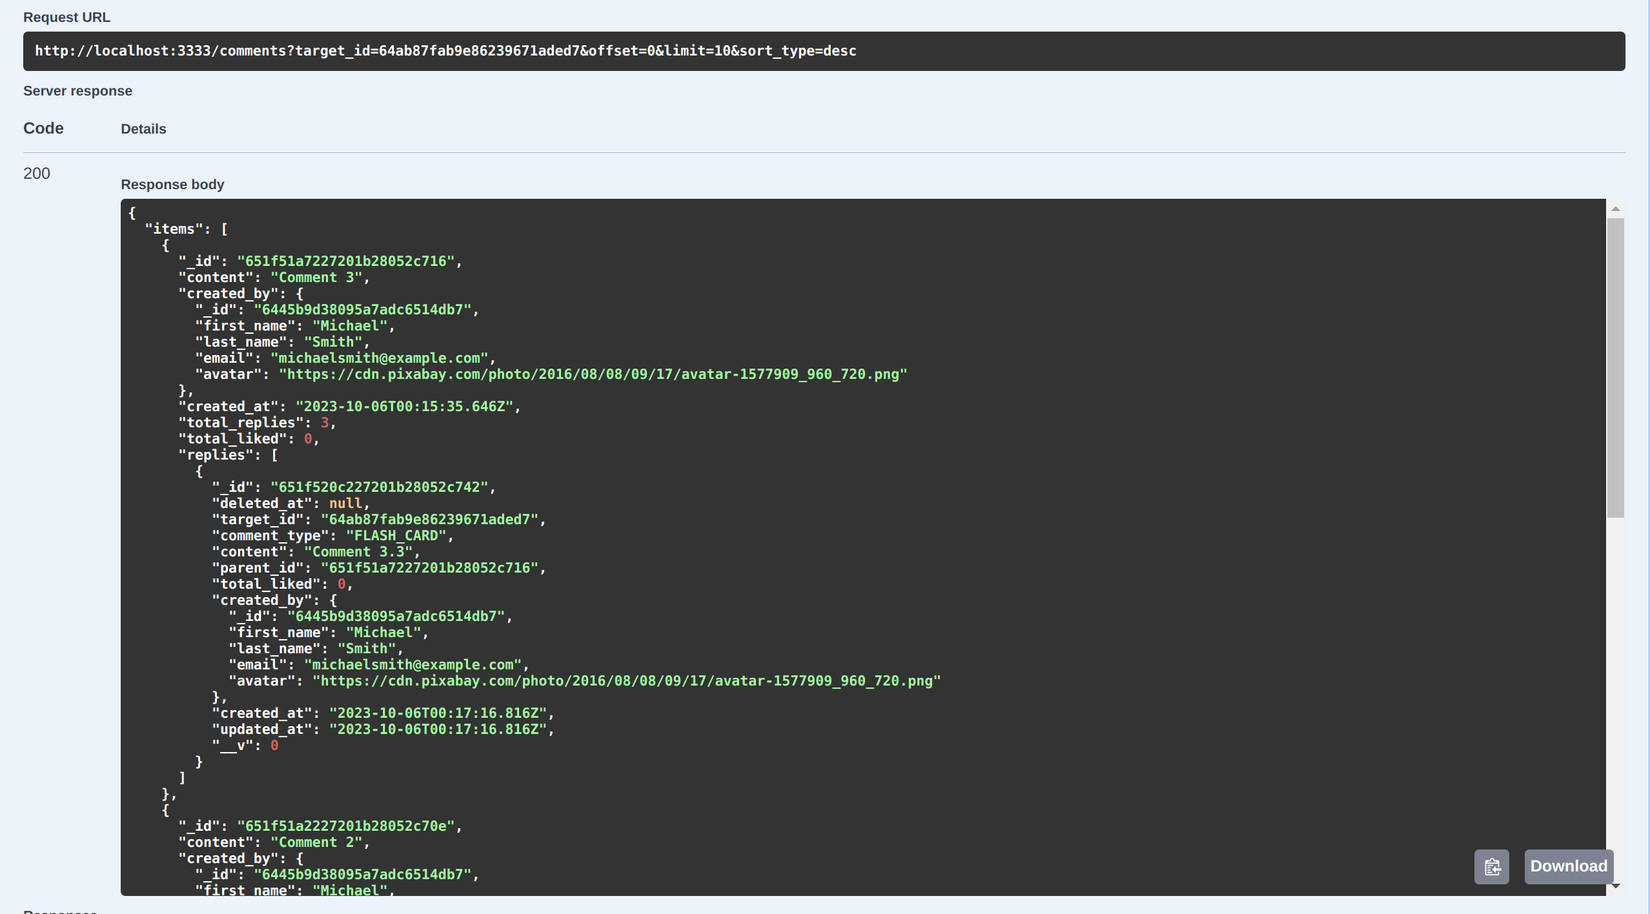
Có thể thấy do chúng ta set limit_child=1 để giới hạn số reply comment trả về nên trong field replies chỉ có 1 phần tử, vậy làm thế nào để fetch các reply còn lại. Chúng ta cùng đến với API get comment thứ 2: lấy các reply comments tiếp theo:
...
export class CommentController {
    ...
    @Get(':comment_id')
	@ApiOperation({
		summary: 'Get more sub comments of specific comment',
	})
	@ApiDocsPagination(Comment.name)
	@ApiQuery({
		name: 'sort_type',
		required: false,
		enum: SORT_TYPE,
	})
	async getMoreSubComments(
		@Param('comment_id', ParseMongoIdPipe) comment_id: string,
		@Query('offset', ParseIntPipe) offset: number,
		@Query('limit', ParseIntPipe) limit: number,
		@Query('sort_type') sort_type: SORT_TYPE,
	) {
		return this.comments_service.findAll(
			{
				parent_id: comment_id,
			},
			{
				offset,
				limit,
				sort_type,
			},
		);
    ...
Tiếp tục ví dụ ở trên, chúng ta sẽ lấy tiếp các reply comment của Comment 3 và ngoại trừ Comment 3.1:

Chúng ta sẽ dùng param offset để skip qua các comments đã được hiển thị, kết hợp với limit sẽ giúp chúng ta control được số lượng comments khi fetch more.
Vậy là chúng ta đã viết xong chức năng comment với độ sâu 1 level như của Lazada. Bên cạnh đó chúng ta cũng cải tiến thêm bằng cách cho phép nhiều người cùng reply 1 comment. Việc hiển thị cũng được chúng ta tối ưu bằng cách chỉ hiển thị một phần các comment reply và sẽ fetch tiếp khi và chỉ khi user muốn.
2. Hệ thống comment infinite level (Hacknews)
Chúng ta cùng đến với cách triển khai thứ 2, khi mà dự án yêu cầu cho phép user comment với độ sâu không giới hạn. Với trường hợp này chúng ta sẽ có nhiều cách giải quyết, một số giải thuật có thể kể đến như:
- Adjacency List
- Path Enumeration
- Nested Sets
- Closure Table
Chúng ta sẽ chọn Path Enumeration để triển khai cho phần này vì theo mình thấy dễ triển khai nhất. Giải thích đơn giản thì Path Enumeration sẽ lưu thêm path chứa đường dẫn từ comment cha đầu tiên cho đến comment reply hiện tại. Cùng xem table dưới để hiểu rõ hơn:
| comment_id | current_path | created_by | content |
|---|---|---|---|
| 1 | 1 | A | Comment 1 |
| 2 | 1/2 | B | Comment 1.1 |
| 3 | 1/2/3 | C | Comment 1.1.1 |
| 4 | 1/2/3/4 | D | Comment 1.1.1.1 |
| 5 | 5 | E | Comment 2 |
| 6 | 6 | F | Comment 3 |
| 7 | 5/7 | G | Comment 2.1 |
Schema
Schema của chúng ta sẽ có dạng như bên dưới:
...
export class Comment extends BaseEntity {
	@Prop({	type: mongoose.Types.ObjectId, required: true })
	target_id: mongoose.Types.ObjectId | FlashCard | Collection;

	@Prop({	enum: COMMENT_TYPE,	required: true })
	comment_type: COMMENT_TYPE;

	@Prop({	required: true })
	content: string;

	@Prop({	type: mongoose.Types.ObjectId, ref: Comment.name })
	parent_id: mongoose.Types.ObjectId | Comment;

	@Prop({	required: true	})
	current_path: string;

    @Prop({ default: 0 })
	total_liked: number;

	@Prop({	type: mongoose.Types.ObjectId, required: true })
	created_by: mongoose.Types.ObjectId | User;
}
...
API tạo comment 📝
Nội dung của API tạo comment sẽ không khác với trường hợp độ sâu 1 level ở Controller và DTO, chúng ta sẽ chỉ cập nhật lại logic ở Service:
...
export class CommentsService extends BaseServiceAbstract<Comment> {
    ...
    override async create(create_comment_dto: CreateCommentDto) {
		const target: FlashCard | Collection =
			create_comment_dto.comment_type === COMMENT_TYPE.FLASH_CARD
				? await this.flash_cards_service.findOne(create_comment_dto.target_id)
				: await this.collections_service.findOne(create_comment_dto.target_id);
		let parent_id = null, parent_path = null;

        if (create_comment_dto.parent_id) {
			const parent = await this.comments_repository.findOneById(
				create_comment_dto.parent_id,
			);
			if (!parent) throw new BadRequestException();
			parent_id = parent._id;
			parent_path = parent.current_path;
		}
		return this.comments_repository.create({
			...create_comment_dto,
			target_id: target._id,
			parent_id,
			parent_path,
		});
	}
}
...
Giải thích: chúng ta sẽ kiểm tra xem comment được tạo có phải là reply comment không. Nếu đúng thì sẽ tìm ra comment được reply để lấy thông tin về current_path gửi đến cho method ở repository. Nếu không thì gửi giá trị mặc định là null.
Repository sẽ là method chính xử lý logic của Path Enumeration:
...
export class CommentRepository extends BaseRepositoryAbstract<CommentDocument>
	implements CommentsRepositoryInterface {
    ...
    override async create(dto: CreateCommentDto) {
		const created_comment = await this.comment_model.create(dto);
        // ⏬ Tạo path từ parent_path
		created_comment.current_path = `${dto.parent_path || ','}${
			created_comment._id
		},`;
		return await created_comment.save();
	}
...
Giải thích:
- Chúng ta sẽ lấy
_idcủa Mongo để dùng luôn cho tiện hoặc các bạn có thể tạo 1 field khác dùng short id hoặc integer cho ngắn hơn. - Phân cách giữa các
_idmình sẽ dùng,thay vì/với mục đích lát nữa khi get comments dùng regex đỡ rườm rà. - Nếu không phải là comment reply sẽ có dạng
,651f7c4170390fdb259bf7dc,, ngược lại sẽ lấycurrent_pathtừ parent kết hợp với_idcủa nó trở thành,651f7c4170390fdb259bf7dc,651f7cfc88ea65894fc7dbb5,.
Có thể các bạn sẽ suy nghĩ nên để logic tạo
current_pathở Service layer vì phần này không liên quan tới Database logic thì các bạn đã nghĩ đúng rồi. Ở đây do mình cần dùng_idcủa nó để tạo nên buộc phải tạo trước để lấy_idnên mình để luôn ở Repository layer. Nếu dùng field khác tự tạo thay cho_idthì nên đặt ở Service layer sẽ hợp lý hơn.
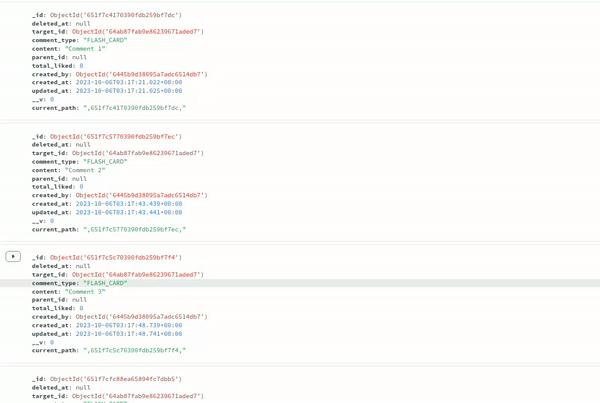
Tiến hành tạo comment theo cấu trúc sau và xem kết quả được lưu trong database:
- Comment 1
    - Comment 1.1
- Comment 2
- Comment 3
    - Comment 3.1
        - Comment 3.1.1
            - Comment 3.1.1.1
            - Comment 3.1.1.2
            - Comment 3.1.1.3
        - Comment 3.1.2
    - Comment 3.2
    - Comment 3.3
- Comment 4
Đây là kết quả của mình sau khi tạo:
API get comments 📃
Sau khi đã tạo xong comment, giờ chúng ta đã có thể triển khai API để lấy comments. Logic sẽ không còn đơn giản như các trường hợp trước, lần này chúng ta sẽ phải dùng tới $regex để hỗ trợ. Trước tiên chúng ta sẽ defind route và param ở Controller:
...
export class CommentsController {
    ...
    @Get()
	@ApiOperation({
		summary: 'Get comments of specific flash card/collection with pagination',
	})
	@ApiDocsPagination(Comment.name)
	@ApiQuery({
		name: 'sort_type',
		required: false,
		enum: SORT_TYPE,
	})
	findAll(
		@Query('target_id', ParseMongoIdPipe) target_id: string,
		@Query('offset', ParseIntPipe) offset: number,
		@Query('limit', ParseIntPipe) limit: number,
		@Query('sort_type') sort_type: SORT_TYPE,
		@Query('including_children', ParseBoolPipe) including_children: boolean,
	) {
		return this.comments_service.findAll(
			{ target_id },
			{ offset, limit, sort_type, including_children },
		);
	}
Giải thích: param sẽ không có gì khác, chỉ có thể including_children giúp linh động trong việc trả về sub-comments.
...
export class CommentsService extends BaseServiceAbstract<Comment> {
    ...
    override async findAll(
		filter: { target_id: string },
		{ offset, limit, sort_type, including_children },
	) {
		const comments_reponse = await this.comments_repository.findAll(
			{
				...filter,
				parent_id: null,
			},
			{
				skip: offset,
				limit,
				sort: {
					created_at: sort_type,
				},
			},
		);

		if (!including_children) {
			return comments_reponse;
		}

        // Sau khi đã có comments tiếp tục tìm sub-comments của từng comment
		const comments_with_children = await Promise.all(
			comments_reponse.items.map(async (comment) => ({
				...JSON.parse(JSON.stringify(comment)),
				children: await this.getAllSubComments({
					target_id: filter.target_id,
					parent_id: comment._id.toString(),
				}),
			})),
		);
		return {
			count: comments_reponse.count,
			items: comments_with_children.flat(),
		};
	}

	async getAllSubComments(
		filter: { target_id: string; parent_id: string },
		deep_level?: number,
	) {
		return await this.comments_repository.getAllSubComments(filter, deep_level);
	}
Như đã nói ở trên, nếu như including_children=false thì chúng ta sẽ trả về comments mà không cần quan tâm sub-comments. Ngược lại chúng ta sẽ phải gọi để tìm sub-comments, và vì $regex là feature của MongoDB nên phải triển khai ở Repository layer (các bạn define method trong CommentsRepositoryInterface giúp mình).
...
export class CommentRepository extends BaseRepositoryAbstract<CommentDocument>
	implements CommentsRepositoryInterface {
    ...
    async getAllSubComments(
		filter: {
			target_id: string;
			parent_id: string;
		},
		deep_level: number, // Độ sâu cần lấy
	): Promise<Array<Comment>> {
		return await this.comment_model.find({
			target_id: filter.target_id,
            deleted_at: null,
			current_path: {
				$regex: new RegExp(
					`${filter.parent_id}(,[^,]*){1,${deep_level ?? ''}},$`,
				),
				$options: 'i',

			},
		});
	}
    ...
Giải thích:
- Giờ là lúc Path Enumeration phát huy tác dụng: field
current_pathđược dùng để tìm các sub-comments với$regex. - Ý nghĩa của đoạn regex:
${filter.parent_id}: phải chứa parent_id(,[^,]*): đây là nhóm regex trong đó:,: theo sau parent_id là dấu,[^,]*: bất kỳ chuỗi ký tự nào không chứa dấu,
{1,${deep_level ?? ''}}: nhóm(,[^,]*)có thể xuất hiện từ 1 đếndeep_levellần (nếudeep_levelkhông được truyền vào sẽ lấy không giới hạn),$: kết thúc bằng dấu,. Không được bỏ cái này nếu không sẽ xảy ra duplicate hoặc lấy theodeep_levelkhông hoạt động.
Mọi thứ đã đầy đủ, giờ chúng ta có thể gọi để kiếm tra kết quả:
Từ hình trên thấy được chúng ta đã lấy được comments cùng với tất cả các reply bất kể ở độ sâu nào. Chúng ta sẽ tận dụng method getAllSubComments để tạo ra thêm API lấy tất cả reply comments của một comment cụ thể:
...
export class CommentsController {
    ...
    @Get(':comment_id')
	@ApiOperation({
		summary: 'Get all sub comments of specific comments',
	})
	@ApiQuery({
		name: 'deep_level',
		required: false,
		example: 2,
	})
	async getAllSubComments(
		@Param('comment_id', ParseMongoIdPipe) comment_id: string,
		@Query('target_id', ParseMongoIdPipe) target_id: string,
		@Query('deep_level') deep_level: number,
	) {
		return this.comments_service.getAllSubComments(
			{
				target_id,
				parent_id: comment_id,
			},
			deep_level,
		);
	}
...
export class CommentsService extends BaseServiceAbstract<Comment> {
    ...
    async getAllSubComments(
		filter: { target_id: string; parent_id: string },
		deep_level?: number,
	) {
		return await this.comments_repository.getAllSubComments(filter, deep_level);
	}
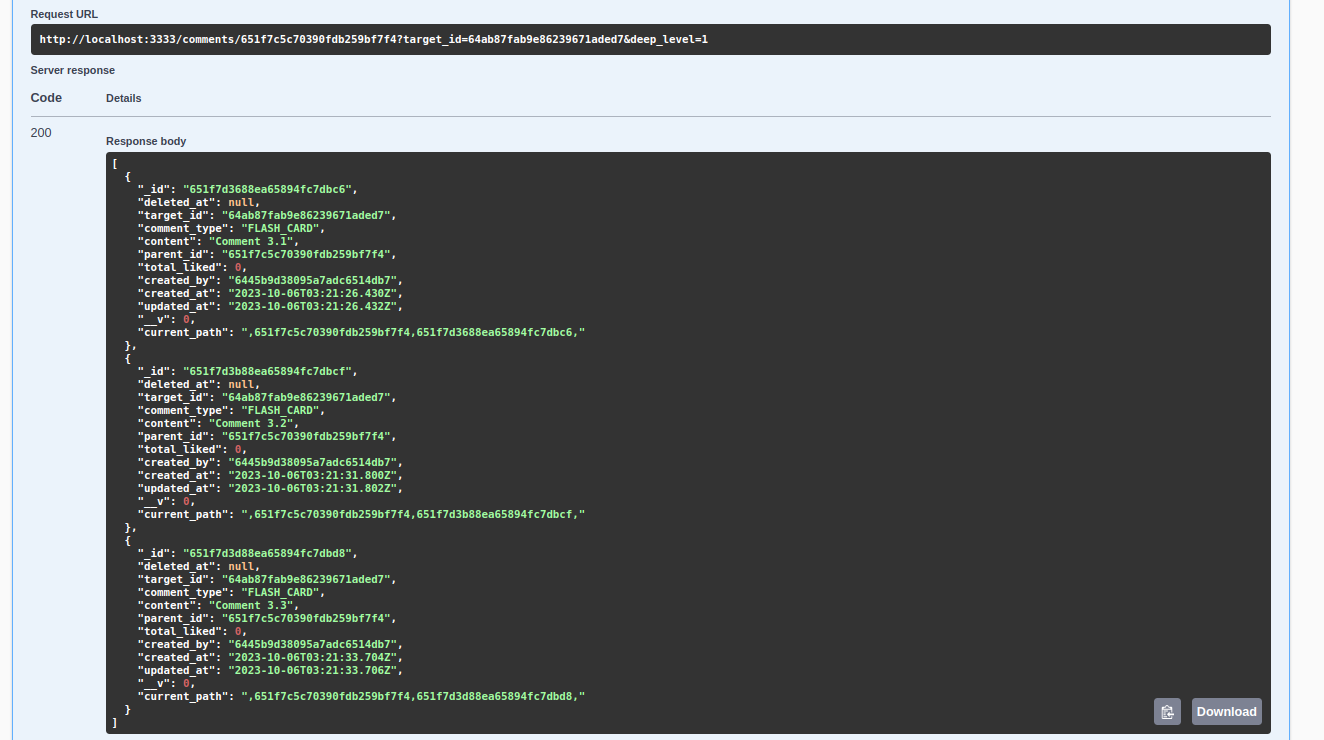
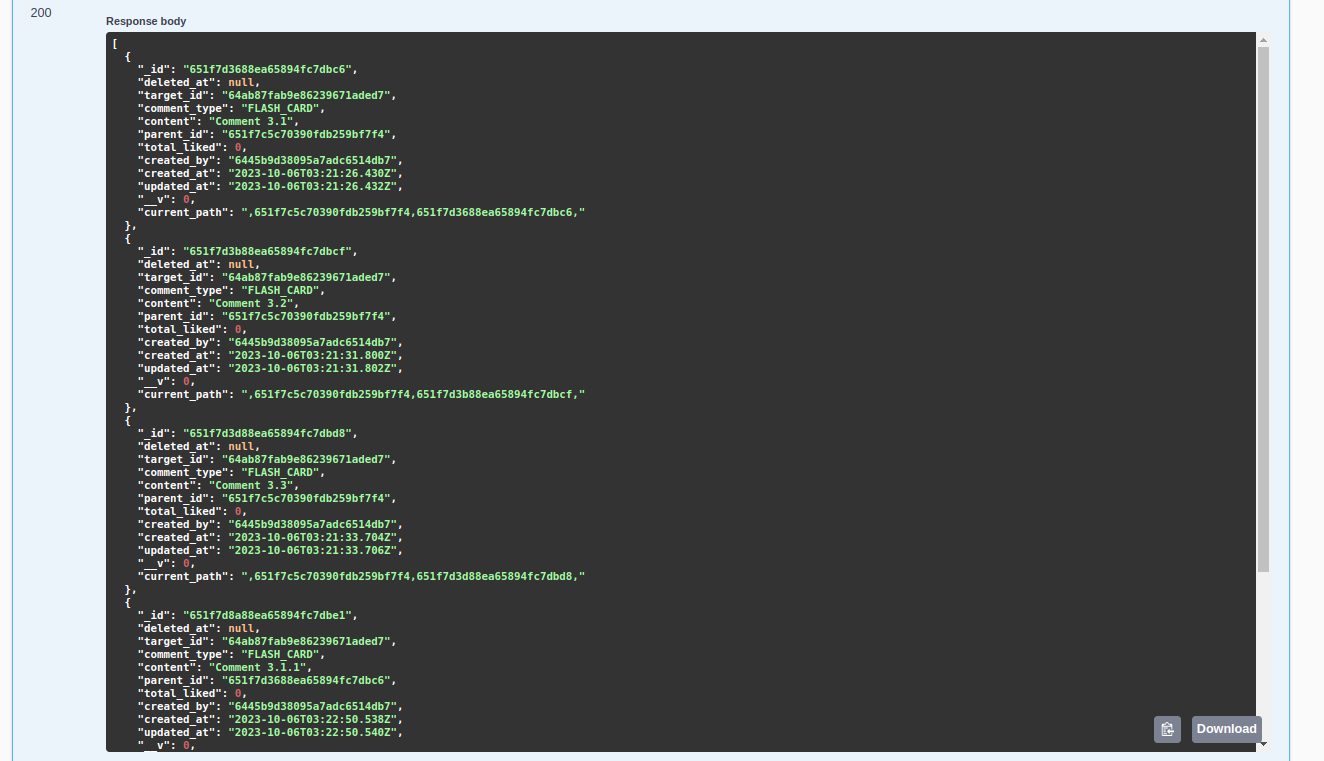
API này sẽ cho phép user có thể điều chỉnh độ sâu của reply comments dựa vào deep_level. Kết quả khi trả về với deep_level=1
Và khi deep_level=2:
API xóa comment 🧹
Ở ví dụ về comment độ sâu 1 level mình bỏ qua API cho phép user xóa comment vì nó quá đơn giản. Nhưng ở phần này thì sẽ có những cách triển khai khác nhau ứng với các yêu cầu khác nhau. 2 trường hợp mình thấy thường gặp khi xóa reply comment ở một độ sâu bất kì là:
- TH1: Xóa tất cả các reply của nó bất kể level.
- TH2: Chỉ xóa comment đó và giữ lại các reply của nó. Cách làm này tương tự như Facebook, các reply comment được giữ lại khi hiển thị phải có thêm dòng note đại loại như: 'Bình luận mà A trả lời đã bị xóa'.
Với TH1 chúng ta sẽ triển khai logic xóa dựa theo current_path với $regex như lúc get, cách triển khai như sau:
...
export class CommentRepository
    ...
    async deleteCommentAndReplies(id: string) {
		return await this.comment_model.updateMany(
			{
				current_path: {
					$regex: new RegExp(id),
					$options: 'i',
				},
			},
			{
				deleted_at: new Date(),
			},
		);
	}
    ...
Ở TH2 thì chúng ta chỉ cần xóa comment đó theo cách thông thường là cập nhật deleted_at như các API soft delete ở các module khác là được. Còn phần hiển thị dòng note như 'Bình luận mà A trả lời đã bị xóa' thì chúng ta sẽ để cho phía FE xử lý, họ chỉ cần check parent_id không tồn tại trong danh sách children.
Trên source code mình sẽ triển khai theo TH1 nên các bạn có thể tham khảo. Trong trường hợp các bạn chọn TH2 thì khi triển khai gặp vấn đề gì có thể comment để mọi người cùng fix.
Vậy là chúng ta đã triển khai xong ví dụ về create, get cũng như delete cho hệ thống comment cho phép người dùng reply comment ở độ sâu không giới hạn. Các phần còn lại như update và delete các bạn có thể tự triển khai tùy theo logic mà các bạn muốn.
Có thể các bạn sẽ để ý mặc dù chúng ta đã trả về toàn bộ reply comments nhưng chúng không được sắp xếp theo cấu trúc đúng với độ sâu. Vấn đề này thì tùy theo cách làm việc của mỗi team, mình thường sẽ nhờ FE control việc đó để tránh BE phải đảm nhận quá nhiều việc.
Kết luận 📝
Ở bài viết hôm nay chúng ta đã cùng nhau tìm hiểu được cách triển khai hệ thống comment theo từng nhu cầu dự án như thế nào. Bên cạnh đó chúng ta cũng phần nào biết được về Path Enumeration trong việc triển khai cấu trúc cây. Hy vọng sẽ giúp ích được cho các bạn trong quá trình phát triển dự án.
Bài viết trên dựa vào kinh nghiệm của mình nên nếu có gì thiếu sót hoặc không hợp lý mong nhận được sự góp ý từ các bạn để mình hoàn chỉnh lại. Cảm ơn mọi người đã giành thời gian đọc bài viết.
Tài liệu tham khảo 🔍
- Thắng, T.X. (2023) Bạn đang Lưu dữ liệu dạng Cây vào CSDL Theo Cách nào?, Viblo. Available at: https://viblo.asia/p/ban-dang-luu-du-lieu-dang-cay-vao-csdl-theo-cach-nao-LzD5dM6YKjY#_tim-hieu-them-o-dau-5 (Accessed: 15 October 2023).
- Hacker news (no date) Hacker News. Available at: https://news.ycombinator.com/ (Accessed: 15 October 2023).
- (No date) Lazada.vn. Available at: https://www.lazada.vn/ (Accessed: 15 October 2023).
- (No date) Shopee.vn. Available at: https://shopee.vn/ (Accessed: 15 October 2023).
Change log 📓
- October 30, 2023: Init document
All rights reserved
