Migrate Circle CI version 2.0 - Automation testing
Bài đăng này đã không được cập nhật trong 7 năm
1. Bài viết này dành cho
- Muốn dùng free CircleCI Android
 .
. - Đã nắm khái niệm Continuous Integration, test coverage (thường xuất hiện trong quy trình Agile).
- Đã từng sử dụng CircleCI 1.0 và có nhu cầu migrate lên CircleCI 2.0 (version 1.0 đã không còn được hỗ trợ từ ngày 31/08/2018.
2. Sơ lược về CI
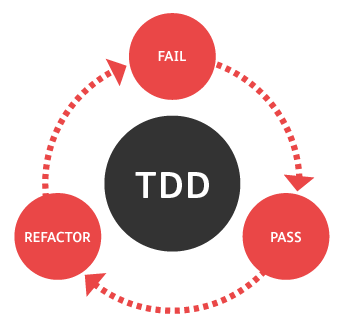
Trong quy trình Test Driven Development (TDD), việc testing là không thể thiếu. Quá trình automation test cần 1 server để developer có thể intergrate code liên tục và đảm bảo chất lượng của code. Hiểu nôm na là với mỗi một commit bạn push lên Source Version Control (Github, Bitbucket,...) đều phải được CI chạy test. Và commit của bạn phải thỏa mãn 1 điều kiện: không làm cho các test hiện tại bị fail. Nếu fail test, sẽ có 2 trường hợp:
- Logic của commit bạn vừa push có thể sai, làm ảnh hưởng đến hệ thống hiện tại.
- Logic của commit bạn vừa push đúng, và bạn cần cập nhập lại các test để pass được logic mới.
Những ý ở trên được tóm gọn lại ở hình dưới đây:
3. CI service hoạt động như thế nào
CI sẽ hook vào project Github của bạn. Khi bạn push lên 1 commit mới, CI sẽ được thông báo và tiến hành chạy các job bạn đã config, ví dụ như: unit test, intrumental test, report, coverall,...
Có nhiều service CI khác nhau, như Jenkins, Travis, GitLab, CircleCI,... Ở bài viết này, mình tập trung vào Circle CI cho Android.
4. CircleCI 2.0
-
Nếu ở CircleCI 1.0, bạn có thể config chạy test cho Android với 1 free emulator thì ở CircleCI 2.0 mọi chuyện lại khác. Theo thông báo chính thức của CircleCI, họ không hỗ trợ chạy máy ảo Android nữa. Vì vậy khi migrate, bạn phải dùng 1 servicec máy ảo của bên thứ ba, ở đây mình dùng Firebase Test Lab (FTL). Bài viết sẽ nhấn mạnh 1 số trick để dùng free dịch vụ này
. -
Với bảng giá của FTL, bạn sẽ có 10 lần chạy test free mỗi ngày với máy ảo, và 5 lần free khi chạy với máy vật lý (máy thật). Đối với project vừa và nhỏ (khoảng 3-4 người), bạn vẫn có thể dùng free dịch vụ này. Nếu muốn chạy nhiều lần test hơn với máy ảo/máy thật, bạn phải trả thêm phí khoảng 1$/giờ. Lưu ý là Unit test sẽ được chạy trên CircleCI (nghĩa là chạy bao nhiêu lần tùy thích), còn Android test sẽ được chạy trên FTL (bị giới hạn số lần nếu muốn free).
-
Vậy có đáng không cho việc migrate này? Theo mình trải nghiệm thì với hiệu suất cũng như thời gian chạy test, migrate lên version 2.0 là việc hoàn toàn xứng đáng. Tuy nhiên việc migrate này khá vất vả.
| Test | Version 1.0 | Version 2.0 (máy ảo) |
|---|---|---|
Unit test (~100 test) |
9 phút | 2.5 phút |
Android test (~150 test) |
25 phút | 12 phút |
5. Chuẩn bị setup
5.1 Firebase Test Lab
- Vào trang Firebase console tạo 1 project mới.
- Thêm 1
Android appvào project vừa tạo. Bạn cần cung cấpAndroid package name. Sau đó ở bướcDownload a config file, bạn sẽ nhận được filegoogle-services.json. Tạm thời lưu lại file này để dùng về. Có thể bỏ qua bướcAdd Firebase SDKvàRun your app to verify installation.
5.2 Google Cloud SDK
5.2.1 Authorize
- Vào trang Service account page, chọn project bạn vừa tạo bên FTL. Bạn kiểm tra xem có nhìn thấy email nào tương tự như
firebase-adminsdk-xxx@xxx.iam.gserviceaccount.comhay không. Email này là tài khoản Fibase service được dùng để chứng thực khi bạn dùng dịch vụ Tesing của FTL. Nếu không thấy email nào giống vậy, bạn trở lại phần project setting ở bên FTL. Tại mụcService account, clickGenerate new private key, sau đó kiểm tra lại tài khoản Fibase service bên GCloud đã có hay chưa. - Tại dòng bạn thấy có email
firebase-adminsdk-xxx@xxx.iam.gserviceaccount.com, click vàoCreate keyở cộtActions. Bạn sẽ tải về được 1 file json, đặt tên làclient-secret.json. - Kiểm tra lại lần nữa tài khoản Fibase service có role là
Editorhay chưa, nếu chưa hãy cấp cho nó. Bạn cò thể kiểm tra ở menuIAM & admin, tabIAM.
5.2.2 Enable API
- Vào trang Google Developers Console API Library page, bạn bật 2 API này lên:
Google Cloud Testing APIvàCloud Tool Results API.
5.3 Encode JSON file
- Bạn có thể skip bước này nếu không muốn bảo mật project của bạn .
- Khi đến bước này, bạn sẽ phải có được 2 file JSON:
google-services.jsonvàclient-secret.json. Bạn không nên push 2 file này lên Git, vì nếu ai đó vô tình có được key này, họ có thể dùng và kích hoạt các gói phải trả phí (chẳng hạn mở mắt ra sẽ được GCloud gửi bill bạn đã tiêu vài nghìn $ chẳng hạn ). - Bạn nên encode 2 file này lại thành chuỗi
base64, sau đó add vàoCircleCI environment variablesđể dùng.
base64 -i ./google-services.json -u ./google-services-encoded.txt
base64 -i ./client-secret.json -u ./client-secret-encoded.txt
| Name | Value |
|---|---|
| CI_NAME | _ |
| COVERALLS_REPO_TOKEN | _ |
| GCLOUD_SERVICE_KEY | key client-secret đã encoded |
| GOOGLE_SERVICES_KEY | key google-services đã encoded |
6. Config file YML
Thay vì tạo file circleci.yml ở root project như ở version 1.0. Trong version 2.0, bạn cần tạo 1 folder .circleci ở root project, sau đó đặt file config.yml vào trong đó.
6.1 Cấu trúc file
Bạn có thể tùy chỉnh theo cấu trúc khác, mình thì thích cấu trúc này:
version: 2

references:
  # We will define reusable references here

jobs:
  # Build debug APK for unit tests and an instrumented test APK
  build_debug:
    # ...

  # Run unit tests
  test_unit:
    # ...

  # Run instrumented tests
  test_instrumented:
    # ...

  # Submit JaCoCo coverage report
  report_coverage:
    # ...

workflows:
  version: 2
  #Setup your workflow here
  workflow:
    jobs:
      # ...
6.2 Setup References
Mình define một số biến để lưu cache hay đường dẫn workspace ở phần này
Cache
  cache_key: &cache_key
    key: cache-{{ checksum "gradle/wrapper/gradle-wrapper.properties" }}-{{ checksum "build.gradle" }}-{{ checksum "app/build.gradle" }}
  restore_cache: &restore_cache
    restore_cache:
      <<: *cache_key
  save_cache: &save_cache
    save_cache:
      <<: *cache_key
      paths:
        - ~/.gradle
        - ~/.m2
Workspace
Để hiểu hơn về workspace, bạn có thể đọc thêm ở đây.
  workspace: &workspace
    ~/workspace
  attach_debug_workspace: &attach_debug_workspace
    attach_workspace:
      at: *workspace
  attach_release_workspace: &attach_release_workspace
    attach_workspace:
      at: *workspace
  persist_debug_workspace: &persist_debug_workspace
    persist_to_workspace:
      root: *workspace
      paths:
        - app/build/intermediates
        - app/build/outputs/androidTest-results
        - app/build/outputs/apk
        - app/build/outputs/code-coverage
        - app/build/test-results
  persist_release_workspace: &persist_release_workspace
    persist_to_workspace:
      root: *workspace
      paths:
        - app/build
  attach_firebase_workspace: &attach_firebase_workspace
    attach_workspace:
      at: *workspace
  persist_firebase_workspace: &persist_firebase_workspace
    persist_to_workspace:
      root: *workspace
      paths:
        - firebase
Docker
- Ở version 2.0, CircleCI hỗ trợ dùng Docker để cấu hình rất tiện, bạn có thể tự cấu hình docker hay dùng các docker được build sẵn here
- Lưu ý version của google cloud docker, một số version có thể gây ra các lỗi nhảm nhí, ở đây mình dùng version
216.0.0cho ổn định, bạn có thể thay bằng version khác (nếu sau này216.0.0đã bị deprecated )
  android_config: &android_config
    working_directory: *workspace
    docker:
      - image: circleci/android:api-27-alpha
    environment:
      TERM: dumb
      _JAVA_OPTIONS: "-Xmx2048m -XX:+UnlockExperimentalVMOptions -XX:+UseCGroupMemoryLimitForHeap"
      GRADLE_OPTS: '-Dorg.gradle.jvmargs="-Xmx2048m"'
      ADB_INSTALL_TIMEOUT : 20

  gcloud_config: &gcloud_config
    working_directory: *workspace
    docker:
      - image: google/cloud-sdk:216.0.0
    environment:
      TERM: dumb
Verify key
Ở đây mình dùng lại 2 biến CircleCI mình đã add ở bước decode file JSON: GOOGLE_SERVICES_KEY và GCLOUD_SERVICE_KEY. Nếu bạn không decode, bạn có thể thay bằng đường dẫn tới 2 file JSON của bạn
  # Google Services

  export_gservices_key: &export_gservices_key
    run:
      name: Export Google Services key environment variable
      command: echo 'export GOOGLE_SERVICES_KEY="$GOOGLE_SERVICES_KEY"' >> $BASH_ENV
  decode_gservices_key: &decode_gservices_key
    run:
      name: Decode Google Services key
      command: echo $GOOGLE_SERVICES_KEY | base64 -di > app/google-services.json

  # Google Cloud Service

  export_gcloud_key: &export_gcloud_key
    run:
      name: Export Google Cloud Service key environment variable
      command: echo 'export GCLOUD_SERVICE_KEY="$GCLOUD_SERVICE_KEY"' >> $BASH_ENV
  decode_gcloud_key: &decode_gcloud_key
    run:
      name: Decode Google Cloud credentials
      command: echo $GCLOUD_SERVICE_KEY | base64 -di > ${HOME}/client-secret.json

  grant_gradle_permission: &grant_gradle_permission
    run:
      name: Grant Permission
      command: chmod +x gradlew
6.3 Config job
Build Debug
Bạn cần build 1 file Debug APK file để đưa cho FTL chạy Android Test.
jobs:
  # Build debug APK for unit tests and an instrumented test APK
  build_debug:
      <<: *android_config
      steps:
        - checkout
        - *grant_gradle_permission
        - *restore_cache
        - run:
            name: Download dependencies
            command: ./gradlew androidDependencies
        - *save_cache
        - *export_gservices_key
        - *decode_gservices_key
        - run:
            name: Gradle build (debug)
            command: ./gradlew -PciBuild=true :app:assembleDebug :app:assembleAndroidTest
        - *persist_debug_workspace
        - store_artifacts:
            path: app/build/outputs/apk/
            destination: /apk/
Run unit test
  test_unit:
      <<: *android_config
      steps:
        - checkout
        - *grant_gradle_permission
        - *restore_cache
        - run:
            name: Download dependencies
            command: ./gradlew androidDependencies
        - *save_cache
        - *export_gservices_key
        - *decode_gservices_key
        - run:
            name: Run unit tests
            command: ./gradlew -PciBuild=true :app:testDebugUnitTest --no-daemon --max-workers 2
        - *persist_debug_workspace
        - store_artifacts:
            path: app/build/reports/
            destination: /reports/
        - store_test_results:
            path: app/build/test-results/
            destination: /test-results/
- Chú ý flags
--no-daemon --max-workers 2, nếu trong quá trình chạy bạn gặp phải lỗi nào giống như vậy:
Execution failed for task ':app:testDebugUnitTest'.
> Process 'Gradle Test Executor 1' finished with non-zero exit value 137
Bạn hãy add thêm flag --max-workers vào. Có thể do unit test bạn nhiều quá, nó chạy nhiều thread quá nên đứng con server.
Run instrumented test
  test_instrumented:
      <<: *gcloud_config
      steps:
        - *attach_debug_workspace
        - *export_gcloud_key
        - *decode_gcloud_key
        - run:
            name: Set Google Cloud target project
            command: gcloud config set project {your-project-id}
        - run:
            name: Authenticate with Google Cloud
            command: gcloud auth activate-service-account {your-serivce-account-email} --key-file ${HOME}/client-secret.json
        - run:
            name: Run instrumented test on Firebase Test Lab
            command: |
              gcloud firebase test android run \
                --type instrumentation \
                --app app/build/outputs/apk/debug/app-debug.apk \
                --test app/build/outputs/apk/androidTest/debug/app-debug-androidTest.apk \
                --device model=Nexus4,version=22,locale=en_US,orientation=portrait \
                --environment-variables coverage=true,coverageFile="/sdcard/coverage.ec" \
                --directories-to-pull=/sdcard --timeout 30m
            no_output_timeout: 45m
        - run:
            name: Create directory to store test results
            command: mkdir firebase
        - run:
            name: Download instrumented test results from Firebase Test Lab
            command: gsutil -m cp -r -U "`gsutil ls gs://test-lab-{some random ID}-{some other random ID} | tail -1`*" /root/workspace/firebase/ | true
        - *persist_firebase_workspace
        - store_artifacts:
            path: firebase/
            destination: /firebase/
Bước này, bạn cần thay đổi 1 số chỗ ở đoạn config trên:
-
Ở bước
Set Google Cloud target project, thay{your-project-id}bằngproject idcủa bạn (xem trongSettingsFirebase Test Lab) -
Ở bước
Authenticate with Google Cloud, thay{your-serivce-account-email}bằng service account email, ví dụ :firebase-adminsdk-xxx@xxx.iam.gserviceaccount.com -
Ở bước
Run instrumented test on Firebase Test Lab, bạn nên đọc cái này trước để config cho đúng here. -
Ở bước
Download instrumented test results from Firebase Test Lab, thaytest-lab-{some random ID}-{some other random ID}bằngtest-lab-x4hsbadixp1m2-i4n4wknmh0d5w. Vậy cáitest-lab...lấy ở đâu? Tới đây mình cần cheat 1 tí. Thật ra khi bạn chạy 1 Android test trên FTL, kết quả test chạy được sẽ được FTL lưu vào 1 folder trên Google Cloud Storage, và sau khoảng 30 ngày sẽ bị xóa. Folder có 1 ID , đây là cái mình cần tìm. -
Đầu tiên, push commit để cho nó chạy Android Test thử. Sau khi chạy xong, bạn vào Firebase Console, mục
QualitychọnTest lab. Sau đó mở phần xem chi tiết kết quả test. ClickTest results, nó sẽ dẫn bạn tới 1 link Google Cloud Storage, trong link này bạn sẽ tìm được ID:
 Chú ý
Chú ý
-
Chắn chắn là đường dẫn đến file APK phải đúng ở các flag
--appvà--test. -
Ở flag
--device, bạn có thể thay đổi device khác nếu bạn muốn. Ở đây mình dùng máy ảo Nexus4 , API 22. Bạn có thể xem danh sách device mà FTL support bằng cách chạy lệnh (cần cài gcloud SDK vào máy install).
gcloud firebase test android models list
-
Ở flag
--environment-variables,kiểm tra kĩcoverageFile="/sdcard/coverage.ec", nếu bạn set coverageFile =/sdcard/tmp/coverage.ecthì có thể file coverage tạo được cho bạn không có quyền ghi trên cái máy ảo của FTL . Nếu bạn có nhiều test, thì nên set--timeout, maximum60mcho máy ảo và30mcho máy thật. Đồng thời, set thêmno_output_timeoutđể tránh CircleCI tự cancle jon của bạn khi nó đang đợi FTL chạy test (nó sẽ tính thời gian sau bao lâu mà không có dòng log nào được in ra sẽ là timout )
) -
Kiểm tra lại lần nữa xem file
coverage.eccó nằm trong thư mục của artifact hay không. Nếu không thấy, bạn thử mở filelogcattrong artifact ra xem thử có lỗi nào như vậy không:
9-12 05:53:52.812: E/CoverageListener(7747): Failed to generate Emma/JaCoCo coverage.
09-12 05:53:52.812: E/CoverageListener(7747): java.lang.reflect.InvocationTargetException
09-12 05:53:52.812: E/CoverageListener(7747): 	at java.lang.reflect.Method.invoke(Native Method)
...
09-12 05:53:52.812: E/CoverageListener(7747): Caused by: java.io.FileNotFoundException: /sdcard/coverage.ec: open failed: EACCES (Permission denied)
09-12 05:53:52.812: E/CoverageListener(7747): 	at libcore.io.IoBridge.open(IoBridge.java:456)
09-12 05:53:52.812: E/CoverageListener(7747): 	at java.io.FileOutputStream.<init>(FileOutputStream.java:87)
09-12 05:53:52.812: E/CoverageListener(7747): 	at com.vladium.emma.rt.RT.dumpCoverageData(RT.java:50)
09-12 05:53:52.812: E/CoverageListener(7747): 	... 8 more
09-12 05:53:52.812: E/CoverageListener(7747): Caused by: android.system.ErrnoException: open failed: EACCES (Permission denied)
09-12 05:53:52.812: E/CoverageListener(7747): 	at libcore.io.Posix.open(Native Method)
...
Có một vào cách giải quyết lỗi này:
- Cấp quyền
Writing on SD card
<uses-permission android:name="android.permission.WRITE_EXTERNAL_STORAGE"/>
- Kiểm tra
testCoverageEnabledđã được enable làtruetrong file app/build.gradle
debug {
    testCoverageEnabled true
}
- Không dùng
HoockeyApp(lib dùng để CD) chung vớiJacoco. Có thể dùng Fabric để thay thế.
Submit Jacoco coverage
  report_coverage:
      <<: *android_config
      steps:
        - checkout
        - *grant_gradle_permission
        - *restore_cache
        - run:
            name: Download dependencies
            command: ./gradlew androidDependencies
        - *attach_debug_workspace
        - *attach_firebase_workspace
        - run:
            name: Move Firebase coverage report
            command: mkdir -p app/build/outputs/code-coverage/connected && cp firebase/Nexus4-22-en_US-portrait/artifacts/*coverage.ec app/build/outputs/code-coverage/connected/coverage.ec
        - *export_gservices_key
        - *decode_gservices_key
        - run:
            name: Generate JaCoCo report
            command: ./gradlew -PciBuild=true :app:jacocoTestReport
        - run:
            name: Upload coverage report to coveralls.io
            command: ./gradlew -PciBuild=true coveralls
        - store_artifacts:
            path: app/build/reports/
            destination: /reports/
6.4. Config workflow
Đây là workflow của mình

workflows:
  version: 2
  workflow:
    jobs:
      - build_debug
      - test_unit:
          requires:
            - build_debug
      - test_instrumented:
          requires:
            - build_debug
      - report_coverage:
          requires:
            - test_unit
            - test_instrumented
Nếu bạn thấy job xanh, tức là bạn đã config thành công CircleCI 2.0
All rights reserved
