Microservices với Spring Boot và Spring Cloud (Phần 3) - Cấu hình Auth Service, User Service và run test cấu hình
Bài đăng này đã không được cập nhật trong 2 năm
Phiên bản của các ứng dụng Spring Boot mà chúng ta sẽ tạo là: 3.0.6 , Java 17
Các bài viết tham khảo:
- https://medium.com/omarelgabrys-blog/microservices-with-spring-boot-creating-our-microserivces-gateway-part-2-31f8aa6b215b
- https://medium.com/@ihorkosandiak/spring-cloud-gateway-security-with-jwt-93341b342020
Các bạn có thể tham khảo thêm các bài viết hay hơn ở https://akitect.io
Link github để các bạn tham khảo code : https://github.com/akitectio/microservices-spring-boot-3
Trước tiên mình cần cài đặt mongodb, niếu bạn chưa cài đặt thì có thể tham khảo https://viblo.asia/p/cach-cai-dat-va-bao-mat-mongodb-tren-ubuntu-2204-n1j4lx7K4wl
Auth Service
Auth Service là một trong những service của kiến trúc microservices, có chức năng quản lý việc xác thực và cấp quyền truy cập cho các request từ các service khác trong hệ thống. Auth Service sử dụng các công nghệ như JWT (JSON Web Token) để thực hiện xác thực và cấp quyền truy cập cho các request.
Các chức năng chính của Auth Service bao gồm:
- Xác thực người dùng (User authentication): cho phép người dùng đăng nhập vào hệ thống bằng tên đăng nhập và mật khẩu.
- Tạo token: sau khi xác thực thành công, Auth Service tạo ra một token để xác định người dùng đã đăng nhập.
- Xác thực token: khi người dùng gửi yêu cầu đến hệ thống, Auth Service sẽ kiểm tra xem token có hợp lệ hay không.
Bạn sử dụng Spring Initializr dể tạo một Project Auth Service và thêm dependencies: Web, Eureka Server, DevTools
Ta chọn và điền phần Project Metadata theo như cầu dự án của mình
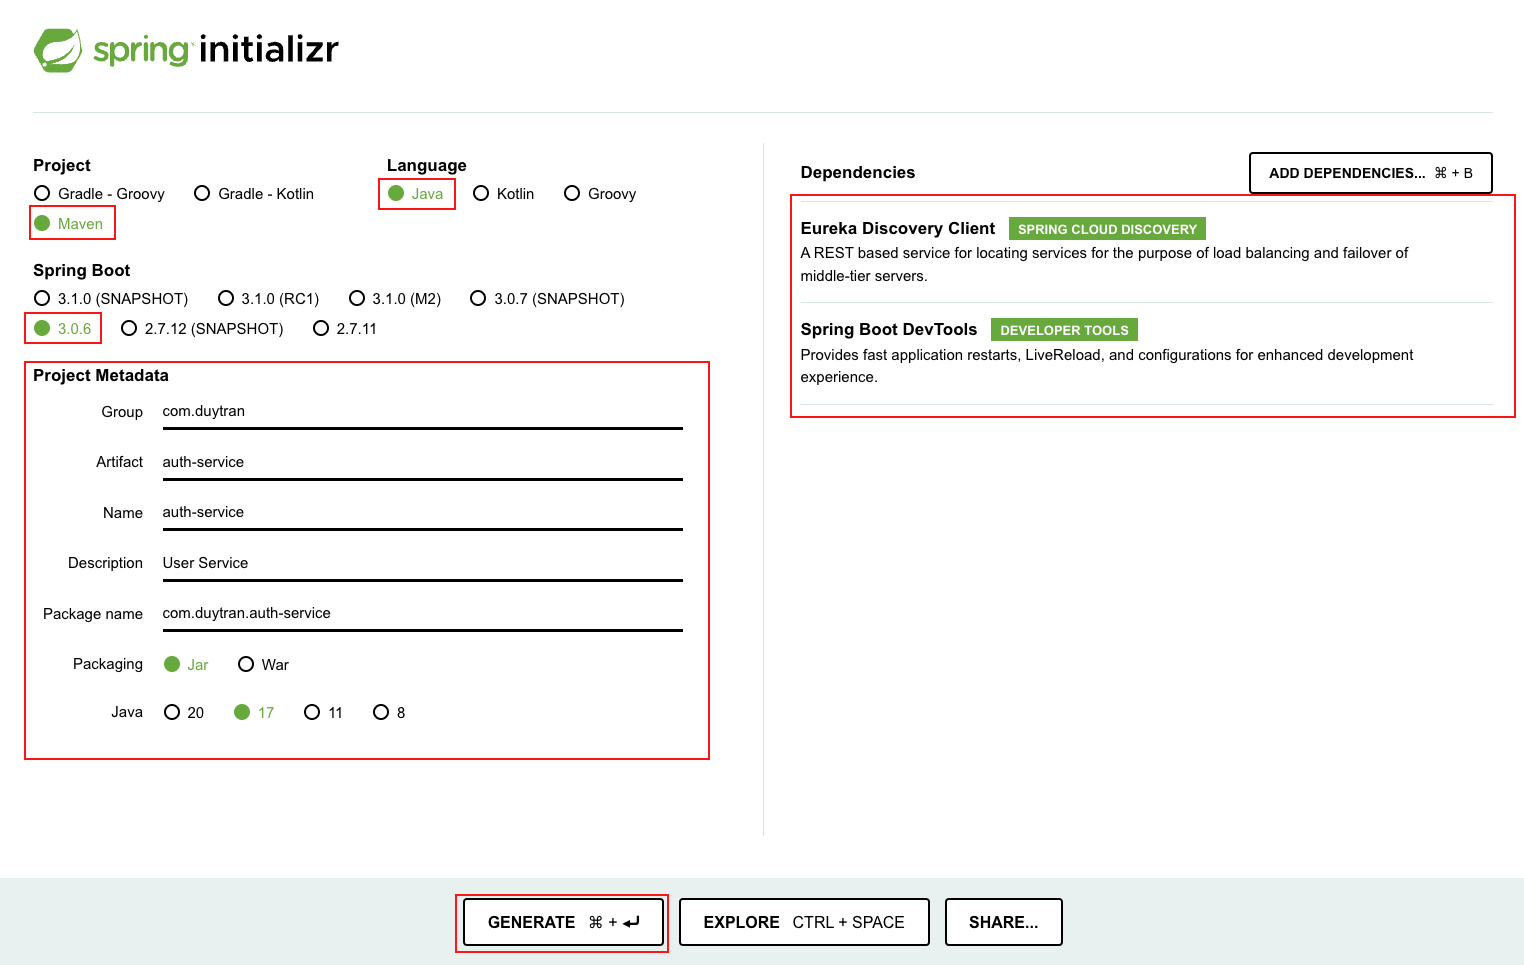
Sau đó nhập vào  để tạo project
Tiếp tục tạo thư mục mới tên là microservices-project và coppy thư mục vừa vào tạo và tạo thêm file pom.xml với nội dung
   <modules>
     <module>eureka-server</module>
        <module>service01</module>
        <module>service02</module>
        <module>gateway-service</module>
        <module>config-service</module>
        <module>auth-service</module> #<- Thêm ở đây
    </modules>
Tiếp theo, trong tệp application.properties đổi tên thành application.yml, chúng ta cần thiết lập một số cấu hình.
server:
  port: 9004

spring:
  application:
    name: auth-service

jwt:
  secret: BvPHGM8C0ia4uOuxxqPD5DTbWC9F9TWvPStp3pb7ARo0oK2mJ3pd3YG4lxA9i8bj6OTbadwezxgeEByY
  expiration: 86400
Tiếp tục tạo thêm tiệp bootstrap.yml, và thêm nội dung
spring:
  cloud:
    config:
      enabled: true
      uri: http://localhost:9296
Tiếp tục trong Controller ta tạo AuthController có nội dung như sau
package com.duytran.authservice.controllers;

import com.duytran.authservice.entities.AuthRequest;
import com.duytran.authservice.entities.AuthResponse;
import com.duytran.authservice.services.AuthService;
import org.springframework.beans.factory.annotation.Autowired;
import org.springframework.http.ResponseEntity;
import org.springframework.web.bind.annotation.PostMapping;
import org.springframework.web.bind.annotation.RequestBody;
import org.springframework.web.bind.annotation.RequestMapping;
import org.springframework.web.bind.annotation.RestController;

@RestController
@RequestMapping(value = "/auth")
public class AuthController {

    private final AuthService authService;

    @Autowired
    public AuthController(final AuthService authService) {
        this.authService = authService;
    }

    @PostMapping(value = "/register")
    public ResponseEntity<AuthResponse> register(@RequestBody AuthRequest authRequest) {
        return ResponseEntity.ok(authService.register(authRequest));
    }

}
Đoạn code trên định nghĩa một REST API endpoint để xử lý yêu cầu đăng ký tài khoản mới cho người dùng.
- Annotation @RestController xác định đây là một controller trả về các giá trị dưới dạng JSON.
- Annotation @RequestMapping xác định URL endpoint của controller, trong trường hợp này là /auth.
- Annotation @PostMapping chỉ định rằng phương thức này sẽ xử lý các yêu cầu POST.
- Tham số AuthRequest được đánh dấu với @RequestBody để chỉ định rằng nó sẽ được giải mã từ dữ liệu đầu vào JSON được gửi đến.
- Cuối cùng, phương thức register của AuthService được gọi để xử lý yêu cầu đăng ký và kết quả trả về được đóng gói trong một ResponseEntity và trả về cho người dùng.
Tiếp theo ta tạo lớp entities bao gồm AuthRequest, AuthResponse, value_objects:
AuthRequest có nội dung như sau
package com.duytran.authservice.entities;

import lombok.AllArgsConstructor;
import lombok.Builder;
import lombok.Data;
import lombok.NoArgsConstructor;

@Data
@AllArgsConstructor
@NoArgsConstructor
@Builder
public class AuthRequest {

    private String email;
    private String password;
    private String firstName;
    private String lastName;
}
AuthResponse có nội dung như sau
package com.duytran.authservice.entities;

import lombok.AllArgsConstructor;
import lombok.Builder;
import lombok.Data;
import lombok.NoArgsConstructor;

@Data
@AllArgsConstructor
@NoArgsConstructor
@Builder
public class AuthResponse {

    private String accessToken;
    private String refreshToken;

}
Phần cuối là value_objects UserVO
package com.duytran.authservice.entities.value_objects;

import lombok.AllArgsConstructor;
import lombok.Builder;
import lombok.Data;
import lombok.NoArgsConstructor;

@AllArgsConstructor
@NoArgsConstructor
@Builder
@Data
public class UserVO {
    private String id;
    private String email;
    private String password;
    private String role;

}
Tiếp theo là ta tạo lớp services bao gồm AuthService và JwtUtil
AuthService sẽ có nội dung như sau:
package com.duytran.authservice.services;

import com.duytran.authservice.entities.AuthRequest;
import com.duytran.authservice.entities.AuthResponse;
import com.duytran.authservice.entities.value_objects.UserVO;
import org.springframework.beans.factory.annotation.Autowired;
import org.springframework.security.crypto.bcrypt.BCrypt;
import org.springframework.stereotype.Service;
import org.springframework.util.Assert;
import org.springframework.web.client.RestTemplate;

@Service
public class AuthService {

    private final RestTemplate restTemplate;
    private final JwtUtil jwt;

    @Autowired
    public AuthService(RestTemplate restTemplate, final JwtUtil jwt) {
        this.restTemplate = restTemplate;
        this.jwt = jwt;
    }

    public AuthResponse register(AuthRequest authRequest) {
        //do validation if user already exists
        authRequest.setPassword(BCrypt.hashpw(authRequest.getPassword(), BCrypt.gensalt()));

        UserVO userVO = restTemplate.postForObject("http://user-service/users", authRequest, UserVO.class);
        Assert.notNull(userVO, "Failed to register user. Please try again later");

        String accessToken = jwt.generate(userVO, "ACCESS");
        String refreshToken = jwt.generate(userVO, "REFRESH");

        return new AuthResponse(accessToken, refreshToken);

    }
}
Đoạn code trên định nghĩa một service AuthService, nó bao gồm phương thức register() để đăng ký tài khoản người dùng.
Trong phương thức này, đầu tiên, mật khẩu được mã hóa bằng BCrypt trước khi lưu vào cơ sở dữ liệu. Sau đó, RestTemplate được sử dụng để gọi một API từ user-service để lưu thông tin người dùng vào cơ sở dữ liệu.
Tiếp theo, JWT được tạo ra với thông tin người dùng và loại mã truy cập, sau đó được sử dụng để tạo ra mã truy cập và mã làm mới, được đóng gói trong đối tượng AuthResponse. Cuối cùng, phương thức trả về đối tượng AuthResponse chứa các mã truy cập và mã làm mới cho người dùng.
Cuối cùng là JwtUtil:
package com.duytran.authservice.services;

import com.duytran.authservice.entities.value_objects.UserVO;
import io.jsonwebtoken.Claims;
import io.jsonwebtoken.Jwts;
import io.jsonwebtoken.security.Keys;
import org.springframework.beans.factory.annotation.Value;
import org.springframework.stereotype.Component;

import javax.annotation.PostConstruct;
import java.security.Key;
import java.util.Date;
import java.util.HashMap;
import java.util.Map;

@Component
public class JwtUtil {

    @Value("${jwt.secret}")
    private String secret;

    @Value("${jwt.expiration}")
    private String expirationTime;

    private Key key;

    @PostConstruct
    public void init() {
        this.key = Keys.hmacShaKeyFor(secret.getBytes());
    }

    public Claims getAllClaimsFromToken(String token) {
        return Jwts.parserBuilder().setSigningKey(key).build().parseClaimsJws(token).getBody();
    }


    public Date getExpirationDateFromToken(String token) {
        return getAllClaimsFromToken(token).getExpiration();
    }

    private Boolean isTokenExpired(String token) {
        final Date expiration = getExpirationDateFromToken(token);
        return expiration.before(new Date());
    }

    public String generate(UserVO userVO, String type) {
        Map<String, Object> claims = new HashMap<>();
        claims.put("id", userVO.getId());
        claims.put("role", userVO.getRole());
        return doGenerateToken(claims, userVO.getEmail(), type);
    }

    private String doGenerateToken(Map<String, Object> claims, String username, String type) {
        long expirationTimeLong;
        if ("ACCESS".equals(type)) {
            expirationTimeLong = Long.parseLong(expirationTime) * 1000;
        } else {
            expirationTimeLong = Long.parseLong(expirationTime) * 1000 * 5;
        }
        final Date createdDate = new Date();
        final Date expirationDate = new Date(createdDate.getTime() + expirationTimeLong);

        return Jwts.builder()
                .setClaims(claims)
                .setSubject(username)
                .setIssuedAt(createdDate)
                .setExpiration(expirationDate)
                .signWith(key)
                .compact();
    }

    public Boolean validateToken(String token) {
        return !isTokenExpired(token);
    }

}
Đoạn code trên là một Spring Component dùng để tạo và xác thực JSON Web Token (JWT). Để tạo một JWT, đầu tiên phải khởi tạo một đối tượng Claims chứa các thông tin về tài khoản người dùng, sau đó sử dụng doGenerateToken để tạo JWT. doGenerateToken sử dụng các thông tin như claims, username và type để tạo ra chuỗi JWT. Ngoài ra, JwtUtil còn có các phương thức khác như isTokenExpired, getExpirationDateFromToken, validateToken để kiểm tra tính hợp lệ của JWT.
Như vậy ta đã tạo và cấu hình thành công Auth Service
User Service
User Service là một trong những microservice trong kiến trúc dịch vụ (microservices architecture) trong đó chịu trách nhiệm quản lý thông tin người dùng, bao gồm đăng ký, đăng nhập và quản lý thông tin cá nhân của người dùng. Nó cung cấp các API để cho các microservice khác truy cập thông tin của người dùng trong hệ thống.
Bạn sử dụng Spring Initializr dể tạo một Project Auth Service và thêm dependencies: Web, Eureka Server, DevTools
Ta chọn và điền phần Project Metadata theo như cầu dự án của mình

Sau đó nhập vào để tạo project
Tiếp tục tạo thư mục mới tên là microservices-project và coppy thư mục vừa vào tạo và tạo thêm file pom.xml với nội dung
   <modules>
     <module>eureka-server</module>
        <module>service01</module>
        <module>service02</module>
        <module>gateway-service</module>
        <module>config-service</module>
        <module>auth-service</module>
          <module>user-service</module> #<- Thêm ở đây
    </modules>
Tiếp theo, trong tệp application.properties đổi tên thành application.yml, chúng ta cần thiết lập một số cấu hình.
server:
  port: 9002

spring:
  application:
    name: user-service
  data:
    mongodb:
      uri: mongodb://userAdmin:(Xx%7DuAL%40%3Dt%3DEP2(!@localhost:27017/USER?replicaSet=rs0&authSource=admin

jwt:
  secret: BvPHGM8C0ia4uOuxxqPD5DTbWC9F9TWvPStp3pb7ARo0oK2mJ3pd3YG4lxA9i8bj6OTbadwezxgeEByY
  expiration: 86400
Tiếp tục tạo thêm tiệp bootstrap.yml, và thêm nội dung
spring:
  cloud:
    config:
      enabled: true
      uri: http://localhost:9296
Tiếp theo là ta tạo lớp controllers bao gồm UserController có nội dung:
package com.duytran.userservice.controllers;


import com.duytran.userservice.entities.User;
import com.duytran.userservice.entities.value_objects.ResponseTemplateVO;
import com.duytran.userservice.services.UserService;
import org.springframework.beans.factory.annotation.Autowired;
import org.springframework.http.ResponseEntity;
import org.springframework.web.bind.annotation.*;

@RestController
@RequestMapping(value = "/users")
public class UserController {

    @Autowired
    private UserService userService;

    @PostMapping
    public User save(@RequestBody User user) {
        return userService.save(user);
    }

    @GetMapping
    public ResponseTemplateVO getUser(
            @RequestHeader(value = "id") String userId,
            @RequestHeader(value = "role") String role) {
        return userService.getUserWithDepartment(userId);
    }

    @GetMapping(value = "/secure")
    public String getSecure() {
        return "Secure endpoint available";
    }
}
Đây là một đoạn mã Java trong một ứng dụng Spring Boot, cụ thể là phần xử lý HTTP API của một User Service. Đoạn mã này chứa một số API để thực hiện các chức năng liên quan đến người dùng:
- API POST /users: Được sử dụng để lưu trữ một đối tượng người dùng mới vào hệ thống. Đầu vào được truyền qua cơ chế Request Body của HTTP. Phương thức trả về đối tượng người dùng đã được lưu trữ trong hệ thống.
- API GET /users: Được sử dụng để lấy thông tin chi tiết của một đối tượng người dùng trong hệ thống. Thông tin người dùng được trả về dưới dạng đối tượng ResponseTemplateVO, chứa thông tin về người dùng cùng với thông tin về phòng ban mà người dùng đó thuộc về. Thông tin về người dùng được truyền qua các tiêu đề HTTP.
- API GET /users/secure: Được sử dụng để trả về thông báo rằng kết nối đến API này là an toàn. Không có thông tin người dùng nào được yêu cầu trong API này.
Tiếp theo là ta tạo lớp entities bao gồm User có nội dung:
package com.duytran.userservice.entities;

import com.fasterxml.jackson.databind.annotation.JsonSerialize;
import com.fasterxml.jackson.databind.ser.std.ToStringSerializer;
import lombok.AllArgsConstructor;
import lombok.Builder;
import lombok.Data;
import lombok.NoArgsConstructor;
import org.bson.types.ObjectId;
import org.springframework.data.mongodb.core.mapping.Document;
import org.springframework.security.crypto.bcrypt.BCrypt;

@AllArgsConstructor
@NoArgsConstructor
@Builder
@Data
@Document(collection = "users")
public class User {


    @JsonSerialize(using = ToStringSerializer.class)
    private ObjectId id;
    private String firstName;
    private String lastName;
    private String email;
    private String departmentId;
    private String password;
    private String role;

}
Tiếp theo là ta tạo lớp repos bao gồm UserRepository có nội dung:
package com.duytran.userservice.repos;

import com.duytran.userservice.entities.User;
import org.bson.types.ObjectId;
import org.springframework.data.mongodb.repository.MongoRepository;
import org.springframework.stereotype.Repository;


@Repository
public interface UserRepository extends MongoRepository<User, ObjectId> {
}
Tiếp theo là ta tạo lớp services bao gồm UserService có nội dung:
package com.duytran.userservice.services;

import com.duytran.userservice.entities.User;
import com.duytran.userservice.entities.value_objects.Department;
import com.duytran.userservice.entities.value_objects.ResponseTemplateVO;
import  com.duytran.userservice.repos.UserRepository;
import lombok.extern.slf4j.Slf4j;
import org.bson.types.ObjectId;
import org.springframework.beans.factory.annotation.Autowired;
import org.springframework.stereotype.Service;
import org.springframework.web.client.RestTemplate;

@Service
@Slf4j
public class UserService {

    private final UserRepository repository;
    private final RestTemplate restTemplate;

    @Autowired
    public UserService(UserRepository repository,
                       RestTemplate restTemplate) {
        this.repository = repository;
        this.restTemplate = restTemplate;
    }


    public User save(User user) {
        return this.repository.save(user);
    }

    public User getById(ObjectId id) {
        return this.repository.findById(id).orElse(null);
    }

    public ResponseTemplateVO getUserWithDepartment(String id) {
        User user = this.getById(new ObjectId(id));

        Department department = restTemplate.getForObject("http://service01/service01/" + user.getDepartmentId(), Department.class);

        return new ResponseTemplateVO(user, department);
    }
}
Run test
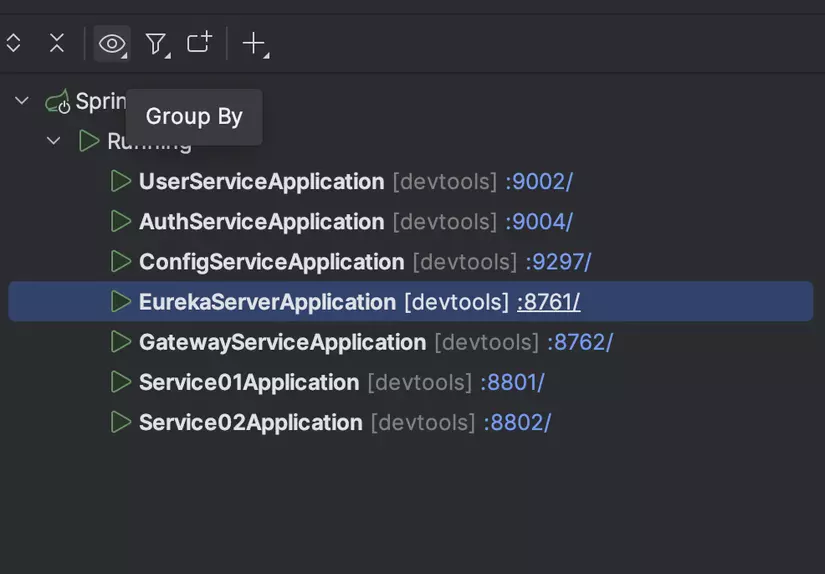
Trước tiên mình run service EurekaServerApplication trước:
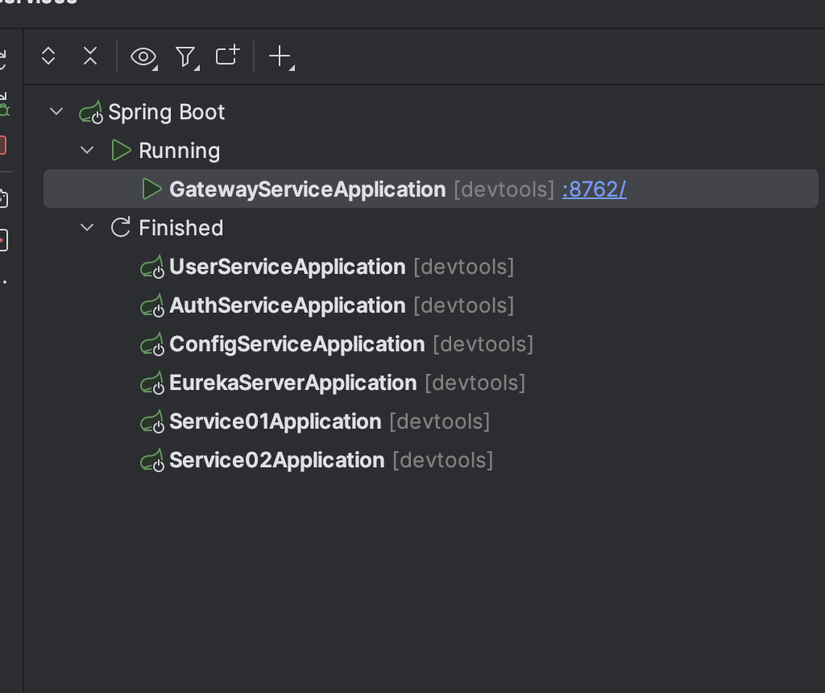
Sau khi sart thành công EurekaServerApplication ta tiếp tục start tất cả service còn lại:
Tiếp tục vào đường dẫn "http://127.0.0.1:8761" để vào kiểm tra service nào đã đăng ký vào Eureka
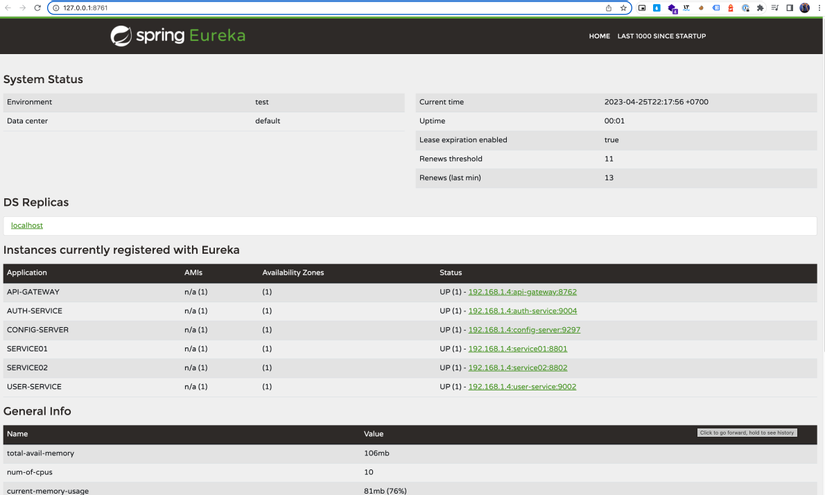
Như vậy bạn đã đăng ký thành công các service vào Eureka Server
Tiếp tục ta sẽ test Gateway Service bằng postmain để tạo user
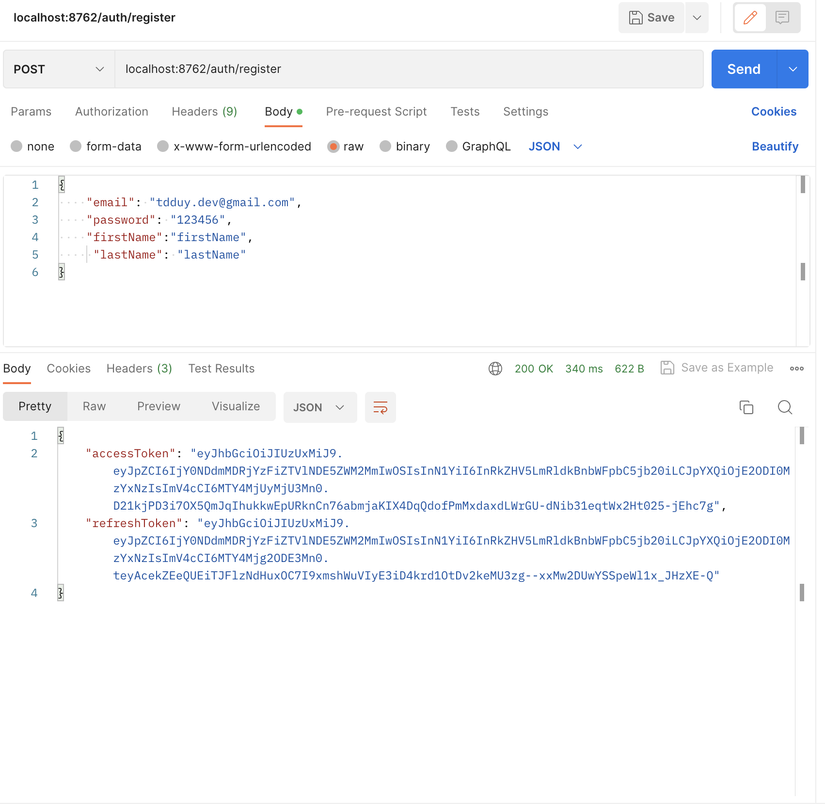
Như vậy mình đã cấu hình thành công Gateway để call tới các service khác.
Trong phần 3 của loạt bài viết về Microservices với Spring Boot và Spring Cloud, chúng ta sẽ tìm hiểu cách cấu hình Auth Service và User Service. Đầu tiên, chúng ta sẽ tạo một Auth Service đơn giản để xác thực và phân quyền người dùng. Sau đó, chúng ta sẽ cấu hình User Service để sử dụng Auth Service để xác thực người dùng và gọi các API của User Service. Cuối cùng, chúng ta sẽ chạy các bài kiểm tra để đảm bảo rằng cấu hình hoạt động như mong đợi. Bài viết này sẽ giúp bạn hiểu rõ hơn về cách cấu hình Microservices với Spring Boot và Spring Cloud, giúp bạn phát triển ứng dụng chất lượng cao và dễ dàng bảo trì.
All rights reserved
