Kubernetes Practice (English) - Manual Blue/Green Deployment
Bài đăng này đã không được cập nhật trong 3 năm
Introduce
When our application is running in production, deploying a new version of the application always requires no downtime, there are several ways to do this and one of the ways to help us avoid downtime is Blue/Green Deployment.

In this post we will learn how to do Blue/Green Deployment manually, in the next post I will show you how to do it automatically using Argo Rollouts. This article I refer to from CNCF Presentation Template K8s Deployment.
Steps to follow
In this article, I use Minikube to run Kubernetes Cluster. We will proceed in the following steps:
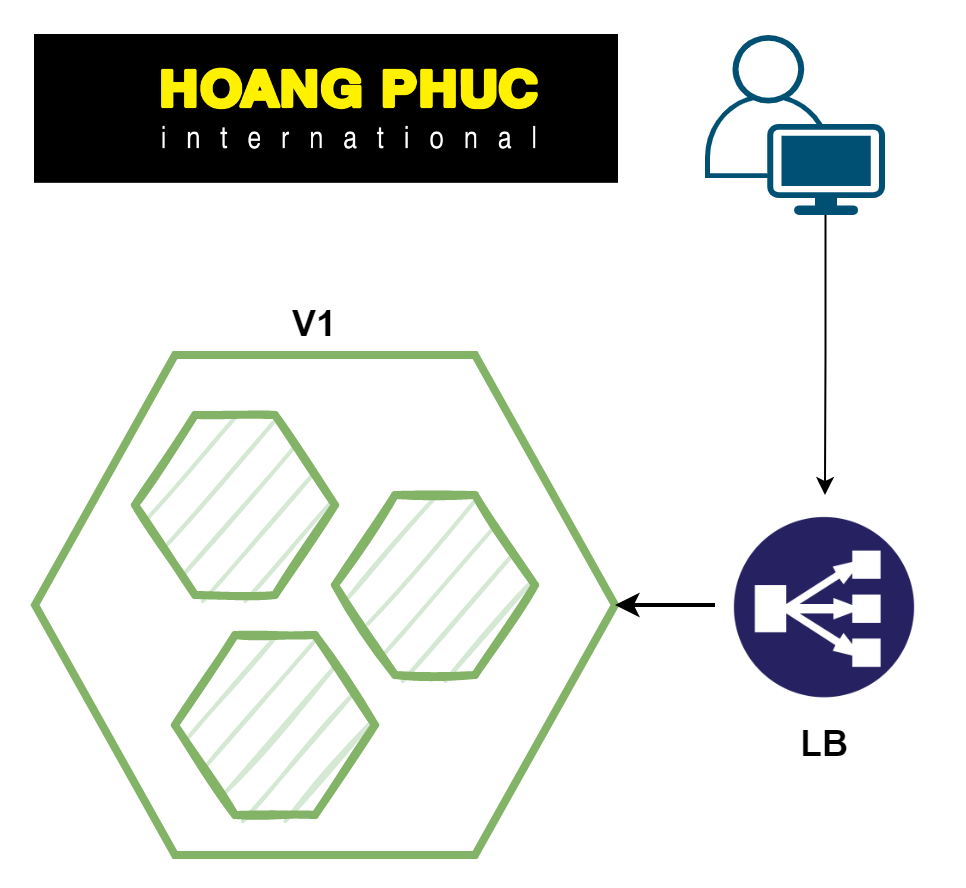
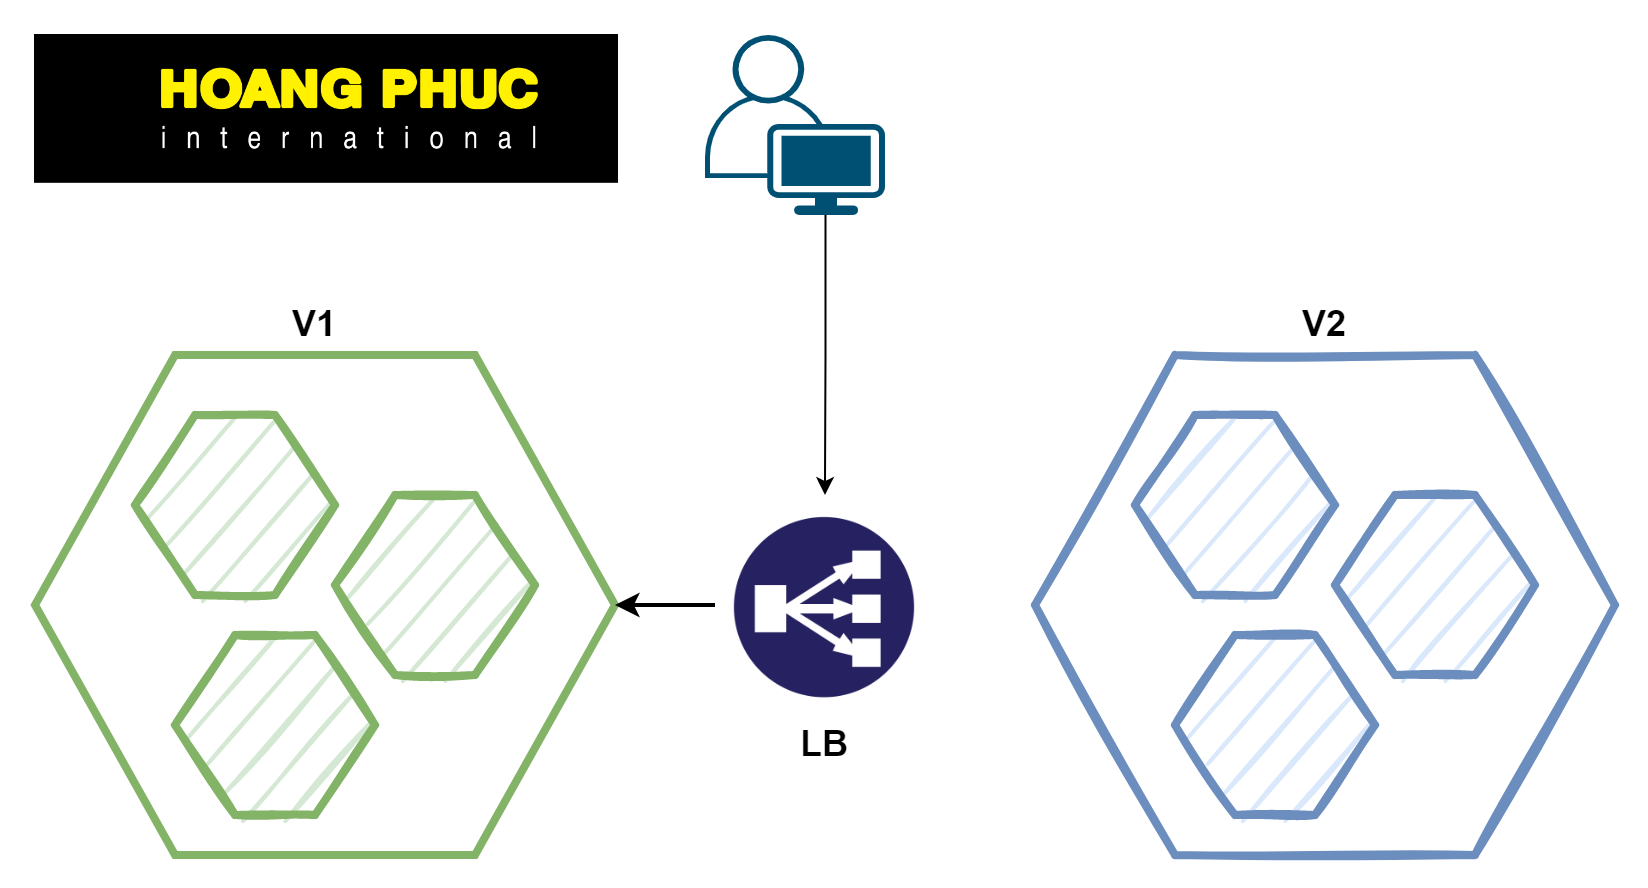
- Call the instance that is running and receiving traffic from our users as version 1
- We deploy a new version of the application as version 2
- Wait for version 2 to run
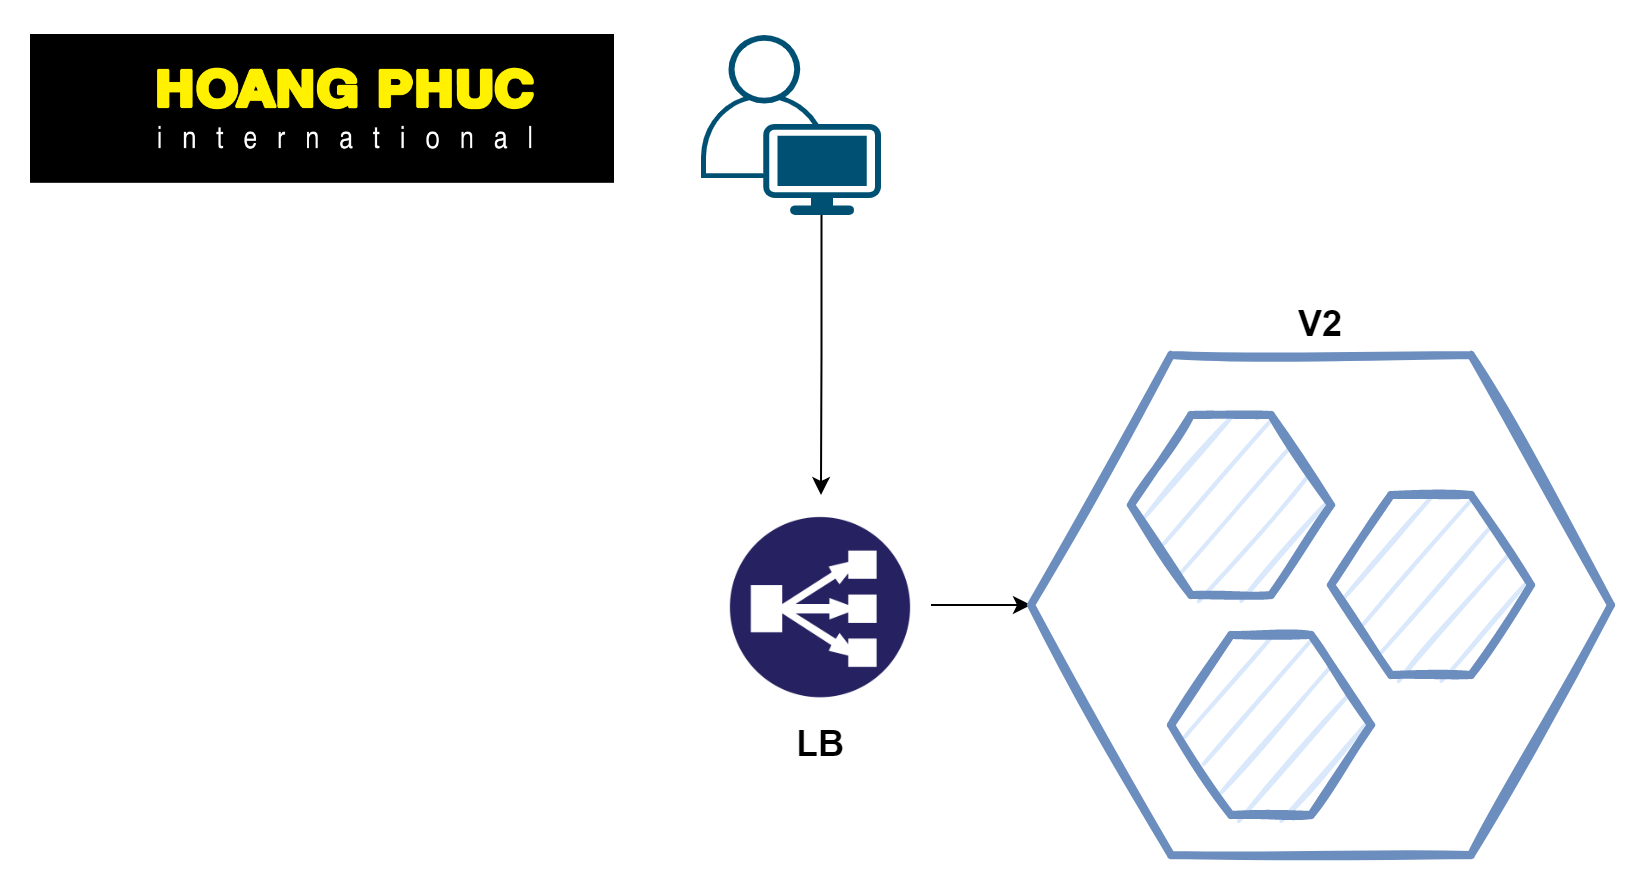
- Switch traffic from version 1 to version 2
- Turn off version 1
In Practice
Let's practice, creating a file named app-v1.yaml to deploy our application version 1, configure it as follows:
apiVersion: apps/v1
kind: Deployment
metadata:
  name: my-app-v1
  labels:
    app: my-app
spec:
  replicas: 3
  selector:
    matchLabels:
      app: my-app
      version: v1.0.0
  template:
    metadata:
      labels:
        app: my-app
        version: v1.0.0
      annotations:
        prometheus.io/scrape: "true"
        prometheus.io/port: "9101"
    spec:
      containers:
      - name: my-app
        image: containersol/k8s-deployment-strategies
        ports:
        - name: http
          containerPort: 8080
        - name: probe
          containerPort: 8086
        env:
        - name: VERSION
          value: v1.0.0
        livenessProbe:
          httpGet:
            path: /live
            port: probe
          initialDelaySeconds: 5
          periodSeconds: 5
        readinessProbe:
          httpGet:
            path: /ready
            port: probe
          periodSeconds: 5
In the file above, we declare a Deployment with two labels "app: my-app" and "version: v1.0.0". I will explain why we need 2 labels.
Next, we create a Service for app-v1 with the file name is service.yaml.
apiVersion: v1
kind: Service
metadata:
  name: my-app
  labels:
    app: my-app
spec:
  type: NodePort
  ports:
  - name: http
    port: 80
    targetPort: http
  # Note here that we match both the app and the version
  selector:
    app: my-app
    version: v1.0.0
The main point here is the selector, as we can see it matches both the app and version labels, and the version label is what we really need to care about. It is the key for us to switch traffic between two versions of the application.
Create Deployment and Service.
kubectl apply -f app-v1.yaml && kubectl apply -f service.yaml
Check all pods are running, if you use Minikube then run as follows:
curl $(minikube service my-app --url)
2022-10-03T20:16:04+07:00 - Host: host-1, Version: v1.0.0
Otherwise, you can use port-forward.
kubectl port-forward <name of pod> 8080:8080
After checking that our version 1 application is running, please turn off port-forward because we will continue to use it later.
Next, we will deploy the new version of the application (version 2). Create a file namedapp-v2.yaml with config as follows:
apiVersion: apps/v1
kind: Deployment
metadata:
  name: my-app-v2
  labels:
    app: my-app
spec:
  replicas: 3
  selector:
    matchLabels:
      app: my-app
      version: v2.0.0
  template:
    metadata:
      labels:
        app: my-app
        version: v2.0.0
      annotations:
        prometheus.io/scrape: "true"
        prometheus.io/port: "9101"
    spec:
      containers:
      - name: my-app
        image: containersol/k8s-deployment-strategies
        ports:
        - name: http
          containerPort: 8080
        - name: probe
          containerPort: 8086
        env:
        - name: VERSION
          value: v2.0.0
        livenessProbe:
          httpGet:
            path: /live
            port: probe
          initialDelaySeconds: 5
          periodSeconds: 5
        readinessProbe:
          httpGet:
            path: /ready
            port: probe
          periodSeconds: 5
You notice in the section labels, we will declare the label version as v2.0.0. Next, we deploy the application version 2.
kubectl apply -f app-v2.yaml
Wait for all Pods to be running state before we continue.
kubectl rollout status deploy my-app-v2 -w
Check that the application version 2 was able to receive traffic.
kubectl port-forward deployment/my-app-v2 8080:8080
Open another terminal and access the application version 2 and make sure it can receive traffic from the user.
curl localhost:8080
If the version 2 application has run successfully and is able to receive traffic, then the next most important part is how to switch the traffic from version 1 to version 2. To do that, we simply update the label of the Service above to version 2. We can edit the YAML file or do it quickly with the patch command.
kubectl patch service my-app -p '{"spec":{"selector":{"version":"v2.0.0"}}}'
At this time, the traffic of the application is switched from version 1 to version 2.

Let's test.
curl $(minikube service my-app --url)
2022-10-03T20:30:54+07:00 - Host: host-1, Version: v2.0.0
Ok, if you see the result is Version: v2.0.0, then we have successfully implemented Blue/Green Deployment. If something happens and you want to go back to version 1, we simply update the label version again.
kubectl patch service my-app -p '{"spec":{"selector":{"version":"v1.0.0"}}}'
Finally, we turn off the application version 1.
kubectl delete deploy my-app-v1
Done 😁. Please like the DevOps VN page to receive notifications of the earliest posts.
Conclusion
So we have learned how to implement Blue/Green Deployment, as you can see, it's not very complicated. But this is just a way to practice playing to know 😁, so in the next post, we will learn how to implement Blue/Green Deployment for a real project with Argo Rollouts.
All rights reserved
