KUBERNETES AUTOSCALING WITH CUSTOM METRICS.
Giới thiệu
Nếu như các bạn đã từng tìm hiểu về Kubernetes thì nó có một tính năng rất đặc biệt đó là có thể tự động mở rộng ( Auto Scaling ) khi workload của hệ thống tăng cao. Nhưng Kubernetes chỉ hỗ trợ Scale dựa trên các giá trị như CPU, RAM.
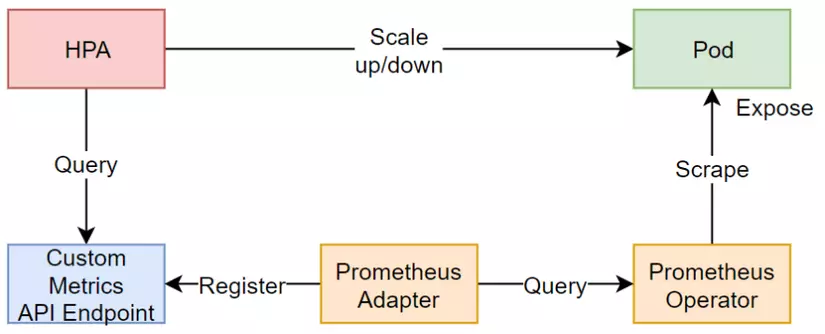
Do đó vấn đề ở đây, nếu bạn là một Devops và bạn đang xây dựng một ứng dụng Web chạy trên tomcat bên cạnh đó sếp còn muốn cái web này ngoài moitor bằng cơm cần phải tự động mở rộng thêm các Pod khi số lượng Request đột ngột tăng cao thì chúng ta phải giải quyết như thế nào? Và để giải quyết vấn đề đó thì trong bài viết này mình sẽ sử dụng giải pháp đó là Custom Metrics trên Kubernetes bằng cách kết hợp các công cụ khác như Prometheus, Prometheus-Adapter, Horizontal Pod Autoscaler (HPA). Metrics mình sử dụng ở đây là tomcat_requestcount_total là metrics sinh ra để tính số lượng request đi vào. Ngoài ra, mở rộng thêm thì chúng ta hoàn toàn có thể auto scale bất kể tình huống nào miễn là chúng ta xác định được metric. Quay lại vấn đề chính thì sơ đồ tổng quan sẽ như thế này.
1.Cài đặt Kubernetes
- Chuẩn bị 2 EC2 trên AWS và để tối ưu chi phí làm lab thì mình sử dụng Instance type là t2.medium với 2 vCPU và 4 GB Memory
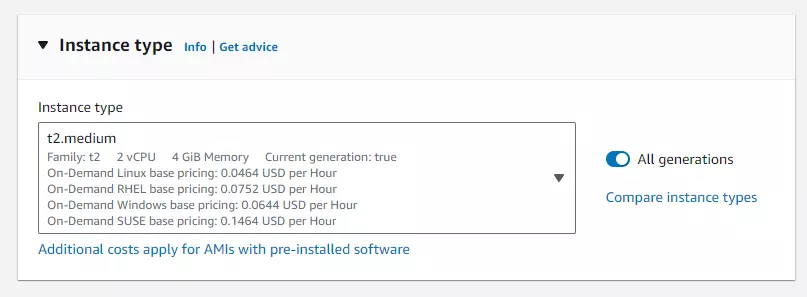
Sau khi tạo ra 2 như sau thì mình sẽ chọn 1 trong 2 làm master và VM còn lại đóng vai trò là client
192.168.10.11 master
192.168.10.12 client
Tiếp theo, ssh vào từng VM và thực hiện các bước sau đây.
- Thực hiện đổi Hostname cho từng VM
sudo hostnamectl set-hostname K8s_master
exec bash
Thực hiện tương tự trên VM còn lại với tên là "k8s_client"
- Disable Swap & Add kernel Parameters
Dùng câu lệnh này để disable swap, thực hiện trên toàn VM
sudo swapoff -a
sudo sed -i '/ swap / s/^\(.*\)$/#\1/g' /etc/fstab
Thêm các mofules
sudo tee /etc/modules-load.d/containerd.conf <<EOF
overlay
br_netfilter
EOF
sudo modprobe overlay
sudo modprobe br_netfilter
Đặt các them số sau cho Kubernetes
sudo tee /etc/sysctl.d/kubernetes.conf <<EOT
net.bridge.bridge-nf-call-ip6tables = 1
net.bridge.bridge-nf-call-iptables = 1
net.ipv4.ip_forward = 1
EOT
Áp dụng các thay đổi
$ sudo sysctl --system
- Cài đặt Containerd Runtime Đầu tiên cài đặt các gói bổ sung
sudo apt install -y curl gnupg2 software-properties-common apt-transport-https ca-certificates
sudo curl -fsSL https://download.docker.com/linux/ubuntu/gpg | sudo gpg --dearmour -o /etc/apt/trusted.gpg.d/docker.gpg
sudo add-apt-repository "deb [arch=amd64] https://download.docker.com/linux/ubuntu $(lsb_release -cs) stable"
- Cài đặt Containerd
sudo apt update
sudo apt install -y containerd.io
- Chỉnh sửa cấu hình Containerd khởi động sử dụng systemd
containerd config default | sudo tee /etc/containerd/config.toml >/dev/null 2>&1
sudo sed -i 's/SystemdCgroup \= false/SystemdCgroup \= true/g' /etc/containerd/config.toml
- Khởi động Containerd
sudo systemctl restart containerd
sudo systemctl enable containerd
- Cài đặt Kubelet, Kubeadm, Kubectl thêm các gói cần thiết để sử dụng Kubernetes apt repository
sudo apt-get update
# apt-transport-https may be a dummy package; if so, you can skip that package
sudo apt-get install -y apt-transport-https ca-certificates curl gpg
Tải xuống public singing key cho Kubernetes package repositories.
curl -fsSL https://pkgs.k8s.io/core:/stable:/v1.31/deb/Release.key | sudo gpg --dearmor -o /etc/apt/keyrings/kubernetes-apt-keyring.gpg
Nếu thư mục /etc/apt/keyrings không tồn tại, bạn có thể tạo bằng lệnh: sudo mkdir -p -m 755 /etc/apt/keyrings
Cài đặt kubelet, kubeadm và kubectl và ghim phiên bản của chúng:
sudo apt-get update
sudo apt-get install -y kubelet kubeadm kubectl
sudo apt-mark hold kubelet kubeadm kubectl
Sẽ mất rất nhiều thời gian để chạy các lệnh trên cho cả 1 VM. Nếu HA được triển khai, sẽ có tới 6 VM trở lên và sẽ mất thời gian gấp 2-3 lần @@. mình rất lười, vì vậy mình đã viếtScriptbên dưới, chỉ cần copy và chạy chúng là hoàn tất. hehe
#!/bin/bash

read -p "Enter name: " name
#-----set hostname
hostnamectl set-hostname $name
#exec bash

echo "Enter your cluster: Ex:
10.1.1.1 master
10.1.1.2 client
more
press enter + enter if done"

while true; do
    read -p "> " line
    if [ -z "$line" ]; then
        break
    fi
    echo "$line" | sudo tee -a /etc/hosts > /dev/null
done

echo "update /etc/hosts."

#------Disable Swap & Add kernel Parameters
swapoff -a
sed -i '/ swap / s/^\(.*\)$/#\1/g' /etc/fstab
tee -a /etc/modules-load.d/containerd.conf <<EOF
overlay
br_netfilter
EOF

modprobe overlay
modprobe br_netfilter

tee -a /etc/sysctl.d/kubernetes.conf <<EOF
net.bridge.bridge-nf-call-ip6tables = 1
net.bridge.bridge-nf-call-iptables = 1
net.ipv4.ip_forward = 1
EOF

sysctl --system

#--Install Containerd Runtime
apt install -y curl gnupg2 software-properties-common apt-transport-https ca-certificates
curl -fsSL https://download.docker.com/linux/ubuntu/gpg | sudo gpg --dearmour -o /etc/apt/trusted.gpg.d/docker.gpg
add-apt-repository "deb [arch=amd64] https://download.docker.com/linux/ubuntu $(lsb_release -cs) stable"
apt update
apt install -y containerd.io
containerd config default | sudo tee /etc/containerd/config.toml >/dev/null 2>&1
sed -i 's/SystemdCgroup \= false/SystemdCgroup \= true/g' /etc/containerd/config.toml
systemctl restart containerd

status="$(systemctl show -p SubState containerd | cut -d'=' -f2)"
if [[ "${status}" == "running" ]]; then
        echo "Service containerd is $status"
else
        echo "Service not running - try install containerd again"
fi
#-------Install Kubectl, Kubeadm and Kubelet
apt-get update
apt-get install -y apt-transport-https ca-certificates curl gpg
curl -fsSL https://pkgs.k8s.io/core:/stable:/v1.31/deb/Release.key | sudo gpg --dearmor -o /etc/apt/keyrings/kubernetes-apt-keyring.gpg
echo 'deb [signed-by=/etc/apt/keyrings/kubernetes-apt-keyring.gpg] https://pkgs.k8s.io/core:/stable:/v1.31/deb/ /' | sudo tee /etc/apt/sources.list.d/kubernetes.list
apt-get update
apt-get install -y kubelet kubeadm kubectl
apt-mark hold kubelet kubeadm kubectl
systemctl enable --now kubelet

exec bash
echo "-----setup done-----"
KHỞI TẠO KUBERNETES
- Sau khi thực hiện xong các trên để chuẩn bị môi trường cho kubernetes thì tại đây chúng ta sẽ khởi tạo để có thể deploy các ứng dụng trên kubernetes.
- Chạy câu lệnh khởi tạo trên master node.
kubeadm init --control-plane-endpoint=k8s-master --upload-certs --skip-phases=addon/kube-proxy
–skip-phases=addon/kube-proxy triển khai cụm Kubernetes mà không có kube-proxy.
khởi tạo cụm thành công sẽ như sau.
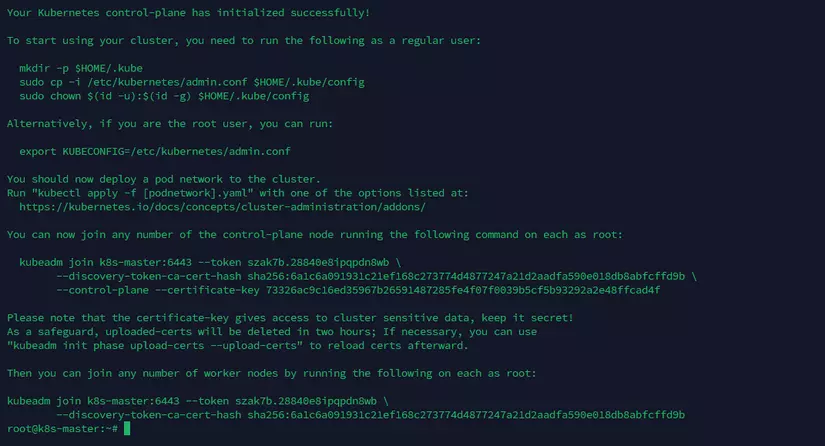
Bắt đầu tương tác với cụm, chạy các lệnh sau trên nút chính.
mkdir -p $HOME/.kube
sudo cp -i /etc/kubernetes/admin.conf $HOME/.kube/config
sudo chown $(id -u):$(id -g) $HOME/.kube/config
Trên client chạy lệnh kubeadm join… xuất hiện khi khởi tạo trên master node thành công

Thiết lập mạng cho Kubernetes
-
Cuối cùng để các thành phần có thể giao tiếp được với nhau trong cụm kubernetes thì thành phần không thể thiếu đó là network.
-
Có rất nhiều loại để thiết lập mạng cho kubernets và trong bài lab này mình chọn Cilium.
-
Bắt đầu vào cài đặt thôi.
curl -LO https://github.com/cilium/cilium-cli/releases/download/v0.16.2/cilium-linux-amd64.tar.gz
curl -LO https://github.com/cilium/cilium-cli/releases/download/v0.16.2/cilium-linux-amd64.tar.gz.sha256sum
Kiểm tra tính toàn vẹn của tập tin
sha256sum --check cilium-linux-amd64.tar.gz.sha256sum
cilium-linux-amd64.tar.gz: OK
Nếu kết quả hiển thị “FAILED”, điều đó có nghĩa là tính toàn vẹn của tệp không được đảm bảo. Bạn nên cân nhắc sử dụng bản phát hành khác.
Giair nén và cài đặt Cilium
Sử dụng lệnh này trước tiên để kiểm tra các phiên bản cilium có sẵncilium install --list-versions
tar xzvfC cilium-linux-amd64.tar.gz /usr/local/bin/
cilium install --version 1.15.0
Vậy là chúng ta đã có một cụm Kubernetes được cài đặt đầy đủ và sẵn sàng sử dụng.

2. THIẾT LẬP TOMCAT
Bạn phải tạo tài khoản Docker Hub của riêng mình để sử dụng làm nơi lưu trữ image cho Kubernetes.
- trong bài lab này mình sẽ sử metrics của tomcat để làm điều kiện scale pod trong kubernetes và để có được thông tin đó mình sẽ sử dụng JMX Exporter
- JMX Exporter là gì , Prometheus JMX Exporter là một java agent, có khả năng truy cập máy chủ MBean để truy cập dữ liệu và chuyển đổi dữ liệu đó thành định dạng số liệu Prometheus. Sau đó, Prometheus sẽ trích xuất số liệu từ đường dẫn lưu trữ số liệu mặc định của JMX Exporter, đó là /metrics.
- Nếu bạn tò mò, mình đã viết một script thiết lập tomcat, bạn có thể chạy nó trên máy Linux của mình để xem JMX Exporter lấy thông tin gì từ tomcat.
#!/bin/bash
install_jdk() {
    wget https://download.java.net/java/ga/jdk11/openjdk-11_linux-x64_bin.tar.gz
    tar xzvf openjdk-11_linux-x64_bin.tar.gz
    mv jdk-11 /opt/
    update-alternatives --install /usr/bin/java java /opt/jdk-11/bin/java 1
    update-alternatives --install /usr/bin/javac javac /opt/jdk-11/bin/javac 1

}

install_tomcat() {

    mkdir -p /opt/tomcat
    wget -c https://archive.apache.org/dist/tomcat/tomcat-9/v9.0.62/bin/apache-tomcat-9.0.62.tar.gz
    tar xzvf apache-tomcat-9.0.62.tar.gz -C /opt/tomcat/ --strip-components=1

    groupadd tomcat
    useradd --no-create-home --shell /bin/false tomcat -g tomcat

    chown -R tomcat:tomcat /opt/tomcat/

    cat <<EOF > /opt/tomcat/prometheus.yml
---
lowercaseOutputLabelNames: true
lowercaseOutputName: true
rules:
- pattern: 'Catalina<type=GlobalRequestProcessor, name=\"(\w+-\w+)-(\d+)\"><>(\w+):'
  name: tomcat_\$3_total
  labels:
    port: "\$2"
    protocol: "\$1"
  help: Tomcat global \$3
  type: COUNTER
- pattern: 'Catalina<j2eeType=Servlet, WebModule=//([-a-zA-Z0-9+&@#/%?=~_|!:.,;]*[-a-zA-Z0-9+&@#/%=~_|]), name=([-a-zA-Z0-9+/$%~_-|!.]*), J2EEApplication=none, J2EEServer=none><>(requestCount|maxTime|processingTime|errorCount):'
  name: tomcat_servlet_\$3_total
  labels:
    module: "\$1"
    servlet: "\$2"
  help: Tomcat servlet \$3 total
  type: COUNTER
- pattern: 'Catalina<type=ThreadPool, name="(\w+-\w+)-(\d+)"><>(currentThreadCount|currentThreadsBusy|keepAliveCount|pollerThreadCount|connectionCount):'
  name: tomcat_threadpool_\$3
  labels:
    port: "\$2"
    protocol: "\$1"
  help: Tomcat threadpool \$3
  type: GAUGE
- pattern: 'Catalina<type=Manager, host=([-a-zA-Z0-9+&@#/%?=~_|!:.,;]*[-a-zA-Z0-9+&@#/%=~_|]), context=([-a-zA-Z0-9+/$%~_-|!.]*)><>(processingTime|sessionCounter|rejectedSessions|expiredSessions):'
  name: tomcat_session_\$3_total
  labels:
    context: "\$2"
    host: "\$1"
  help: Tomcat session \$3 total
  type: COUNTER
- pattern: 'java.lang<type=OperatingSystem><>(committed_virtual_memory|free_physical_memory|free_swap_space|total_physical_memory|total_swap_space)_size:'
  name: os_\$1_bytes
  type: GAUGE
  attrNameSnakeCase: true
- pattern: 'java.lang<type=OperatingSystem><>((?!process_cpu_time)\w+):'
  name: os_\$1
  type: GAUGE
  attrNameSnakeCase: true

EOF

    cat <<EOF > /opt/tomcat/bin/setenv.sh
CATALINA_OPTS="\$CATALINA_OPTS -javaagent:/opt/jmx_prometheus_javaagent-0.19.0.jar=8182:/opt/tomcat/prometheus.yml"
Environment=JAVA_HOME=/opt/jdk-11
export JAVA_HOME=/opt/jdk-11
EOF

    wget https://repo1.maven.org/maven2/io/prometheus/jmx/jmx_prometheus_javaagent/0.19.0/jmx_prometheus_javaagent-0.19.0.jar
    mv jmx_prometheus_javaagent-0.19.0.jar /opt/


}
install_jdk
install_tomcat
Chạy lệnh này để khởi động máy chủ Tomcat.
/opt/tomcat/bin/startup.sh
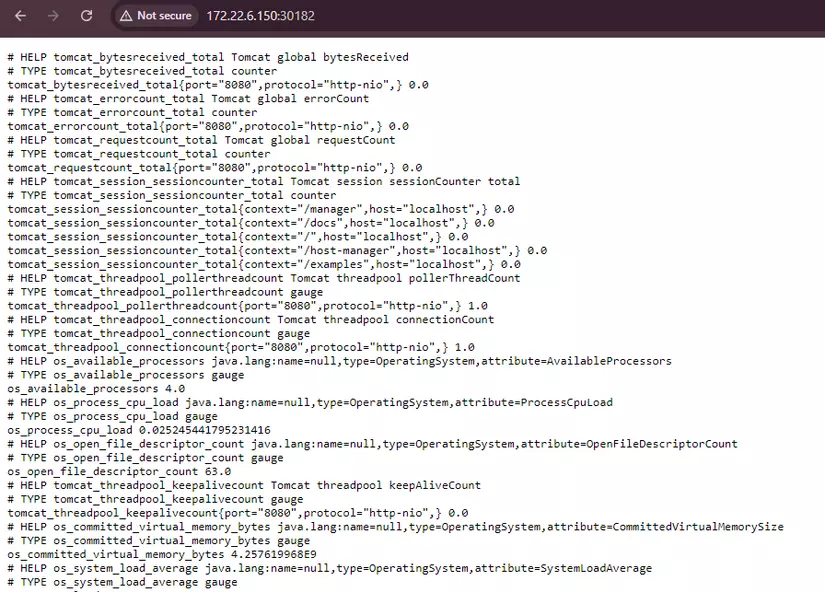
Tomcat chạy trên cổng 8080 và dữ liệu được hiển thị trên cổng 8182.
Metrics sẽ trông như thế này
- Tiếp theo sẽ tạo image tomcat để sử dụng deploy trên Kubernetes
- Sử dụng một VM khác để tạo image, yêu cầu VM đó đã cài đặt Docker.
- Thực hiện lệnh bên dưới để tạo thư mục và Dockerfile.
mkdir tomcat
cd tomcat
#Prepare the necessary files. Versions may vary depending on your purpose.
wget https://download.java.net/java/ga/jdk11/openjdk-11_linux-x64_bin.tar.gz
wget -c https://archive.apache.org/dist/tomcat/tomcat-9/v9.0.62/bin/apache-tomcat-9.0.62.tar.gz
wget https://repo1.maven.org/maven2/io/prometheus/jmx/jmx_prometheus_javaagent/0.19.0/jmx_prometheus_javaagent-0.19.0.jar
touch Dockerfile
- Thêm các dòng bên dưới vào Dockerfile
FROM ubuntu:20.04
RUN apt-get update && apt-get install -y tar \
    && rm -rf /var/lib/apt/lists/*

COPY openjdk-11_linux-x64_bin.tar.gz /tmp/
RUN mkdir -p /opt/jdk-11 \
    && tar xzvf /tmp/openjdk-11_linux-x64_bin.tar.gz -C /opt/jdk-11/ --strip-components=1 \
    && update-alternatives --install /usr/bin/java java /opt/jdk-11/bin/java 1 \
    && update-alternatives --install /usr/bin/javac javac /opt/jdk-11/bin/javac 1

COPY apache-tomcat-9.0.62.tar.gz /tmp/
RUN mkdir -p /opt/tomcat \
    && tar xzvf /tmp/apache-tomcat-9.0.62.tar.gz -C /opt/tomcat/ --strip-components=1

RUN groupadd tomcat \
    && useradd --no-create-home --shell /bin/false tomcat -g tomcat \
    && chown -R tomcat:tomcat /opt/tomcat/

COPY prometheus.yml /opt/tomcat/
COPY setenv.sh /opt/tomcat/bin/

COPY jmx_prometheus_javaagent-0.19.0.jar /opt/
EXPOSE 8182 8080
CMD ["/opt/tomcat/bin/catalina.sh", "run"]
- Tạo image bằng lệnh sau
docker build -t my-tomcat-image .
- Trong máy của bạn, hãy đăng nhập vào Docker Hub. Bạn sẽ được yêu cầu nhập tên người dùng và mật khẩu. Mật khẩu sẽ được mã hóa và lưu trữ cục bộ.
docker login
- Gắn tag image
#docker tag <image_id> <dockerhub_username>/<repository_name>:<tag>
docker tag 282612a56d35 nessa13044/tomcat-k8s:v1
- Đẩy image vào DockerHub
docker push nessa13044/tomcat-k8s:v1
- Kiểm tra image đã xuất hiện trên DockerHub.

3.THIẾT LẬP MONITORING TRÊN KUBERNETES
- Thiết lập Prometheus trên Kubernetes
git clone https://github.com/techiescamp/kubernetes-prometheus
- Tạo Namespace & ClusterRole
- Đầu tiên, chúng ta sẽ tạo một namespace trên Kubernetes cho tất cả các thành phần giám sát của mình. Nếu bạn không chỉ định namespace, tất cả các đối tượng triển khai Prometheus Kubernetes sẽ được triển khai trên namespace mặc định.
- Thực hiện lệnh sau để tạo không gian tên mới có tên là monitoring.
kubectl create namespace monitoring
Prometheus sử dụng API Kubernetes để đọc tất cả các metric có sẵn từ Node, Pod, Deployment, v.v. Vì lý do này, chúng ta cần tạo chính sách RBAC có quyền đọc vào các nhóm API bắt buộc và liên kết chính sách với namespace monitoring.
- Tạo RBAC từ tệp clusterRole.yaml mặc định clusterRole.yaml
apiVersion: rbac.authorization.k8s.io/v1
kind: ClusterRole
metadata:
  name: prometheus
rules:
- apiGroups: [""]
  resources:
  - nodes
  - nodes/proxy
  - services
  - endpoints
  - pods
  verbs: ["get", "list", "watch"]
- apiGroups:
  - extensions
  resources:
  - ingresses
  verbs: ["get", "list", "watch"]
- nonResourceURLs: ["/metrics"]
  verbs: ["get"]
---
apiVersion: rbac.authorization.k8s.io/v1
kind: ClusterRoleBinding
metadata:
  name: prometheus
roleRef:
  apiGroup: rbac.authorization.k8s.io
  kind: ClusterRole
  name: prometheus
subjects:
- kind: ServiceAccount
  name: default
  namespace: monitoring
-
Một chút giải thích về Role trên, các cấu hình mặc định là quá đủ cho bài lab này, bạn có thể thấy rằng các quyền get, list và watch được thêm vào các nodes, service endpoints, pod và ingress. Ràng buộc vai trò được ràng buộc với namespace monitoriing. Nếu bạn có bất kỳ trường hợp sử dụng nào để lấy số liệu từ bất kỳ đối tượng nào khác, bạn cần chỉnh sửa lại file trên.
-
Tạo role bằng lệnh sau.
kubectl create -f clusterRole.yaml
-
Tạo config-map cho Prometheus
-
Tất cả các cấu hình cho Prometheus đều là một phần của tệp prometheus.yaml và tất cả các quy tắc cảnh báo cho Alertmanager đều được cấu hình trong prometheus.rules .
-
prometheus.yaml : Đây là cấu hình Prometheus chính chứa tất cả các cấu hình thu thập dữ liệu, thông tin chi tiết về khám phá dịch vụ, vị trí lưu trữ, cấu hình lưu giữ dữ liệu, v.v.
-
prometheus.rules : Tệp này chứa tất cả các quy tắc cảnh báo của Prometheus
-
Bằng cách đưa cấu hình Prometheus vào Kubernetes bằng config-map, bất cứ khi nào bạn cần thêm hoặc xóa cấu hình. Bạn cần cập nhật config-map và khởi động lại các pod Prometheus để áp dụng cấu hình mới.
-
Trong bài lab này mình không sử dụng rometheus.rules . có thể mình sẽ thiết lập nó trong phòng thí nghiệm tiếp theo
-
Mở tệp config-map.yaml và thêm yaml bên dưới. Các cấu hình bên dưới sẽ lấy được số liệu tomcat mà chúng ta muốn có.
      - job_name: 'tomcat'
        kubernetes_sd_configs:
        - role: endpoints
        relabel_configs:

        - source_labels: [__meta_kubernetes_namespace]
          action: replace
          target_label: kubernetes_namespace
        - source_labels: [__meta_kubernetes_pod_name]
          action: replace
          target_label: kubernetes_pod_name

        - source_labels: [__meta_kubernetes_endpoints_name]
          regex: 'tomcat-service'
          action: keep
        - source_labels: [__meta_kubernetes_endpoint_port_name]
          regex: 'prometheus'
          action: keep
- Thực hiện câu lệnh sau để tạo config-map
kubectl create -f config-map.yaml
**giải thích một chút về cấu hình config-map trên **
- Đầu tiên, chúng ta cần xác định endpoint của service tomcat
kubectl get endpoints -A

-
như bạn thấy tomcat-service là mục tiêu mình muốn lấy nên mình sử dụng regex để chỉ lấy tomcat-service.
-
Regex tiếp theo mình sẽ chỉ định để chỉ lấy cổng mà tomcat hiển thị số liệu. Vì tomcat sẽ hiển thị 2 cổng 8080 và 8182 và chỉ có 1 cổng có số liệu, do đó để tránh nhầm lẫn, mình chỉ lấy cổng chứa số liệu 8182 có tên là prometheus .
-
Deploy prometheus
kubectl create -f prometheus-deployment.yaml
- Kiểm tra kết nối với Prometheus Dashboard, hiển thị Prometheus dưới dạng dịch vụ NodePort.
- Tạo một tệp có tên prometheus-service.yaml và sao chép nội dung sau. Điều này sẽ hiển thị Prometheus trên tất cả IP của VM kubernetes trên cổng 30000.
apiVersion: v1
kind: Service
metadata:
  name: prometheus-service
  namespace: monitoring
  annotations:
      prometheus.io/scrape: 'true'
      prometheus.io/port:   '9090'
spec:
  selector:
    app: prometheus-server
  type: NodePort
  ports:
    - port: 8080
      targetPort: 9090
      nodePort: 30000
kubectl apply -f prometheus-service.yaml
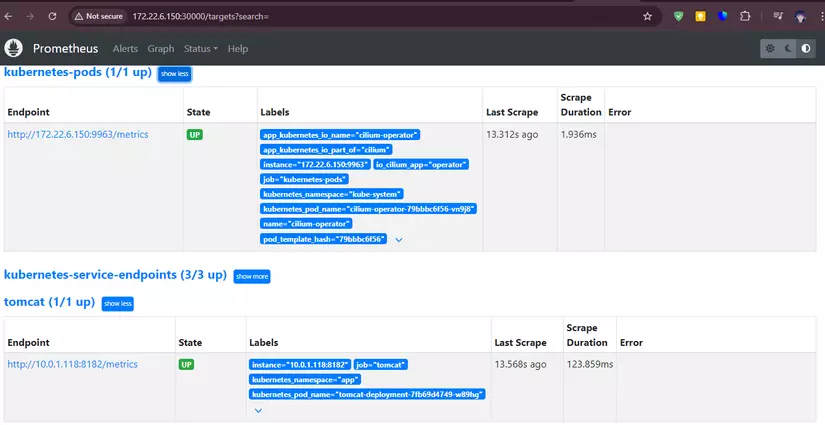
- Bây giờ truy cập vào ip:port 30000, chúng ta có thể thấy prometheus đã lấy số liệu của pod tomcat.
4. THIẾT LẬP PROMETHEUS-ADAPTER
- Tải xuống Prometheus Adapter Manifest, Sử dụng lệnh bên dưới để sao chép tệp yaml.
git clone https://github.com/kubernetes-sigs/prometheus-adapter.git
- Di chuyển vào thư mục deploy/manifests và bạn sẽ thấy được tất cả các file cần thiết
- Chúng ta cần chỉnh sửa một số cấu hình để phù hợp hơn với bài lab này.
- Mở tệp api-service.yaml
apiVersion: apiregistration.k8s.io/v1
kind: APIService
metadata:
  labels:
    app.kubernetes.io/component: metrics-adapter
    app.kubernetes.io/name: prometheus-adapter
    app.kubernetes.io/version: 0.12.0
  #name: v1beta1.metrics.k8s.io
  name: v1beta1.custom.metrics.k8s.io
spec:
  #group: metrics.k8s.io
  group: custom.metrics.k8s.io
  groupPriorityMinimum: 100
  insecureSkipTLSVerify: true
  service:
    name: prometheus-adapter
    namespace: monitoring
  version: v1beta1
  versionPriority: 100
- Thay đổi API hỗ trợ Kubernetes thành custom.metrics.k8s.io
- Tiếp theo, hãy thay thế tệp configmap.yaml bên dưới để xác định và lấy metric tomcat_requestcount_total từ các pod Tomcat
apiVersion: v1
data:
  config.yaml: |
    rules:
    #- seriesQuery: 'tomcat_requestcount_total'
    - seriesQuery: '{__name__=~"^tomcat_.*",instance!=""}'
      #resources: {overrides: {job: {resource: "job"}}}
      resources:
        overrides:
          instance: {resource: "node"}
          job: {resource: "job"}
          kubernetes_namespace: {resource: "namespace"}
          kubernetes_pod_name: {resource: "pod"}
      name:
        matches: "tomcat_requestcount_total"
        #matches: "^tomcat_(.*)$"
      metricsQuery: "sum(rate(<<.Series>>{<<.LabelMatchers>>}[3m])*180) by (<<.GroupBy>>)"
    externalRules:
    - seriesQuery: 'tomcat_requestcount_total'
      resources:
        overrides:
          instance: {resource: "node"}
          job: {resource: "job"}
          kubernetes_namespace: {resource: "namespace"}
          kubernetes_pod_name: {resource: "pod"}
      name:
        matches: "tomcat_requestcount_total"
        as: "tomcat_requestcount_total"
      metricsQuery: "sum(rate(<<.Series>>{<<.LabelMatchers>>}[3m])*180) by (<<.GroupBy>>)"

kind: ConfigMap
metadata:
  labels:
    app.kubernetes.io/component: metrics-adapter
    app.kubernetes.io/name: prometheus-adapter
    app.kubernetes.io/version: 0.12.0
  name: adapter-config
  namespace: monitoring
- Deploy prometheus-adapter, thực hiện theo lệnh để hoàn tất triển khai bộ điều hợp.
kubectl create -f prometheus-adapter/deploy/manifests/
- Như chúng ta có thể thấy, prometheus-adapter triển khai thành công và chạy trên kubernetes
~# kubectl get pod -A -o wide
NAMESPACE     NAME                                    READY   STATUS    RESTARTS   AGE   IP              NODE         NOMINATED NODE   READINESS GATES
app           tomcat-deployment-7fb69d4749-fnpd4      1/1     Running   0          36m   10.0.1.99       k8s-worker   <none>           <none>
kube-system   cilium-8phqv                            1/1     Running   0          76m   172.22.6.150    k8s-worker   <none>           <none>
kube-system   cilium-bgvjv                            1/1     Running   0          76m   172.22.11.124   k8s-master   <none>           <none>
kube-system   cilium-operator-79bbbc6f56-sdlwq        1/1     Running   0          76m   172.22.6.150    k8s-worker   <none>           <none>
kube-system   coredns-6f6b679f8f-6ljtz                1/1     Running   0          78m   10.0.0.8        k8s-master   <none>           <none>
kube-system   coredns-6f6b679f8f-btcxx                1/1     Running   0          78m   10.0.0.114      k8s-master   <none>           <none>
kube-system   etcd-k8s-master                         1/1     Running   0          79m   172.22.11.124   k8s-master   <none>           <none>
kube-system   kube-apiserver-k8s-master               1/1     Running   0          79m   172.22.11.124   k8s-master   <none>           <none>
kube-system   kube-controller-manager-k8s-master      1/1     Running   30         79m   172.22.11.124   k8s-master   <none>           <none>
kube-system   kube-scheduler-k8s-master               1/1     Running   30         79m   172.22.11.124   k8s-master   <none>           <none>
monitoring    prometheus-adapter-777cb6d9d8-5lpp8     1/1     Running   0          32m   10.0.1.58       k8s-worker   <none>           <none>
monitoring    prometheus-deployment-5b9f6c9dd-z8s9f   1/1     Running   0          36m   10.0.1.30       k8s-worker   <none>           <none>
- kiểm tra xem đã lấy được metrics từ pod Tomcat hay chưa
~# kubectl get --raw "/apis/custom.metrics.k8s.io/v1beta1/" | jq .
{
  "kind": "APIResourceList",
  "apiVersion": "v1",
  "groupVersion": "custom.metrics.k8s.io/v1beta1",
  "resources": [
    {
      "name": "namespaces/tomcat_requestcount_total",
      "singularName": "",
      "namespaced": false,
      "kind": "MetricValueList",
      "verbs": [
        "get"
      ]
    },
    {
      "name": "pods/tomcat_requestcount_total",
      "singularName": "",
      "namespaced": true,
      "kind": "MetricValueList",
      "verbs": [
        "get"
      ]
    },
    {
      "name": "nodes/tomcat_requestcount_total",
      "singularName": "",
      "namespaced": false,
      "kind": "MetricValueList",
      "verbs": [
        "get"
      ]
    },
    {
      "name": "jobs.batch/tomcat_requestcount_total",
      "singularName": "",
      "namespaced": true,
      "kind": "MetricValueList",
      "verbs": [
        "get"
      ]
    }
  ]
}
- Chúng ta có thể thấy rằng số liệu tomcat_requestcount_total có sẵn trên tất cả các tomcat triển khai. Bây giờ, hãy kiểm tra giá trị hiện tại của số liệu này.
~# kubectl get --raw "/apis/custom.metrics.k8s.io/v1beta1/namespaces/app/pods/*/tomcat_requestcount_total" | jq .
{
  "kind": "MetricValueList",
  "apiVersion": "custom.metrics.k8s.io/v1beta1",
  "metadata": {},
  "items": [
    {
      "describedObject": {
        "kind": "Pod",
        "namespace": "app",
        "name": "tomcat-deployment-7fb69d4749-fnpd4",
        "apiVersion": "/v1"
      },
      "metricName": "tomcat_requestcount_total",
      "timestamp": "2024-09-16T15:53:02Z",
      "value": "0",
      "selector": null
    }
  ]
}
- Thành công, trong phần tiếp theo mình sẽ sử dụng metrics này để làm điều kiện mở rộng
5. Setup Horizontal Pod Autoscaling - HPA
- Các metrics tùy chỉnh phải được gắn nhãn và hiển thị theo cách mà HPA có thể truy vấn.
- Để sử dụng metrics tùy chỉnh, hãy tạo hoặc sửa đổi tài nguyên HPA. Dưới đây là ví dụ về cấu hình YAML cho HPA có thể mở rộng dựa trên số liệu ta vừa có được ở bước trên
apiVersion: autoscaling/v2
kind: HorizontalPodAutoscaler
metadata:
  name: hpa-tomcat
spec:
  scaleTargetRef:
    apiVersion: apps/v1
    kind: Deployment
    name: tomcat-deployment
  minReplicas: 1
  maxReplicas: 3
  metrics:
  - type: Pods
    pods:
      metric:
        name: "tomcat_requestcount_total"
      target:
        type: AverageValue
        averageValue: 1000000m
- Tạo HPA bằng lệnh sau.
kubectl create -f hpa-tomcat.yaml -n app
Lưu ý: Bạn phải triển khai hpa trong cùng không gian tên với các pod mà bạn muốn mở rộng quy mô.
- Bây giờ, chúng ta hãy kiểm tra trạng thái hiện tại của HPA như sau.
~# kubectl get hpa -A
NAMESPACE   NAME         REFERENCE                      TARGETS   MINPODS   MAXPODS   REPLICAS
app         hpa-tomcat   Deployment/tomcat-deployment   0/1000      1         3         1
- Có thể thấy target đang là 0/1000 có nghĩa là khi trung bình có hơn 1000 request đi vào tâts cả các pod Tomcat thì sẽ scale thêm 1 pod mới.
~# kubectl describe hpa -A
Name:                                   hpa-tomcat
Namespace:                              app
Labels:                                 <none>
Annotations:                            <none>
CreationTimestamp:                      Mon, 16 Sep 2024 16:42:58 +0000
Reference:                              Deployment/tomcat-deployment
Metrics:                                ( current / target )
  "tomcat_requestcount_total" on pods:  14400m / 10
Min replicas:                           1
Max replicas:                           3
Deployment pods:                        1 current / 2 desired
Conditions:
  Type            Status  Reason              Message
  ----            ------  ------              -------
  AbleToScale     True    SucceededRescale    the HPA controller was able to update the target scale to 2
  ScalingActive   True    ValidMetricFound    the HPA was able to successfully calculate a replica count from pods metric tomcat_requestcount_total
  ScalingLimited  False   DesiredWithinRange  the desired count is within the acceptable range
Events:
  Type     Reason                        Age                   From                       Message
  ----     ------                        ----                  ----                       -------
  Normal   SuccessfulRescale             5s (x2 over 4d23h)    horizontal-pod-autoscaler  New size: 2; reason: pods metric tomcat_requestcount_total above target
6. DEMO
- Đầu tiên ta sẽ giả lập một lượng request http lớn đi vào các 1 pod tomcat đang deploy trên kubernetes và sau khi lượng request vượt ngưỡng thì cùng xem tiến trình autoscale của kubernetes
- Sử dụng lệnh này để tạo một pod có tên là “loadgenerator” và liên tục gửi các yêu cầu HTTP đến một địa chỉ IP (ở đây là dịch vụ 10.98.29.31:8080 của tomcat) để mô phỏng tải tăng lên trên dịch vụ tại địa chỉ đó.
hãy thay đổi ip của service tomcat bằng ip thích hợp
kubectl run -it --rm --restart=Never loadgenerator --image=busybox -- sh -c "while true; do wget -O - -q http://10.98.29.31:8080; done"
- Trên VM mở terminal và chạy câu lệnh sau đây để xem quá trình scale
kubectl get hpa -A -w

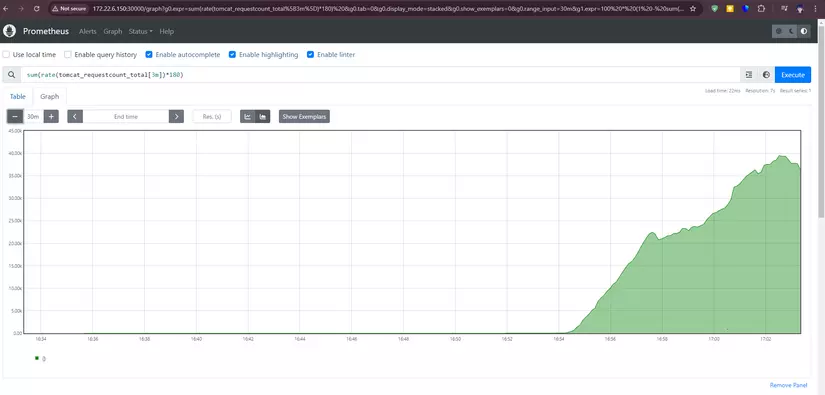
- Như bạn có thể thấy, số lượng http request (hơn 30k ở đây) thì số lượng pod sẽ tự động mở rộng thành 3 bản sao theo cấu hình phía trên của mình. vì mình thiết lập trên HPA max pod là 3 nên chỉ tối đa 3 pod được sinh ra. Bạn có thể tùy chỉnh bao nhiêu pod tùy ý dựa vào workload của bạn.
- Bạn cũng quan sát được quá trình scale lên trên terminal diễn ra như sau:

Vậy là mình vừa hoàn thành xong phần lab về mở rộng ứng dụng bằng Custom-metrics trên Kubernetes, các bạn có câu hỏi nào thì để ở phần bình luận nhé
All rights reserved