JWT with Laravel 5.5 and Angular 4 (P2)
Bài đăng này đã không được cập nhật trong 8 năm
Chào các bạn, ở bài viết lần trước chúng ta đã viết api cho tất cả các hoạt động mà ta sẽ đi qua.
Trong bài viết phần này mình sẽ trình bày về Login nhé.
Phần II: Login
B1: Cài đặt package LARAVEL-CORS
- Các bạn có thể xem định nghĩa tại đây
- Sau đó run server lên nhé (php artisan server) nếu bị xung đột cổng thì bạn có thể thêm giá trị --port = xxxx (với x là cổng khác, vì mặc định cổng sẽ là 8000)
B2: Cài đặt package AdminLTE
- Để thuận tiện cho việc tạo project và viết code chuẩn chỉ hơn các bạn nên cài đặt package sau:
git clone https://github.com/csotomon/Angular2-AdminLTE.git - Package này sẽ giúp bạn có 1 giao diện để thực hành dễ hơn và hơn nữa bạn cũng có thể tự học cấu trúc của một module - 1 điểm mạnh trong Angular đó là tính module hóa (ta sẽ không sử dụng tất cả và có thể lược bỏ bớt).
Sau đó chạy lệnh
npm installđể cài đặt cách package trong npm. - Cần phải cài đặt thêm 1 package nữa nếu như máy bạn chưa có Angular@Cli :
npm install -g @angular/cli
B3: Kết nối client đến server.
Cấu hình lại file src/environments/environment.prod.ts bạn thêm dòng này vào file: api_url: 'http://domain/api'
Sau đó bạn chạy lệnh npm serve để run project Angular (localhost:4200)
B4: Tạo các thành phần trong phần login
- Theo đúng tính chất làm việc của angular thì ta sẽ tạo auth module để làm việc.
Chạy lệnh : ng g module auth sau đó Angular@Cli sẽ tự tạo cho chúng ta file module như thế này
/* src/app/auth/auth.module.ts  */
import { NgModule } from '@angular/core';
import { CommonModule } from '@angular/common';

@NgModule({
  imports: [
    CommonModule
  ],
  declarations: []
})
export class AuthModule { }
Trong folder auth vừa được tạo:
- Tạo login component (bao gồm phần xử lý, giao diên)
ng g c loginvà profile componentng g c profile - Tạo auth service (các kết nối đến server)
ng g s auth. - Tạo model
ng g m model
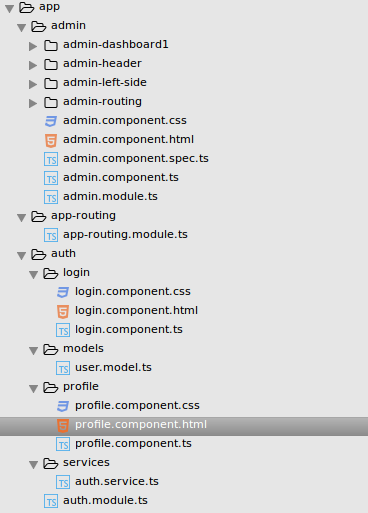
Sau khi tạo đầy đủ và mình đã lược bỏ những phần không cần thì chúng ta sẽ có 1 cấu trúc thư mục như thế này
B5: Code thoaiiii
- Thêm AuthModule vào @NgModule (src/app/app.module.ts) và sửa lại declarations
...
import { AuthModule } from './auth/auth.module';

@NgModule({
    declarations: [
        AppComponent,
      ],
    imports: [
    ...
    AuthModule,
    ],
    ...
})
export class AppModule { }
- Import các library, component, service vào auth module (src/app/auth/auth.module.ts)
import { RouterModule } from '@angular/router';
import { NgModule } from '@angular/core';
import { CommonModule } from '@angular/common';
import { ReactiveFormsModule } from '@angular/forms';
import { HttpClientModule } from '@angular/common/http';

import { AuthService } from './services/auth.service';
import { LoginComponent } from './login/login.component';

@NgModule({
  imports: [
    CommonModule,
    ReactiveFormsModule,
    HttpClientModule,
    RouterModule
  ],
  declarations: [
    LoginComponent,
  ],
  providers: [
    AuthService
  ]
})
export class AuthModule { }
- Thay đổi lại router
- app-routing (src/app/app-routing/app-routing.module.ts)
...
import { LoginComponent } from './../auth/login/login.component';

@NgModule({
  imports: [
    RouterModule.forRoot([
      { path: '', redirectTo: 'admin', pathMatch: 'full' },
      { path: 'auth/login', component: LoginComponent },
    ])
  ],
    ...
})
export class AppRoutingModule { }
- admin-routing (src/app/admin-routing/admin-routing.module.ts)
import { AdminDashboard1Component } from './../admin-dashboard1/admin-dashboard1.component';
import { AdminComponent } from './../admin.component';
import { NgModule, Component } from '@angular/core';
import { CommonModule } from '@angular/common';
import { RouterModule } from '@angular/router';
import { AuthGuard } from './../../guards/auth.guard';

@NgModule({
  imports: [
    RouterModule.forChild([
      {
        path: 'admin',
        component: AdminComponent,
          canActivate: [AuthGuard],
          canActivateChild: [AuthGuard],
        children: [
          {
            path: '',
            redirectTo: 'dashboard1',
            pathMatch: 'full'
          },
          {
            path: 'dashboard1',
            component: AdminDashboard1Component
          },
        ]
      }
    ])
  ],
  exports: [
    RouterModule
  ]
})
export class AdminRoutingModule { }
Bạn thay đổi lại file admin.component.html sau khi đã loại bỏ bớt các component trong admin.component
<div class="wrapper">
  <app-admin-header></app-admin-header>
  <app-admin-left-side></app-admin-left-side>
  <router-outlet></router-outlet> /* router outlet là phần chứa các view con thay đổi */
</div>
Bạn để ý phần có chứa redirectTo nó sẽ hoạt động như sau
- nếu ta chỉ vào
localhost:4200thì angular sẽredirectTo sang adminsau đó nó sẽ vào AdminComponent (ở đây bạn thấy phần canActivate là để nó sẽ kiểm tra login nếu chưa đăng nhập thì sẽ redirec lai sangauth/login) - và nếu đăng nhập rồi thì nó sẽ chạy xuống các childRouter.
- Thiết lập model (src/app/models/user.model.ts)
export class User {
    id: number;
    name: string;
    email: string;
    create_at: string;
    updated_at: string;
}
- Service
import { Injectable } from '@angular/core';
import { HttpClient } from '@angular/common/http';
import { environment } from './../../../environments/environment.prod';
import 'rxjs/add/operator/do';
import { Observable } from 'rxjs/Observable';
import { User } from './../models/user.model';
@Injectable()
export class AuthService {
    constructor(
        private httpClient : HttpClient
        ) { }
    check() : boolean {
        return localStorage.getItem('user') ? true : false;
    }
    login(credentials : {email: string, password: string}): Observable<boolean>{
        return this.httpClient.post<any>(`${environment.api_url}/auth/login`,credentials)
        .do(data => {
            localStorage.setItem('token', data.token);
            localStorage.setItem('user', btoa(JSON.stringify(data.user)));
        });
    }
}
Observable : Nói nôm na nếu ta có 2 component A và B. Bạn muốn khi A thay đổi cai gi đó, và B sẽ nhận dc sự thay đổi đó và xử lý chung. (dùng kèm với subcribe) bạn có thể nghiên cứu thêm ở đây
- Giao diện trang login và sử dụng Reactive Forms
<div class="container app-login" style="margin-top: 20vh;">
<div class="row">
<div class="panel panel-default">
<div class="panel-body">
<h1 class="text-center">
<b>JWT</b>
<br/>
<small>Laravel 5.5 Angular 4</small>
</h1>
<br/>
<div class="alert alert-warning" *ngIf="errorCredentials">
<button type="button" class="close" data-dismiss="alert" aria-hidden="true">×</button>
Login Failed
</div>
<form [formGroup]="f" novalidate>
<div class="form-group"
[ngClass]="{'has-success': f.controls['email'].valid,
'has-error': f.controls['email'].invalid &&
(f.controls['email'].touched ||
f.controls['email'].dirty)}
">
<input type="email"
formControlName="email"
class="form-control">
<span *ngIf="f.controls['email'].valid"
class="glyphicon glyphicon-ok form-control-feedback"
aria-hidden="true"
></span>
<span *ngIf="f.controls['email'].invalid &&
(f.controls['email'].touched ||
f.controls['email'].dirty)">
<span class="glyphicon glyphicon-remove form-control-feedback"
aria-hidden="true"></span>
<span class="text-danger">Email Invalid</span>
</span>
</div>
<div class="form-group"
[ngClass]="{'has-success': f.controls['password'].valid,
'has-error': f.controls['password'].invalid &&
(f.controls['password'].touched ||
f.controls['password'].dirty)}">
<input type="password"
formControlName="password"
class="form-control">
<span class="text-danger"
*ngIf="f.controls['password'].invalid &&
(f.controls['password'].touched ||
f.controls['password'].dirty)
">Password Invalid</span>
</div>
<button type="submit" class="btn btn-default" [disabled]="f.invalid" (click)="onSubmit()">Login</button>
</form>
</div>
</div>
</div>
</div>
- Login Component
import { Component, OnInit } from '@angular/core';
import { FormGroup, FormBuilder, Validators } from '@angular/forms';
import { AuthService } from './../services/auth.service';
import { Subscription } from 'rxjs/Subscription';
import { HttpErrorResponse } from '@angular/common/http';
import { Router } from '@angular/router';

@Component({
    selector: 'app-login',
    templateUrl: './login.component.html',
    styleUrls: ['./login.component.css']
})
export class LoginComponent implements OnInit {

    f: FormGroup;
    subScription: Subscription;
    errorCredentials : boolean = false;

    constructor(
        private formBuilder: FormBuilder,
        private authService: AuthService,
        private routerService: Router
        ) { }

    ngOnInit() {
        this.f = this.formBuilder.group({
            email: [null, [Validators.required, Validators.email]],
            password: [null, [Validators.required]]
        });
    }

    onSubmit() {
        this.subScription = this.authService.login(this.f.value).subscribe(res => {
            this.routerService.navigate(['admin']);
        }, (errorRes : HttpErrorResponse) => {
            if(errorRes.status === 401){
                this.errorCredentials=true;
            }
        });

    }

    ngOnDestroy(){
        if(this.subScription){
            this.subScription.unsubscribe();
        }
    }
}
Các bạn lúc nãy có thể để ý đoạn redirectTo ở trên không ạ? nêu chúng ta không set rằng buộc phải login thì mới được vào trang admin chứ không được chưa login đã vào. Bởi vậy chúng ta sẽ có thêm phần xác thực guard của angular nữa. 7. Guard
- Tạo folder guard sau đó chạy lệnh:
ng g g authbên trong folder sửa fileauth.guard
import { Injectable } from '@angular/core';
import { CanActivate, ActivatedRouteSnapshot, RouterStateSnapshot, CanActivateChild } from '@angular/router';
import { Observable } from 'rxjs/Observable';
import { AuthService } from './../auth/services/auth.service';
import { Router } from '@angular/router';

@Injectable()
export class AuthGuard implements CanActivate, CanActivateChild {
    constructor(
            private authService : AuthService,
            private routerService: Router
        ){}

    canActivate(
        next: ActivatedRouteSnapshot,
        state: RouterStateSnapshot): Observable<boolean> | Promise<boolean> | boolean {
        if(this.authService.check()){
            return true;
        }else{
            this.routerService.navigate(['auth/login']);
            return false;
        }
    }

    canActivateChild(
        next: ActivatedRouteSnapshot,
        state: RouterStateSnapshot): Observable<boolean> | Promise<boolean> | boolean {
        if(this.authService.check()){
            return true;
        }else{
            this.routerService.navigate(['auth/login']);
            return false;
        }
    }
}
Đây là phần giải thích cho đoạn CanActivate và canActivateChild ở trong phần admin-routing.
Kết thúc
Vậy là mình đã trình bày xong phần login. Phần này setup cũng khá dài nên mình giành phần sau để trình bày nốt các mục còn lại. Cảm ơn các bạn đã theo dõi, nếu có thắc mắc bạn có thể comment hoặc add chatwork của mình, mình sẽ giải đáp. Hẹn các bạn trong bài viết lần sau.
Link tham khảo: Rxjs và Reactive Programing
All rights reserved
