GET Data Realtime From Weather Yahoo API with SocketIO and VueJS
Bài đăng này đã không được cập nhật trong 7 năm
Mở đầu
Ứng dụng với các vấn đề liên quan đến realtime thì đã có rất nhiều trong thực tế, và cũng có rất nhều bài chia sẻ, các tutorial giới thiệu về việc sử dụng SocketIO. Vì cũng có khá nhiều bài viết về chat nên như tiêu đề bài viết, bài viết này mình xin chia sẻ cách get data từ Weather Yahoo API với SocketIO và VueJS.
A. Setup một vài điều kiện cần thiết.
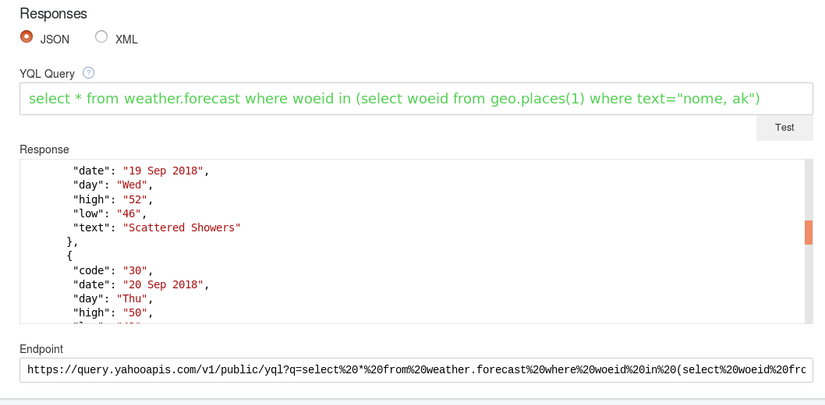
- Vào Weather Yahoo API để lấy đường dẫn get API
- Khởi tạo một folder chứa code và run bằng Vue@cli
- Tạo một file
app.jsnằm trong thư mục root của folder và install thêm các packagesocket.io,socket.io-client....như sau:
{
  "name": "socketio-vuejs",
  "version": "0.1.0",
  "private": true,
  "scripts": {
    "serve": "vue-cli-service serve",
    "build": "vue-cli-service build"
  },
  "dependencies": {
    "axios": "^0.18.0",
    "express": "^4.16.3",
    "moment-timezone": "^0.5.21",
    "request": "^2.88.0",
    "request-promise": "^4.2.2",
    "socket.io": "^2.1.1",
    "socket.io-client": "^2.1.1",
    "vue": "^2.5.17",
    "vue-moment": "^4.0.0",
    "vue-router": "^3.0.1",
    "vue-socket.io": "^2.1.1-b",
    "vuex": "^3.0.1"
  },
  "devDependencies": {
    "@vue/cli-plugin-babel": "^3.0.3",
    "@vue/cli-service": "^3.0.3",
    "vue-template-compiler": "^2.5.17"
  },
  "postcss": {
    "plugins": {
      "autoprefixer": {}
    }
  },
  "browserslist": [
    "> 1%",
    "last 2 versions",
    "not ie <= 8"
  ]
}
B Xây dựng ứng dụng
B1. Build server với SocketIO
- Trong file app.js bạn thực hiện như sau
const express = require("express");
const http = require("http");
const socketIo = require("socket.io");
const axios = require("axios");
const port = process.env.PORT || 4001;
const app = express();
const server = http.createServer(app);
const io = socketIo(server);
var request = require('request-promise');
var abc = {};

io.on("connection", socket => {
  console.log(socket.id + " connected");

  setInterval(function () {
    getApiAndEmit(socket, 'hanoi', 'vn')
  }, 1000);

  socket.on("disconnect", () => console.log("Client disconnected"));
});

function getApiAndEmit(socket, cityCode, countryCode, emitText = 'initGetAPI') {
  request('https://query.yahooapis.com/v1/public/yql?q=select%20*%20from%20weather.forecast%20where%20woeid%20in%20(select%20woeid%20from%20geo.places(1)%20where%20text%3D%22'
          + cityCode + '%2C'
          + countryCode + '%22)%20and%20u%3D"c"&format=json&env=store%3A%2F%2Fdatatables.org%2Falltableswithkeys')
    .then(function (data) {
      if (socket) {
        socket.emit(emitText, JSON.parse(data));
      }
    })
    .catch(function (err) {
      console.log(err);
    });
};

server.listen(port, () => console.log(`Listening on port ${port}`));
- Ở đây mình sử dụng thêm package
request-promiseđể hỗ trợ cho việc promise functiongetApiAndEmit` sẽ nhận đầu vào là socket, city code, country code (ở đây yahoo yêu cầu như vậy) và một emitText - nó sẽ được thực hiện khi connect API thành công. Nếu API trả về kết quả thì chúng ta sẽ gửi đi một sự kiện ứng với emitText = 'initGetApi'.- Sau đó trên command bạn chạy lệnh
node app.jsđể build xem data lấy được chưa nhé. (Khi bạn chạy lên thì sẽ thấy mọi việc rõ ràng và cứ 1s mình sẽ request lên API của yahoo một lần.
- Chú ý: ở dự án thực tế thì không ai dùng
setIntervalcác bạn nhé, thường sẽ sử đụng một vài thư viện hỗ trợ nhưnode-cron,cron...
B2. Lắng nghe emit từ VueJS.
- Mình sẽ lấy theme trong này để giao diện được dễ nhìn.
- Đây là cấu trúc thư mục của folder
- Các file được cấu hình như sau
- main.js
import Vue from 'vue'
import App from './App.vue'
import router from './router'
import store from './store'
import socketio from 'socket.io-client'
import VueSocketIO from 'vue-socket.io'
import VueMoment from 'vue-moment'
import moment from 'moment-timezone'

Vue.use(VueMoment, {
    moment,
});

let socket = socketio('http://127.0.0.1:4001');
Vue.use(VueSocketIO, socket)

Vue.config.productionTip = false

new Vue({
  router,
  store,
  render: h => h(App)
}).$mount('#app')
- router.js
import Vue from 'vue'
import Router from 'vue-router'
import Home from './components/Home'
import Weather from './components/Weather'

Vue.use(Router)

export default new Router({
  mode: 'history',
  base: process.env.BASE_URL,
  routes: [
    {
      path: '/',
      name: 'home',
      component: Home
    },
    {
      path: '/weather',
      name: 'weather',
      component: Weather
    }
  ]
})
- Home.vue
<template>
    <div>
		<div class="container" v-if="weather">
			<div class="city">
				<div class="title">
					<h2>{{ weather.location.city }}</h2>
					<h3>{{ weather.location.country }}</h3>
				</div>
				<div class="date-time">
					<div class="dmy">
						<div id="txt"> {{ new Date() | moment("HH:mm:ss") }} </div>
						<div class="date">
							{{ new Date() | moment("dddd, MMMM Do YYYY") }}
						</div>
					</div>
					<div class="temperature">
						<p>{{ weather.item.condition.temp }}°<span>C</span></p>
					</div>
					<div class="clear"></div>
				</div>
			</div>
			<div class="forecast">
				<div class="forecast-icon">
					<img src="../assets/images/forecast.png" alt="New York Weather Widget">
				</div>
				<div class="today-weather">
					<h3>Cloudy</h3>
					<ul>
						<li v-for="(value,key) in weather.item.forecast" v-if="key <= 5">
							{{ value.day }}
							<span>
								{{ value.low }}°C - {{ value.high }}°C
							</span>
						</li>
					</ul>
				</div>
			</div>
			<div class="clear"></div>
		</div>
	</div>
</template>

<script>

export default {
    name: 'home',
    data() {
        return {
            weather: null,
        }
	},
	created() {
		let vm = this;
        this.$socket.on("initGetAPI", data => {
        	vm.weather = data.query.results.channel;
        });
	}
}
</script>

<style>
	@import '../assets/style.css'
</style>
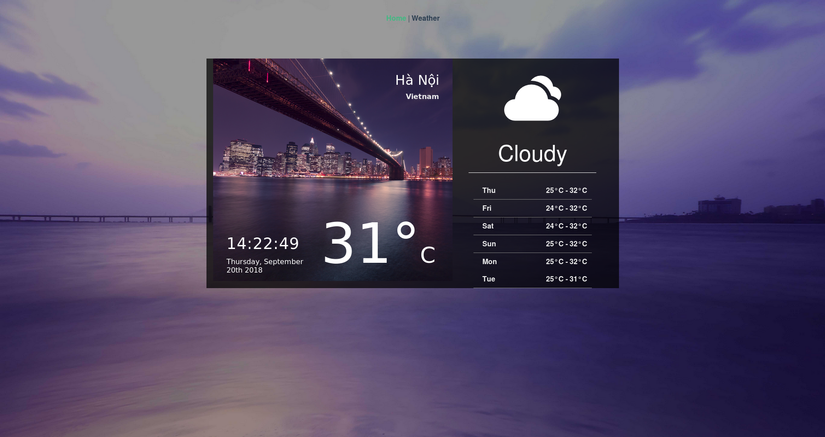
- Life Cycle
created()sẽ là nơi lắng nghe sự kiệninitGetAPIđược truyền thông qua socket để nhận lại được data. - Ta sẽ có được giao diện như thế này
----- Làm vậy thì đơn giản quá, mình sẽ biến tấu một tẹo.
C. Nâng cấp
- Trong
Home.vueta thêm như sau:
<template>
    <div>
        City code: <input type="input" v-model="form.city_code"/>
		Country code: <input type="input" v-model="form.country_code"/>
		<br/><br/>
		<button class="btn btn-primary" @click="search()">Search</button>
        ...
    </div>
</template>
data() {
    return {
        form: {
            city_code: 'hanoi',
            country_code: 'vn'
        },
        weather: null,
    }
},
created() {
    if (this.$route.name == 'home') {
        this.$socket.emit("initAPI", this.form)
    }
    ....
},
methods: {
    search() {
        this.$socket.emit("sendData", this.form);
        this.$router.push({name: "weather", params:{form: this.form}, query: {city_code: this.form.city_code, country_code: this.form.country_code}})
    }
}
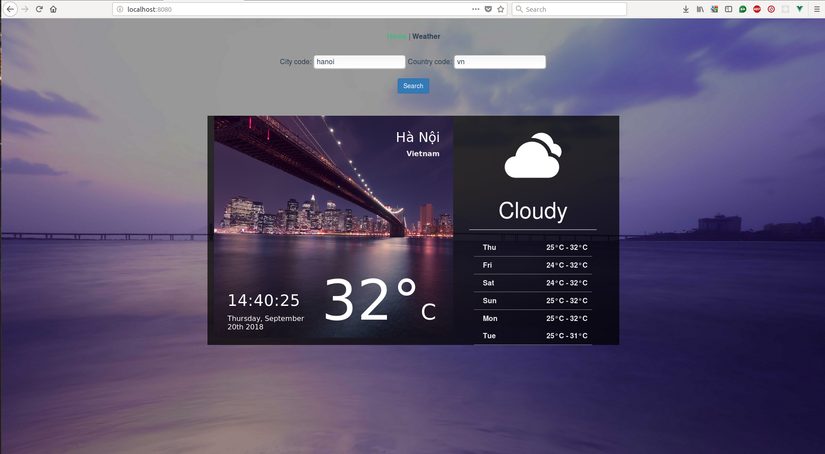
-
ở đây mặc định sẽ là lấy Hà Nội với mã lần lượt là (hanoi, vn)
-
Nếu nhập mã đúng và click thì sẽ chuyển sang thời tiết của một địa danh theo ô input nhập vào sau đó sẽ redirect sang trang kết quả với giá trị tương ứng.
-
Trong app.js ta sẽ sửa như sau.
...
io.on("connection", socket => {
  console.log(socket.id + " connected");

  //init API with city_code = hanoi && country_code = vn
  socket.on("initAPI", (data) => {
    handleAPI(socket, data)
  });

  //get data with city_code = ? && country_code = ?
  socket.on("sendData", (data) => {
    handleAPI(socket, data, 'getData')
  });

  socket.on("disconnect", () => console.log("Client disconnected"));
});

function handleAPI(socket, data, emitText = 'initGetAPI') {
  if (abc && abc[socket.id]) {
      clearInterval(abc[socket.id]);
  }

  abc[socket.id] = setInterval(function () {
    getApiAndEmit(socket, data.city_code, data.country_code, emitText)
  }, 1000);
}
...
- ở đây để lắng nghe đúng ai đã submit thì mình sẽ lưu đúng cái giá trị đó vào
abc[socket.id]để không bị ảnh hưởng đến người khác - Sau đó sẽ xóa đúng cái event đã có data trước đó nếu như thực hiện cập nhật một input khác.
emitlà gửi đi một event vàonlà nhận lại một event.
- Bên Weather component ta sẽ đặt như sau.
<template>
	<body>
		<div class="container" v-if="weather">
			<div class="city">
				<div class="title">
					<h2>{{ weather.location.city }}</h2>
					<h3>{{ weather.location.country }}</h3>
				</div>
				<div class="date-time">
					<div class="dmy">
						<div id="txt"> {{ new Date() | moment("HH:mm:ss") }} </div>
						<div class="date">
							{{ new Date() | moment("dddd, MMMM Do YYYY") }}
						</div>
					</div>
					<div class="temperature">
						<p>{{ weather.item.condition.temp }}°<span>C</span></p>
					</div>
					<div class="clear"></div>
				</div>
			</div>
			<div class="forecast">
				<div class="forecast-icon">
					<img src="../assets/images/forecast.png" alt="New York Weather Widget">
				</div>
				<div class="today-weather">
					<h3>Cloudy</h3>
					<ul>
						<li v-for="(value,key) in weather.item.forecast" v-if="key <= 5">
							{{ value.day }}
							<span>
								{{ value.low }}°C - {{ value.high }}°C
							</span>
						</li>
					</ul>
				</div>
			</div>
			<div class="clear"></div>
		</div>
	</body>
</template>
<script>
	export default {
		name: "weather",
		data() {
	        return {
	            weather: null,
	            error: ''
	        }
		},
		created() {
			if (this.$route.query.city_code && this.$route.query.country_code) {
				this.$socket.emit("sendData", {city_code: this.$route.query.city_code, country_code: this.$route.query.country_code});
			}

			let vm = this;
	        this.$socket.on("getData", data => {
	        	vm.weather = data.query.results.channel;
	        });
		}

	}
</script>
- Kết qủa như sau:
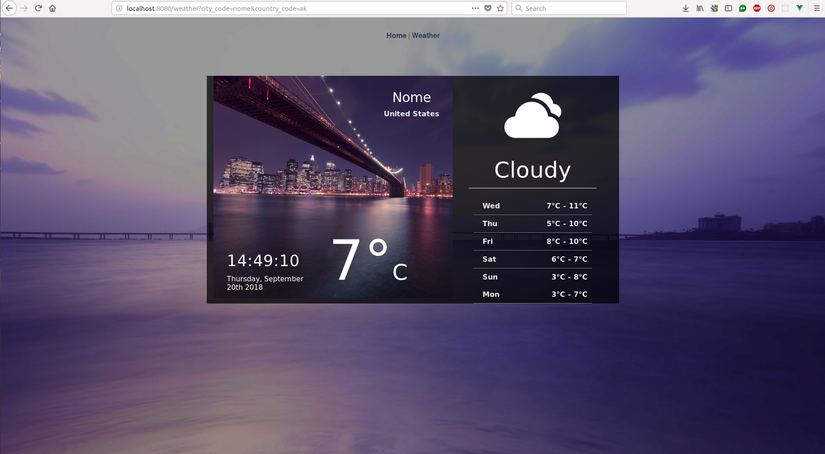
- Dù bạn có f5 hay thay đổi trên url với các giá trị code thì vẫn cứ là ok.
Kết thúc
Bài viết của mình đến đây là hết, đây chỉ là những kiến thức cơ bản. Muốn tìm hiểu thêm thì bạn lên mạng tìm thêm nhé, mình nghĩ bài này khá có ích vì dự án thực tế làm tương đối nhiều về vấn đề này. Cảm ơn các bạn.
All rights reserved
