Hướng dẫn xây dựng ứng dụng có phần giới thiệu Intro Slide
Bài đăng này đã không được cập nhật trong 4 năm
Có màn hình giới thiệu là cách tuyệt vời để giới thiệu cho người dùng những tính năng quan trọng ứng dụng của bạn
Video Demo
Bước 1.
Tạo project mới
- Vào Android studio chọn File => New project và chọn Empty Activity
- Download file res.zip sau đó thêm vào project của bạn
Bước 2.
Mở file colors.xml sau đó thêm đoạn mã sau vào file giao diện
colors.xml
<?xml version="1.0" encoding="utf-8"?>
<resources>
    <color name="colorPrimary">#3F51B5</color>
    <color name="colorPrimaryDark">#303F9F</color>
    <color name="colorAccent">#FF4081</color>

    <!-- Screens background color-->
    <color name="bg_screen1">#f64c73</color>
    <color name="bg_screen2">#20d2bb</color>
    <color name="bg_screen3">#3395ff</color>
    <color name="bg_screen4">#c873f4</color>

    <!-- dots inactive colors -->
    <color name="dot_dark_screen1">#d1395c</color>
    <color name="dot_dark_screen2">#14a895</color>
    <color name="dot_dark_screen3">#2278d4</color>
    <color name="dot_dark_screen4">#a854d4</color>

    <!-- dots active colors -->
    <color name="dot_light_screen1">#f98da5</color>
    <color name="dot_light_screen2">#8cf9eb</color>
    <color name="dot_light_screen3">#93c6fd</color>
    <color name="dot_light_screen4">#e4b5fc</color>

    <array name="array_dot_active">
        <item>@color/dot_light_screen1</item>
        <item>@color/dot_light_screen2</item>
        <item>@color/dot_light_screen3</item>
        <item>@color/dot_light_screen4</item>
    </array>

    <array name="array_dot_inactive">
        <item>@color/dot_dark_screen1</item>
        <item>@color/dot_dark_screen2</item>
        <item>@color/dot_dark_screen3</item>
        <item>@color/dot_dark_screen4</item>
    </array>
</resources>
Bước 3.
Thêm đoạn mã này vào file strings.xml
strings.xml
<resources>
<string name="app_name">Intro Slider</string>
<string name="title_activity_welcome">Home Screen</string>
<string name="next">NEXT</string>
<string name="skip">SKIP</string>
<string name="start">GOT IT</string>
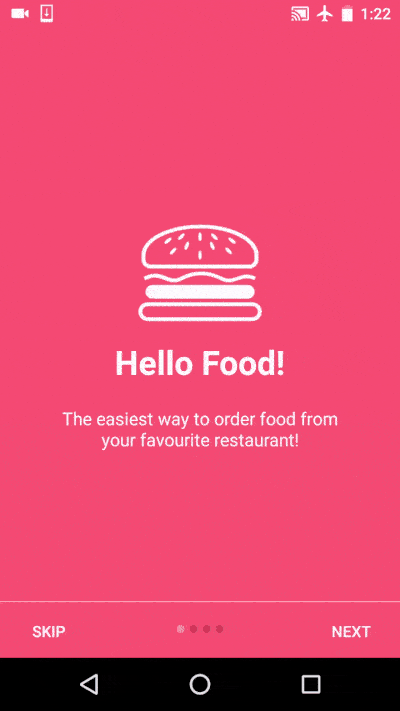
<string name="slide_1_title">Hello Food!</string>
<string name="slide_1_desc">The easiest way to order food from your favourite restaurant!</string>
<string name="slide_2_title">Movie Tickets</string>
<string name="slide_2_desc">Book movie tickets for your family and friends!</string>
<string name="slide_3_title">Great Discounts</string>
<string name="slide_3_desc">Best discounts on every single service we offer!</string>
<string name="slide_4_title">World Travel</string>
<string name="slide_4_desc">Book tickets of any transportation and travel the world!</string>
<string name="play_again_desc">To see the welcome slider again, goto Settings -> apps -> welcome slider -> clear data</string>
<string name="play_again">Play Again</string>
</resources>
Bước 4.
Tiếp đến là thêm đoạn mã sau vào file dimens.xml
dimens.xml
<resources>
    <!-- Default screen margins, per the Android Design guidelines. -->
    <dimen name="activity_horizontal_margin">16dp</dimen>
    <dimen name="activity_vertical_margin">16dp</dimen>
    <dimen name="fab_margin">16dp</dimen>
    <dimen name="dots_height">30dp</dimen>
    <dimen name="dots_margin_bottom">20dp</dimen>
    <dimen name="img_width_height">120dp</dimen>
    <dimen name="slide_title">30dp</dimen>
    <dimen name="slide_desc">16dp</dimen>
    <dimen name="desc_padding">40dp</dimen>
</resources>
Bước 5.
Tiếp đến là thêm đoạn mã này vào file styles.xml
styles.xml
<resources>

    <!-- Base application theme. -->
    <style name="AppTheme" parent="Theme.AppCompat.Light.DarkActionBar">
        <!-- Customize your theme here. -->
        <item name="colorPrimary">@color/colorPrimary</item>
        <item name="colorPrimaryDark">@color/colorPrimaryDark</item>
        <item name="colorAccent">@color/colorAccent</item>
        <item name="windowActionBar">false</item>
        <item name="windowNoTitle">true</item>
    </style>

    <style name="AppTheme.AppBarOverlay" parent="ThemeOverlay.AppCompat.Dark.ActionBar" />

    <style name="AppTheme.PopupOverlay" parent="ThemeOverlay.AppCompat.Light" />

</resources>
Bước 6.
Màn hình giới thiệu nên chỉ xuất hiện ở lần đầu khởi chạy ứng dụng. Nếu người dùng chạy ứng dụng của bạn từ lần thứ 2 trở đi thì nên đưa người dùng vào màn hình chính của ứng dụng hơn. Và chúng ta sẽ sử dụng SharedPreferences để lưu lại giá trị lần đầu khởi chạy ứng dụng hay không
Tạo file PrefManager.java và tạo phương thức isFirstTimeLaunch() trả về true nếu là lần đầu khởi chạy ứng dụng
PrefManager.java
package info.androidhive.introslider;

import android.content.Context;
import android.content.SharedPreferences;

/**
 * Created by Lincoln on 05/05/16.
 */
public class PrefManager {
    SharedPreferences pref;
    SharedPreferences.Editor editor;
    Context _context;

    // shared pref mode
    int PRIVATE_MODE = 0;

    // Shared preferences file name
    private static final String PREF_NAME = "androidhive-welcome";

    private static final String IS_FIRST_TIME_LAUNCH = "IsFirstTimeLaunch";

    public PrefManager(Context context) {
        this._context = context;
        pref = _context.getSharedPreferences(PREF_NAME, PRIVATE_MODE);
        editor = pref.edit();
    }

    public void setFirstTimeLaunch(boolean isFirstTime) {
        editor.putBoolean(IS_FIRST_TIME_LAUNCH, isFirstTime);
        editor.commit();
    }

    public boolean isFirstTimeLaunch() {
        return pref.getBoolean(IS_FIRST_TIME_LAUNCH, true);
    }

}
Bước 7.
Có 4 silde trên màn hình giới thiệu, tương với với 4 giao diện với những màu sắc, hình ảnh, chữ khác nhau...
Tạo 4 file welcome_side1.xml, welcome_side2.xml, welcome_side3.xml and welcome_side4.xml trong thư mục layout của dự án
welcome_slide1.xml
<?xml version="1.0" encoding="utf-8"?>
<RelativeLayout xmlns:android="http://schemas.android.com/apk/res/android"
    android:layout_width="match_parent"
    android:layout_height="match_parent"
    android:background="@color/bg_screen1">

    <LinearLayout
        android:layout_width="wrap_content"
        android:layout_height="wrap_content"
        android:layout_centerInParent="true"
        android:gravity="center_horizontal"
        android:orientation="vertical">

        <ImageView
            android:layout_width="@dimen/img_width_height"
            android:layout_height="@dimen/img_width_height"
            android:src="@drawable/ic_food" />

        <TextView
            android:layout_width="wrap_content"
            android:layout_height="wrap_content"
            android:text="@string/slide_1_title"
            android:textColor="@android:color/white"
            android:textSize="@dimen/slide_title"
            android:textStyle="bold" />

        <TextView
            android:layout_width="wrap_content"
            android:layout_height="wrap_content"
            android:layout_marginTop="20dp"
            android:paddingLeft="@dimen/desc_padding"
            android:paddingRight="@dimen/desc_padding"
            android:text="@string/slide_1_desc"
            android:textAlignment="center"
            android:textColor="@android:color/white"
            android:textSize="@dimen/slide_desc" />

    </LinearLayout>
</RelativeLayout>
welcome_slide2.xml
<?xml version="1.0" encoding="utf-8"?>
<RelativeLayout xmlns:android="http://schemas.android.com/apk/res/android"
    android:layout_width="match_parent"
    android:layout_height="match_parent"
    android:background="@color/bg_screen2">

    <LinearLayout
        android:layout_width="wrap_content"
        android:layout_height="wrap_content"
        android:layout_centerInParent="true"
        android:gravity="center_horizontal"
        android:orientation="vertical">

        <ImageView
            android:layout_width="@dimen/img_width_height"
            android:layout_height="@dimen/img_width_height"
            android:src="@drawable/ic_movie" />

        <TextView
            android:layout_width="wrap_content"
            android:layout_height="wrap_content"
            android:text="@string/slide_2_title"
            android:textColor="@android:color/white"
            android:textSize="@dimen/slide_title"
            android:textStyle="bold" />

        <TextView
            android:layout_width="wrap_content"
            android:layout_height="wrap_content"
            android:layout_marginTop="20dp"
            android:paddingLeft="@dimen/desc_padding"
            android:paddingRight="@dimen/desc_padding"
            android:text="@string/slide_2_desc"
            android:textAlignment="center"
            android:textColor="@android:color/white"
            android:textSize="@dimen/slide_desc" />

    </LinearLayout>

</RelativeLayout>
welcome_slide3.xml
<?xml version="1.0" encoding="utf-8"?>
<RelativeLayout xmlns:android="http://schemas.android.com/apk/res/android"
    android:layout_width="match_parent"
    android:layout_height="match_parent"
    android:background="@color/bg_screen3">

    <LinearLayout
        android:layout_width="wrap_content"
        android:layout_height="wrap_content"
        android:layout_centerInParent="true"
        android:gravity="center_horizontal"
        android:orientation="vertical">

        <ImageView
            android:layout_width="@dimen/img_width_height"
            android:layout_height="@dimen/img_width_height"
            android:src="@drawable/ic_discount" />

        <TextView
            android:layout_width="wrap_content"
            android:layout_height="wrap_content"
            android:text="@string/slide_3_title"
            android:textColor="@android:color/white"
            android:textSize="@dimen/slide_title"
            android:textStyle="bold" />

        <TextView
            android:layout_width="wrap_content"
            android:layout_height="wrap_content"
            android:layout_marginTop="20dp"
            android:paddingLeft="@dimen/desc_padding"
            android:paddingRight="@dimen/desc_padding"
            android:text="@string/slide_3_desc"
            android:textAlignment="center"
            android:textColor="@android:color/white"
            android:textSize="@dimen/slide_desc" />

    </LinearLayout>

</RelativeLayout>
welcome_slide4.xml
<?xml version="1.0" encoding="utf-8"?>
<RelativeLayout xmlns:android="http://schemas.android.com/apk/res/android"
    android:layout_width="match_parent"
    android:layout_height="match_parent"
    android:background="@color/bg_screen4">

    <LinearLayout
        android:layout_width="wrap_content"
        android:layout_height="wrap_content"
        android:layout_centerInParent="true"
        android:gravity="center_horizontal"
        android:orientation="vertical">

        <ImageView
            android:layout_width="@dimen/img_width_height"
            android:layout_height="@dimen/img_width_height"
            android:src="@drawable/ic_travel" />

        <TextView
            android:layout_width="wrap_content"
            android:layout_height="wrap_content"
            android:text="@string/slide_4_title"
            android:textColor="@android:color/white"
            android:textSize="@dimen/slide_title"
            android:textStyle="bold" />

        <TextView
            android:layout_width="wrap_content"
            android:layout_height="wrap_content"
            android:layout_marginTop="20dp"
            android:paddingLeft="@dimen/desc_padding"
            android:paddingRight="@dimen/desc_padding"
            android:text="@string/slide_4_desc"
            android:textAlignment="center"
            android:textColor="@android:color/white"
            android:textSize="@dimen/slide_desc" />

    </LinearLayout>

</RelativeLayout>
Bước 8.
Tiếp theo, chúng ta tạo file activity_welcome.xml với đoạn mã ở dưới, chúng ta tạo ViewPager để hiển thị slide, tạo LinearLayout cùng với các dấu chấm điều hướng và 2 buttons Skip và Next
activity_welcome.xml
<?xml version="1.0" encoding="utf-8"?>
<RelativeLayout xmlns:android="http://schemas.android.com/apk/res/android"
    xmlns:app="http://schemas.android.com/apk/res-auto"
    xmlns:tools="http://schemas.android.com/tools"
    android:layout_width="match_parent"
    android:layout_height="match_parent"
    tools:showIn="@layout/activity_welcome">

    <android.support.v4.view.ViewPager
        android:id="@+id/view_pager"
        android:layout_width="match_parent"
        android:layout_height="match_parent" />

    <LinearLayout
        android:id="@+id/layoutDots"
        android:layout_width="match_parent"
        android:layout_height="@dimen/dots_height"
        android:layout_alignParentBottom="true"
        android:layout_marginBottom="@dimen/dots_margin_bottom"
        android:gravity="center"
        android:orientation="horizontal"></LinearLayout>

    <View
        android:layout_width="match_parent"
        android:layout_height="1dp"
        android:alpha=".5"
        android:layout_above="@id/layoutDots"
        android:background="@android:color/white" />

    <Button
        android:id="@+id/btn_next"
        android:layout_width="wrap_content"
        android:layout_height="wrap_content"
        android:layout_alignParentBottom="true"
        android:layout_alignParentRight="true"
        android:background="@null"
        android:text="@string/next"
        android:textColor="@android:color/white" />

    <Button
        android:id="@+id/btn_skip"
        android:layout_width="wrap_content"
        android:layout_height="wrap_content"
        android:layout_alignParentBottom="true"
        android:layout_alignParentLeft="true"
        android:background="@null"
        android:text="@string/skip"
        android:textColor="@android:color/white" />

</RelativeLayout>
Bước 9.
Tạo file WelcomeActivity.java, chúng ta sẽ làm những công việc: kiểm tra xem lần chạy này có phải là lần khởi chạy đầu tiên không? tạo PagerAdapter cho việc hiển thị slide, thêm các sự kiện cho 2 buttons Skip và Next
WelcomeActivity.java
package info.androidhive.introslider;

import android.content.Context;
import android.content.Intent;
import android.graphics.Color;
import android.os.Build;
import android.os.Bundle;
import android.support.v4.view.PagerAdapter;
import android.support.v4.view.ViewPager;
import android.support.v7.app.AppCompatActivity;
import android.text.Html;
import android.view.LayoutInflater;
import android.view.View;
import android.view.ViewGroup;
import android.view.Window;
import android.view.WindowManager;
import android.widget.Button;
import android.widget.LinearLayout;
import android.widget.TextView;

public class WelcomeActivity extends AppCompatActivity {

    private ViewPager viewPager;
    private MyViewPagerAdapter myViewPagerAdapter;
    private LinearLayout dotsLayout;
    private TextView[] dots;
    private int[] layouts;
    private Button btnSkip, btnNext;
    private PrefManager prefManager;

    @Override
    protected void onCreate(Bundle savedInstanceState) {
        super.onCreate(savedInstanceState);

        // Checking for first time launch - before calling setContentView()
        prefManager = new PrefManager(this);
        if (!prefManager.isFirstTimeLaunch()) {
            launchHomeScreen();
            finish();
        }

        // Making notification bar transparent
        if (Build.VERSION.SDK_INT >= 21) {
            getWindow().getDecorView().setSystemUiVisibility(View.SYSTEM_UI_FLAG_LAYOUT_STABLE | View.SYSTEM_UI_FLAG_LAYOUT_FULLSCREEN);
        }

        setContentView(R.layout.activity_welcome);

        viewPager = (ViewPager) findViewById(R.id.view_pager);
        dotsLayout = (LinearLayout) findViewById(R.id.layoutDots);
        btnSkip = (Button) findViewById(R.id.btn_skip);
        btnNext = (Button) findViewById(R.id.btn_next);

        // layouts of all welcome sliders
        // add few more layouts if you want
        layouts = new int[]{
                R.layout.welcome_slide1,
                R.layout.welcome_slide2,
                R.layout.welcome_slide3,
                R.layout.welcome_slide4};

        // adding bottom dots
        addBottomDots(0);

        // making notification bar transparent
        changeStatusBarColor();

        myViewPagerAdapter = new MyViewPagerAdapter();
        viewPager.setAdapter(myViewPagerAdapter);
        viewPager.addOnPageChangeListener(viewPagerPageChangeListener);

        btnSkip.setOnClickListener(new View.OnClickListener() {
            @Override
            public void onClick(View v) {
                launchHomeScreen();
            }
        });

        btnNext.setOnClickListener(new View.OnClickListener() {
            @Override
            public void onClick(View v) {
                // checking for last page
                // if last page home screen will be launched
                int current = getItem(+1);
                if (current < layouts.length) {
                    // move to next screen
                    viewPager.setCurrentItem(current);
                } else {
                    launchHomeScreen();
                }
            }
        });
    }

    private void addBottomDots(int currentPage) {
        dots = new TextView[layouts.length];

        int[] colorsActive = getResources().getIntArray(R.array.array_dot_active);
        int[] colorsInactive = getResources().getIntArray(R.array.array_dot_inactive);

        dotsLayout.removeAllViews();
        for (int i = 0; i < dots.length; i++) {
            dots[i] = new TextView(this);
            dots[i].setText(Html.fromHtml("•"));
            dots[i].setTextSize(35);
            dots[i].setTextColor(colorsInactive[currentPage]);
            dotsLayout.addView(dots[i]);
        }

        if (dots.length > 0)
            dots[currentPage].setTextColor(colorsActive[currentPage]);
    }

    private int getItem(int i) {
        return viewPager.getCurrentItem() + i;
    }

    private void launchHomeScreen() {
        prefManager.setFirstTimeLaunch(false);
        startActivity(new Intent(WelcomeActivity.this, MainActivity.class));
        finish();
    }

    //  viewpager change listener
    ViewPager.OnPageChangeListener viewPagerPageChangeListener = new ViewPager.OnPageChangeListener() {

        @Override
        public void onPageSelected(int position) {
            addBottomDots(position);

            // changing the next button text 'NEXT' / 'GOT IT'
            if (position == layouts.length - 1) {
                // last page. make button text to GOT IT
                btnNext.setText(getString(R.string.start));
                btnSkip.setVisibility(View.GONE);
            } else {
                // still pages are left
                btnNext.setText(getString(R.string.next));
                btnSkip.setVisibility(View.VISIBLE);
            }
        }

        @Override
        public void onPageScrolled(int arg0, float arg1, int arg2) {

        }

        @Override
        public void onPageScrollStateChanged(int arg0) {

        }
    };

    /**
     * Making notification bar transparent
     */
    private void changeStatusBarColor() {
        if (Build.VERSION.SDK_INT >= Build.VERSION_CODES.LOLLIPOP) {
            Window window = getWindow();
            window.addFlags(WindowManager.LayoutParams.FLAG_DRAWS_SYSTEM_BAR_BACKGROUNDS);
            window.setStatusBarColor(Color.TRANSPARENT);
        }
    }

    /**
     * View pager adapter
     */
    public class MyViewPagerAdapter extends PagerAdapter {
        private LayoutInflater layoutInflater;

        public MyViewPagerAdapter() {
        }

        @Override
        public Object instantiateItem(ViewGroup container, int position) {
            layoutInflater = (LayoutInflater) getSystemService(Context.LAYOUT_INFLATER_SERVICE);

            View view = layoutInflater.inflate(layouts[position], container, false);
            container.addView(view);

            return view;
        }

        @Override
        public int getCount() {
            return layouts.length;
        }

        @Override
        public boolean isViewFromObject(View view, Object obj) {
            return view == obj;
        }

        @Override
        public void destroyItem(ViewGroup container, int position, Object object) {
            View view = (View) object;
            container.removeView(view);
        }
    }
}
Bước 10: Cuối cùng, trong file AndroidManifest.xml chúng ta sẽ để WelcomeActivity chạy mặc định đầu tiên khi vào ứng dụng như đoạn mã ở dưới
AndroidManifest.xml
<?xml version="1.0" encoding="utf-8"?>
<manifest xmlns:android="http://schemas.android.com/apk/res/android"
    package="info.androidhive.introslider">

    <application
        android:allowBackup="true"
        android:icon="@mipmap/ic_launcher"
        android:label="@string/app_name"
        android:supportsRtl="true"
        android:theme="@style/AppTheme">
        <activity android:name="info.androidhive.introslider.WelcomeActivity">
            <intent-filter>
                <action android:name="android.intent.action.MAIN" />

                <category android:name="android.intent.category.LAUNCHER" />
            </intent-filter>
        </activity>
        <activity
            android:name="info.androidhive.introslider.MainActivity"
            android:label="@string/title_activity_welcome"
            android:theme="@style/AppTheme.NoActionBar"></activity>
    </application>

</manifest>
Kết quả:
Nguồn: http://www.androidhive.info/2016/05/android-build-intro-slider-app/
All rights reserved
