Hướng dẫn xác thực bằng vân tay trong Android
Bài đăng này đã không được cập nhật trong 4 năm
Cùng với việc phát hành Android 6.0 (M) vào năm ngoái, đã có sự thay đổi khá lớn đối với các API, một trong số đó là vân tay xác thực. Với việc phát hành các API mới, chứng thực người dùng với sự giúp đỡ của các bộ cảm biến dấu vân tay trên nhiều thiết bị khác nhau. Sau ví dụ hướng dẫn cho thấy làm thế nào để thực hiện Fingerprint Authentication trong ứng dụng của bạn.
Để xác thực người dùng bằng cách sử dụng cảm biến dấu vân tay, bạn cần để có một đối tượng của lớp FingerprintManager và gọi phương thức authenticate(). Tuy nhiên ứng dụng của bạn phải được chạy trên một thiết bị tương thích trong đó bao gồm một cảm biến dấu vân tay. Hơn nữa, bạn phải có giao diện người dùng cho flow xác thực dấu vân tay trên ứng dụng của bạn, và sử dụng icon tiêu chuẩn dấu vân tay trong giao diện người dùng của bạn. Lưu ý rằng nếu bạn đang phát triển nhiều ứng dụng sử dụng xác thực vân tay, mỗi ứng dụng phải xác thực dấu vân tay của người sử dụng riêng biệt.
Ưu điểm của việc sử dụng vân tay xác thực
- Không vấn đề ngay cả việc bạn không thể nhớ lại mật khẩu, dấu vân tay của bạn vẫn giữ nguyên không bị thay đổi bởi người khác
- Nhanh chóng, thuận tiện và đáng tin cậy để sử dụng.
- Dấu vân tay của bạn là duy nhất đảm bảo rằng nó chỉ được khóa hay mở bởi bạn.
- Với sự giúp đỡ của xác thực vân tay, giao dịch trực tuyến trở nên thuận tiện hơn
1. Hướng dẫn tạo project mới
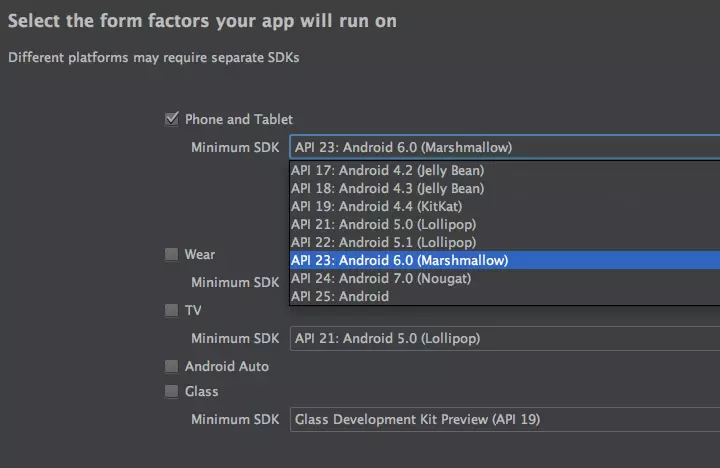
Bước 1. Tạo project mới trong Android Studio: File ⇒ New Project và set minimum SDK version là Android 6.0 (API 23).
Bước 2. Vì chúng ta sẽ làm việc cùng với xác thực vân tay, chúng ta cần thêm quyền USE_FINGERPRINT trong file AndroidManifest.xml
AndroidManifest.xml
<?xml version="1.0" encoding="utf-8"?>
<manifest xmlns:android="http://schemas.android.com/apk/res/android"
   package="info.androidhive.fingerprint">

   <uses-permission android:name="android.permission.USE_FINGERPRINT" />

   <application
       android:allowBackup="true"
       android:icon="@mipmap/ic_launcher"
       android:label="@string/app_name"
       android:supportsRtl="true"
       android:theme="@style/AppTheme">
       <activity android:name=".FingerprintActivity">
           <intent-filter>
               <action android:name="android.intent.action.MAIN" />

               <category android:name="android.intent.category.LAUNCHER" />
           </intent-filter>
       </activity>
   </application>
</manifest>
Bước 3. Chọn thư mục res ⇒ values và cập nhật file colors.
colors.xml
<?xml version="1.0" encoding="utf-8"?>
<resources>
   <color name="colorPrimary">#263237</color>
   <color name="colorPrimaryDark">#1e282d</color>
   <color name="colorAccent">#1e282d</color>
   <color name="textPrimary">#f5f5f5</color>
   <color name="textPrimaryDark">#95aab4</color>
   <color name="errorText">#ff7878</color>
</resources>
Bước 4. Chọn thư mục res ⇒ values và cập nhật file strings.
strings.xml
<resources>
<string name="app_name">Fingerprint</string>
<string name="title_activity_main">MainActivity</string>
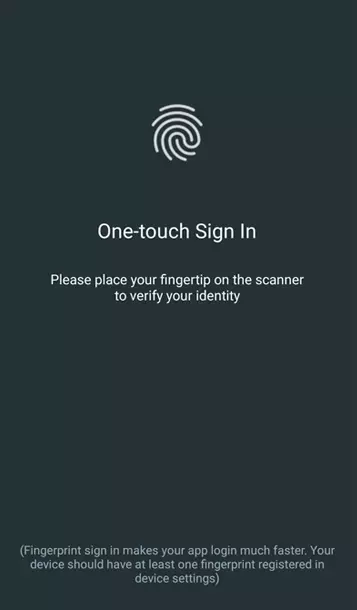
<string name="title_fingerprint">One-touch Sign In</string>
<string name="desc_fingerprint">Please place your fingertip on the scanner to verify your identity</string>
<string name="note">(Fingerprint sign in makes your app login much faster. Your device should have at least one fingerprint registered in device settings)</string>
<string name="title_activity_home">Fingerprint</string>
<string name="activity_home_desc">You have successfully logged in with fingerprint authentication</string>
<string name="activity_home_note">Close and re-open the app to see the fingerprint auth screen again</string>
</resources>
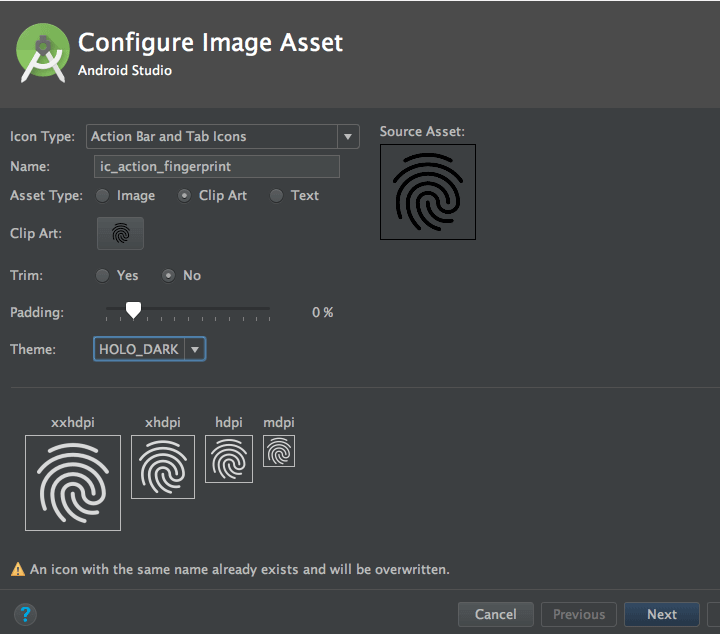
Bước 5. Tạo fingerprint icon cùng với sự hỗ trợ của Android Image Assets. Bằng cách click chuột phải vào thư mục drawable và tạo mới ⇒ Image Asset named ic_action_fingerprint
2. Tạo Fingerprint Activity
Bước 6. Tạo file layout với tên activity_fingerprint.xml và thay thế đoạn code ở dưới đây
activity_fingerprint.xml
<?xml version="1.0" encoding="utf-8"?>
<RelativeLayout xmlns:android="http://schemas.android.com/apk/res/android"
   xmlns:tools="http://schemas.android.com/tools"
   android:id="@+id/activity_fingerprint"
   android:layout_width="match_parent"
   android:layout_height="match_parent"
   android:background="@color/colorPrimary"
   tools:context="info.androidhive.fingerprint.FingerprintActivity">

   <LinearLayout
       android:layout_width="match_parent"
       android:id="@+id/headerLayout"
       android:orientation="vertical"
       android:gravity="center"
       android:layout_marginTop="100dp"
       android:layout_height="wrap_content">

       <ImageView
           android:layout_width="70dp"
           android:layout_height="70dp"
           android:src="@drawable/ic_action_fingerprint"
           android:id="@+id/icon"
           android:paddingTop="2dp"
           android:layout_marginBottom="30dp"/>

       <TextView
           android:layout_width="wrap_content"
           android:layout_height="wrap_content"
           android:textColor="@color/textPrimary"
           android:textSize="24sp"
           android:text="@string/title_fingerprint"
           android:layout_marginLeft="5dp"
           android:layout_marginRight="5dp"
           android:layout_marginTop="20dp"
           android:layout_marginBottom="10dp"/>

       <TextView
           android:layout_width="match_parent"
           android:layout_height="wrap_content"
           android:textColor="@color/textPrimary"
           android:textSize="16sp"
           android:textAlignment="center"
           android:gravity="center"
           android:id="@+id/desc"
           android:text="@string/desc_fingerprint"
           android:layout_margin="16dp"
           android:paddingEnd="30dp"
           android:paddingStart="30dp"/>

       <TextView
           android:layout_width="match_parent"
           android:layout_height="wrap_content"
           android:textColor="@color/errorText"
           android:textSize="14sp"
           android:textAlignment="center"
           android:id="@+id/errorText"
           android:paddingEnd="30dp"
           android:paddingStart="30dp"
           android:layout_marginTop="30dp"
           android:gravity="center"/>

   </LinearLayout>
   <TextView
       android:layout_width="wrap_content"
       android:layout_height="wrap_content"
       android:textColor="@color/textPrimaryDark"
       android:textSize="14sp"
       android:text="@string/note"
       android:layout_marginLeft="16dp"
       android:textAlignment="center"
       android:layout_marginRight="16dp"
       android:layout_marginBottom="26dp"
       android:layout_alignParentBottom="true"/>

</RelativeLayout>
Bước 7. Tạo một activity với tên là FingeprintActivity.java. Trong phương thức onCreate () sẽ inflate layout activity_fingerprint.xml.
-
GenerateKey(): sẽ tạo một khóa mã hóa sau đó được lưu trữ an toàn trên thiết bị.
-
CipherInit(): sẽ khởi tạo mật mã và sẽ được sử dụng để tạo ra các FingerprintManager mã hóa.
-
Đối tượng CryptoObject và kiểm tra khác nhau trước khi bắt đầu quá trình xác thực được thực hiện bên trong phương thức onCreate().
FinagerprintActvity.java
package info.androidhive.fingerprint;

import android.Manifest;
import android.annotation.TargetApi;
import android.app.KeyguardManager;
import android.content.pm.PackageManager;
import android.hardware.fingerprint.FingerprintManager;
import android.os.Build;
import android.security.keystore.KeyGenParameterSpec;
import android.security.keystore.KeyPermanentlyInvalidatedException;
import android.security.keystore.KeyProperties;
import android.support.v4.app.ActivityCompat;
import android.support.v7.app.AppCompatActivity;
import android.os.Bundle;
import android.widget.TextView;
import java.io.IOException;
import java.security.InvalidAlgorithmParameterException;
import java.security.InvalidKeyException;
import java.security.KeyStore;
import java.security.KeyStoreException;
import java.security.NoSuchAlgorithmException;
import java.security.NoSuchProviderException;
import java.security.UnrecoverableKeyException;
import java.security.cert.CertificateException;
import javax.crypto.Cipher;
import javax.crypto.KeyGenerator;
import javax.crypto.NoSuchPaddingException;
import javax.crypto.SecretKey;

public class FingerprintActivity extends AppCompatActivity {

   private KeyStore keyStore;
   // Variable used for storing the key in the Android Keystore container
   private static final String KEY_NAME = "androidHive";
   private Cipher cipher;
   private TextView textView;

   @Override
   protected void onCreate(Bundle savedInstanceState) {
       super.onCreate(savedInstanceState);
       setContentView(R.layout.activity_fingerprint);

       // Initializing both Android Keyguard Manager and Fingerprint Manager
       KeyguardManager keyguardManager = (KeyguardManager) getSystemService(KEYGUARD_SERVICE);
       FingerprintManager fingerprintManager = (FingerprintManager) getSystemService(FINGERPRINT_SERVICE);

       textView = (TextView) findViewById(R.id.errorText);

       // Check whether the device has a Fingerprint sensor.
       if(!fingerprintManager.isHardwareDetected()){
           /**
            * An error message will be displayed if the device does not contain the fingerprint hardware.
            * However if you plan to implement a default authentication method,
            * you can redirect the user to a default authentication activity from here.
            * Example:
            * Intent intent = new Intent(this, DefaultAuthenticationActivity.class);
            * startActivity(intent);
            */
           textView.setText("Your Device does not have a Fingerprint Sensor");
       }else {
           // Checks whether fingerprint permission is set on manifest
           if (ActivityCompat.checkSelfPermission(this, Manifest.permission.USE_FINGERPRINT) != PackageManager.PERMISSION_GRANTED) {
               textView.setText("Fingerprint authentication permission not enabled");
           }else{
               // Check whether at least one fingerprint is registered
               if (!fingerprintManager.hasEnrolledFingerprints()) {
                   textView.setText("Register at least one fingerprint in Settings");
               }else{
                   // Checks whether lock screen security is enabled or not
                   if (!keyguardManager.isKeyguardSecure()) {
                       textView.setText("Lock screen security not enabled in Settings");
                   }else{
                       generateKey();

                       if (cipherInit()) {
                           FingerprintManager.CryptoObject cryptoObject = new FingerprintManager.CryptoObject(cipher);
                           FingerprintHandler helper = new FingerprintHandler(this);
                           helper.startAuth(fingerprintManager, cryptoObject);
                       }
                   }
               }
           }
       }
   }

   @TargetApi(Build.VERSION_CODES.M)
   protected void generateKey() {
       try {
           keyStore = KeyStore.getInstance("AndroidKeyStore");
       } catch (Exception e) {
           e.printStackTrace();
       }

       KeyGenerator keyGenerator;
       try {
           keyGenerator = KeyGenerator.getInstance(KeyProperties.KEY_ALGORITHM_AES, "AndroidKeyStore");
       } catch (NoSuchAlgorithmException | NoSuchProviderException e) {
           throw new RuntimeException("Failed to get KeyGenerator instance", e);
       }

       try {
           keyStore.load(null);
           keyGenerator.init(new
                   KeyGenParameterSpec.Builder(KEY_NAME,
                   KeyProperties.PURPOSE_ENCRYPT |
                           KeyProperties.PURPOSE_DECRYPT)
                   .setBlockModes(KeyProperties.BLOCK_MODE_CBC)
                   .setUserAuthenticationRequired(true)
                   .setEncryptionPaddings(
                           KeyProperties.ENCRYPTION_PADDING_PKCS7)
                   .build());
           keyGenerator.generateKey();
       } catch (NoSuchAlgorithmException |
               InvalidAlgorithmParameterException
               | CertificateException | IOException e) {
           throw new RuntimeException(e);
       }
   }

   @TargetApi(Build.VERSION_CODES.M)
   public boolean cipherInit() {
       try {
           cipher = Cipher.getInstance(KeyProperties.KEY_ALGORITHM_AES + "/" + KeyProperties.BLOCK_MODE_CBC + "/" + KeyProperties.ENCRYPTION_PADDING_PKCS7);
       } catch (NoSuchAlgorithmException | NoSuchPaddingException e) {
           throw new RuntimeException("Failed to get Cipher", e);
       }

       try {
           keyStore.load(null);
           SecretKey key = (SecretKey) keyStore.getKey(KEY_NAME,
                   null);
           cipher.init(Cipher.ENCRYPT_MODE, key);
           return true;
       } catch (KeyPermanentlyInvalidatedException e) {
           return false;
       } catch (KeyStoreException | CertificateException | UnrecoverableKeyException | IOException | NoSuchAlgorithmException | InvalidKeyException e) {
           throw new RuntimeException("Failed to init Cipher", e);
       }
   }
}
3. Tạo Home Activity
Bước 8. Tạo activity bằng cách chuột phải vafpo project, New ⇒ Activity ⇒ Basic Activity và cập nhật file như ở bên dưới
activity_home.xml
<?xml version="1.0" encoding="utf-8"?>
<android.support.design.widget.CoordinatorLayout xmlns:android="http://schemas.android.com/apk/res/android"
   xmlns:app="http://schemas.android.com/apk/res-auto"
   xmlns:tools="http://schemas.android.com/tools"
   android:layout_width="match_parent"
   android:layout_height="match_parent"
   android:fitsSystemWindows="true"
   tools:context="info.androidhive.fingerprint.HomeActivity">

   <android.support.design.widget.AppBarLayout
       android:layout_width="match_parent"
       android:layout_height="wrap_content"
       android:theme="@style/AppTheme.AppBarOverlay">

       <android.support.v7.widget.Toolbar
           android:id="@+id/toolbar"
           android:layout_width="match_parent"
           android:layout_height="?attr/actionBarSize"
           android:background="?attr/colorPrimary"
           app:popupTheme="@style/AppTheme.PopupOverlay" />

   </android.support.design.widget.AppBarLayout>

   <include layout="@layout/content_home" />

</android.support.design.widget.CoordinatorLayout>
content_home.xml
<?xml version="1.0" encoding="utf-8"?>
<RelativeLayout xmlns:android="http://schemas.android.com/apk/res/android"
   xmlns:app="http://schemas.android.com/apk/res-auto"
   xmlns:tools="http://schemas.android.com/tools"
   android:id="@+id/content_home"
   android:layout_width="match_parent"
   android:layout_height="match_parent"
   android:paddingBottom="@dimen/activity_vertical_margin"
   android:paddingLeft="@dimen/activity_horizontal_margin"
   android:paddingRight="@dimen/activity_horizontal_margin"
   android:paddingTop="@dimen/activity_vertical_margin"
   app:layout_behavior="@string/appbar_scrolling_view_behavior"
   tools:context="info.androidhive.fingerprint.HomeActivity"
   tools:showIn="@layout/activity_home">

   <TextView
       android:layout_width="match_parent"
       android:text="@string/activity_home_desc"
       android:layout_centerVertical="true"
       android:textSize="24sp"
       android:textAlignment="center"
       android:textColor="@color/colorPrimary"
       android:layout_height="wrap_content" />

   <TextView
       android:layout_width="match_parent"
       android:text="@string/activity_home_note"
       android:layout_alignParentBottom="true"
       android:textSize="14sp"
       android:textAlignment="center"
       android:textColor="@color/colorPrimary"
       android:layout_height="wrap_content"
       android:layout_marginBottom="24dp"/>

</RelativeLayout>
HomeActivity.class
package info.androidhive.fingerprint;

import android.os.Bundle;
import android.support.v7.app.AppCompatActivity;
import android.support.v7.widget.Toolbar;

public class HomeActivity extends AppCompatActivity {

   @Override
   protected void onCreate(Bundle savedInstanceState) {
       super.onCreate(savedInstanceState);
       setContentView(R.layout.activity_home);
       Toolbar toolbar = (Toolbar) findViewById(R.id.toolbar);
       setSupportActionBar(toolbar);
   }
}
4. Creating Fingerprint Authentication Handler Class
Bước 9. Tạo class với tên là FingerprintHandler.java. Lớp Handler kế thừa từ FingerprintManager.AuthenticationCallback và bao gồm một số các module bổ sung. Thay thế các thiết lập như đoạn code ở bên dưới.
FingerprintHandler.java
package info.androidhive.fingerprint;

import android.Manifest;
import android.app.Activity;
import android.content.Context;
import android.content.pm.PackageManager;
import android.hardware.fingerprint.FingerprintManager;
import android.os.CancellationSignal;
import android.support.v4.app.ActivityCompat;
import android.support.v4.content.ContextCompat;
import android.widget.TextView;

/**
* Created by whit3hawks on 11/16/16.
*/
public class FingerprintHandler extends FingerprintManager.AuthenticationCallback {

   private Context context;

   // Constructor
   public FingerprintHandler(Context mContext) {
       context = mContext;
   }

   public void startAuth(FingerprintManager manager, FingerprintManager.CryptoObject cryptoObject) {
       CancellationSignal cancellationSignal = new CancellationSignal();
       if (ActivityCompat.checkSelfPermission(context, Manifest.permission.USE_FINGERPRINT) != PackageManager.PERMISSION_GRANTED) {
           return;
       }
       manager.authenticate(cryptoObject, cancellationSignal, 0, this, null);
   }

   @Override
   public void onAuthenticationError(int errMsgId, CharSequence errString) {
       this.update("Fingerprint Authentication error\n" + errString, false);
   }

   @Override
   public void onAuthenticationHelp(int helpMsgId, CharSequence helpString) {
       this.update("Fingerprint Authentication help\n" + helpString, false);
   }

   @Override
   public void onAuthenticationFailed() {
       this.update("Fingerprint Authentication failed.", false);
   }

   @Override
   public void onAuthenticationSucceeded(FingerprintManager.AuthenticationResult result) {
       this.update("Fingerprint Authentication succeeded.", true);
   }

   public void update(String e, Boolean success){
       TextView textView = (TextView) ((Activity)context).findViewById(R.id.errorText);
       textView.setText(e);
       if(success){
           textView.setTextColor(ContextCompat.getColor(context,R.color.colorPrimaryDark));
       }
   }
}
5. Testing the Project
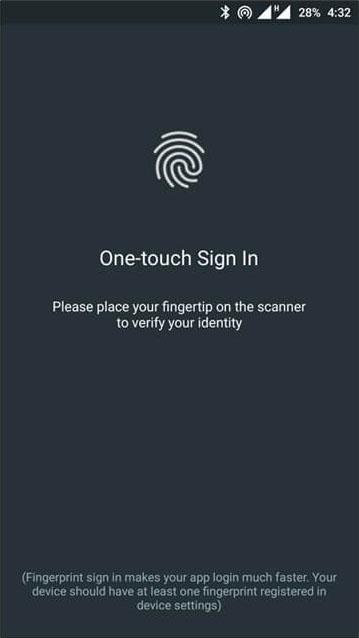
Thử nghiệm trên một thiết bị thật
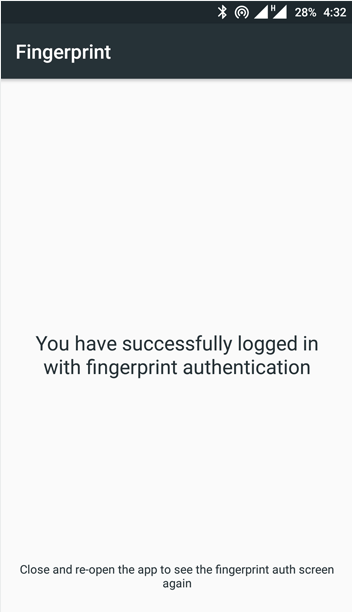
Thay thế dấu vân tay của bạn trên máy quét dấu vân tay. Nếu vân tay xác thực là thành công, người dùng sẽ được đưa đến Hoạt động chủ như hình dưới đây.
Thử nghiệm trên máy ảo
Bạn cũng có thể thử nghiệm ứng dụng trên máy ảo bằng cách::
-
Cài đặt Android SDKTools Revision 24,3, nếu bạn chưa cài
-
Đăng ký học một dấu vân tay mới bằng cách vào Settings ⇒ Security ⇒ Fingerprint, sau đó làm theo các hướng dẫn
-
Sử dụng máy ảo để mô phỏng sự kiện chạm vân tay với các lệnh sau đây. Sử dụng các lệnh tương tự để mô phỏng với các sự kiện cảm ứng vân tay trên màn hình khóa hoặc trong ứng dụng của bạn.
adb -e emu finger touch <finger_id>
All rights reserved
