(EzyPlatform) Xây dựng phía Backend cho Blog - Phần 1
Bài đăng này đã không được cập nhật trong 2 năm
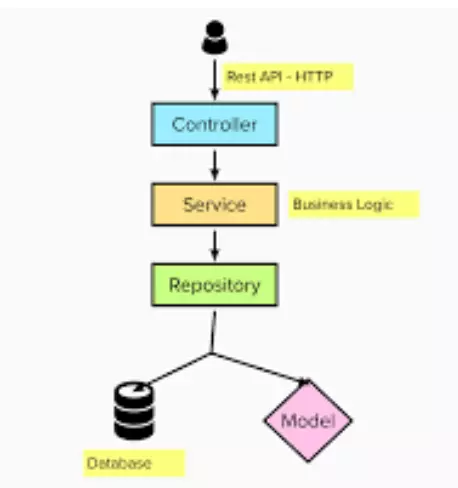
Giới thiệu về mô hình 3 layer
Ưu điểm của mô hình 3 layer:
- Phân tách nhiệm vụ: mỗi layer tập chung vào một nhiệm vụ riêng biệt.
- Dễ bảo trì, mở rộng: các phần của ứng dụng được tách riêng cho nên giảm tối thiểu việc ảnh hưởng khi một thành phần trong ứng dụng bị thay đổi.
- Tái sử dụng mã: do các thành phần được chia tách nên ta có thể tái sử dụng lại mã của các thành phần đó.
Các thành phần cơ bản trong mô hình 3 layer
Các thành phần cơ bản bao gồm: controller, service và repository. Trong đó:
- Controller: chịu trách nhiệm thu thập yêu cầu và trả về dữ liệu thông qua các thành phần trong giao diện người dùng.
- Service: chịu trách nhiệm giải quyết các logic nghiệp vụ phức tạp trước khi đưa lên cho controller và trước khi đưa xuống cho repository để chuyển vào CSDL.
- Repository: chịu trách nhiệm truy xuất CSDL (đọc, ghi, cập nhật).
Giới thiệu về mô hình sử dụng trong dự án
Trong dự án Blog được xây dựng trên nền tảng EzyPlatform, chúng ta sẽ sử dụng mô hình n layer với 3 layer chính là controller, service và repository (3 layer chính giao tiếp với nhau như đã đề cập ở trên). Ngoài ra, chúng ta còn sử dụng thêm một số layer phụ giúp quá trình phân tách nhiệm vụ cho các layer trở nên rõ ràng hơn. Nhiệm vụ các layer này sẽ được giải thích rõ trong các phần tiếp theo.
Xây dựng phần Backend cho Blog
Trong phần này chúng ta đi xây dựng phần hiển thị dữ liệu cho một bài viết tại trang home của Blog.
Fontend cho phần bài viết chính
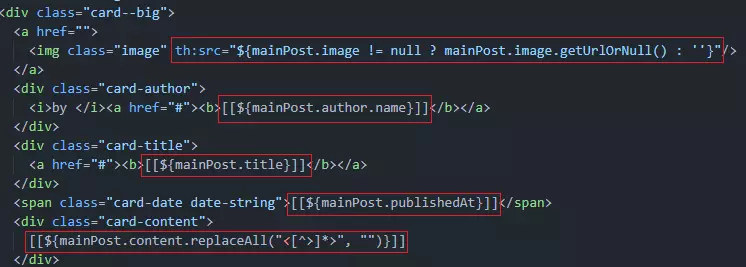
Dưới đây là đoạn mã html sử dụng cho phần bài viết này:
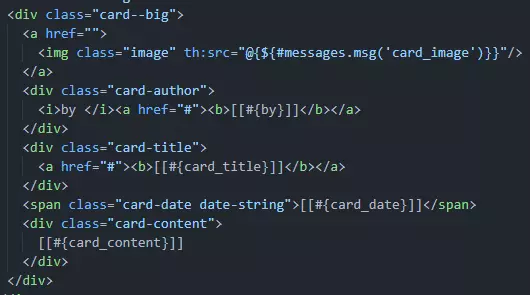
Các biểu thức Thymeleaf được sử dụng ở trên sẽ lấy dữ liệu trong file message.properties để gán dữ liệu tạm thời cho các thẻ trong html.

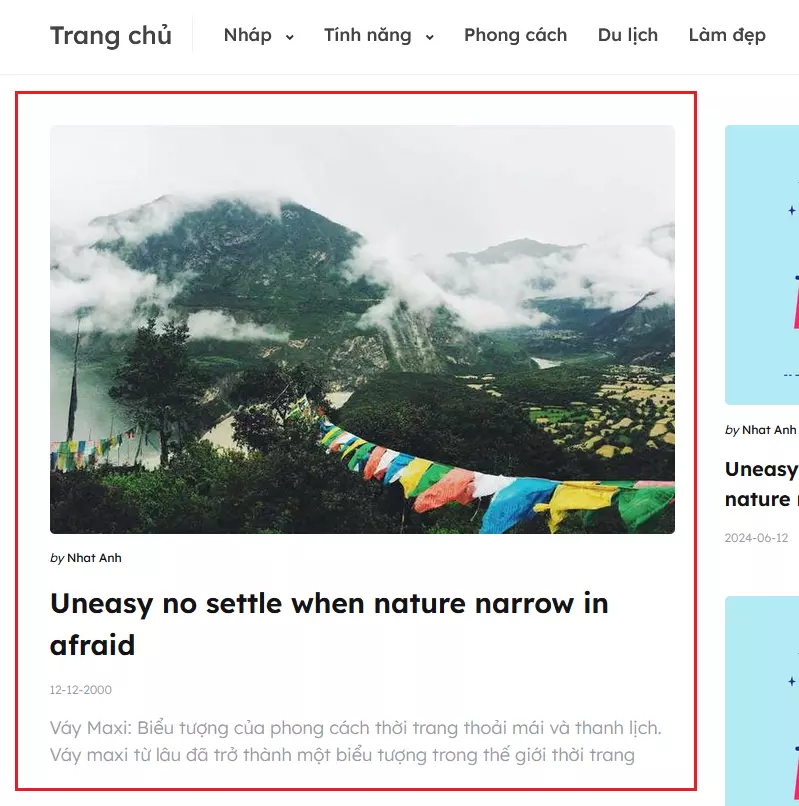
Sau khi gán dữ liệu tạm thời, phần bài viết sẽ có giao diện như sau:
Tạo dữ liệu cho bài viết (trong phần giao diện của admin)
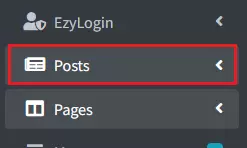
Bước 1: Vào giao diện trang admin (localhost:9090). Chọn mục Posts trên thanh menu. Để mở giao diện thêm các bài viết.
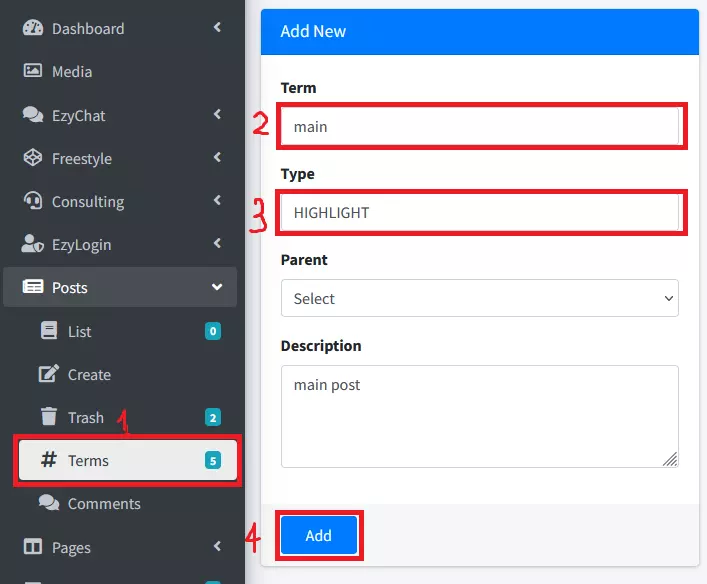
Bước 2: Chọn mục Terms trong Posts để tạo Term trước. Mỗi một bài viết sẽ có chứa các Term (có thể hiểu là các tag). Một Term phải đi cùng với một Term Type (một Term Type có thể có thể chứa nhiều Term và một bài viết có thể các các Term đến từ Term Type khác nhau). Để tạo chúng ta nhập Term và Term Type vào, nếu Term Type đã tồn tại nó sẽ thêm Term vào Term Type đó, nếu Term Type chưa tồn tại nó sẽ tạo mới một Term Type và thêm Term đó vào.
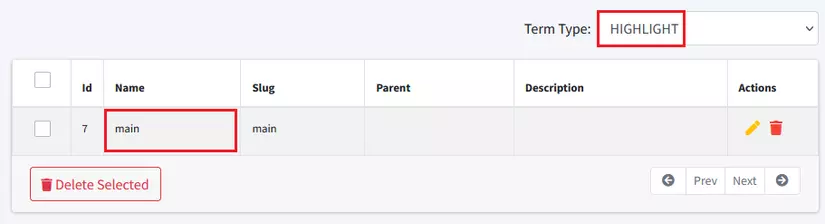
Sau khi tạo một Term sẽ được hiển thị trong một Term Type như sau:
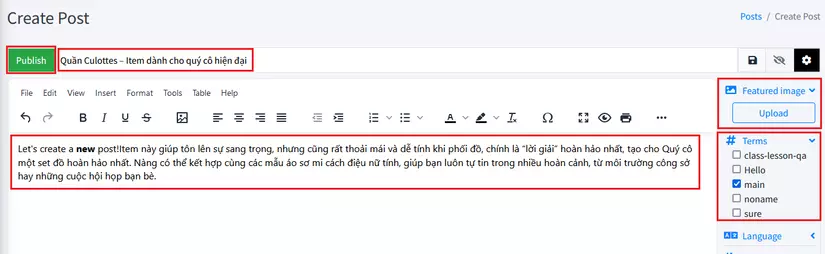
Bước 3: Sau khi đã tạo xong Term chúng ta sẽ bắt đầu tạo Post. Trong mục Posts chọn Create. Giao diện tạo Post hiện ra, chúng ta sẽ nhập các thông tin cho bài viết muốn tạo: Title, Image, Content, Term. Cuối cùng, nhấn Publish để xuất bản bài viết.
Bước 4: Chúng ta có thể kiểm tra bài viết vừa xuất bản bên trong mục List.

Thêm plugin để sử dụng
Chúng ta có thể kiểm tra các dữ liệu của bài viết vừa thêm trong CSDL (ezyplatform). Tất cả các thao tác chúng ta thực hiện để thêm bài viết, sẽ sử dụng các bảng bắt đầu bằng ezyarticle trong CSDL.
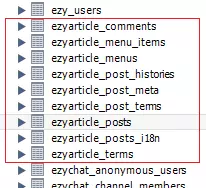
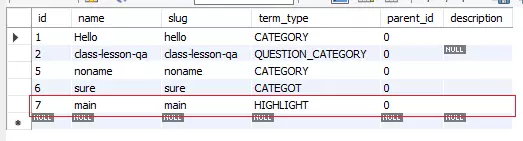
Đầu tiên, chúng ta sẽ tìm kiếm bảng ezyarticle_terms trong CSDL, trong bảng này chúng ta sẽ thấy Term và Term Type chúng ta đã thêm ban đầu và id cho cặp Term và Term Type này.
Tiếp tục, chúng ta sẽ tìm kiếm bảng ezyarticle_post_terms, chúng ta sẽ thấy term_id của cặp Term và Term Type vừa rồi, sau đó chúng ta sẽ nhìn thấy post_id tương ứng.
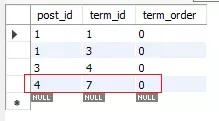
Chúng ta sẽ tìm đến bảng ezyarticle_posts, tìm id tương ứng với post_id vừa tìm được, chúng ta sẽ thấy bài viết mà chúng ta vừa tạo.

Lưu ý: Thêm Plugin để sử dụng: vào thư mục gốc của dự án gõ lệnh cmd: ezy.bat link <tên_lugin_viết thường(có khoảng cách thì thêm “_”>. VD: ezy.bat link ezyarticle → Nếu sử dụng ezyarticle.
Viết mã để hiển thị bài viết vừa thêm
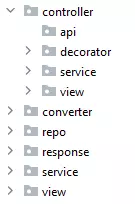
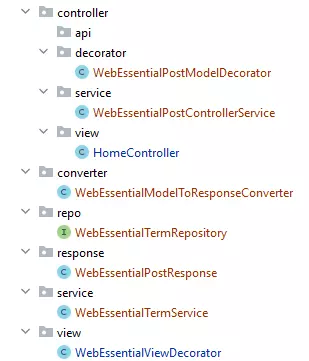
Tạo các Package sử dụng cho dự án:
- controller:
1.1. view: nhận yêu cầu, sử dụng service và trả về kết quả.
1.2. service: xử lý nghiệp vụ được yêu cầu bởi view.
1.3. decorator: điều chỉnh dữ liệu nhận được để lấy ra những dữ liệu cần thiết. - service: chứa logic nghiệp vụ được xây dựng bởi người dùng, được gọi bởi controller.
- repo: nhận yêu cầu từ service, thao tác với CSDL và trả về kết quả.
- converter: loại bỏ dữ liệu dư thừa trả về một đối tượng response chỉ chứa dữ liệu yêu cần dùng.
- response: định nghĩa các dữ liệu cần thiết cho một yêu cầu (nghiệp vụ) cụ thể.
- view: được sử dụng sau khi nhận được View và trước khi tạo ra mã html từ template.

Tạo các class tương ứng cho mỗi Package trên:
- Viết mã cho class HomeController:
package com.blog.essential.web.controller.view;

import com.blog.essential.web.controller.service.WebEssentialPostControllerService;
import com.blog.essential.web.response.WebEssentialPostResponse;
import com.tvd12.ezyhttp.server.core.annotation.Controller;
import com.tvd12.ezyhttp.server.core.annotation.DoGet;
import com.tvd12.ezyhttp.server.core.view.View;
import lombok.AllArgsConstructor;

import static org.youngmonkeys.ezyplatform.constant.CommonConstants.VIEW_VARIABLE_PAGE_TITLE;

@Controller
@AllArgsConstructor
public class HomeController {

    private final WebEssentialPostControllerService essentialPostControllerService;

    @DoGet("/")
    public View home() {
        WebEssentialPostResponse mainPost = essentialPostControllerService
                .getMainPostOrNull();
        return View.builder()
            .template("home") //--> Hàm
            .addVariable("mainPost", mainPost)
            .addVariable(VIEW_VARIABLE_PAGE_TITLE, "hehe")
            .build();
    }
}
Khi trang home được khởi động, nó sẽ gửi yêu cầu đến controller của trang home (controller.view.HomeController). Yêu cầu lấy dữ liệu, do đó nó chạy vào phương thức để lấy dữ liệu của controller.view.HomeController có anotation @DoGet(“/“).
Phương thức mà nó chạy vào là home(). Phương thức này có kiểu trả về là View (được quy định).
View là một lớp được viết sẵn. View có một phương thức static là builder() với kiểu trả về là một Builder. Do đó khi gọi View.builder() nó trả cho chúng ta một đối tượng Buider và từ đó chúng ta có thể sử dụng các phương thức có trong class Bulider (Buillder là một class được viết sẵn trong class View bởi nhà phát triển, còn Builder mà chúng ta sử dụng với anotation @Builder là của thư viện Lombok)
View.Builder là kiểu Builder vì class Builder được khai báo bên trong class View (nó là một inner class) và nó là một class static - do đó nó không yêu cầu một thể hiện của lớp View để tồn tại.
Chúng ta có thể thấy trong lớp Builder xây dựng một loạt các phương thức với câu lệnh trả về là this, điều này để hỗ trợ việc gọi một chuỗi các phương thức (method chaining), ý tưởng của nó là sau khi phương thức này được hoàn thành, nó sẽ trả về chính đối tượng hiện tại, do đối tượng trả về lại là đối tượng hiện tại nên chúng ta có thể sử dụng đối tượng hiện tại để thực hiện tiếp một phương thức tương tự, kết quả của quá trình này giúp chúng ta thực hiện một loại các phương thức mà chỉ sử dụng một câu lệnh giúp tiết kiệm các biến trung gian và code gọn gàng hơn. VD: person.setName(“Alice“).setAge(30). Sau khi đã sử dụng builder() để thiết lập một loại các giá trị thì nó chạy phương thức cuối cùng build(). Phương thức này yêu cầu trả về kiểu dữ liệu View. Cuối cùng sau khi thực hiện một chuỗi các phương thức nối tiếp nhau, chúng ta nhận được một đối tượng view để trả về cho phương thức home().
Sau khi chạy vào home(), nó khởi tạo một response (PostResponse) lưu trữ post chính cho trang web, đối tượng này (mainPost) sẽ sử dụng một đối tượng controller.service (PostControllerService) để lấy ra bài đăng chính, PostControllerService sẽ gọi tới một dịch vụ mà nó lưu trữ (getMainPostOrNull) để lấy ra lấy ra bài đăng chính và trả về một đối tượng response (PostResponse).
- Viết mã cho class WebEssentialPostControllerService + class WebEssentialTermService + interface WebEssentialTermRepository:
Định nghĩa: Constant cho Term và Term Type lấy ra: vào <tên_dự_án>-sdk → src → main → java → com... → Tạo một class tên là EssentialConstants.
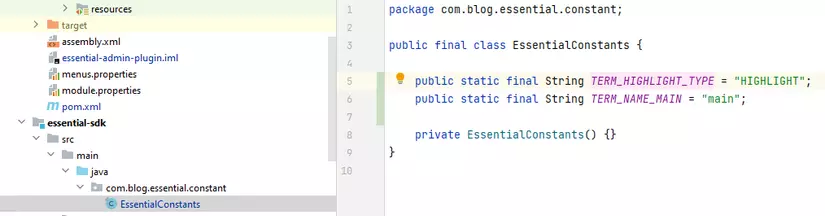
package com.blog.essential.constant;

public final class EssentialConstants {

    public static final String TERM_HIGHLIGHT_TYPE = "HIGHLIGHT";
    public static final String TERM_NAME_MAIN = "main";

    private EssentialConstants() {}
}
package com.blog.essential.web.controller.service;

import com.blog.essential.web.controller.decorator.WebEssentialPostModelDecorator;
import com.blog.essential.web.response.WebEssentialPostResponse;
import com.blog.essential.web.service.WebEssentialTermService;
import com.tvd12.ezyhttp.server.core.annotation.Service;
import lombok.AllArgsConstructor;
import org.youngmonkeys.ezyarticle.sdk.model.PostModel;
import org.youngmonkeys.ezyarticle.sdk.model.TermModel;
import org.youngmonkeys.ezyarticle.web.service.WebPostService;
import org.youngmonkeys.ezyarticle.web.service.WebTermService;

import static com.blog.essential.constant.EssentialConstants.TERM_HIGHLIGHT_TYPE;
import static com.blog.essential.constant.EssentialConstants.TERM_NAME_MAIN;

@Service
@AllArgsConstructor
public class WebEssentialPostControllerService {

    private final WebEssentialTermService essentialTermService;
    private final WebPostService postService;
    private final WebTermService termService;
    private final WebEssentialPostModelDecorator essentialPostModelDecorator;

    public WebEssentialPostResponse getMainPostOrNull() {
        TermModel mainTerm = termService.getTermByTypeAndName(
            TERM_HIGHLIGHT_TYPE,
            TERM_NAME_MAIN
        );
        if (mainTerm == null) {
            return null;
        }
        long postId = essentialTermService.getPostIdByTermId(
            mainTerm.getId()
        );
        if (postId <= 0) {
            return null;
        }
        PostModel post = postService.getPublishedPostById(postId);
        if (post == null) {
            return null;
        }
        return essentialPostModelDecorator.decorate(post);
    }
}
package com.blog.essential.web.service;

import com.blog.essential.web.repo.WebEssentialTermRepository;
import com.tvd12.ezyhttp.server.core.annotation.Service;
import lombok.AllArgsConstructor;
import org.youngmonkeys.ezyplatform.result.IdResult;

@Service
@AllArgsConstructor
public class WebEssentialTermService {

    private final WebEssentialTermRepository essentialTermRepository;

    public long getPostIdByTermId(long termId) {
        IdResult result = essentialTermRepository.findPostIdByTermId(
            termId
        );
        return result != null ? result.getId() : 0L;
    }
}
package com.blog.essential.web.repo;

import com.tvd12.ezydata.database.EzyDatabaseRepository;
import com.tvd12.ezyfox.database.annotation.EzyQuery;
import com.tvd12.ezyfox.database.annotation.EzyRepository;
import org.youngmonkeys.ezyarticle.sdk.entity.PostTerm;
import org.youngmonkeys.ezyarticle.sdk.entity.PostTermId;
import org.youngmonkeys.ezyplatform.result.IdResult;

@EzyRepository
public interface WebEssentialTermRepository
        extends EzyDatabaseRepository<PostTermId, PostTerm> {

    @EzyQuery(
        "SELECT e.postId FROM PostTerm e WHERE e.termId = ?0"
    )
    IdResult findPostIdByTermId(long termId);
}
Trong phương thức (getMainPostOrNull), nó sử dụng hai service được viết sẵn để lấy ra TermModel theo tên và kiểu (theo Term và Term Type). Một service được khai báo (TermService) được sử dụng lấy ra id của post dựa trên id lấy từ TermModel. Trong service này sử dụng repo (TermRepository) để lấy ra postid bên trong CSDL dựa trên termId truyền vào. Cuối cùng khi hoàn thành chúng ta sẽ nhận được postId. Sau khi có postId chúng ta sử dụng một service có sẵn PostService để lấy ra một đối tượng PostModel dựa trên postId. Cuối cùng chúng ta nhận được một đối tượng PostModel chứa các thông tin của bài viết.
- Viết mã cho class WebEssentialPostModelDecorator:
package com.blog.essential.web.controller.decorator;

import com.blog.essential.web.converter.WebEssentialModelToResponseConverter;
import com.blog.essential.web.response.WebEssentialPostResponse;
import com.tvd12.ezyfox.bean.annotation.EzySingleton;
import lombok.AllArgsConstructor;
import org.youngmonkeys.ezyarticle.sdk.model.PostModel;
import org.youngmonkeys.ezyplatform.model.MediaNameModel;
import org.youngmonkeys.ezyplatform.model.UuidNameModel;
import org.youngmonkeys.ezyplatform.web.service.WebAdminService;
import org.youngmonkeys.ezyplatform.web.service.WebMediaService;

@EzySingleton
@AllArgsConstructor
public class WebEssentialPostModelDecorator {

    private final WebAdminService adminService;
    private final WebMediaService mediaService;
    private final WebEssentialModelToResponseConverter essentialModelToResponseConverter;

    public WebEssentialPostResponse decorate(PostModel model) {
        UuidNameModel author = adminService.getAdminUuidNameById(
            model.getAuthorAdminId()
        );
        MediaNameModel image = mediaService.getMediaNameById(
            model.getFeaturedImageId()
        );
        return essentialModelToResponseConverter.toPostResponse(
            model,
            author,
            image
        );
    }
}
Sử dụng một dercorator (PostModelDecorator) để tinh chỉnh dữ liệu (lấy ra đầy đủ các dữ liệu cần thiết) của post vừa lấy được và trả về một đối tượng response thông qua phương thức decorate() của decorator. Trong phương thức decorate chúng ta nhận vào một đối tượng PostModel. Vì chúng ta muốn lấy ra tên của tác giả và hình ảnh để hiển thị lên trang web mà bên trong đối tượng model (PostModel) hiện tại chỉ chứa id của tác giả và id của hình ảnh. Do đó, chúng ta sử dụng hai service (adminService, mediaService đã được xây dựng sẵn) để lấy tên của tác giả theo id và tên của hình ảnh theo id. Lúc này chúng ta đã có những thông tin sau: tên tác giả, tên hình ảnh và model chứa các thông tin: tiêu đề, nội dung và ngày đăng và các thông tin khác.
- Viết mã cho class WebEssentialModelToResponseConverter + class WebEssentialPostResponse:
package com.blog.essential.web.converter;

import com.blog.essential.web.response.WebEssentialPostResponse;
import com.tvd12.ezyfox.bean.annotation.EzySingleton;
import org.youngmonkeys.ezyarticle.sdk.model.PostModel;
import org.youngmonkeys.ezyplatform.model.MediaNameModel;
import org.youngmonkeys.ezyplatform.model.UuidNameModel;

@EzySingleton
public class WebEssentialModelToResponseConverter {

    public WebEssentialPostResponse toPostResponse(
        PostModel model,
        UuidNameModel author,
        MediaNameModel image
    ) {
        return WebEssentialPostResponse.builder()
            .image(image)
            .title(model.getTitle())
            .author(author)
            .content(model.getContent())
            .publishedAt(model.getPublishedAt())
            .build();
    }
}
package com.blog.essential.web.response;

import lombok.Builder;
import lombok.Getter;
import org.youngmonkeys.ezyplatform.model.MediaNameModel;
import org.youngmonkeys.ezyplatform.model.UuidNameModel;

@Getter
@Builder
public class WebEssentialPostResponse {
    private final MediaNameModel image;
    private final UuidNameModel author;
    private final String title;
    private final String content;
    private final long publishedAt;
}
Do trong đối tượng model có chứa rất nhiều các thông tin khác mà các thông tin này post chính của chúng ta không cần sử dụng. Do đó, chúng ta cần lược bỏ đi những thông tin này để thông tin trả về được gọn gàng. Để làm điều này, chúng ta sử dụng converter để chuyển các thông tin hiện có sang response (ở đây chúng ta đang chuyển đổi từ model sang response), response chứa các lớp để tinh chỉnh lại các thông tin nhận được (chỉ lấy ra những thông tin cẩn thiết). Ở đây, chúng ta tạo ra một lớp PostResponse, lớp này chứa các thông tin mà post chính sẽ sử dụng, sử dụng thêm cho lớp này anotation của lombok là @Getter và @Builder (@Builder thiết lập các giá trị PostResponse và @Getter giúp lấy ra các giá trị này) và dùng builder() để thiết lập các giá trị sau đó trả về một PostResponse.
- Viết mã cho class WebEssentialViewDecorator:
package com.blog.essential.web.view;

import com.tvd12.ezyfox.bean.annotation.EzySingleton;
import org.youngmonkeys.ezyplatform.web.view.WebViewDecorator;

@EzySingleton
public class WebEssentialViewDecorator extends WebViewDecorator {

}
Sau khi đã hoàn tất, PostResponse sẽ được trả về qua decorator → controller.service → controller.view. Lúc này, mainPost được gán giá trị là một đối tượng PostResponse. Truyền mainPost vào View và các thông tin cần thiết cho View.
Sau khi View được tạo ra view.ViewDecorator được framework gọi trước khi tạo html từ template.
Gán giá trị động
Thay đổi các biểu thức Thymeleaf trong mã html để nhận giá trị từ đối tượng mainPost
Sau khi lưu và khởi động lại, chúng ta sẽ nhận được kết quả:
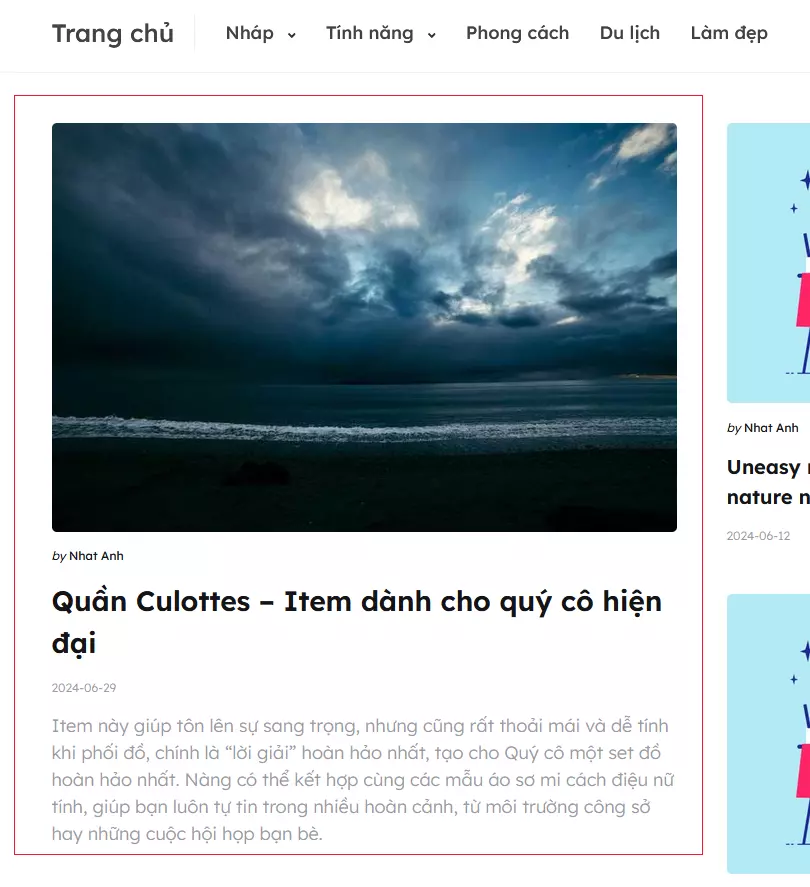
Tóm tắt: phần này hướng dẫn chúng ta gán dữ liệu động cho một bài viết trên Blog
All rights reserved
