EKS private worker
Giới thiệu
Là bài tiếp theo của Tôi bắt đầu học EKS.
Bài trước mình đã dựng một cụm EKS với worker node là public (có ip public và có thể truy cập được từ internet) nên không được bảo mật cho lắm, chưa kể ip public còn bị tính tiền nên mình đang trả phí cho tài nguyên không sử dụng đến. Nên là bài này mình sẽ dựng một cụm EKS private worker.
Nếu các bạn chưa xem bài trước cũng không sao, tuy nhiên những thông tin mình đã đề cập trong bài trước thì bài này mình sẽ nêu qua và reference đến bài trước, và mình khuyên là các bạn nên xem cả bài trước để có cái hiểu hoàn chỉnh về EKS.
Kiến trúc của cụm lần này trông như sau: có public, private subnets, worker nằm trong private subnet truy cập internet qua nat gateway nằm ở public subnet.
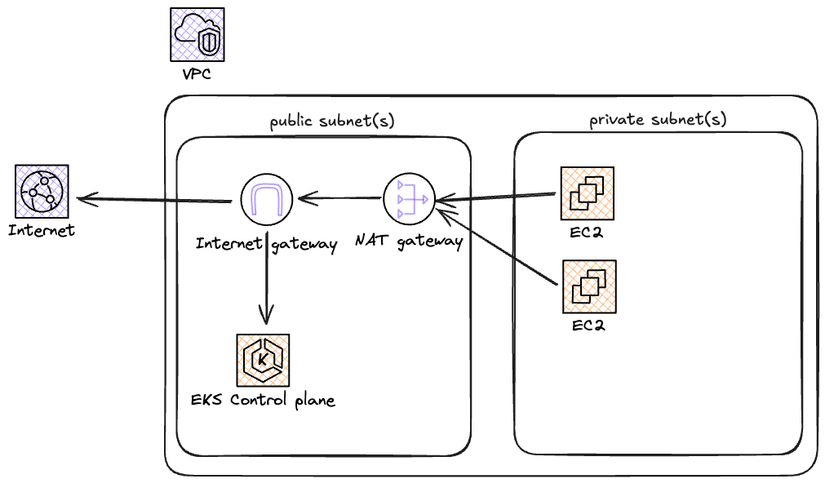
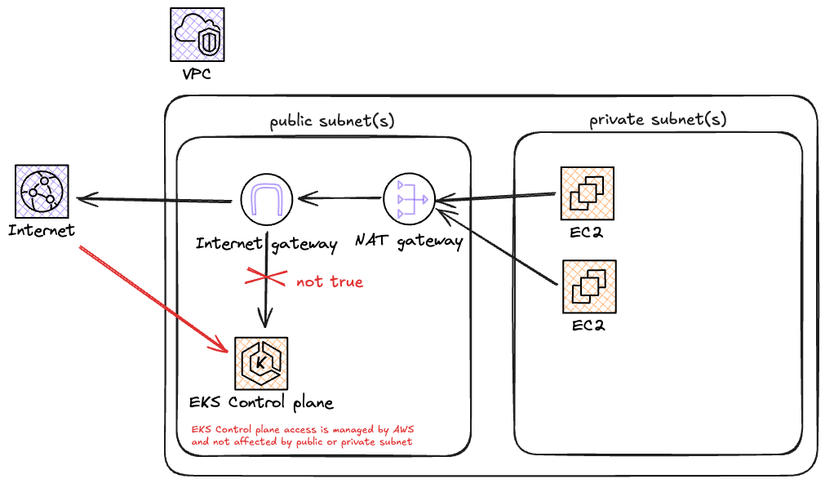
[UPDATE] trong quá trình triển khai mình nhận ra việc đặt control plane ở public hay private subnet không ảnh hưởng tới việc truy cập cụm, chứng tỏ việc truy cập được quản lý độc lập bởi aws.
Các bước dựng cụm lần này cũng tương tự như bài trước, khác mỗi bước dựng network
- Tạo network (*): vpc, subnets, internet gateway, nat gateway, route table.
- Khởi tạo EKS cluster
- Setup eks node group + eks addons: vpc-cni, kube-proxy, coredns
- Test nginx deployment
- Dọn dẹp
link GitHub cho bài này nè aws-eks-example/one
Khởi tạo project
Phần này các bạn làm tương tự bài trước hoặc tự setup sao cho giống yêu cầu của bạn nhé
terraform.tf
terraform {
  required_providers {
    aws = {
      source  = "hashicorp/aws"
      version = "5.24"
    }
  }

  required_version = ">= 1.2.0"
}
provider "aws" {
  region = "ap-southeast-1"
}
Sau đó khởi tạo provider bằng lệnh
terraform init
Khởi tạo xong provider thì bắt đầu triển
1. Tạo network (*)
Network cho cụm EKS lần này sẽ trông như sau:
- 1 vpc có dải ip là
10.0.0.0/16có tên làone- 1 internet gateway để cho phép truy cập internet từ trong ra ngoài và từ ngoài vào trong. - có 2 availability zone, mỗi availability zone có
- 1 public subnet: các instance trong subnet này sẽ được gán ip public và truy cập được từ public internet
- 1 private subnet: các instance trong subnet này sẽ ko được gán ip public và không thể truy cập các ec2 instance này từ internet
- 1 nat gateway: cho phép các ec2 instance trong private subnet truy cập được internet và control plane.
- mỗi nat gateway cần một ip public (
eip) để có thể thực hiện NAT
- mỗi nat gateway cần một ip public (
- 1 route table public:
publiccho public subnet publicone_one - 1 route table nat:
natdùng chung cho 2 private subnet - các route rule cho 2 route table trên
Toàn bộ source code cho network mình sẽ để ở file network.tf link GitHub nè https://github.com/tuana9a/aws-eks-example/blob/main/one/network.tf
1.0 Tạo vpc
- vpc có dải ip là
10.0.0.0/16có tên làone - tạo 4 subnets trên 2 availability zones là:
ap-southeast-1a,ap-southeast-1b- mỗi một zone lại có 1 public, 1 private
- Public subnet sẽ có trường
map_public_ip_on_launch = true, private subnet sẽ làmap_public_ip_on_launch = false
1.0-network.tf
resource "aws_vpc" "one" {
  cidr_block = "10.0.0.0/16"
  tags = {
    Name = "one"
  }
}
resource "aws_subnet" "one_public_a" {
  vpc_id            = aws_vpc.one.id
  cidr_block        = "10.0.1.0/24"
  availability_zone = "ap-southeast-1a"

  map_public_ip_on_launch = true

  tags = {
    Name = "one_public_a"
  }
}
resource "aws_subnet" "one_private_a" {
  vpc_id            = aws_vpc.one.id
  cidr_block        = "10.0.2.0/24"
  availability_zone = "ap-southeast-1a"

  map_public_ip_on_launch = false

  tags = {
    Name = "one_private_a"
  }
}
resource "aws_subnet" "one_public_b" {
  vpc_id            = aws_vpc.one.id
  cidr_block        = "10.0.3.0/24"
  availability_zone = "ap-southeast-1b"

  map_public_ip_on_launch = true

  tags = {
    Name = "one_public_b"
  }
}
resource "aws_subnet" "one_private_b" {
  vpc_id            = aws_vpc.one.id
  cidr_block        = "10.0.4.0/24"
  availability_zone = "ap-southeast-1b"

  map_public_ip_on_launch = false

  tags = {
    Name = "one_private_b"
  }
}
1.2 Tạo internet gateway và route public
1 internet gateway để cho phép truy cập internet từ trong ra ngoài và từ ngoài vào trong.
1.2-network-public.tf
resource "aws_internet_gateway" "public" {
  vpc_id = aws_vpc.one.id
  tags = {
    Name = "public"
  }
}
1 route table public: public sử dụng chung cho các public subnet
1.2-network-public.tf
resource "aws_route_table" "public" {
  vpc_id = aws_vpc.one.id
  tags = {
    Name = "public"
  }
}
Route table public sẽ có một rule là: sẽ route toàn bộ traffic qua internet gateway: (cidr 0.0.0.0/0 sẽ match với mọi destination nếu ko có cidr match hơn: cái này trong môn mạng máy tính), ý định là để traffic từ private subnet qua nat gateway nằm trong public subnet, rồi nat gateway ở public subnet sẽ mặc định gửi tiếp traffic ra ngoài internet với internet gateway.
1.2-network-public.tf
resource "aws_route" "public" {
  route_table_id         = aws_route_table.public.id
  destination_cidr_block = "0.0.0.0/0"
  gateway_id             = aws_internet_gateway.public.id
}
Tạo xong route rồi thì gắn route table đó cho các public subnet
1.2-network-public.tf
resource "aws_route_table_association" "one_public_a" {
  route_table_id = aws_route_table.public.id
  subnet_id      = aws_subnet.one_public_a.id
}
resource "aws_route_table_association" "one_public_b" {
  route_table_id = aws_route_table.public.id
  subnet_id      = aws_subnet.one_public_b.id
}
1.3 Tạo nat gateway và nat route
Mỗi zone mình sẽ tạo một nat gateway, tương ứng 2 zone sẽ tạo 2 nat gateway.
Lưu ý:
- Câu hỏi ở đây là có thể dùng chung nat gateway không? Có thể dùng nhưng bạn sẽ bị charge tiền traffic giữa 2 zone. Và nếu một zone bị down thì zone còn lại sẽ không truy cập public internet được nữa.
- worker trong private subnet sẽ sử dụng nat để có thể truy cập public internet, nếu không có nat hoặc thứ khác tương đương thì nếu worker của bạn cần truy cập public internet thì sẽ toang: VD: kéo docker image từ public registry.
- một nat gateway cần một ip public (
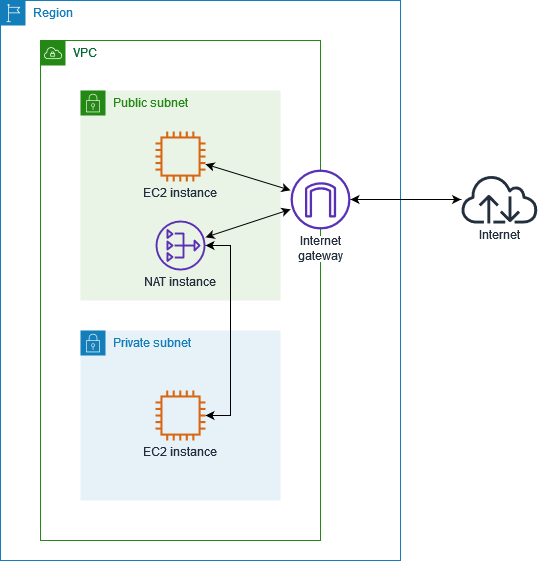
eip) để có thể đóng vai trò đứng trước public internet và internal subnet của mình - nat gateway cho private subnet nhưng lại nằm ở public subnet. Giải thích: các bạn có thể xem ở đây hoặc các bạn hiểu đơn giản như sau: thằng nat này cần truy cập public internet và traffic từ public internet về cũng phải vào được nat gateway, do vậy nó cần được nằm ở public subnet.
Ok hiểu rùi thì tạo nhé.
1.3-network-nat.tf
resource "aws_eip" "nat_a" {
  domain = "vpc"
  tags = {
    Name = "nat_a"
  }
}
resource "aws_eip" "nat_b" {
  domain = "vpc"
  tags = {
    Name = "nat_b"
  }
}
resource "aws_nat_gateway" "nat_a" {
  allocation_id = aws_eip.nat_a.allocation_id
  subnet_id     = aws_subnet.one_public_a.id

  tags = {
    Name = "nat_a"
  }
}
resource "aws_nat_gateway" "nat_b" {
  allocation_id = aws_eip.nat_b.allocation_id
  subnet_id     = aws_subnet.one_public_b.id

  tags = {
    Name = "nat_b"
  }
}
Giờ đến phần routing: do có 2 nat gateway nên tương ứng mình sẽ tạo 2 route table:
1.3-network-nat.tf
resource "aws_route_table" "nat_a" {
  vpc_id = aws_vpc.one.id
  tags = {
    Name = "nat_a"
  }
}
resource "aws_route_table" "nat_b" {
  vpc_id = aws_vpc.one.id
  tags = {
    Name = "nat_b"
  }
}
Các route table này chỉ một route rule: mặc định route toàn bộ traffic qua nat gateway
1.3-network-nat.tf
resource "aws_route" "nat_a" {
  route_table_id         = aws_route_table.nat_a.id
  destination_cidr_block = "0.0.0.0/0"
  nat_gateway_id         = aws_nat_gateway.nat_a.id
}
resource "aws_route" "nat_b" {
  route_table_id         = aws_route_table.nat_b.id
  destination_cidr_block = "0.0.0.0/0"
  nat_gateway_id         = aws_nat_gateway.nat_b.id
}
Xong rồi thì gắn vào private subnet tương ứng
1.3-network-nat.tf
resource "aws_route_table_association" "one_private_a" {
  route_table_id = aws_route_table.nat_a.id
  subnet_id      = aws_subnet.one_private_a.id
}
resource "aws_route_table_association" "one_private_b" {
  route_table_id = aws_route_table.nat_b.id
  subnet_id      = aws_subnet.one_private_b.id
}
Như vậy traffic từ private subnet mặc định sẽ qua nat gateway, mà nat gateway nằm trên public subnet và traffic mặc định trên public subnet sẽ qua internet gateway và ra public internet. Từ đó private worker trong private subnet có thể truy cập được public internet.
cuối cùng cũng xong network, các bạn có thể apply thử.
terraform apply # yes
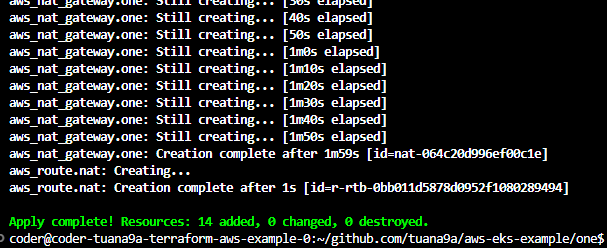
Yay xong r, tốn não dã man - networking vẫn là một thứ gì đó. Sau khi dựng xong network thì có thể bắt đầu dựng cụm EKS rùi
2. Khởi tạo EKS Cluster
Đến lúc dựng cụm rồi, phần này mình sẽ đi nhanh vì nó giống hệt bài trước
Cụm mình tạo như sau:
- iam role có tên là
EKSClusterRole - tên cụm là
one - subnets cho cụm là public subnet:
one_public_amục đích là cho phép mình tiếp cập control plane từ public internet,các worker cũng chọc tới control plane thông qua public internet cho đơn giản- UPDATE: EKS yêu cầu ít nhất 2 az cho việc tạo cluster

- UPDATE: EKS yêu cầu ít nhất 2 az cho việc tạo cluster
- UPDATE Mình test thử tạo cluster với 2 private subnets xem tạo được không? Và có thể truy cập control plane từ public được không?\
Câu trả lời là: có - chứng tỏ việc truy cập được từ public hay không, không bị ảnh hưởng bởi việc đặt cluster (control plane) ở public hay private subnets
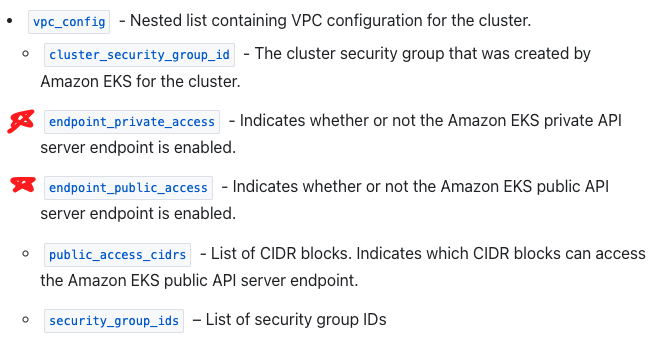
Nếu kiểm tra các option khi tạo eks cluster chúng ta có thể thấy option phía dưới
2-eks-cluster.tf
resource "aws_iam_role" "eks_cluster_role" {
  name = "EKSClusterRole"
  assume_role_policy = jsonencode({
    Version = "2012-10-17"
    Statement = [
      {
        Action = "sts:AssumeRole"
        Effect = "Allow"
        Sid    = ""
        Principal = {
          Service = "eks.amazonaws.com"
        }
      },
    ]
  })
  managed_policy_arns = [
    "arn:aws:iam::aws:policy/AmazonEKSClusterPolicy"
  ]
}
resource "aws_eks_cluster" "one" {
  name     = "one"
  role_arn = aws_iam_role.eks_cluster_role.arn
  version  = "1.33" # UPDATED 2025

  vpc_config {
    subnet_ids = [
      aws_subnet.one_private_a.id,
      aws_subnet.one_private_b.id,
    ]
  }

  # Ensure that IAM Role permissions are created before and deleted after EKS Cluster handling.
  # Otherwise, EKS will not be able to properly delete EKS managed EC2 infrastructure such as Security Groups.
  depends_on = [
    aws_iam_role.eks_cluster_role,
  ]
}
terraform apply # yes
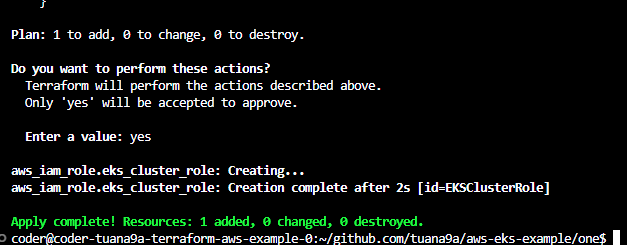

Bình thường sẽ mất khoảng 7-8 phút, lần này mất tận 12 phút (khác mỗi cho vào private subnets). Các thông tin bên lề các bạn có thể xem thêm ở mục 3. Khởi tạo control plane trong bài viết trước. Kết quả khi kiểm tra trên giao diện trông sẽ như sau.

3. eks node group + eks addon: vpc-cni, kube-proxy, coredns
Phần này cũng tương tự bài trước, tuy nhiên mình đã thêm code để đảm bảo là node group và addon sẽ chạy một phát lên luôn
Tạo node group
3-eks-node-group.tf
resource "aws_iam_role" "eks_node_role" {
  name = "EKSNodeRole"
  assume_role_policy = jsonencode({
    Version = "2012-10-17"
    Statement = [
      {
        Action = "sts:AssumeRole"
        Effect = "Allow"
        Sid    = ""
        Principal = {
          Service = "ec2.amazonaws.com"
        }
      },
    ]
  })
  managed_policy_arns = [
    "arn:aws:iam::aws:policy/AmazonEKSWorkerNodePolicy",
    "arn:aws:iam::aws:policy/AmazonEC2ContainerRegistryReadOnly",
    "arn:aws:iam::aws:policy/AmazonEKS_CNI_Policy"
  ]
}
# WARN: apply AFTER vpc-cni, kube-proxy
# WARN: apply BEFORE coredns
resource "aws_eks_node_group" "one" {
  cluster_name    = aws_eks_cluster.one.name
  node_group_name = "one"
  version         = "1.33" # UPDATED 2025
  node_role_arn   = aws_iam_role.eks_node_role.arn
  capacity_type   = "SPOT"

  instance_types = [
    "t3.medium"
  ]

  subnet_ids = [
    aws_subnet.one_private_a.id,
    aws_subnet.one_private_b.id,
  ]

  scaling_config {
    desired_size = 1
    max_size     = 3
    min_size     = 1
  }

  update_config {
    max_unavailable = 1
  }

  # Ensure that IAM Role permissions are created before and deleted after EKS Node Group handling.
  # Otherwise, EKS will not be able to properly delete EC2 Instances and Elastic Network Interfaces.
  depends_on = [
    aws_iam_role.eks_node_role,
    aws_eks_addon.one_vpccni,
    aws_eks_addon.one_kubeproxy,
  ]
}
Lưu ý là thằng node group depends_on aws_eks_addon.one_vpccni, aws_eks_addon.one_kubeproxy
Cách tìm eks addon version các bạn tìm trên mạng hoặc dùng script của mình ở README nhé
3-eks-addons.tf
# WARN: apply BEFORE node_group
resource "aws_eks_addon" "one_vpccni" {
  cluster_name  = aws_eks_cluster.one.name
  addon_name    = "vpc-cni"
  addon_version = "v1.19.5-eksbuild.1" # UPDATED 2025
}
# WARN: apply BEFORE node_group
resource "aws_eks_addon" "one_kubeproxy" {
  cluster_name  = aws_eks_cluster.one.name
  addon_name    = "kube-proxy"
  addon_version = "v1.33.3-eksbuild.4" # UPDATED 2025
}
# WARN: apply AFTER node_group
resource "aws_eks_addon" "one_coredns" {
  cluster_name  = aws_eks_cluster.one.name
  addon_name    = "coredns"
  addon_version = "v1.12.1-eksbuild.2" # UPDATED 2025

  depends_on = [aws_eks_node_group.one]
}
Lưu ý là thằng addon coredns depends_on aws_eks_node_group.one
terraform apply # yes

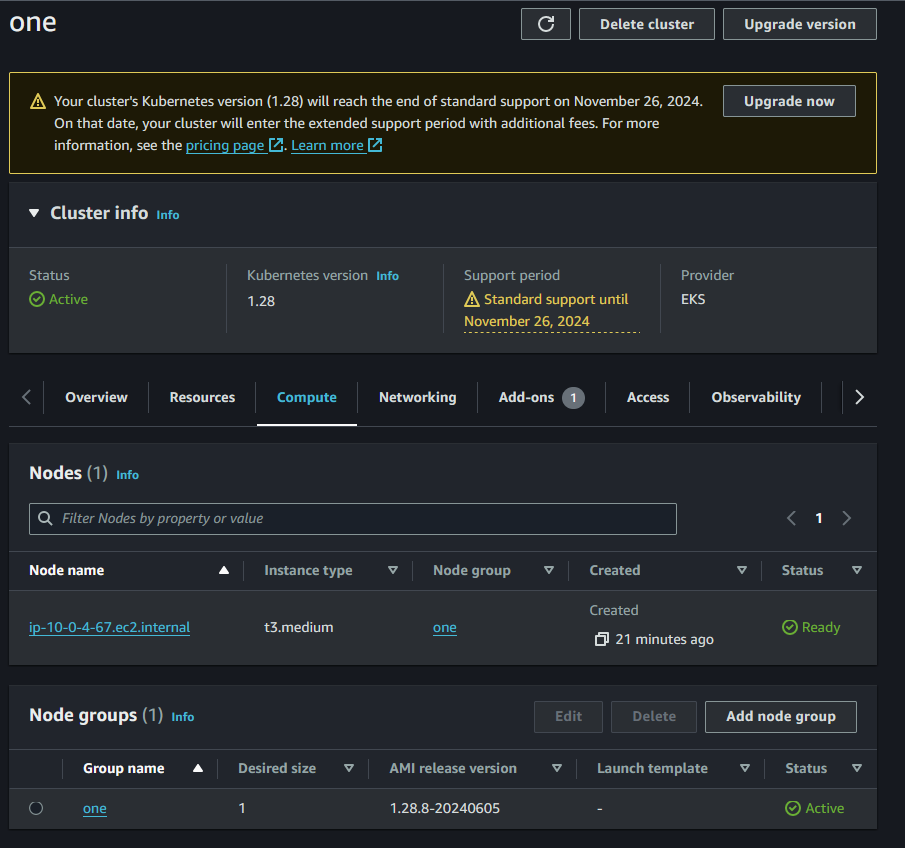
Check trên aws console
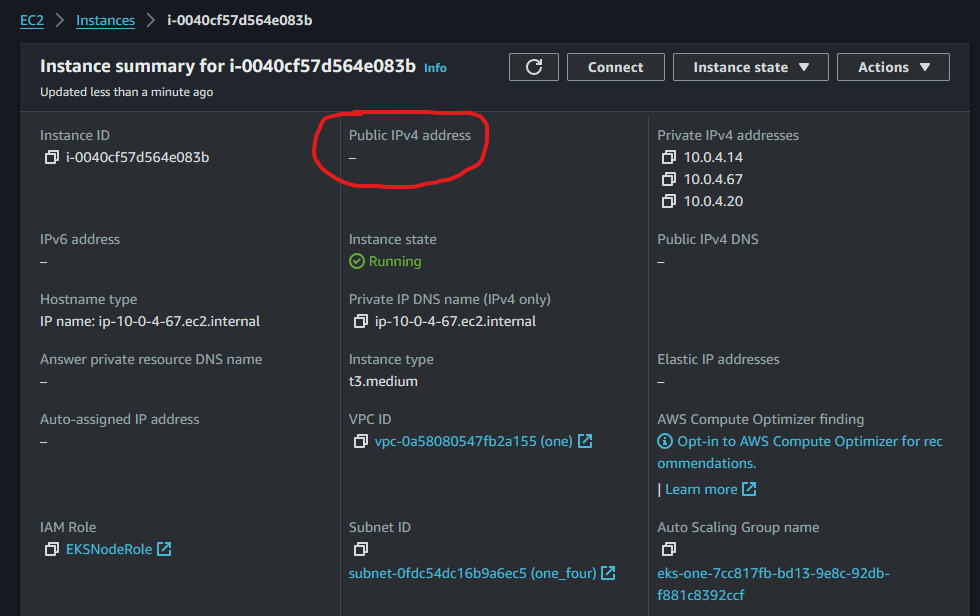
Và khi click vào chi tiết instance thì ta không thấy có ip public được gắn vào worker node
Ok vậy đã dựng xong worker node, các thông tin khác các bạn có thể xem thêm bài trước 6. Khởi tạo worker node
Vậy là đã dựng xong cụm EKS, tiếp theo mình sẽ test một vài deployment để xem cụm của mình có hoạt động hay không
4. Test nginx deployment
kéo kubeconfig về bằng lệnh
aws eks update-kubeconfig --name one
sau đó tạo file nginx-deployment.yml với nội dung như sau
apiVersion: apps/v1
kind: Deployment
metadata:
  name: nginx-deployment
  labels:
    app: nginx
spec:
  replicas: 10
  selector:
    matchLabels:
      app: nginx
  template:
    metadata:
      labels:
        app: nginx
    spec:
      containers:
        - name: nginx
          image: nginx:1.14.2
          ports:
            - containerPort: 80
          resources:
            requests:
              memory: "64Mi"
              cpu: "64m"
            limits:
              memory: "128Mi"
              cpu: "128m"
cùng chạy thử và xem kết quả nhé
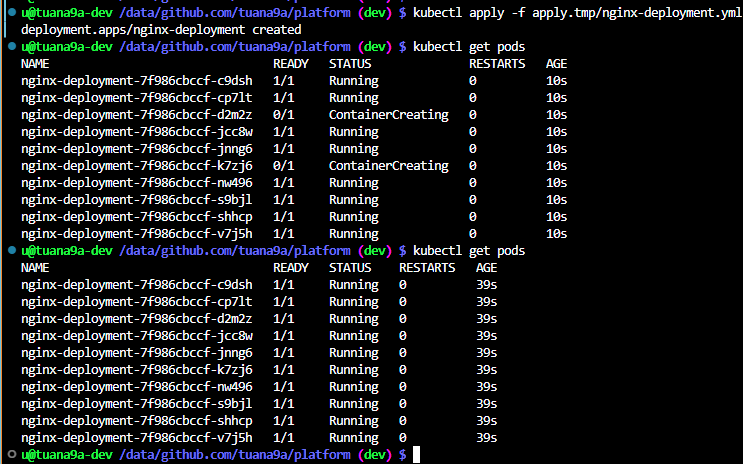
OK vậy là đã thành công tạo một cụm EKS private worker: an toàn, bảo mật và chuẩn chỉ, theo best practice hơn. Cảm ơn ae đã dành thời gian ra để đọc đến đây.
5. Dọn dẹp
terraform destroy # yes
Kết
Vậy là đã setup xong cụm EKS với worker node nằm ở private subnet, không bị expose ra ngoài internet.
Sau đó các e có thể quay lại bài đầu tiên phần Tôi bắt đầu học EKS#TODO của bài trước để xem các trò tiếp theo mình sẽ làm với EKS.
All rights reserved