Begin Design Pattern in Swift Part 1
Bài đăng này đã không được cập nhật trong 4 năm
1. What is Design pattern
Design pattern là phương pháp tái sử dụng code trong thiết kế phần mềm. Design pattern thiết kế để hướng lập trình viên viết code 1 cách dễ dàng hơn, code dễ hiểu, dễ tái sử dụng và maintain. 1 số design pattern:
- Creational: Singleton
- Structural: MVC, Decorator, Adapter, Façade
- Behavioral: Observer, Mememto
2. Getting started
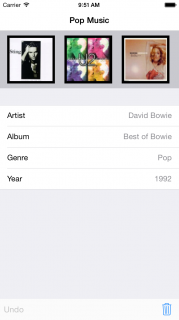
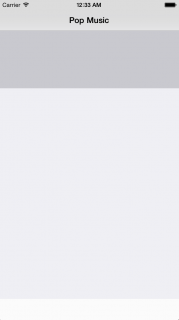
Chúng ta sẽ làm 1 app giao diện như sau:
 Download started project: Click here to Download
Tạo 2 class Album, AlbumView để lưu trữ dữ liệu và hiển thị dữ liệu Trong Album.swift ta thêm các thuộc tính sau:
var title : String!
var artist : String!
var genre : String!
var coverUrl : String!
var year : String!
Add phương thức khởi tạo cho nó:
init(title: String, artist: String, genre: String, coverUrl: String, year: String) {
  super.init()
  self.title = title
  self.artist = artist
  self.genre = genre
  self.coverUrl = coverUrl
  self.year = year
}
Khai báo biến description lấy thông tin của Album:
override var description: String {
	return "title: \(title)" +
	       "artist: \(artist)" +
	       "genre: \(genre)" +
	       "coverUrl: \(coverUrl)" +
	       "year: \(year)"
}
File AlbumnView.swift: Thêm các thuộc tính sau:
private var coverImage: UIImageView!
private var indicator: UIActivityIndicatorView!
coverImage dùng để hiển thị ảnh cover của album, indicator dùng để hiển thị trạng thái loading khi load dữ liệu ảnh cover từ mạng về Add các phương thức khởi tạo cho AlbumView.swift
required init(coder aDecoder: NSCoder) {
  super.init(coder: aDecoder)
  commonInit()
}

init(frame: CGRect, albumCover: String) {
  super.init(frame: frame)
  commonInit()
}

func commonInit() {
  backgroundColor = UIColor.blackColor()
  coverImage = UIImageView(frame: CGRect(x: 5, y: 5, width: frame.size.width - 10, height: frame.size.height - 10))
  addSubview(coverImage)
  indicator = UIActivityIndicatorView()
  indicator.center = center
  indicator.activityIndicatorViewStyle = .WhiteLarge
  indicator.startAnimating()
  addSubview(indicator)
}
Thêm phương thức sau để highlight:
func highlightAlbum(#didHighlightView: Bool) {
  if didHighlightView == true {
    backgroundColor = UIColor.whiteColor()
  } else {
    backgroundColor = UIColor.blackColor()
  }
}
Vậy là chúng ta đã có dữ liệu sẵn sàng cho việc tìm hiểu Design pattern đầu tiên.
3. MVC
MVC : Model View Controller được ví là King of Design Paterns.
- Model: lưu trữ dữ liệu và thao tác với dữ liệu. Trong ứng dụng này thì Model chính là Album class.
- View: dùng để hiển thị dữ liệu. Trong ứng dụng này thì View là AlbumView class.
- Controller: kết nối giữa View và Model, ở đây Controller là ViewController class
Mô hình MVC:
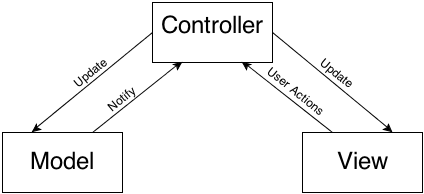 Model sẽ thông báo cho Controller khi data thay đổi, sau đó Controller sẽ update data này trong Views. Khi user tác động lên Views nó sẽ thông báo tới Controller, Controller sẽ thông báo cập nhật data tới Model.
Chúng ta nên tạo các folder với tên: Model, View, Controller để lưu các class có vai trò tương ứng. Như vậy ta sẽ kéo các file Album.swift vào thư mục Model, AlbumView.swift vào View, ViewController.swift vào Controller.
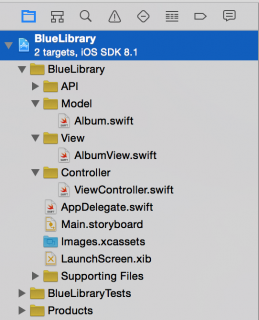
Lúc này cấu trúc project của ta sẽ như sau:
Model sẽ thông báo cho Controller khi data thay đổi, sau đó Controller sẽ update data này trong Views. Khi user tác động lên Views nó sẽ thông báo tới Controller, Controller sẽ thông báo cập nhật data tới Model.
Chúng ta nên tạo các folder với tên: Model, View, Controller để lưu các class có vai trò tương ứng. Như vậy ta sẽ kéo các file Album.swift vào thư mục Model, AlbumView.swift vào View, ViewController.swift vào Controller.
Lúc này cấu trúc project của ta sẽ như sau:
 Chúng ta cần đảm bảo mỗi class tạo ra trong project đều phải thực hiện 1 trong 3 chức năng: Model, View, Controller, không combine lại thành 1 class
4. Singleton
Tạo folder API, sau đó tạo file LibaryAPI.swift Thêm đoạn code sau:
//1
class var sharedInstance: LibraryAPI {
  //2
  struct Singleton {
    //3
    static let instance = LibraryAPI()
  }
  //4
  return Singleton.instance
}
Ta đã có 1 singleton object dùng để quản lý albums. Tạo file PersistencyManager.swift, thêm code sau:
private var albums = [Album]()
Hàm khởi tạo:
override init() {
  //Dummy list of albums
  let album1 = Album(title: "Best of Bowie",
         artist: "David Bowie",
         genre: "Pop",
         coverUrl: "http://www.coversproject.com/static/thumbs/album/album_david%20bowie_best%20of%20bowie.png",
         year: "1992")

  let album2 = Album(title: "It's My Life",
         artist: "No Doubt",
         genre: "Pop",
         coverUrl: "http://www.coversproject.com/static/thumbs/album/album_no%20doubt_its%20my%20life%20%20bathwater.png",
         year: "2003")

  let album3 = Album(title: "Nothing Like The Sun",
         artist: "Sting",
         genre: "Pop",
         coverUrl: "http://www.coversproject.com/static/thumbs/album/album_sting_nothing%20like%20the%20sun.png",
         year: "1999")

  let album4 = Album(title: "Staring at the Sun",
         artist: "U2",
         genre: "Pop",
         coverUrl: "http://www.coversproject.com/static/thumbs/album/album_u2_staring%20at%20the%20sun.png",
         year: "2000")

  let album5 = Album(title: "American Pie",
         artist: "Madonna",
         genre: "Pop",
         coverUrl: "http://www.coversproject.com/static/thumbs/album/album_madonna_american%20pie.png",
         year: "2000")

  albums = [album1, album2, album3, album4, album5]
}
Trong hàm khởi tạo trên ta tạo ra mảng dữ liệu với 5 albums. Thêm các function sau vào class:
func getAlbums() -> [Album] {
  return albums
}

func addAlbum(album: Album, index: Int) {
  if (albums.count >= index) {
    albums.insert(album, atIndex: index)
  } else {
    albums.append(album)
  }
}

func deleteAlbumAtIndex(index: Int) {
  albums.removeAtIndex(index)
}
Các phương thức trên cho phép get, add và delete album. Ở đây có vẻ như PersistencyManager không phải là 1 singleton, để thấy được điều này hãy xem mối quan hệ giữa LibraryAPI và PersistencyManager ở phần tiếp theo: Facade pattern.
5. Façade
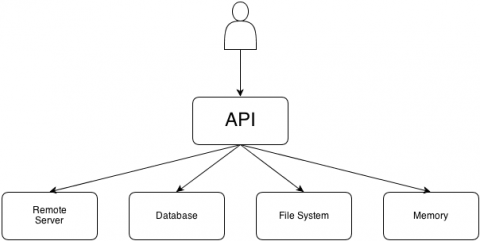
Facade pattern cung cấp 1 single interface cho 1 hệ thống phức tạp.
 Trong LibraryAPI.swift thêm các properties sau:
private let persistencyManager: PersistencyManager
private let httpClient: HTTPClient
private let isOnline: Bool
Khởi tạo các properties này trong hàm init()
override init() {
  persistencyManager = PersistencyManager()
  httpClient = HTTPClient()
  isOnline = false

  super.init()
}
HTTPClient ở đây không làm việc với server thật, nó chỉ đóng vai trò mô tả cách sử dụng facade pattern, do đó isOnline luôn luôn là false. Thêm các hàm sau vào LibaryAPI.swift
func getAlbums() -> [Album] {
  return persistencyManager.getAlbums()
}

func addAlbum(album: Album, index: Int) {
  persistencyManager.addAlbum(album, index: index)
  if isOnline {
    httpClient.postRequest("/api/addAlbum", body: album.description)
  }
}

func deleteAlbum(index: Int) {
  persistencyManager.deleteAlbumAtIndex(index)
  if isOnline {
    httpClient.postRequest("/api/deleteAlbum", body: "\(index)")
  }
}
Hàm addAlbum: đầu tiên update data locally, sau đó nếu có internet nó sẽ update dữ liệu trên remote server. Đây chính là sức mạn của Facade, khi 1 class nằm ngoài hệ thống này làm 1 thao tác add new album, nó sẽ không biết và không cần biết bên trong hệ thống xử lý như nào.
Build and run:
 Phần tiếp theo Decorator pattern sẽ giúp ta hiển thị dữ liệu lên view
6. Decorator
Decorator pattern thêm các behavior và responsiblity vào 1 class có sẵn mà không cần thay đổi code của class có sẵn. Ta có thể thấy pattern này trong Extension và Delegation trong Swift.
Sử dụng Extension:
Chúng ta muốn hiển thị Album như sau:
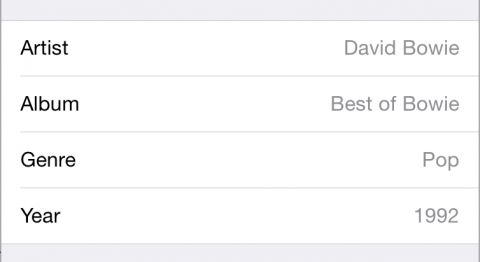 Tạo file AlbumExtensions.swift với nội dung:
extension Album {
  func ae_tableRepresentation() -> (titles:[String], values:[String]) {
    return (["Artist", "Album", "Genre", "Year"], [artist, title, genre, year])
  }
}
Sử dụng Delegation: Mở file ViewController.swift thêm các properties sau:
private var allAlbums = [Album]()
private var currentAlbumData : (titles:[String], values:[String])?
private var currentAlbumIndex = 0
Replace hàm ViewDidLoad với đoạn code sau:
override func viewDidLoad() {
  super.viewDidLoad()
  //1
  self.navigationController?.navigationBar.translucent = false
  currentAlbumIndex = 0

  //2
  allAlbums = LibraryAPI.sharedInstance.getAlbums()

  // 3
  // the uitableview that presents the album data
  dataTable.delegate = self
  dataTable.dataSource = self
  dataTable.backgroundView = nil
  view.addSubview(dataTable!)
}
Thêm hàm sau :
func showDataForAlbum(albumIndex: Int) {
  // defensive code: make sure the requested index is lower than the amount of albums
  if (albumIndex < allAlbums.count && albumIndex > -1) {
    //fetch the album
    let album = allAlbums[albumIndex]
    // save the albums data to present it later in the tableview
    currentAlbumData = album.ae_tableRepresentation()
  } else {
    currentAlbumData = nil
  }
  // we have the data we need, let's refresh our tableview
  dataTable!.reloadData()
}
Ta sẽ gọi hàm này trong ViewDidLoad:
self.showDataForAlbum(currentAlbumIndex)
Thêm các extension:
extension ViewController: UITableViewDataSource {
func tableView(tableView: UITableView, numberOfRowsInSection section: Int) -> Int {
  if let albumData = currentAlbumData {
    return albumData.titles.count
  } else {
    return 0
  }
}

func tableView(tableView: UITableView, cellForRowAtIndexPath indexPath: NSIndexPath) -> UITableViewCell {
  var cell:UITableViewCell = tableView.dequeueReusableCellWithIdentifier("Cell", forIndexPath: indexPath) as! UITableViewCell
  if let albumData = currentAlbumData {
    cell.textLabel!.text = albumData.titles[indexPath.row]
    cell.detailTextLabel!.text = albumData.values[indexPath.row]
  }
  return cell
}
}

extension ViewController: UITableViewDelegate {
}
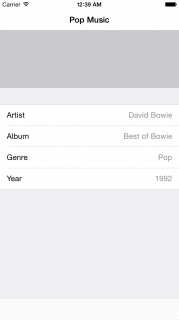
Build and run ta sẽ được kết quả như mong muốn :
 Tham khảo:
https://www.raywenderlich.com/86477/introducing-ios-design-patterns-in-swift-part-1
Tham khảo:
https://www.raywenderlich.com/86477/introducing-ios-design-patterns-in-swift-part-1
All rights reserved
