Appium Basic (P1) - Run First Android Automation Test
Bài đăng này đã không được cập nhật trong 6 năm
Ứng dụng trên thiết bị di động ngày càng phổ biến. Nhiều ứng dụng web cũng đã có ứng dụng di động để bắt kịp xu hướng. Đối với Tester, hiểu biết về kiểm thử tự động cho ứng dụng di động là cần thiết để kết nối với công nghệ mới. Appium là công cụ kiểm thử tự động cho ứng dụng di động.
Appium khá giống với công cụ kiểm thử tự động cho web là Selenium, sẽ rất dễ dàng để tìm hiểu Appium nếu bạn đã biết về Selenium. Tham khảo về Selenium tại đây.
Trong series này, mình sẽ trình bày một số hướng dẫn để bạn có thể thao tác với các đối tượng cơ bản của app di động, cũng như thực hiện test được một số case đơn giản.
Phần giới thiệu và cài đặt đã có bài viết rất chi tiết, mình không hướng dẫn lại nữa, bạn vui lòng tham khảo 2 bài viết này: Phần 1 , Phần 2.
Để dễ hiểu, mình sẽ code demo trước sau đó giải thích code sau, code Java trên Eclipse. App dùng để test là Chatwork trên thiết bị Android. Download tại đây.
First test - Chức năng Login app WSM
import java.io.File;
import java.io.IOException;
import java.net.MalformedURLException;
import java.net.URL;
import java.text.SimpleDateFormat;
import java.util.Date;
import java.util.List;
import java.util.concurrent.TimeUnit;

import org.apache.commons.io.FileUtils;
import org.openqa.selenium.By;
import org.openqa.selenium.OutputType;
import org.openqa.selenium.TakesScreenshot;
import org.openqa.selenium.WebElement;
import org.openqa.selenium.remote.DesiredCapabilities;
import org.testng.Assert;
import org.testng.annotations.AfterSuite;
import org.testng.annotations.AfterTest;
import org.testng.annotations.BeforeSuite;
import org.testng.annotations.BeforeTest;
import org.testng.annotations.DataProvider;
import org.testng.annotations.Test;

import io.appium.java_client.AppiumDriver;
import io.appium.java_client.FindsByAndroidUIAutomator;
import io.appium.java_client.MobileElement;
import io.appium.java_client.android.AndroidDriver;
import io.appium.java_client.remote.AndroidMobileCapabilityType;
import lesson0312.XLSHelper;

public class LoginCW {

	private AndroidDriver driver;

	@BeforeTest
	public void setUp() throws MalformedURLException {

		//Setup device information
		DesiredCapabilities caps = new DesiredCapabilities();
		caps.setCapability("deviceName", "42001f936b0065bd");
		caps.setCapability("platformName", "Android");

		//Setup app information
		caps.setCapability(AndroidMobileCapabilityType.APP_PACKAGE, "com.framgia.wsm");
		caps.setCapability(AndroidMobileCapabilityType.APP_ACTIVITY,
				"com.framgia.wsm.screen.login.LoginActivity");

		//Setup appium server address and port number
		driver = new AndroidDriver(new URL("http://0.0.0.0:4723/wd/hub"), caps);
		driver.manage().timeouts().implicitlyWait(15, TimeUnit.SECONDS);
	}

	@DataProvider
	private Object[][] loginDataProvider() {
		return XLSHelper.retrieveCellsMulti("user.xls", 2, 2);
	}

	@Test (dataProvider = "loginDataProvider")
	public void Login(String userName, String passWord) {

		//Input Username & Password
		WebElement user = driver.findElement(By.id("com.framgia.wsm:id/edit_username"));
		user.sendKeys(userName);
		WebElement pass = driver.findElement(By.id("com.framgia.wsm:id/edit_password"));
		pass.sendKeys(passWord);
        driver.hideKeyboard();

		//Click Login
		driver.findElement(By.id("com.framgia.wsm:id/btn_login")).click();

		//Check result
		WebElement toolbar = driver.findElement(By.id("com.framgia.wsm:id/text_name"));
    	Assert.assertEquals(toolbar.getText(), "Nguyen Thi Phuong B");
        takeScreenShot();
	}

    	public void takeScreenShot() {
		// Set folder name to store screenshots.
		String destDir = "screenshots";

		// Capture screenshot.
		File scrFile = ((TakesScreenshot) driver).getScreenshotAs(OutputType.FILE);

		// Set date format to set It as screenshot file name.
		SimpleDateFormat dateFormat = new SimpleDateFormat("dd-MMM-yyyy__hh_mm_ssaa");

		// Create folder under project with name "screenshots" provided to destDir.
		new File(destDir).mkdirs();

		// Set file name using current date time.
		String destFile = dateFormat.format(new Date()) + ".png";

		try {
			// Copy paste file at destination folder location
			FileUtils.copyFile(scrFile, new File(destDir + "/" + destFile));
		} catch (IOException e) {
			e.printStackTrace();
		}
	}

	@AfterTest
	public void End() {
	}

}
1. Thiết lập liên kết giữa Appium server và thiết bị
Ta dùng hàm setUp() để cài đặt liên kết giữa Appium server với thiết bị. Thay một số thông tin đặc trưng nếu bạn dùng thiết bị khác, hoặc muốn test app khác:
- deviceName: Tham khảo cách lấy deviceName tại đây.
- platformName: Android hoặc IOS
- APP_PACKAGE & APP_ACTIVITY: thông tin của app cần test, lấy bằng cách cài app APK INFOR để xem thông tin.
2. Thiết lập DataProvider
Tạo file "user.xls" chứa data test.
![]()
Đọc file "user.xls", lấy data dòng 11. Trường hợp muốn đọc nhiều dòng hơn, VD từ dòng 11->15 sẽ là: ("user.xls", 11, 15).
private Object[][] loginDataProvider() {
		return XLSHelper.retrieveCellsMulti("user.xls", 11, 11);
	}
3. Thực hiện test chức năng Login
Màn hình Login app WSM trên công cụ UI Automator Viewer
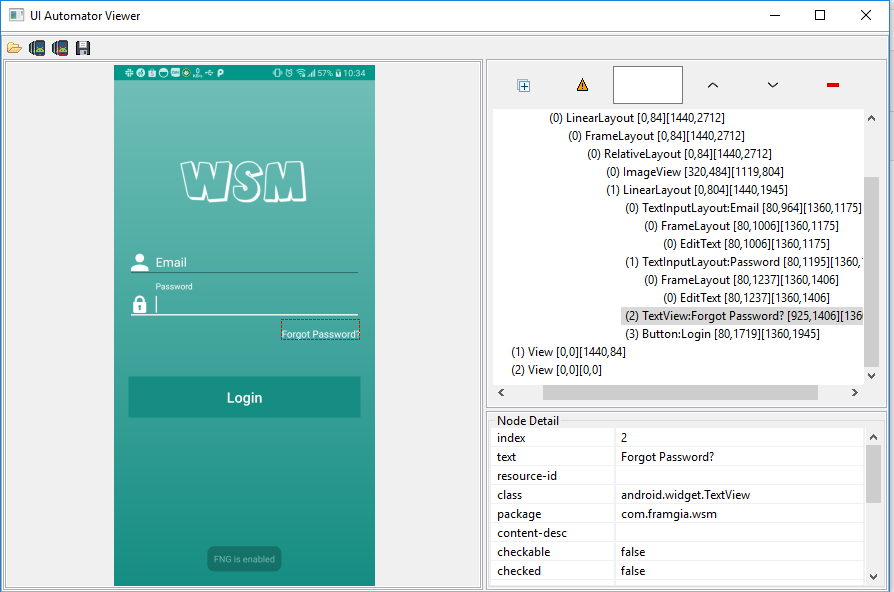
- Tìm element trên màn hình
Có nhiều phương thức để tìm element trên màn hình. Trong đó có 3 kiểu hay dùng:
FindElement by id: Tìm một hoặc nhiều element có [resource-id] tương ứng trên màn hình:
WebElement div = driver.findElement(By.id("[resource-id]"));
FindElement by ClassName: Tìm một hoặc nhiều element có [class] tương ứng trên màn hình:
WebElement toolbar = driver.findElementByClassName("[class]");
FindElement by xpath: Tìm một hoặc nhiều element có [class] = android.widget.TextView và [resource-id] chứa 'text_login' trên màn hình Login
driver.findElement(By.xpath("//android.widget.TextView[contains(@resource-id,'text_login')]"))
3 phương thức trên có thể trả về 1 hoặc nhiều Element tùy vào số lượng element có cùng id/ClassName/xpath. Đối với trường hợp trả về nhiều Element, ta có thể cho vào List rồi get phần tử mong muốn.
List<WebElement> list = div.findElements(By.className("android.widget.LinearLayout"));
		WebElement text = list.get(0);
Quay trở lại VD, đoạn code này tìm textbox Email bằng phương thức findElement by id. Tương tự với Textbox Password và button Login.
WebElement user = driver.findElement(By.id("com.framgia.wsm:id/edit_username"));
- Một số action với element
clear() : xóa data trong element (đối với text field)
click() : click element (đối với button)
sendKeys(String) : input data cho element (đối với text field)
equals(Opject obj): boolean : so sánh elemt với một obj, trả về true hoặc false
getAttribute(String name): String : lấy thuộc tính bất kì của element, trả về String
isDisplayed() : boolean : kiểm tra element có được hiển thị hay không, trả về true hoặc false
isSelected() : boolean : kiểm tra element có được chọn hay không (đối với checkbox), trả về true hoặc false
... và nhiều action khác nữa.
- So sánh Actual result với Expected result
Kiểm tra tên user Login đã đúng với expect chưa:
  WebElement toolbar = driver.findElement(By.id("com.framgia.wsm:id/text_name"));
  Assert.assertEquals(toolbar.getText(), "Nguyen Thi Phuong B");
Chụp ảnh màn hình lưu attachment: takeScreenShot();
4. Kiểm tra kết quả test trên Console và ScreenShot Attachment
Kết quả test được hiển thị trên Console như sau, TCs Login vừa chạy đã PASSED.
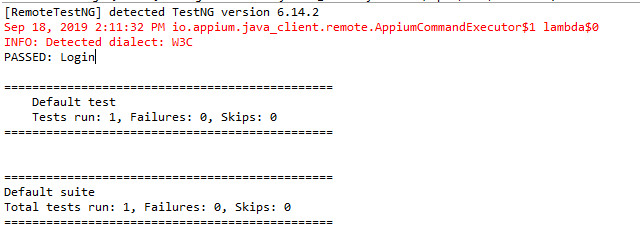
Screenshoot được lưu vào thư mục tương ứng:
![]()
Trên đây là một số hướng dẫn cơ bản để bạn có thể chạy được First test đơn giản. Trong bài tiếp theo, mình sẽ tìm hiểu thêm về thao tác với một số element đặc biệt và giới thiệu thao tác Scroll & swipe. Thanks for reading ^^
All rights reserved
