15 Phút "Đóng Gạch" Node.js: Setup Từ Zero Đến Production (GraphQL, PostgreSQL + Flyway, Docker & CI/CD)
Chào anh em Viblo,
Nối tiếp thành công của bài viết hướng dẫn setup Node.js REST API trước đây link , hôm nay chúng ta sẽ cùng nhau "nâng cấp" bộ kĩ năng với một stack hiện đại và thực chiến hơn rất nhiều dành cho các hệ thống lớn: Node.js + GraphQL + PostgreSQL (quản lý qua Flyway) + Docker + GitHub Actions.
Nếu bạn đã từng mệt mỏi với việc tạo hàng chục endpoint REST chỉ để phục vụ một màn hình UI phức tạp, hoặc đau đầu vì over-fetching (lấy thừa data) làm chậm app mobile, thì GraphQL chính là "chân ái". Bài viết này thiết kế chi tiết step-by-step để một Junior Developer cũng có thể tự tay làm từ A-Z.
🎯 Mã nguồn: Mình đã chuẩn bị sẵn một repo mẫu cực chuẩn để anh em có thể clone về vừa đọc bài vừa đối chiếu code. 🔗 Repo Tham Khảo: nodejs-graphql-service (Toàn bộ code backend PostgreSQL & GraphQL nằm trong source sinh ra từ tool repo này).
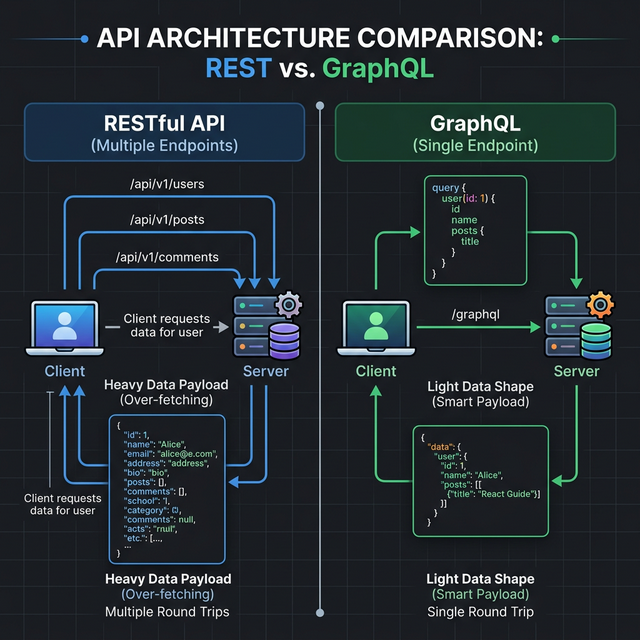
1. RESTful API vs GraphQL: Hiểu Cách Hoạt Động
Trước khi bắt tay vào gõ code, hãy dành chút thời gian để hiểu tại sao chúng ta lại tiếp cận GraphQL.
Góc nhìn RESTful API
- Cách thức: Dựa trên khái niệm tài nguyên (Resources). Bạn truy cập vào nhiều URL khác nhau tương ứng với từng tài nguyên (
GET /users,GET /posts/1). - Điểm mạnh:
- Cấu trúc dễ hiểu, quen thuộc với đại đa số Developer.
- Tận dụng cực tốt cơ chế Cache có sẵn của giao thức HTTP (CDN, Browser cache, Varnish).
- Dễ dàng xử lý các bài toán upload file nhờ Multipart/form-data trực quan.
- Điểm yếu: Cấu trúc dữ liệu trả về bị fix cứng. Backend trả về bao nhiêu field thì Frontend phải lấy bấy nhiêu, dẫn đến việc lấy thừa (Over-fetching) hoặc thiếu dữ liệu (Under-fetching phải gọi thêm API khác).
Góc nhìn GraphQL
- Cách thức: Chỉ có DUY NHẤT một Endpoint (thường là
POST /graphql). Frontend sẽ gửi một bản query quy định chính xác những field mình cần, và Backend sẽ trả về khớp 100% bản query đó. - Điểm mạnh:
- Smart Payload: Lấy đúng, đủ dữ liệu cần thiết - Không thừa 1 byte nào.
- Ghép nối nhiều loại tài nguyên (User, Post, Comment) chỉ trong 1 lần gọi network duy nhất, đặc biệt tối ưu cho Mobile.
- Schema (Type Definitions) hoạt động như một Document sống, Frontend dựa vào Schema để code UI mà không cần đợi Backend viết code xong.
- Điểm yếu:
- Khó tận dụng HTTP Cache (vì mọi query đều là request
POST/graphql). - Dễ dính lỗi N+1 Query ở Backend nếu không cẩn thận sử dụng DataLoader.
- Khó upload file mặc định hơn REST (thường phải dùng thêm thư viện GraphQL Multipart Request Spec).
- Khó tận dụng HTTP Cache (vì mọi query đều là request
2. Ứng Dụng Thực Tế: Khi Nào Dùng Gì?
Không có viên đạn bạc trong lập trình. Hãy chọn đúng tool cho từng bài toán:
- Nằm lòng RESTful khi:
- Dự án nhỏ, CRUD đơn giản, không có quan hệ chéo phức tạp.
- Làm hệ thống Public API cho các bên thứ 3 (Webhook, tích hợp cổng thanh toán...).
- Cần tận dụng tối đa cơ chế Cache tầng HTTP của trình duyệt.
- Chuyển sang GraphQL khi:
- Hệ thống có UI phức tạp, Dashboard cần lấy dữ liệu tổng hợp từ nhiều bảng/nhiều service.
- Phát triển Mobile App: Cần tiết kiệm tối đa băng thông mạng.
- Team Front/Back làm việc độc lập. Frontend tự định nghĩa cục data muốn lấy mà không cần đợi Backend viết route mới.
3. Setup Source Code Từ Zero (Chuẩn Thực Chiến)
Chúng ta sẽ setup server GraphQL apollo-server-express, kết nối PostgreSQL qua sequelize (DB Configuration sẽ thiết lập ở phần Docker).
Bước 3.1: Khởi tạo và cài đặt Dependencies
Tạo folder dự án:
mkdir nodejs-graphql-service
cd nodejs-graphql-service
npm init -y
Cài đặt thư viện Core (Express, Apollo Server, Security, PostgreSQL):
npm install express @apollo/server graphql cors helmet hpp express-rate-limit dotenv morgan sequelize pg pg-hstore
Cài đặt các gói hỗ trợ phát triển (TypeScript):
npm install -D typescript @types/node @types/express @types/cors @types/morgan ts-node tsconfig-paths
Mở package.json, thêm các scripts cơ bản này vào để lát chúng ta chạy dev và build CI/CD:
"scripts": {
  "dev": "ts-node -r tsconfig-paths/register src/index.ts",
  "build": "tsc",
  "test": "echo \"Error: no test specified\" && exit 0"
}
Bước 3.2: Cấu hình Kết Nối PostgreSQL và Model (Sequelize)
Mọi data thực tế sẽ lưu ở DB, nên ta cấu hình file kết nối src/config/database.ts:
import { Sequelize } from 'sequelize';
import dotenv from 'dotenv';

dotenv.config();

const sequelize = new Sequelize(
  process.env.DB_NAME || 'demo',
  process.env.DB_USER || 'postgres',
  process.env.DB_PASSWORD || 'root',
  {
    host: process.env.DB_HOST || '127.0.0.1',
    dialect: 'postgres',
    logging: false,
    port: parseInt(process.env.DB_PORT || '5432')
  }
);

export default sequelize;
Cùng với đó, tạo file Model đại diện cho bảng Users trong Postgres tại src/models/User.ts:
import { DataTypes, Model, Optional } from 'sequelize';
import sequelize from '../config/database';

interface UserAttributes { id: number; name: string; email: string; }
interface UserCreationAttributes extends Optional<UserAttributes, 'id'> {}

class User extends Model<UserAttributes, UserCreationAttributes> implements UserAttributes {
  public id!: number;
  public name!: string;
  public email!: string;
}

User.init({
  id: { type: DataTypes.INTEGER, autoIncrement: true, primaryKey: true },
  name: { type: DataTypes.STRING, allowNull: false },
  email: { type: DataTypes.STRING, allowNull: false, unique: true }
}, { sequelize, tableName: 'users', timestamps: false });

export default User;
Bước 3.3: Xây dựng GraphQL TypeDefs & Resolvers
Tạo file src/graphql/typeDefs.ts:
export const typeDefs = `#graphql
  type User {
    id: ID!
    name: String!
    email: String!
  }

  type Query {
    getAllUsers: [User]
  }

  type Mutation {
    createUser(name: String!, email: String!): User
  }
`;
Tạo file src/graphql/resolvers.ts. Chú ý chúng ta sẽ chọc thẳng xuống Sequelize Model để gọi DB thay vì dùng mock data ảo nhé:
import { GraphQLError } from 'graphql';
import User from '../models/User';

export const resolvers = {
  Query: {
    getAllUsers: async () => {
      try {
        return await User.findAll(); // Chọc thẳng vào PostgreSQL
      } catch (error: any) {
        throw new GraphQLError(error.message, { extensions: { code: 'INTERNAL_SERVER_ERROR' } });
      }
    }
  },
  Mutation: {
    createUser: async (_: any, { name, email }: { name: string, email: string }) => {
      try {
        return await User.create({ name, email }); // INSERT row mới
      } catch (error: any) {
        throw new GraphQLError(error.message, { extensions: { code: 'INTERNAL_SERVER_ERROR' } });
      }
    }
  }
};
Bước 3.3: File Entry Point (src/index.ts)
Thử thách lớn nhất khi làm Apollo Server là lỗi bảo mật màn hình trắng khi mở Apollo Sandbox. Giải quyết triệt để thông qua cấu hình helmet Content-Security-Policy (CSP):
import express from 'express';
import cors from 'cors';
import helmet from 'helmet';
import dotenv from 'dotenv';
import { ApolloServer } from '@apollo/server';
import { expressMiddleware } from '@apollo/server/express4';
import { ApolloServerPluginLandingPageLocalDefault } from '@apollo/server/plugin/landingPage/default';
import { typeDefs } from './graphql/typeDefs';
import { resolvers } from './graphql/resolvers';
import sequelize from './config/database'; // Import config Sequelize

dotenv.config();
const app = express();
const port = process.env.PORT || 3000;

// Sửa lỗi màn hình trắng cho Apollo Sandbox bằng CSP của Helmet
app.use(helmet({
  crossOriginEmbedderPolicy: false,
  contentSecurityPolicy: {
    directives: {
      imgSrc: [`'self'`, 'data:', 'apollo-server-landing-page.cdn.apollographql.com'],
      scriptSrc: [`'self'`, `https: 'unsafe-inline'`],
      manifestSrc: [`'self'`, 'apollo-server-landing-page.cdn.apollographql.com'],
      frameSrc: [`'self'`, 'sandbox.embed.apollographql.com'],
    },
  },
}));

app.use(cors());
app.use(express.json());

const startServer = async () => {
    const server = new ApolloServer({
      typeDefs,
      resolvers,
      plugins: [ApolloServerPluginLandingPageLocalDefault({ embed: true })],
    });

    await server.start();
    app.use('/graphql', expressMiddleware(server));

    // Connect DB xong mới mở port
    await sequelize.sync();
    app.listen(port, () => {
        console.log(`🚀 GraphQL Server running at http://localhost:${port}/graphql`);
    });
};

startServer();
4. Cấu Hình Kết Nối Database (Docker, PostgreSQL & Flyway)
Chúng ta không để DB chạy thô trên máy. Ở production, database thay đổi liên tục. Do đó, việc dùng Flyway để quản lý migration (ai tạo bảng gì, lúc nào) là bắt buộc. Chúng ta sẽ dùng docker-compose.yml để khởi tạo Node App, PostgreSQL, và Flyway container.
Tạo file docker-compose.yml ở thư mục gốc:
services:
  app:
    build: .
    ports:
      - "${PORT:-3000}:3000"
    depends_on:
      - db
      - flyway
    environment:
      - PORT=3000
      - DB_HOST=db
      - DB_USER=postgres
      - DB_PASSWORD=root
      - DB_NAME=demo

  db:
    image: postgres:15
    restart: always
    environment:
      POSTGRES_USER: postgres
      POSTGRES_PASSWORD: root
      POSTGRES_DB: demo
    ports:
      - "${DB_PORT:-5432}:5432"
    volumes:
      - ./flyway/sql:/docker-entrypoint-initdb.d

  flyway:
    image: flyway/flyway
    command: -connectRetries=60 migrate
    volumes:
      - ./flyway/sql:/flyway/sql
    environment:
      FLYWAY_URL: jdbc:postgresql://db:5432/demo
      FLYWAY_USER: postgres
      FLYWAY_PASSWORD: root
    depends_on:
      - db
Sức mạnh ở đây là gì? Khi bạn gõ docker-compose up -d, Container flyway sẽ lập tức chờ db (Postgres) sẵn sàng, sau đó nó sẽ đọc các file .sql trong folder ./flyway/sql và tiến hành tạo bảng (Migrations) tự động.
Để Flyway có file migration chạy, hãy tạo file flyway/sql/V1__Create_users_table.sql:
CREATE TABLE users (
  id SERIAL PRIMARY KEY,
  name VARCHAR(255) NOT NULL,
  email VARCHAR(255) UNIQUE NOT NULL
);
Sau khi cả bọn chạy xong xuôi, thằng app Node.js mới được phép kết nối. Cực kỳ an toàn cho dự án thực tế.
5. Tự động hóa CI/CD với GitHub Actions
Code chạy ngon ở local chưa chắc đã không "bùm" trên Server do thiếu Dependency. Để tự động hóa quy trình kiểm tra chất lượng code và chạy Test mỗi khi git push, ta dựng thêm Workflow CI/CD.
Tạo folder .github/workflows/ và ném file ci.yml này vào:
name: Node.js CI

on:
  push:
    branches: [ "main" ]
  pull_request:
    branches: [ "main" ]

jobs:
  build:
    runs-on: ubuntu-latest

    strategy:
      matrix:
        node-version: [18.x, 20.x] # Chạy Test trên 2 phiên bản Node khác nhau phòng đứt gãy

    steps:
    - uses: actions/checkout@v3

    - name: Use Node.js ${{ matrix.node-version }}
      uses: actions/setup-node@v3
      with:
        node-version: ${{ matrix.node-version }}
        cache: 'npm'

    - name: Install Dependencies
      run: npm ci # Dùng npm ci thay vì npm install trên môi trường Production

    - name: Lint Code
      run: npm run lint

    - name: Run Tests
      run: npm test # Đảm bảo unit test không đỏ!

    - name: Build Source
      run: npm run build --if-present
6. Demo Sử Dụng Apollo Sandbox Thực Chiến
Mọi thứ đã setup hoàn hảo. Chạy docker-compose up -d và npm run dev. Mở trình duyệt truy cập: http://localhost:3000/graphql. Giao diện Apollo Sandbox sẽ hiện ra mượt mà nhờ cấu hình Helmet trước đó của chúng ta.
Tại khung Query, bóp cò ngay 2 Snippet này:
Thêm một User mới vào DB Postgres:
mutation CreateUser {
  createUser(name: "Siêu Nhân Viblo", email: "auth@viblo.asia") {
    id
    name
    email
  }
}
Lấy danh sách 100% người dùng thực tế:
query GetAllUsers {
  getAllUsers {
    id
    name
    email
  }
}
Dữ liệu sẽ được GraphQL bứng thẳng xuống DB Postgres để lấy ra và trả về cực kì gọn gàng. Giao diện frontend yêu cầu lấy 3 trường (id, name, email) thì backend trả về đúng 3 trường. Không hề lấy dư 1 byte data nếu không cần thiết!
7. Điều Bất Ngờ Nhất Ở Cuối Bài... 🤫
Đọc hướng dẫn chi tiết đến cuối cùng bạn có thấy chóng mặt không? Code base chia file lắt nhắt, gõ Typescript Alias, cấu hình Security cho Apollo, lại còn cài Docker-compose combo Postgres + Flyway, chưa kể dựng workflow CI/CD github-actions.yml nữa thì hết trọn vẹn sức lực một ngày làm việc cuối tuần.
Mẹo để không bao giờ phải làm Manual Setup ngớ ngẩn này:
Từ kinh nghiệm "ăn quả đắng" việc đi xin Code Base cho từng dự án, team mình đã phát triển một CLI Engine gánh vác toàn bộ Source Code GraphQL (Clean Architecture/MVC) TỰ ĐỘNG CHỈ TRONG ĐÚNG 10 GIÂY.
Công cụ thần thánh này có tên: nodejs-quickstart-structure
Bạn mở Terminal Node JS, không cần git clone repo nào hết, chỉ việc chạy đúng 1 lệnh:
npx nodejs-quickstart-structure init
- Bấm phím tắt chọn
TypeScript - Chọn kiến trúc phân lớp
Clean Architecture - Chọn Data Storage
PostgreSQL - Chọn cách thức giao tiếp
GraphQL - Chọn Pipeline CI/CD là
GitHub Actions
BÙM! 💥 Bạn vừa gen thành công toàn bộ kiến trúc y hệt bài hướng dẫn này (đã được chia Controller/Repo/Entities cực chuẩn). Chỉ việc đổi port rồi dev luôn logic business của bạn, không cần làm boilerplate thêm một thao tác thừa nào.
🔗 Link repo công cụ: github.com/paudang/nodejs-quickstart-structure
👉Bài viết này thuộc Series Node.js Production-Ready. Bạn có thể xem trọn bộ các kỹ thuật khác tại đây [Link Series].
Đừng quên thả 1 sao (⭐) vào repo nếu tool gánh còng lưng deadline của bạn chiều nay nhé! Chúc anh em thành công.
All rights reserved
