Xử lý Alert/Popup trong Selenium WebDriver – Selenium Tutorial #16
Bài đăng này đã không được cập nhật trong 5 năm
Trong bài trước, chúng ta đã tìm hiểu các kiểu Wait khác nhau do WebDriver cung cấp. Sang bài này chúng ta sẽ thảo luận về các loại cảnh báo (alert) khác nhau sẽ hiển thị trong khi kiểm thử các ứng dụng web và các chiến lược xử lý chúng.
Có hai loại popup/cảnh báo mà chúng ta sẽ tập trung chủ yếu vào:
- Windows-based alert pop-up (các cảnh báo/popup của hệ thống/OS)
- Web-based alert pop-up
Như chúng ta đã biết việc xử lý popup (cửa sổ bật lên) nằm ngoài khả năng xử lý của WebDriver, do đó, chúng ta sẽ sử dụng một số tiện ích của bên thứ ba để xử lý các popup này.
Xử lý popup là một trong những công việc khó khăn nhất để tự động hóa trong khi kiểm thử các ứng dụng web. Thêm nữa là sự đa dạng của các loại popup càng làm phức tạp thêm tình hình.
Alert box/ Pop up box/ confirmation Box/ Prompt/ Authentication Box là gì?
Tất cả các loại trên đều bao gồm một box/khung nhỏ xuất hiện trên màn hình hiển thị để cung cấp cho bạn một số loại thông tin hoặc để cảnh báo bạn về một hoạt động có khả năng gây hại hoặc yêu cầu bạn cấp quyền cho phép thực hiện hành động nào đó.
Ví dụ: Hãy xem xét một ví dụ thực tế để hiểu rõ hơn; Giả sử rằng bạn đã tải một bức ảnh lên bất kỳ trang mạng xã hội phổ biến nào. Sau đó, bạn muốn xóa bức ảnh đã tải lên. Để xóa, bạn đã click vào nút xóa. Ngay khi click vào nút xóa, hệ thống sẽ hiển thị cảnh báo nhắc nhở - Bạn có thực sự muốn xóa tệp không? Kèm theo 2 lựa chọn Yes|Cancel (Đồng ý hoặc hủy bỏ tác vụ).
Dưới đây là cách để xử lý popup (sử dụng Web Driver), đầu tiên là đi từ các web-based popup :
Web-Based Popup (cách xử lý popup base trên web)

WebDriver cung cấp cho người dùng một cách rất hiệu quả để xử lý các popup này là sử dụng 4 method dưới đây cho giao diện cảnh báo (Alert interface):
- void dismiss() – phương thức
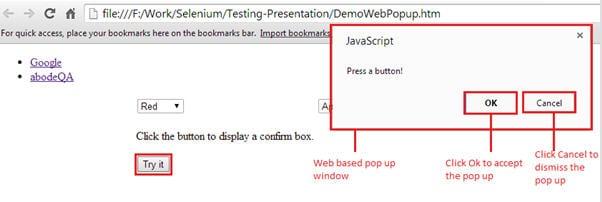
dismiss()sẽ thực hiện action click vào button “Cancel” khi cửa sổ popup xuất hiện. - void accept() – phương thức
accept()sẽ thực hiện action click vào button “OK” khi cửa sổ popup xuất hiện. - String getText() – phương thức
getText()sẽ thực hiện trả về nội dung text được hiển thị trong alert box / popup. - void sendKeys(String stringToSend) – phương thức
sendKeys()sẽ thực hiện nhập vào alert box một giá trị xác định = paramstringToSend.
Giải thích ứng dụng đang được thử nghiệm
Chúng ta cần thiết kế một trang web bao gồm một vài loại phần tử web cơ bản dưới đây (Có thể dùng lại ứng dụng đã sử dụng trong các bài trước) :
- Hyperlink : 2 đường dẫn có tên là “Google” và “abodeQA” điều hướng người dùng đến 2 trang tương ứng là “http://www.google.com/” và “http://www.abodeqa.com/” trong sự kiện click button.
- Dropdown : 3 link (selector) để chọn colour (màu sắc), fruit (quả) và animal (động vật) , mỗi 1 dropdown/selector sẽ có 1 tập option riêng và 1 option trong số đó được set làm giá trị mặc định của mỗi select box tương ứng.
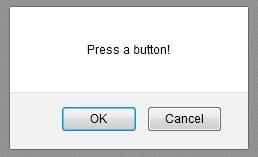
- Button: Button “try it” . Khi click button này thì sẽ show ra 1 popup gồm 2 button "OK" và "Cancel".

Dưới đây là mã HTML tạo trang web tương ứng:
<!DOCTYPE html></pre>
<html>
<head><title> Testing Select Class </title>
<body>
<div id="header">
<ul id="linkTabs">
<li>
<a href="https://www.google.com/">Google</a>
</li>
<li>
<a href="http://abodeqa.wordpress.com/">abodeQA</a>
</li>
</ul>
</div>
<div class="header_spacer"></div>
<div id="container">
<div id="content" style="padding-left: 185px;">
<table id="selectTable">
<tbody>
<tr>
<td>
<div>
<select id="SelectID_One">
<option value="redvalue">Red</option>
<option value="greenvalue">Green</option>
<option value="yellowvalue">Yellow</option>
<option value="greyvalue">Grey</option>
</select>
</div>
</td>
<td>
<div>
<select id="SelectID_Two">
<option value="applevalue">Apple</option>
<option value="orangevalue">Orange</option>
<option value="mangovalue">Mango</option>
<option value="limevalue">Lime</option>
</select>
</div>
</td>
<td>
<div>
<select id="SelectID_Three">
<option value="selectValue">Select</option>
<option value="elephantvalue">Elephant</option>
<option value="mousevalue">Mouse</option>
<option value="dogvalue">Dog</option>
</select>
</div>
</td>
</tr>
<tr>
<td>

<!DOCTYPE html>
<html>
<body>
<p>Click the button to display a confirm box.</p>
<button onclick="myFunction()">Try it</button>

<script>
function myFunction()
{
confirm("Press a button!");
}
</script>
</body>
</html>
</td>
</tr>
</tbody>
</table>
</div>
</div>
</body>
</html>
Scenario:
- Khởi chạy trình duyệt web và mở trang web cần test
- Click vào nút “Try it”
- Accept alert (chọn OK)
- Click lại vào nút “Try it”
- Reject alert (Chọn Cancel)
WebDriver Code sử dụng Select Class
Bước 1: Tạo một class java mới có tên là “DemoWebAlert” trong project “Learning_Selenium” (project sử dụng để test trong các bài trước đây).
Bước 2: Sao chép và dán đoạn mã dưới đây vào class “DemoWebAlert.java” (Đây là đoạn mã tương đương với kịch bản trên).
import org.junit.After;
import org.junit.Before;
import org.junit.Test;
import org.openqa.selenium.Alert;
import org.openqa.selenium.By;
import org.openqa.selenium.WebDriver;
import org.openqa.selenium.firefox.FirefoxDriver;

/**
* class description
*/

public class DemoWebAlert {
                WebDriver driver;
                /**
                * Constructor
                */
                public DemoWebAlert() {
                }

                /**
                * Set up browser settings and open the application
                */

                @Before
                public void setUp() {
                                driver=new FirefoxDriver();
                                // Opened the application
                                driver.get("file:///F:/Work/Selenium/Testing-Presentation/DemoWebPopup.htm");
                                driver.manage().window().maximize();
                }

                /**
                * Test to check Select functionality
                * @throws InterruptedException
                */

                @Test
                public void testWebAlert() throws InterruptedException {
                                // clicking on try it button
                                driver.findElement(By.xpath("//button[contains(text(),'Try it')]")).click();
                                Thread.sleep(5000);

                                // accepting javascript alert
                                Alert alert = driver.switchTo().alert();
                                alert.accept();

                                // clicking on try it button
                                driver.findElement(By.xpath("//button[contains(text(),'Try it')]")).click();
                                Thread.sleep(5000);

                                // accepting javascript alert
                                driver.switchTo().alert().dismiss();

                                // clicking on try it button
                                driver.findElement(By.xpath("//button[contains(text(),'Try it')]")).click();
                                Thread.sleep(5000);

                                // accepting javascript alert
                                System.out.println(driver.switchTo().alert().getText());
                                driver.switchTo().alert().accept();
                }

                /**
                * Tear down the setup after test completes
                */

                @After
                public void tearDown() {
                    driver.quit();
                }
}
Giải trình Code
Import Statement:
Import org.openqa.selenium.Alert – Gói tham chiếu đến lớp Cảnh báo (Alert class), lớp này được yêu cầu để xử lý các web-based alert (cảnh báo dựa trên web) trong WebDriver.
Khởi tạo object cho class Alert:
Alert alert = driver.switchTo().alert();
Câu lệnh trên tạo một biến tham chiếu cho class Alert và tham chiếu nó tới cảnh báo trong ứng dụng test.
Switch to Alert
Driver.switchTo().alert();
Sử dụng để chuyển hướng bộ điều khiển sang cửa sổ pop up được tạo gần đây nhất.
Accept the Alert
alert.accept();
Lệnh này sẽ thực hiện action click vào nút "OK" trên popup
Reject the Alert
alert.dismiss();
Lệnh này sẽ thực hiện action click vào nút "Cancel" trên popup (close popup và dừng action).
Window Based Pop-Up

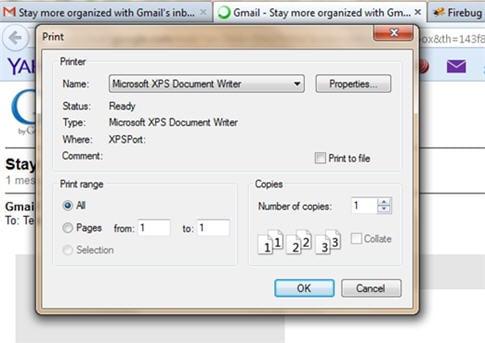
Trong khi tự động hóa, đôi lúc chúng ta gặp một số tình huống cần xử lý các cửa sổ bật lên của hệ điều hành : ví dụ như popup print hoặc browsing window (file browser popup) trong khi thực hiện upload file ...
Việc xử lý các Window Based popup này sẽ phức tạp hơn Web Based popup vì chúng ta biết Selenium là một công cụ kiểm tra tự động hóa chỉ hỗ trợ kiểm tra ứng dụng web, điều đó có nghĩa là nó không hỗ trợ các ứng dụng dựa trên hệ điều hành (windows) và Window Based Pop-Up là một trong số đó. Mặc dù một mình Selenium không thể giúp được tình hình nhưng cùng với sự can thiệp của bên thứ ba thì vấn đề này có thể được khắc phục.
Một trong số các công cụ này là Robot class
Robot class là một tiện ích dựa trên java, nó mô phỏng các thao tác trên bàn phím và chuột.
Giải thích ứng dụng đang được thử nghiệm
Chọn “gmail.com” là đối tượng kiểm thử.
Scenario:
- Khởi chạy trình duyệt web và mở ứng dụng – “gmail.com”
- Nhập tên người dùng và mật khẩu hợp lệ
- Click vào nút đăng nhập
- Click vào nút compose
- Click vào biểu tượng attach/đính kèm (upload file)
- Chọn file trong list file hiển thị trong cửa sổ File Browser (window based pop up)
WebDriver Code sử dụng Robot Class
Bước 1: Tạo một class java mới có tên là “DemoWindowAlert” trong project “Learning_Selenium”.
Bước 2: Sao chép và dán đoạn mã dưới đây vào class “DemoWindowAlert.java”. Đây là đoạn mã tương ứng với kịch bản trên.
import java.awt.Robot;</pre>
import java.awt.event.KeyEvent;
import org.junit.After;
import org.junit.Before;
import org.junit.Test;
import org.openqa.selenium.By;
import org.openqa.selenium.WebDriver;
import org.openqa.selenium.firefox.FirefoxDriver;

public class DemoWindowAlert {
WebDriver driver;
@Before

public void setUp()
{
driver=new FirefoxDriver();
driver.get("https://gmail.com");
driver.manage().window().maximize();
}

@Test
public void testWindowAlert() throws Exception{

// enter a valid email address
driver.findElement(By.id("Email")).sendKeys("TestSelenium1607@gmail.com");

// enter a valid password
driver.findElement(By.id("Passwd")).sendKeys("TestSelenium");

// click on sign in button
driver.findElement(By.id("signIn")).click();
Thread.sleep(30000);

// click on compose button
driver.findElement(By.xpath("//div[@class='z0']//div[contains(text(),'COMPOSE')]")).click();

// click on attach files icon
driver.findElement(By.xpath("//div[contains(@command,'Files')]//div[contains(@class,'aaA')]")).click();

// creating instance of Robot class (A java based utility)
Robot rb =new Robot();

// pressing keys with the help of keyPress and keyRelease events
rb.keyPress(KeyEvent.VK_D);
rb.keyRelease(KeyEvent.VK_D);
Thread.sleep(2000);

rb.keyPress(KeyEvent.VK_SHIFT);
rb.keyPress(KeyEvent.VK_SEMICOLON);
rb.keyRelease(KeyEvent.VK_SEMICOLON);
rb.keyRelease(KeyEvent.VK_SHIFT);

rb.keyPress(KeyEvent.VK_BACK_SLASH);
rb.keyRelease(KeyEvent.VK_BACK_SLASH);
Thread.sleep(2000);

rb.keyPress(KeyEvent.VK_P);
rb.keyRelease(KeyEvent.VK_P);

rb.keyPress(KeyEvent.VK_I);
rb.keyRelease(KeyEvent.VK_I);

rb.keyPress(KeyEvent.VK_C);
rb.keyRelease(KeyEvent.VK_C);
Thread.sleep(2000);

rb.keyPress(KeyEvent.VK_ENTER);
rb.keyRelease(KeyEvent.VK_ENTER);
Thread.sleep(2000);
}

@After
public void tearDown()
{
driver.quit();
}
}
Giải trình Code
Import Statement
import java.awt.Robot – gói này tham chiếu đến class Robot trong java, class này được gọi để mô phỏng các sự kiện của chuột và bàn phím.
import java.awt.event.KeyEvent – Gói này cho phép người dùng sử dụng các sự kiện keyPress và keyRelease của bàn phím.
Tạo đối tượng cho Robot class
Robot rb =new Robot();
Tạo một biến tham chiếu cho class Robot và khởi tạo nó.
Sự kiện KeyPress và KeyRelease
rb.keyPress(KeyEvent.VK_D);
rb.keyRelease(KeyEvent.VK_D);
Phương thức keyPress và keyRelease mô phỏng người dùng nhấn và thả một phím nhất định trên bàn phím tương ứng.
Đây là toàn bộ nội dung của bài hướng dẫn xử lý alert/popup trong WebDriver. Bài dịch trên còn thiếu sót. Bạn có thể tham khảo bài viết gốc tại đây:
https://www.softwaretestinghelp.com/handle-alerts-popups-selenium-webdriver-selenium-tutorial-16/
All rights reserved