Two Factor Authenticate với Devise
Bài đăng này đã không được cập nhật trong 7 năm
Introduction
Việc sử dụng password và email/username để login vào hệ thông cũng không thể coi là đủ an toàn. Nếu người khác có thể đoán hoặc biết được password của bạn là một vấn đề khá nguy hiểm. Như vậy hiên tại nhiều hệ thống cho phép người dùng enable Two factor Authenticate (2FA) là cách để đảm bảo tài khoản của họ sẽ được an toàn rất nhiều. Cách này là yêu cầu người dùng dùng thiết bị thứ 2 để xác nhận tài khoản như điện thoại, ....
Việc implement 2FA cũng không phải là việc đơn giản để có thể implement một cách đúng, và đòi hỏi bạn phải làm khá nhiều. Rất may, cũng có nhiều service đã implement sẵn, bạn chỉ cần cài đặt và kết hợp vào hệ thống của mình là được. Trong bài này mình sẽ hướng dẫn sử dụng service Authy của Twilio để tạo 2FA một cách tiện lợi và nhanh.
Implementation
1. Cài đặt Devise
Add gem devise như bình thường.
https://github.com/plataformatec/devise
gem "devise"
=> bundle install
$ rails generate devise:install
$ rails generate devise User
2. Cài đặt Authy
- Để sử dụng Authy API, bạn cần có Twilio Account : https://www.twilio.com/try-twilio
- Tạo Authy Application: https://www.twilio.com/console/authy/applications
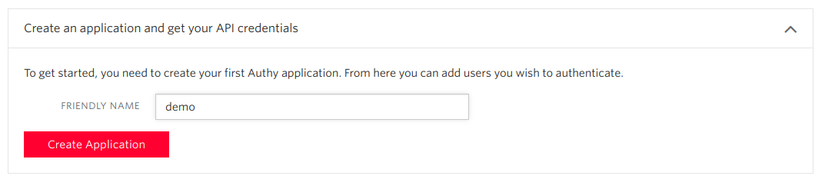
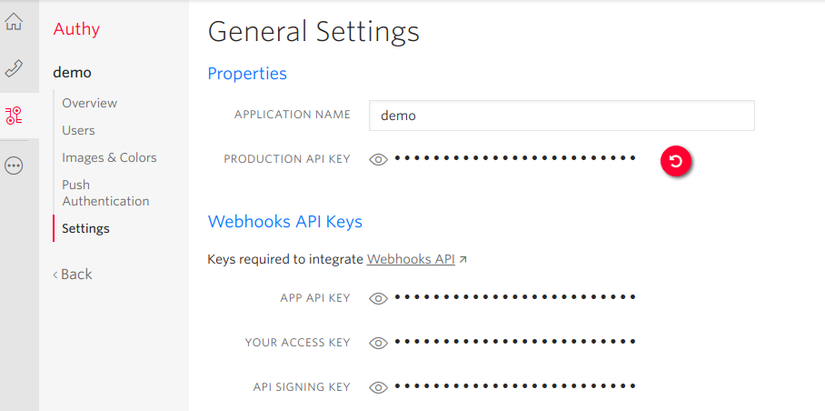
- Vào Setting của application vừa tạo để lấy API KEY
- Cài đặt gem:
gem "devise-authy"
=> bundle install
Generate ra views của Authy
rails g devise_authy:install
sẽ generate ra như sau
insert  config/initializers/devise.rb
initializer  authy.rb
create  config/locales/devise.authy.en.yml
create  app/views/devise/devise_authy/enable_authy.html.erb
create  app/views/devise/devise_authy/verify_authy.html.erb
create  app/views/devise/devise_authy/verify_authy_installation.html.erb
create  app/assets/stylesheets/devise_authy.css
create  app/assets/javascripts/devise_authy.js
insert  app/views/layouts/application.html.erb
Trong file config/initializers/authy.rb có ENV["AUTHY_API_KEY"]
Vậy bạn cần phải có env này.
Config Model
rails g devise_authy User
sẽ generate ra như sau
insert  app/models/user.rb
insert  app/models/user.rb
invoke  active_record
create    db/migrate/20181222082534_devise_authy_add_to_users.rb
Cuối cùng:
rake db:migrate
3. Chạy demo
Bạn có thể vào routes của devise như bình thường để sign up / sign in. Tuy nhiên, Authy cũng đã sinh ra thêm các routes khác nữa như sau:
           user_verify_authy GET    /users/verify_authy(.:format)                       devise/devise_authy#GET_verify_authy
                             POST   /users/verify_authy(.:format)                       devise/devise_authy#POST_verify_authy
           user_enable_authy GET    /users/enable_authy(.:format)                       devise/devise_authy#GET_enable_authy
                             POST   /users/enable_authy(.:format)                       devise/devise_authy#POST_enable_authy
          user_disable_authy POST   /users/disable_authy(.:format)                      devise/devise_authy#POST_disable_authy
user_verify_authy_installation GET    /users/verify_authy_installation(.:format)          devise/devise_authy#GET_verify_authy_installation
                             POST   /users/verify_authy_installation(.:format)          devise/devise_authy#POST_verify_authy_installation
  user_authy_onetouch_status GET    /users/authy_onetouch_status(.:format)              devise/devise_authy#GET_authy_onetouch_status
            user_request_sms POST   /users/request-sms(.:format)                        devise/devise_authy#request_sms
     user_request_phone_call POST   /users/request-phone-call(.:format)                 devise/devise_authy#request_phone_call
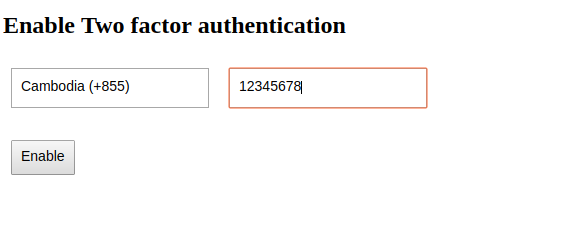
Để enable 2FA, vào link: http://localhost:3000/users/enable_authy
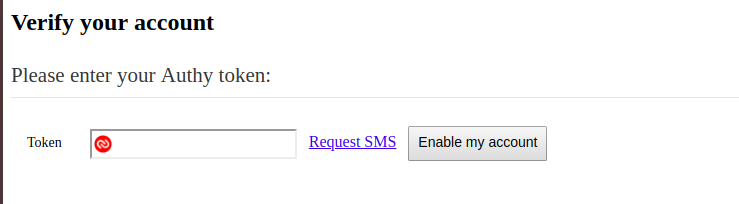
Sau khi enable thành công, mỗi khi user login thì nó sẽ tự redirect cho user xác nhận Token.

Đến đây, 2FA đã chạy thành công 
Conclusion
Như hướng dẫn trên, Authy đã giúp bạn kết hợp 2FA một cách hiệu quả và nhanh, không cần code nhiều. Bạn có thể tham khao thêm:
All rights reserved
