Truyền dữ liệu giữa các fragments bằng interface
Bài đăng này đã không được cập nhật trong 8 năm
Chào các bạn, một thứ 6 nữa lại đến đúng không. Đối với mình thì đây là cái ngày toẹt cmn vời nhất trong tuần vì mình biết rằng mình sẽ được nghỉ ngơi trong 2 ngày cuối tuần (Vẫn xin chia buồn với những bạn OT hoặc vẫn phải đi học vào cuối tuần nhé). Lan man vậy được rồi giờ chúng ta vào vấn đề chính thôi nào. Trước tiên, chúng ta sẽ nói về giao diện của cái demo mà mình làm. Nó cũng cơ bản thôi, bao gồm 2 tabs (mình đặt tên là tab 1 và tab 2). Chi tiết thì ở trong hình bên dưới nhé.
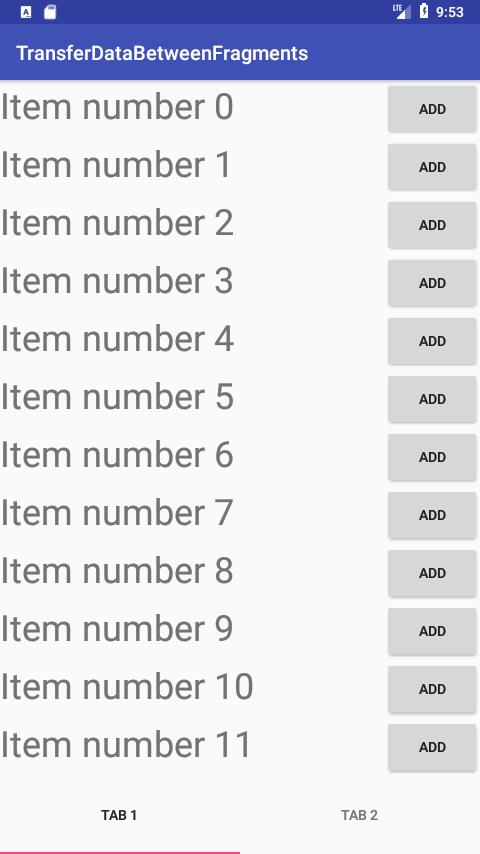
Đây là tab 1, nó sẽ chứa một list các items và mỗi items thì sẽ có tên và một nút Add tương ứng. Mỗi khi mình click nút Add, tên của item đó sẽ được chuyển sang tab 2. Như thế này nè
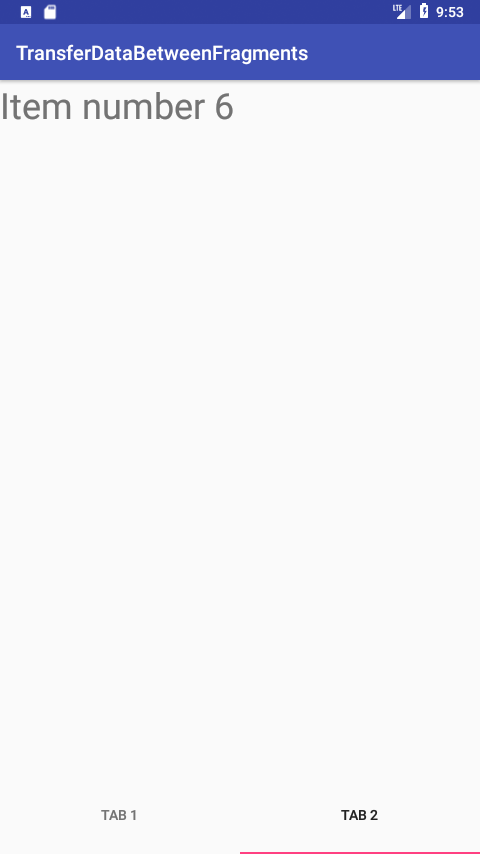
Kết quả đây nhé, mình click vào item số 6 và bên tab 2 nó nhận được dữ liệu là tên của item 6.
Tiếp theo là phần code giao diện, nó khá đơn giản thôi nên mình sẽ không giải thích nhiều lắm. Chú ý chút là các bạn phải thêm 2 thư viện này vào nhé
implementation 'com.android.support:design:27.1.1'
implementation 'com.android.support:recyclerview-v7:27.1.1'
<?xml version="1.0" encoding="utf-8"?>
<LinearLayout xmlns:android="http://schemas.android.com/apk/res/android"
    xmlns:app="http://schemas.android.com/apk/res-auto"
    xmlns:tools="http://schemas.android.com/tools"
    android:layout_width="match_parent"
    android:layout_height="match_parent"
    tools:context=".MainActivity"
    android:orientation="vertical">

    <android.support.v4.view.ViewPager
        android:id="@+id/viewPager"
        android:layout_width="match_parent"
        android:layout_height="0dp"
        android:layout_weight="18"/>

    <android.support.design.widget.TabLayout
        android:id="@+id/tabLayout"
        android:layout_width="match_parent"
        android:layout_height="0dp"
        android:layout_weight="2"/>

</LinearLayout>
Giao diện màn hình chính đây nhé
<?xml version="1.0" encoding="utf-8"?>
<FrameLayout xmlns:android="http://schemas.android.com/apk/res/android"
    xmlns:tools="http://schemas.android.com/tools"
    android:layout_width="match_parent"
    android:layout_height="match_parent"
    tools:context=".Fragment1">

    <android.support.v7.widget.RecyclerView
        android:id="@+id/recyclerView"
        android:layout_width="match_parent"
        android:layout_height="match_parent"/>

</FrameLayout>
Đây là giao diện màn fragment 1 của tab 1
<?xml version="1.0" encoding="utf-8"?>
<FrameLayout xmlns:android="http://schemas.android.com/apk/res/android"
    xmlns:tools="http://schemas.android.com/tools"
    android:layout_width="match_parent"
    android:layout_height="match_parent"
    tools:context=".Fragment2">

    <!-- TODO: Update blank fragment layout -->
    <TextView
        android:id="@+id/tvTab2"
        android:layout_width="match_parent"
        android:layout_height="match_parent"
        android:text="@string/hello_blank_fragment"
        android:textSize="36sp"/>

</FrameLayout>
Giao diện fragment 2 của tab 2
<?xml version="1.0" encoding="utf-8"?>
<LinearLayout xmlns:android="http://schemas.android.com/apk/res/android"
    android:orientation="horizontal" android:layout_width="match_parent"
    android:layout_height="match_parent">

    <TextView
        android:id="@+id/tvItem"
        android:layout_width="0dp"
        android:layout_height="match_parent"
        android:layout_weight="8"
        android:textSize="36sp"/>

    <Button
        android:id="@+id/btnAdd"
        android:layout_width="0dp"
        android:layout_height="match_parent"
        android:text="Add"
        android:layout_weight="2" />
</LinearLayout>
Giao diện cho từng item bên fragment 1
Phew, giao diện dài dòng quá nhỉ, giờ đến phần logic nhé. Mình sẽ post code ở trên và giải thích nó bên dưới phần code nhé.
Đầu tiên, mình sẽ tạo một interface như sau:
public interface OnClickItemTab1 {
    void onClickItem(String text);
}
Mục đích của interface này là mỗi khi được gọi, nó sẽ lấy ra tên của item (cái tham số text trong hàm ấy) và truyền về nơi implement cái interface này.
public class CustomAdapter extends RecyclerView.Adapter<CustomAdapter.ViewHolder>{

    ArrayList listItem;
    Context context;
    OnClickItemTab1 onClickItemTab1;

    public CustomAdapter(ArrayList listItem, Context context, OnClickItemTab1 onClickItemTab1) {
        this.listItem = listItem;
        this.context = context;
        this.onClickItemTab1 = onClickItemTab1;
    }

    @NonNull
    @Override
    public ViewHolder onCreateViewHolder(@NonNull ViewGroup parent, int viewType) {
        LayoutInflater inflater = (LayoutInflater) context.getSystemService(Context.LAYOUT_INFLATER_SERVICE);
        View v = inflater.inflate(R.layout.item_layout, null);
        LinearLayout.LayoutParams params = new LinearLayout.LayoutParams(ViewGroup.LayoutParams.MATCH_PARENT, ViewGroup.LayoutParams.WRAP_CONTENT);
        v.setLayoutParams(params);
        return new ViewHolder(v);
    }

    @Override
    public void onBindViewHolder(@NonNull ViewHolder holder, final int position) {
        holder.tv.setText("Item number " + position);
        holder.btn.setOnClickListener(new View.OnClickListener() {
            @Override
            public void onClick(View view) {
                Toast.makeText(context, ""+position, Toast.LENGTH_SHORT).show();
                onClickItemTab1.onClickItem("Item number " + position);
            }
        });
    }

    @Override
    public int getItemCount() {
        return listItem.size();
    }

    class ViewHolder extends RecyclerView.ViewHolder {
        TextView tv;
        Button btn;
        public ViewHolder(View itemView) {
            super(itemView);
            tv = itemView.findViewById(R.id.tvItem);
            btn = itemView.findViewById(R.id.btnAdd);
        }
    }
}
Do ở đây mình sử dụng recyclerview cho nên mình sẽ extends hàm Adapter mặc định của recyclerview. Trong phần constructor của cái CustomAdapter này, mình sẽ khởi tạo một OnClickItemTab1 interface. Mỗi khi có sự kiện click vào nút Add ở mỗi item, nó sẽ gọi đến hàm onClickItem("Item number " + position) để truyền sang fragment 2 tên của item mà mình vừa click.
public class Fragment1 extends Fragment {

    RecyclerView mRecyclerView;
    CustomAdapter adapter;
    ArrayList listItem = new ArrayList();
    OnClickItemTab1 onClickItemTab1;
    public Fragment1() {
        // Required empty public constructor
    }

    public void setOnClickItemTab1(OnClickItemTab1 onClickItemTab1) {
        this.onClickItemTab1 = onClickItemTab1;
    }

    public static Fragment1 getInstance(){
        return new Fragment1();
    }

    @Override
    public View onCreateView(LayoutInflater inflater, ViewGroup container,
                             Bundle savedInstanceState) {
        // Inflate the layout for this fragment
        View v = inflater.inflate(R.layout.fragment_fragment1, container, false);
        mRecyclerView = v.findViewById(R.id.recyclerView);
        LinearLayoutManager manager = new LinearLayoutManager(getContext(), LinearLayoutManager.VERTICAL, false);
        setup();
        adapter = new CustomAdapter(listItem, getContext(), onClickItemTab1);
        mRecyclerView.setAdapter(adapter);
        mRecyclerView.setLayoutManager(manager);
        return v;
    }

    private void setup() {
        for(int i=0; i<100; i++){
            listItem.add(i);
        }
    }
}
Đây là fragment 1, mình khởi tạo sẵn bộ dữ liệu gồm 100 items, có số từ 0 đến 99. Trong fragment 1, mình khai báo một biết OnClickItemTab1 onClickItemTab1; và tạo setter cho nó. Sau đó, trong hàm khởi tạo adapter, mình truyền vào biến onClickItemTab1 này (Truyền vào ở đây thì cái CustomAdapter mới có cái mà sử dụng chứ phải không các bạn). Okay, vậy là việc fragment gửi dữ liệu đã xong, chúng ta hãy xem fragment 2 làm sao để có thể nhận được dữ liệu nhé.
public class Fragment2 extends Fragment implements OnClickItemTab1{
    TextView mTextViewTab2;
    OnClickItemTab1 onClickItemTab1 = this;

    public Fragment2() {
        // Required empty public constructor
    }

    public OnClickItemTab1 getOnClickItemTab1() {
        return onClickItemTab1;
    }

    public static Fragment2 getInstance(){
        return new Fragment2();
    }

    @Override
    public View onCreateView(LayoutInflater inflater, ViewGroup container,
                             Bundle savedInstanceState) {
        // Inflate the layout for this fragment
        View v = inflater.inflate(R.layout.fragment_fragment2, container, false);
        mTextViewTab2 = v.findViewById(R.id.tvTab2);
        return v;
    }


    @Override
    public void onClickItem(String text) {
        mTextViewTab2.setText(text);
    }
}
Trong fragment 2, mình implements OnClickItemTab1 để mỗi khi nhận được dữ liệu từ fragment 1, nó sẽ quyết định làm gì với dữ liệu đó. Tất nhiên, để fragment 1 có thể gọi được cái phương thức đã implement trong fragment 2, nó sẽ phải chìa ra một OnClickItemTab1 interface để phương thức 2 có thể gọi tới bằng 2 câu lệnh khởi tạo giá trị cho biến onClickItemTab1 và hàm getter tương ứng. Cuối cùng, chúng ta hãy ngó qua MainActivity một chút để xem làm thế nào để kết hợp cái đống mà mình vừa giải thích bên trên nhé.
public class MainActivity extends AppCompatActivity {
    ViewPager mViewPager;
    TabLayout mTabLayout;
    OnClickItemTab1 onClickItemTab1;
    Fragment2 fragment2;
    Fragment1 fragment1;

    @Override
    protected void onCreate(Bundle savedInstanceState) {
        super.onCreate(savedInstanceState);
        setContentView(R.layout.activity_main);
        mapping();
        fragment2 = Fragment2.getInstance();
        fragment1 = Fragment1.getInstance();
        fragment1.setOnClickItemTab1(fragment2.getOnClickItemTab1());
        mViewPager.setAdapter(new ViewPagerAdapter(getSupportFragmentManager()));
        mTabLayout.setupWithViewPager(mViewPager);
    }

    private void mapping() {
        mViewPager = findViewById(R.id.viewPager);
        mTabLayout = findViewById(R.id.tabLayout);
    }

    class ViewPagerAdapter extends FragmentPagerAdapter{

        public ViewPagerAdapter(android.support.v4.app.FragmentManager fm) {
            super(fm);
        }

        @Override
        public android.support.v4.app.Fragment getItem(int position) {
            switch (position){
                case 0:
                    return fragment1;
                case 1:
                    return fragment2;
            }
            return null;
        }

        @Override
        public int getCount() {
            return 2;
        }

        @Nullable
        @Override
        public CharSequence getPageTitle(int position) {
            switch (position){
                case 0: return "Tab 1";
                case 1: return "Tab 2";
            }
            return super.getPageTitle(position);
        }
    }
}
Về cách tạo giao diện với TabLayout và ViewPager thì các bạn vào linh sau đây để coi nhé: http://bfy.tw/Hye9, người ta sẽ giải thích kĩ hơn. Ở trong demo của mình, mình truyền vào fragment 1 cái interface mà mình đã dựng sẵn bên fragment 2. Ngay lập tức fragment 1 sẽ có được interface mà fragment 2 đã triển khai. Mỗi lần fragment 1 gọi hàm trong interface đó, fragment 2 sẽ biết mình phải làm gì tiếp theo.
fragment1.setOnClickItemTab1(fragment2.getOnClickItemTab1());
Với cách làm như trên, chúng ta đã có thể dễ dàng truyền dữ liệu qua lại giữa các fragments mà không cần sử dụng bất cứ một thư viện bên ngoài nào. Kèm với đó, các bạn có thể mở rộng ra cho việc truyền dữ liệu giữa các class cho nhau. Hehe, phải công nhận interface là một trong những thứ toẹt vời nhất của Java. Chúc các bạn code vui và có ngày nghỉ cuối tuần thật vui vẻ nha :v
P/s: Link sample cho các bạn nào vẫn chưa làm được: https://github.com/ITWall/TransferDataBetweenFragments
All rights reserved
