Trải Nghiệm Automator View | UI Test Android
Bài đăng này đã không được cập nhật trong 6 năm
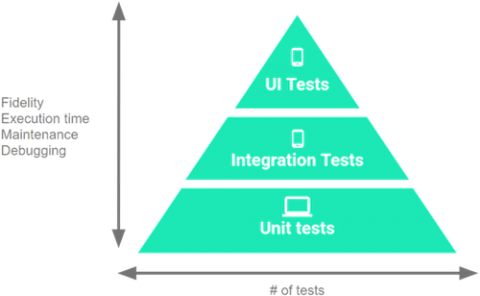
Trong bài viết trước của mình Unit Test với Những cách làm tốt hơn, các bạn đã được làm quen và tiếp cận những cách viết Unit Test sao cho hiệu quả và không phải vất vả nhiều. Chắc chắn rằng những bạn để ý nhiều về Unit Test sẽ mong muốn cải thiện sản phẩm và chất lượng code của mình cao hơn nữa. Kiểm thử là một công việc không gì ngoài mong muốn kiểm soát chất lượng sản phẩm mang dịch vụ tốt tới khách hàng. Câu hỏi là: "Không biết anh em chúng ta ngoài code ra thì có thể tự thực hiện phần việc Tester tốt hơn nữa được không?" Câu trả lời của mình đương nhiên là CÓ, khi bạn làm được 3 bậc thang ở hình vẽ trên. 
Bạn chắc còn nhớ tỷ lệ tầm quan trọng của 3 bậc thang trên :
- UI Tests: 10%
- Integration Tests: 20%
- Unit Tests: 70%
Việc kiểm thử View chính là phần UI Test (10%) chắc hẳn so với 2 người "anh/em" của nó thì rất nhỏ bé nhưng việc thực hiện lại dễ bị bỏ qua nhất nên vô tình chúng ta đã bị mất 10% chất lượng sản phẩm của mình rồi. Hôm nay, chúng ta cùng nhau tìm hiểu xem làm thế nào để chất lượng phần UI sản phẩm mình TỐT hơn nữa nhé!
1. UI Test cho RecylerView
Mình sẽ tạo 1 app đơn giản danh sách hiển thị item và sử dụng RecyclerView như hình ảnh trên.
Code phần xml rất đơn giản, bạn tự thêm vào
Phần Adapter cho RecyclerView như sau:
ItemAdapter.java
public class ItemAdapter extends RecyclerView.Adapter<ItemAdapter.ViewHolder> {

    private final List<String> mDataSet;

    private final Context mContext;

    /**
     * Provide a reference to the type of views that you are using
     * (custom {@link RecyclerView.ViewHolder}).
     */
    static class ViewHolder extends RecyclerView.ViewHolder {
        private final TextView textView;

        // We'll use this field to showcase matching the holder from the test.
        private boolean mIsInTheMiddle = false;

        ViewHolder(View v) {
            super(v);
            textView = (TextView) v.findViewById(R.id.textView);
        }

        TextView getTextView() {
            return textView;
        }

        boolean getIsInTheMiddle() {
            return mIsInTheMiddle;
        }

        void setIsInTheMiddle(boolean isInTheMiddle) {
            mIsInTheMiddle = isInTheMiddle;
        }
    }

    /**
     * Initialize the dataset of the Adapter.
     *
     * @param dataSet String[] containing the data to populate views to be used by RecyclerView.
     */
    ItemAdapter(List<String> dataSet, Context context) {
        mDataSet = dataSet;
        mContext = context;
    }

    @Override
    public ViewHolder onCreateViewHolder(ViewGroup viewGroup, int viewType) {
        // Create a new view.
        View v = LayoutInflater.from(viewGroup.getContext())
                .inflate(R.layout.text_row_item, viewGroup, false);

        return new ViewHolder(v);
    }

    @Override
    public void onBindViewHolder(ViewHolder viewHolder, final int position) {
        if (position == mDataSet.size() / 2 /* calculate middle element position */) {
            viewHolder.setIsInTheMiddle(true);
            viewHolder.getTextView().setText(mContext.getResources().getString(R.string.middle));
        } else {
            viewHolder.setIsInTheMiddle(false);
            viewHolder.getTextView().setText(mDataSet.get(position));
        }
    }

    // Return the size of your data set (invoked by the layout manager)
    @Override
    public int getItemCount() {
        return mDataSet.size();
    }
}
Note: Trong danh sách hiển thị chúng ta sẽ đánh dấu item nằm ở giữa với text: "This is the middle!" Lát nữa trong phần UI Test để kiểm tra xem nó hiển thị có đúng không.
Sau đó bạn sử dụng adapter này để hiển thị item lên RecyclerView trong MainActivity là xong.
MainActivity.java
public class MainActivity extends Activity {

    private static final int DATASET_COUNT = 50;

    @Override
    protected void onCreate(Bundle savedInstanceState) {
        super.onCreate(savedInstanceState);
        setContentView(R.layout.activity_main);

        // Create a RecyclerView, a LayoutManager, a data Adapter and wire everything up.
        RecyclerView recyclerView = (RecyclerView) findViewById(R.id.recyclerView);

        LinearLayoutManager layoutManager = new LinearLayoutManager(getApplicationContext());
        recyclerView.setLayoutManager(layoutManager);

        List<String> dataSet = new ArrayList<>(DATASET_COUNT);
        for (int i = 0; i < DATASET_COUNT; i++) {
            dataSet.add(getString(R.string.item_element_text) + i);
        }
        ItemAdapter adapter = new ItemAdapter(dataSet, getApplicationContext());
        recyclerView.setAdapter(adapter);
    }
}
2. Implement Espresso cho App
Espresso là một framework được cung cấp bởi AndroidX Test, nó cho phép developer tương tác tự động với thành phần UI của app, từ đó cho kết quả kiểm tra thao tác, sự kiện, view có thực hiện như mong muốn hay không. Nó mang lại kết quả như chúng ta thao tác bằng tay.
Cài đặt:
trong app
build.gradle
     androidTestImplementation 'androidx.test:core:' + rootProject.coreVersion;
    androidTestImplementation 'androidx.test.ext:junit:' + rootProject.extJUnitVersion;
    androidTestImplementation 'androidx.test:runner:' + rootProject.runnerVersion;
    androidTestImplementation 'androidx.test.espresso:espresso-core:' + rootProject.espressoVersion;
    androidTestImplementation 'androidx.test.espresso:espresso-contrib:' + rootProject.espressoVersion;
version của mình là : 3.3.0-alpha04
Bây giờ bạn tạo 1 file test riêng cho phần UI ở trên, do chỉ có một màn hình nên chỉ cần 1 file test thôi RecyclerViewSampleTest
RecyclerViewSampleTest
@RunWith(AndroidJUnit4.class)
@LargeTest
public class RecyclerViewSampleTest {

    private static final int ITEM_BELOW_THE_FOLD = 40;

    /**
     * Use {@link ActivityScenario} to create and launch the activity under test. This is a
     * replacement for {@link androidx.test.rule.ActivityTestRule}.
     */
    @Rule
    public ActivityScenarioRule<MainActivity> activityScenarioRule =
        new ActivityScenarioRule<MainActivity>(MainActivity.class);

    @Test
    public void scrollToItemBelowFold_checkItsText() {
        // First scroll to the position that needs to be matched and click on it.
        onView(ViewMatchers.withId(R.id.recyclerView))
                .perform(RecyclerViewActions.actionOnItemAtPosition(ITEM_BELOW_THE_FOLD, click()));

        // Match the text in an item below the fold and check that it's displayed.
        String itemElementText = getApplicationContext().getResources().getString(
                R.string.item_element_text) + String.valueOf(ITEM_BELOW_THE_FOLD);
        onView(withText(itemElementText)).check(matches(isDisplayed()));
    }

    @Test
    public void itemInMiddleOfList_hasSpecialText() {
        // First, scroll to the view holder using the isInTheMiddle matcher.
        onView(ViewMatchers.withId(R.id.recyclerView))
                .perform(RecyclerViewActions.scrollToHolder(isInTheMiddle()));

        // Check that the item has the special text.
        String middleElementText =
                getApplicationContext().getResources().getString(R.string.middle);
        onView(withText(middleElementText)).check(matches(isDisplayed()));
    }

    /**
     * Matches the {@link ItemAdapter.ViewHolder}s in the middle of the list.
     */
    private static Matcher<ItemAdapter.ViewHolder> isInTheMiddle() {
        return new TypeSafeMatcher<ItemAdapter.ViewHolder>() {
            @Override
            protected boolean matchesSafely(ItemAdapter.ViewHolder customHolder) {
                return customHolder.getIsInTheMiddle();
            }

            @Override
            public void describeTo(Description description) {
                description.appendText("item in the middle");
            }
        };
    }
}
Giải thích:
Trong UI Test trên có 2 function Test:
- scrollToItemBelowFold_checkItsText Mở App => kéo tới vị trí 40 và kiểm tra xem nó có phải là Text hay không
onView(ViewMatchers.withId(R.id.recyclerView))
                .perform(RecyclerViewActions.actionOnItemAtPosition(ITEM_BELOW_THE_FOLD, click()));
Espresso cung cấp method onView cho phép bạn thao tác với view thông qua việc gọi tới ID của view, bạn có thể scroll, click v.v. Ở đây chúng ta scroll RecyclerView tới vị trí 40.
- itemInMiddleOfList_hasSpecialText Kiểm tra vị trí ở giữa có phải là text mà chúng ta quy định riêng với nội dung This is the middle!
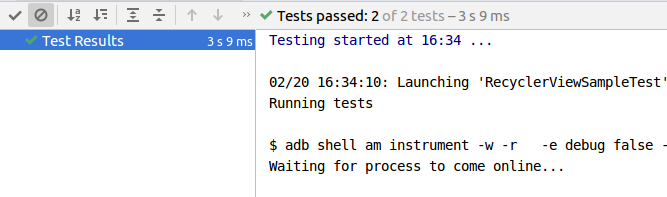
Kết quả thực chạy:
Bonus
3. Sử dụng UI Automator
Như vậy các bạn đã có thể tự viết UI Test cho project của mình rồi, nhưng ngoài ra còn có cách làm TỐT hơn nữa. Đôi lúc bạn thấy view của mình hiển thị sai, mà tìm mãi không biết mình đã setting kiểu gì mà khi chạy thật lại nhìn " Nó Chán " đến thế. Và đây là cách mình làm, kiểm tra UI ngay trong lúc chạy app, nhìn được ngay lỗi sai của mình rất đơn giản.

Bạn chỉ cần di chuột đến từng vị trí, nó sẽ báo cho bạn khoảng cách, margin, layout parent, v.v Rất chi tiết cho bạn biết được thực tế bạn đã dùng View gì, setting ra sao và từ đó bạn sữa lỗi rất dễ.
4. Tổng kết
UI Test chiếm 10% phần việc quan trọng trong Kiểm thử nhưng nó lại không khó để bạn làm TỐT, hy vọng với cách làm trên đây bạn đã có thể tự viết UI Test cho project của mình. Chúc các bạn có nhưng project chất lượng hơn nữa trong tương lai! Nếu có thắc mắc gì vui lòng comment để mình giải đáp nhé.
All rights reserved
