Tìm hiểu về UIPresentationController: tạo custom present cho UIViewController
Bài đăng này đã không được cập nhật trong 4 năm
I. Giới thiệu
Đối với lập trình viên iOS, việc tạo UIViewController và hiển thị nó là những việc hết sức thân thuộc. Tất cả ứng dụng đều cần có các UIViewController, và hiển thị chúng để có 1 ứng dụng chạy được. Thông thường, để present 1 UIViewController, chúng ta chỉ cần đơn giản gọi hàm present(_:animated:completion:) , iOS sẽ hiển thị UIViewController của chúng ta với transition animation khá đẹp mắt.
Trong iOS, hệ thống cung cấp cho chúng ta một vài tuỳ chọn hiển thị (Full Screen, Current Context, Page Sheet,…) cùng với vài tuỳ trọn transition animation (Cover Vertical, Flip Horizontal,…). Tuy nhiên, trong rất nhiều trường hợp, ứng dụng của chúng ta cần những dạng hiển thị khác, với transition animation khác để ứng dụng chạy theo đúng ý của chúng ta. Lúc này, chúng ta sẽ cần đào xâu hơn vào các hàm trong iOS, để custom cách hiển thị.
Trong bài này, tôi xin giới thiệu đến các bạn UIPresentationController, các class và function chúng ta cần dùng để custom cách iOS present các UIViewController thông qua ứng dụng demo bên dưới.
Chú ý, bài viết này dành cho những bạn đã quen thuộc với iOS, đối với các bạn mới học code iOS, tôi khuyến khích các bạn nên học các kiến thức cơ bản về iOS trước.
II. Demo project với UIPresentationController
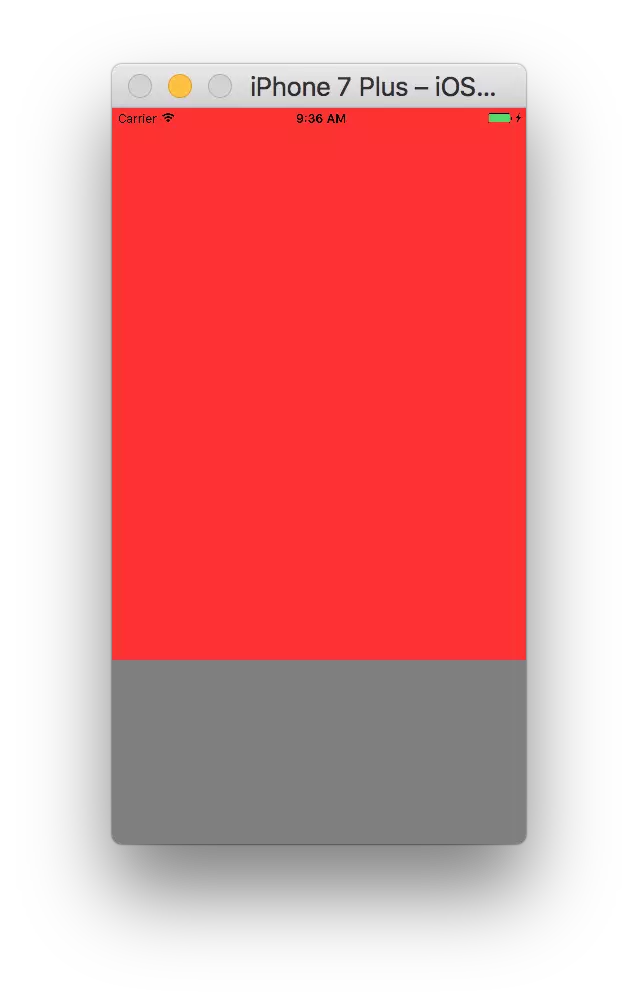
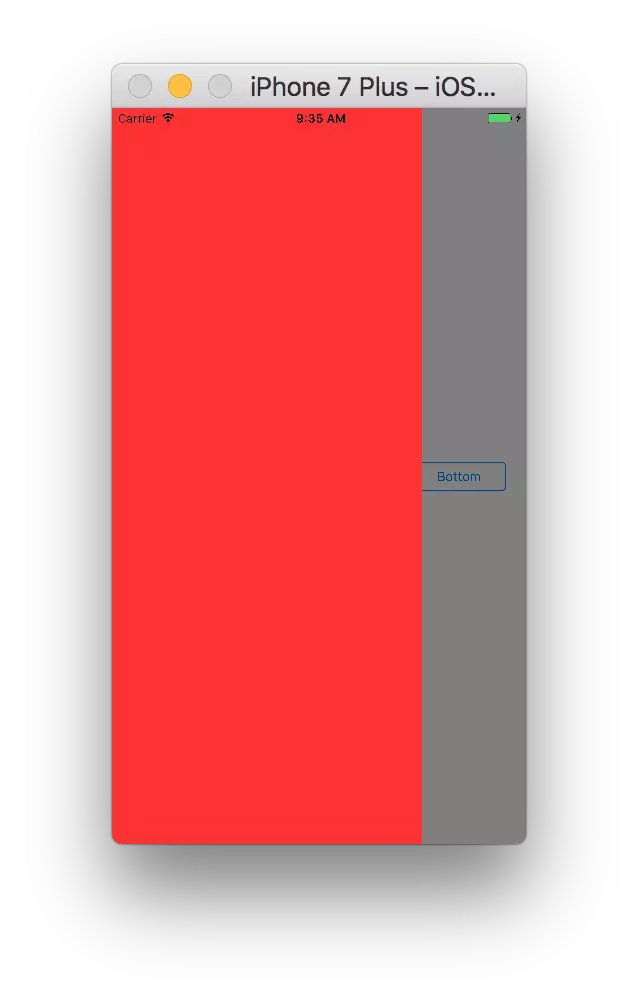
Trong demo project này, tôi sẽ tạo custom modal present với hiển thị 1 phần màn hình và animation phụ thuộc vào hướng mà chúng ta muốn. Về cơ bản thì sau khi chúng ta hoàn thành demo này, chúng ta có thể present modal như hình sau:
1. Tạo project
Đầu tiên, chúng ta tạo project trong xcode, đặt tên PresentationTutorial, để ngôn ngữ lập trình là swift và tạo project.
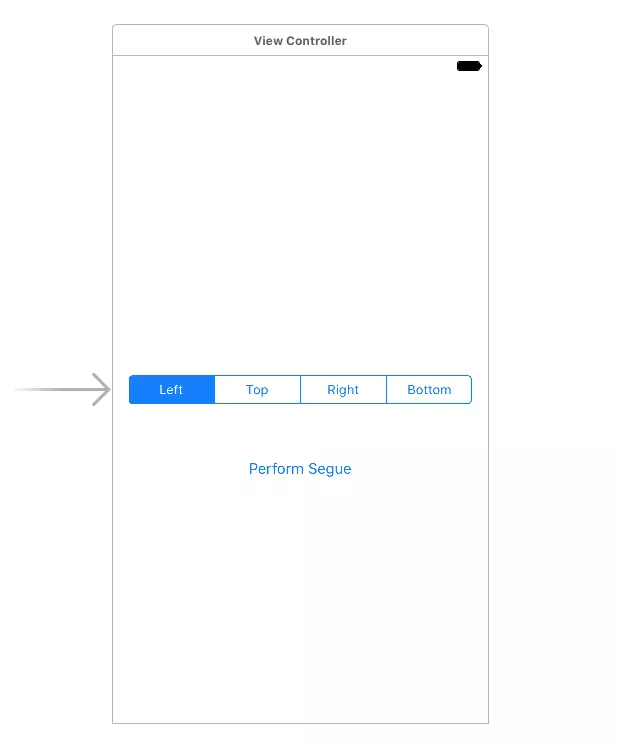
Tiếp theo, mở file Main.Storyboard, chúng ta cần tạo 1 ít UI cho ViewController.swift:
- Bước 1: kéo tạo 1 UISegmentedControl, tạo auto layout UISegmentedControl này (tạo sao cũng được, miễn để cho segment control của chúng ta không bị che khuất khi chạy app), config UISegmentedControl với 4 segment tên lần lượt left, top, right, bottom.
- Bước 2: kéo tạo 1 UIButton, tạo auto layout cho button, đổi title thành "Perform Segue".
Sau khi hoàn thành, chúng ta sẽ được như hình sau:
Mở Assistant editor, trong file ViewController.swift, kéo tạo IBOutlet cho UISegmentedControl, IBAction cho UIButton của chúng ta:
class ViewController: UIViewController {

    @IBOutlet weak var segmentedControl: UISegmentedControl!

    @IBAction func handlePerformSegueButtonClicked(_ sender: Any) {

    }
}
Bây giờ, chúng ta cần 1 UIViewController để present.
- Bước 1: tạo file PresentedViewController.swift với class PresentedViewController thừa kế từ class UIViewController.
- Bước 2: Trong file Main.Storyboard, kéo tạo UIViewController, set class PresentedViewController, đổi màu cho UIView sang màu đỏ (để chúng ta dễ nhận biết, các bạn có thể hiển thị bất kỳ cái gì các bạn muốn).
- Bước 3: Kéo tạo modal segue từ ViewController sang PresentedViewController (lưu ý chọn segue là present modally), đặt Identifier cho segue này là ToPresentedVCSegue.
Sau khi hoàn thành các bước ở trên, file Main.Storyboard của chúng ta sẽ được như sau:

2. Custom vị trí và kích thước của UIViewController
Thông thường, khi muốn present UIViewController, chúng ta chỉ đơn giản gọi hàm present(:animated:completion:) mà không để ý bên trong iOS đã làm những gì. Bây giờ, để custom present, chúng ta cần tìm hiểu về cách mà iOS present UIViewController của chúng ta. Về cơ bản, khi chúng ta gọi hàm present(:animated:completion:), iOS sẽ làm 2 bước sau:
- Bước 1: khởi tạo 1 instance UIPresentationController.
- Bước 2: gắn UIView của UIViewController sẽ được present vào UIView của instance UIPresentationController và hiển thị nó bằng một trong các mẫu modal của iOS
Để thay đổi cách hiển thị và transition animation, chúng ta sẽ thừa kế UIPresentationController và tạo transitioning delegate. OK, đấy là lý thuyết, bây giờ chúng ta sẽ đi vào từng bước.
a. Tạo transition delegate
Đầu tiên, chúng ta tạo new file subclass của class NSObject, đặt tên SlideInPresentationDelegate và chọn ngôn ngữ là swift và thêm code vào trong file SlideInPresentationDelegate như sau:
import UIKit
// 1
enum PresentationDirection: Int {
    case left = 0
    case top = 1
    case right = 2
    case bottom = 3
}

class SlideInPresentationDelegate: NSObject, UIViewControllerTransitioningDelegate {
    // 2
    var direction = PresentationDirection.left
}
- 1: Tạo 1 enum tương ứng cho các hướng mà chúng ta có thể present UIViewController
- 2: Tạo 1 property là instance của enum bên trên, hướng mà chúng ta sẽ present UIViewController
Tiếp theo, mở file ViewController.swift và thêm property:
var slideInPresentationDelegate = SlideInPresentationDelegate()
Thêm code để perform segue cho UIButton của chúng ta như sau:
@IBAction func handlePerformSegueButtonClicked(_ sender: Any) {
    self.performSegue(withIdentifier: "ToPresentedVCSegue", sender: self)
}
Bây giờ, override hàm prepare(for segue: sender:) như sau:
override func prepare(for segue: UIStoryboardSegue, sender: Any?) {
    if segue.identifier == "ToPresentedVCSegue" {
        // 1
        let direction = PresentationDirection(rawValue: segmentedControl.selectedSegmentIndex)!
        // 2
        slideInPresentationDelegate.direction = direction
        // 3
        let controller = segue.destination
        // 4
        controller.transitioningDelegate = slideInPresentationDelegate
        // 5
        controller.modalPresentationStyle = .custom
    }
}
Trong đoạn code bên trên:
- 1: tạo 1 instance PresentationDirection với giá trị phụ thuộc index của segmentedControl.
- 2: gán direction cho property slideInPresentationDelegate chúng ta tạo bên trên.
- 3: tạo biến controller là UIViewController mà chúng ta sẽ present.
- 4: gán slideInPresentationDelegate là transitioningDelegate cho controller.
- 5: Khai báo style của modalPresentationStyle là custom. Chúng ta cần khai báo cái này để cho controller biết là chúng ta sẽ sử dụng custom present style của chúng ta thay vì default present style của iOS.
b. Tạo UIPresentationController
Bây giờ chúng ta sẽ tạo 1 lớp thừa kế từ UIPresentationController với tên là SlideInPresentationController và ngôn ngữ là swift. Mở file này lên và thêm đoạn code như sau:
import UIKit

class SlideInPresentationController: UIPresentationController {

    var direction: PresentationDirection

    init(presentedViewController: UIViewController, presenting presentingViewController: UIViewController?, direction: PresentationDirection) {
        self.direction = direction

        super.init(presentedViewController: presentedViewController, presenting: presentingViewController)
    }
}
Đoạn code bên trên đã khá rõ ràng, chúng ta thêm property direction cho lớp SlideInPresentationController và tạo hàm init cho lớp đó.
c . Thêm background phía sau UIViewcontroller
Các bạn để ý rằng trong hình bên trên, ngoài UIViewController hiển thị chiếm phần lớn màn hình, phía bên dưới là 1 UIViewController khác bị làm tối đi. Chúng ta sẽ làm việc này bằng cách thêm 1 UIView màu tối bên dưới để tạo hiệu ứng này. Chúng ta thêm code sau vào SlideInPresentationController:
var backgroundView: UIView!

func setupBackgroundView() {
    backgroundView = UIView()
    backgroundView.translatesAutoresizingMaskIntoConstraints = false
    backgroundView.backgroundColor = UIColor(white: 0.0, alpha: 0.5)
    backgroundView.alpha = 0.0
}
Tiếp theo, chúng ta sẽ xử lý dismiss UIViewController của chúng ta khi người dùng tap vào phần background này. đầu tiên thêm hàm sau:
func handleTap(recognizer: UITapGestureRecognizer) {
    presentingViewController.dismiss(animated: true, completion: nil)
}
Tiếp đó thêm đoạn code sau vào cuối hàm setupBackgroundView():
let recognizer = UITapGestureRecognizer(target: self, action: #selector(handleTap(recognizer:)))
        backgroundView.addGestureRecognizer(recognizer)
Cuối cùng thêm đoạn code sau vào cuối hàm init(presentedViewController:presenting:direction:):
setupBackgroundView()
d. Implement các hàm cho UIPresentationController
Ở các bước bên trên, chúng ta đã làm khá nhiều việc, từ tạo UIViewControllerTransitioningDelegate, tạo UIPresentationController, nhưng nếu các bạn chạy thử, các bạn sẽ thấy ứng dụng của chúng ta chẳng có gì thay đổi cả. Đó là bởi vì chúng ta vẫn chưa custom hiển thị cho UIView, và thậm chí chưa sử dụng UIPresentationController. Bây giờ chúng ta sẽ đi làm những việc đó.
Bước 1, chúng ta mở file SlideInPresentationController.swift và override lần lượt các hàm như sau:
override func presentationTransitionWillBegin() {
    // 1
    containerView?.insertSubview(backgroundView, at: 0)
    // 2
    NSLayoutConstraint.activate(NSLayoutConstraint.constraints(withVisualFormat: "V:|[backgroundView]|", options: [], metrics: nil, views: ["backgroundView" : backgroundView]))

    NSLayoutConstraint.activate(NSLayoutConstraint.constraints(withVisualFormat: "H:|[backgroundView]|", options: [], metrics: nil, views: ["backgroundView" : backgroundView]))
    // 3
    guard let coordinator = presentedViewController.transitionCoordinator else {
        backgroundView.alpha = 1.0
        return
    }
    coordinator.animate(alongsideTransition: { _ in
        self.backgroundView.alpha = 1.0
    })
}
Nhìn vào tên hàm bên trên, ta có thể thấy được ý nghĩa của hàm này: hàm được gọi khi iOS bắt đầu present UIViewController
- 1: containerView chính là view cha của UIView của UIViewController được present. Chúng ta thêm backgroundView vào bên dưới cùng của containerView.
- 2: tạo auto layout cho backgroundView, để view này không bị lỗi hiển thị khi chạy ứng dụng
- 3: tạo animation cho backgroundView. bằng cách tạo này, backgroundView sẽ thay đổi alpha đồng thời với animation của transition
Bước 2, chúng ta override hàm dismissalTransitionWillBegin(), hàm này sẽ được gọi đến ngay trước khi quá trình dismiss UIViewController được thực hiện:
override func dismissalTransitionWillBegin() {
    guard let coordinator = presentedViewController.transitionCoordinator else {
        backgroundView.alpha = 0
        return
    }

    coordinator.animate(alongsideTransition: { _ in
        backgroundView.alpha = 0
    })
}
Tương tự như hàm presentationTransitionWillBegin() ở bên trên, hàm dismissalTransitionWillBegin() thực hiện quá trình ngược lại, tạo animation đưa alpha của backgroundView về 0.
Bước 3, chúng ta override lần lượt các hàm và property sau để tính toán kích thước và vị trí UIView của UIViewController được present:
// 1
override func containerViewWillLayoutSubviews() {
    presentedView?.frame = frameOfPresentedViewInContainerView
}
// 2
override func size(forChildContentContainer container: UIContentContainer, withParentContainerSize parentSize: CGSize) -> CGSize {
    switch direction {
    case .left, .right:
        return CGSize(width: parentSize.width*(3.0/4.0), height: parentSize.height)
    case .top, .bottom:
        return CGSize(width: parentSize.width, height: parentSize.height*(3.0/4.0))
    }
}
// 3
override var frameOfPresentedViewInContainerView: CGRect {
    var frame: CGRect = .zero
    frame.size = size(forChildContentContainer: presentedViewController, withParentContainerSize: containerView!.bounds.size)

    switch direction {
    case .right:
        frame.origin.x = containerView!.frame.width*(1.0/4.0)
    case .bottom:
        frame.origin.y = containerView!.frame.height*(1.0/4.0)
    default:
        frame.origin = .zero
    }

    return frame
}
Bên trên, chúng ta điều chỉnh kích thước và vị trí của UIView được present. đối với các direction khác nhau lại có kích thước và vị trí khác nhau.
- 1: đảm bảo view của UIViewController được present sẽ thay đổi khít với contrainerView mỗi khi containerView bố trí lại UIViews
- 2: điều chỉnh kích thước UIView của presented UIViewController
- 3: điều chỉnh toạ độ UIView của presented UIViewController
Cuối cùng, chúng ta mở file SlideInPresentationDelegate.swift và thêm hàm sau:
func presentationController(forPresented presented: UIViewController, presenting: UIViewController?, source: UIViewController) -> UIPresentationController? {
	let presentationController = SlideInPresentationController(presentedViewController: presented, presenting: presenting, direction: direction)

	return presentationController
}
Ở đoạn code bên trên, class SlideInPresentationController của chúng ta chính thức được sử dụng. Hàm này sẽ được iOS gọi mỗi khi UIViewController được present.
OK, chúng ta đã hoàn thành việc custom vị trí và kích thước của UIViewController, build và chạy thử project, các bạn sẽ có được như hình sau:
3. Custom animation cho UIViewController
Các bạn hãy dùng thử các present direction khác nhau trong demo app bằng cách chọn các segment khác nhau, chúng ta sẽ thấy mặc dù vị trí của UIViewController được present với các direction khác nhau thì khác nhau, nhưng tất cả đều có chung 1 animation: trượt từ dưới lên trên. Trong phần này, chúng ta sẽ tạo custom animation để với mỗi direction khác nhau thì sẽ có present animation khác nhau. Lần lượt trượt từ trái qua với left, phải với right, trên xuống với top và dưới lên với bottom.
import UIKit

class SlideInPresentationAnimator: NSObject {

    let direction: PresentationDirection

    let isPresentation: Bool

    init(direction: PresentationDirection, isPresentation: Bool) {
        self.direction = direction
        self.isPresentation = isPresentation
        super.init()
    }
}
Bên trên, chúng ta thêm property direction để biết hướng của present và isPresentation để xác định animation là present hay dismiss UIViewController. Thêm hàm init(direction: isPresentation)
Tiếp theo, vẫn trong file SlideInPresentationAnimator.swift chúng ta thêm UIViewControllerAnimatedTransitioning protocol cho SlideInPresentationAnimator và viết các hàm cho protocol này:
class SlideInPresentationAnimator: NSObject, UIViewControllerAnimatedTransitioning {

    let direction: PresentationDirection

    let isPresentation: Bool

    init(direction: PresentationDirection, isPresentation: Bool) {
        self.direction = direction
        self.isPresentation = isPresentation
        super.init()
    }
    // 1
    func transitionDuration(using transitionContext: UIViewControllerContextTransitioning?) -> TimeInterval {
        return 0.3
    }

    func animateTransition(using transitionContext: UIViewControllerContextTransitioning) {
        // 2
        let key = isPresentation ? UITransitionContextViewControllerKey.to : UITransitionContextViewControllerKey.from
        let controller = transitionContext.viewController(forKey: key)!

        // 3
        if isPresentation {
            transitionContext.containerView.addSubview(controller.view)
        }
        // 4
        let presentedFrame = transitionContext.finalFrame(for: controller)
        var dismissedFrame = presentedFrame
        switch direction {
        case .left:
            dismissedFrame.origin.x = -presentedFrame.width
        case .right:
            dismissedFrame.origin.x = transitionContext.containerView.frame.size.width
        case .top:
            dismissedFrame.origin.y = -presentedFrame.height
        case .bottom:
            dismissedFrame.origin.y = transitionContext.containerView.frame.size.height
        }

        // 5
        let initialFrame = isPresentation ? dismissedFrame : presentedFrame
        let finalFrame = isPresentation ? presentedFrame : dismissedFrame

        // 6
        let animationDuration = transitionDuration(using: transitionContext)
        controller.view.frame = initialFrame
        UIView.animate(withDuration: animationDuration, animations: {
            controller.view.frame = finalFrame
        }) { (finished) in
            transitionContext.completeTransition(finished)
        }

    }

}
- 1: set duration cho animation
- 2: từ giá trị isPresentation, chúng ta xác định được đây là quá trình present hay dismiss để lấy UIViewController cần tạo animation
- 3: nếu animation của chúng ta là present, chúng ta thêm UIView của UIViewController cần present vào containerView
- 4: chúng ta thiết lập giá trị cho frame của controller thời điểm đã hiển thị ra và thời điểm đã bị giấu đi, để từ các giá trị này chúng ta sẽ tạo animation
- 5: tuỳ vào quá trình là present hay dismiss, chúng ta tạo frame ban đầu và frame kết thúc của animation cho UIView
- 6: đây là đoạn code thực hiện animation. frame của UIView sẽ được animate từ giá trị ban đầu đến giá trị kết thúc của frame
OK, công việc của chúng ta đã sắp hoàn tất. Việc cuối cùng cần làm bây giờ là gán animation vừa tạo cho TransitioningDelegate của chúng ta. Mở file SlideInPresentationDelegate.swift và thêm 2 hàm sau:
func animationController(forPresented presented: UIViewController, presenting: UIViewController, source: UIViewController) -> UIViewControllerAnimatedTransitioning? {
    return SlideInPresentationAnimator(direction: direction, isPresentation: true)
}

func animationController(forDismissed dismissed: UIViewController) -> UIViewControllerAnimatedTransitioning? {
    return SlideInPresentationAnimator(direction: direction, isPresentation: false)
}
2 hàm bên trên được gọi khi bắt đầu quá trình present và dismiss UIViewController. Bên trong cả 2 hàm chúng ta trả về instance của SlideInPresentationAnimator, chỉ khác nhau ở giá trị isPresentation là true đối với quá trình present, false đối với quá trình dismiss.
Vậy là việc custom animation cho quá trình present UIViewController đã hoàn thành. Build và chạy thử project, các bạn sẽ thấy tuỳ vào hướng mà chúng ta chọn, UIViewController sẽ bay vào/bay ra theo hướng đó rất đẹp mắt. Tôi xin được kết thúc demo project ở đây
III. Kết luận
Trên đây, tôi đã giới thiệu đến các bạn UIPresentationController và cách để custom những cách mặc định iOS dùng để hiển thị UIViewController. Vẫn chỉ là hiển thị view ra, nhưng quá trình thực hiện rất lằng nhằng thay vì chỉ 1 dòng code mặc định từ iOS. Tuy nhiên, cái gì cũng có cái giá của nó, sau khi custom UIPresentationController, chúng ta có thể show/hide UIViewController của chúng ta theo bất kỳ cách nào chúng ta muốn, cũng đáng để làm đấy chứ 
Cuối cùng, tôi xin cảm ơn các bạn đã theo dõi bài viết này, have a nice day ^_^!
All rights reserved
