Tìm hiểu về các loại Layout trong Android
Bài đăng này đã không được cập nhật trong 7 năm
1. Frame Layout
Framelayout là dạng layout cơ bản nhất khi gắn các view lên layout này thì nó sẽ luôn giữ các view này ở phía góc trái màn hình và không cho chúng ta thay đồi vị trí của chúng, các view đưa vào sau sẽ đè lên view ở trước trừ khi bạn thiết lập transparent cho view sau đó.
<FrameLayout xmlns:android="http://schemas.android.com/apk/res/android"
    xmlns:tools="http://schemas.android.com/tools"
    android:layout_width="match_parent"
    android:layout_height="match_parent"
    tools:context=".MainActivity" >


    <TextView
        android:id="@+id/textView"
        android:layout_width="300dp"
        android:layout_height="300dp"
        android:background="@color/colorAccent"
        android:text="TextView" />

    <TextView
        android:id="@+id/textView2"
        android:layout_width="218dp"
        android:layout_height="221dp"
        android:background="@color/colorPrimaryDark" />
</FrameLayout>
kết quả
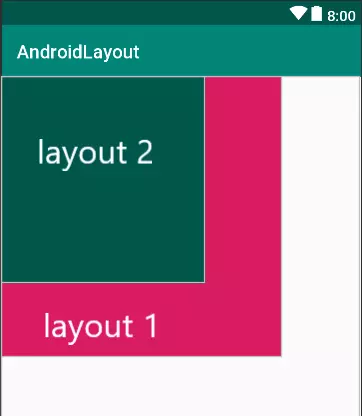 Trong ví dụ trên hình màu xanh đã nằm trên hình màu hồng và bạn sẽ chẳng thế thay đổi vị trí của các view này.
2. LinearLayout
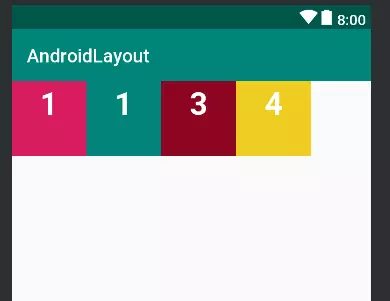
Linear Layout có lẽ là loại layout hay được sử dụng nhất vì tính đơn giản của nó. LinearLayout sẽ bố trí các view theo dạng khối và không đè lên nhau. Linear Layout có hai chiều bố trí bố cục là:
Vertical Orientation– các view bên trong sẽ được sắp xếp theo chiều dọcHorizontal Orientation– Tương tự nhưng theo chiều ngang
ví dụ: LinearLayout theo chiều ngang
code:
<LinearLayout
    xmlns:android1="http://schemas.android.com/apk/res/android"
    android1:layout_width="match_parent"
    android1:layout_height="match_parent"
    android1:orientation="horizontal" >

    <TextView
        android1:layout_width="80dp"
        android1:layout_height="80dp"
        android1:text="1"
        android1:textColor="#fff"
        android1:textSize="15pt"
        android1:textAlignment="center"
        android1:textStyle="bold"
        android1:background="@color/colorAccent" />

    <TextView
        android1:layout_width="80dp"
        android1:layout_height="80dp"
        android1:text="1"
        android1:textColor="#fff"
        android1:textSize="15pt"
        android1:textAlignment="center"
        android1:textStyle="bold"
        android1:background="@color/colorPrimary" />

    <TextView
        android1:layout_width="80dp"
        android1:layout_height="80dp"
        android1:text="3"
        android1:textColor="#fff"
        android1:textSize="15pt"
        android1:textAlignment="center"
        android1:textStyle="bold"
        android1:background="#8c0520" />

    <TextView
        android1:layout_width="80dp"
        android1:layout_height="80dp"
        android1:background="#efcd21"
        android1:text="4"
        android1:textAlignment="center"
        android1:textColor="#fff"
        android1:textSize="15pt"
        android1:textStyle="bold" />
</LinearLayout>
kết quả
3. Realative Layout
RelativeLayout là loại Layout mà trong đó vị trí của mỗi view con sẽ được xác định so với view khác hoặc so với thành phần cha của chúng thông qua ID. Bạn có thể sắp xếp 1 view ở bên trái, bên phải view khác hoặc ở giữa màn hình.
<RelativeLayout xmlns:android="http://schemas.android.com/apk/res/android"
    android:layout_width="match_parent"
    android:layout_height="match_parent">

    <TextView
        android:layout_width="150dp"
        android:layout_height="50dp"
        android:text="1"
        android:textColor="#fff"
        android:id="@+id/hop1"
        android:textSize="10pt"
        android:textAlignment="center"
        android:background="@color/colorAccent" />

    <TextView
        android:layout_width="150dp"
        android:layout_height="50dp"
        android:text="2"
        android:textColor="#fff"
        android:id="@+id/hop2"
        android:textSize="10pt"
        android:textAlignment="center"
        android:layout_toRightOf="@+id/hop1"
        android:background="@color/colorPrimary" />

    <TextView
        android:layout_width="150dp"
        android:layout_height="50dp"
        android:text="3"
        android:textColor="#fff"
        android:id="@+id/hop3"
        android:background="#8e0917"
        android:textSize="10pt"
        android:textAlignment="center"
        android:layout_below="@+id/hop1" />

    <TextView
        android:layout_width="150dp"
        android:layout_height="50dp"
        android:text="4"
        android:textColor="#fff"
        android:id="@+id/hop4"
        android:textSize="10pt"
        android:textAlignment="center"
        android:background="#edcb25"
        android:layout_below="@+id/hop2"
        android:layout_toRightOf="@+id/hop3" />
</RelativeLayout>
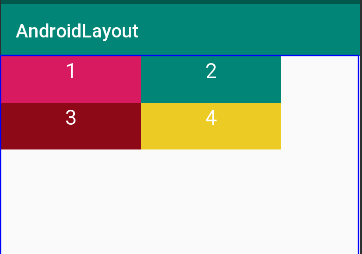
Như bạn thấy trong ví dụ trên tôi có 4 cái hộp với màu sắc khác nhau được sắp xếp cạnh nhau và mỗi hộp đều được gán id từ hop1->hop4 như bạn thấy hộp 2 ở bên phải hộp 1 nên tôi dùng thuộc tínhandroid:layout_toRightOf="@+id/hop1" để đưa hộp 2 về bên phải hộp 1 và bạn thấy hộp 4 nằm bên phải hộp 3 và dưới hộp 2 nên tôi sử dụng hai thuộc tính:
android:layout_below="@+id/hop2"
android:layout_toRightOf="@+id/hop3"
để đưa hộp 4 về bên trái hộp 3 và dưới hộp hai.
Bạn thấy trong thuộc tính android:layout_toRightOfcó giá trị là 1 id của một view vì Relative Layout sử dụng ID để xác định các vị trí của view với nhau mà.
4. TableLayout
Với TableLayout nó sẽ sắp xếp các View con bên trong thành dạng bảng. Mỗi hàng là một đối tượng view TableRow bên trong TableRow chứa các View con, mỗi View con này nằm ở vị trí một ô bảng (cell). Cột / hàng trong bảng bắt đầu từ số 0. Đầu tiên hãy thực hành một layout với TableLayout và TableRow
<TableLayout android:layout_height="match_parent"
    android:layout_width="match_parent"
    xmlns:android="http://schemas.android.com/apk/res/android">
    <TableRow>
        <TextView
            android:text="TableLayout Example"
            android:background="#c98282"
            android:gravity="center"/>
    </TableRow>

    <TableRow>
        <Button android:text="B1 B1" />
        <Button android:text="B2"/>
    </TableRow>

    <TableRow>
        <Button android:text="C1" />
        <Button android:text="C2" />
        <Button android:text="Cell example" />
    </TableRow>
</TableLayout>
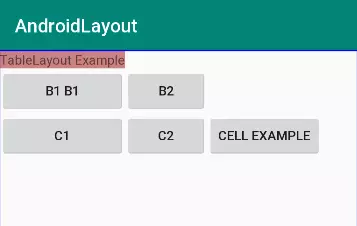 Nhìn vào ví dụ ta thấy:
- Giao diện có 3 hàng do có 3 TableRow
- Bảng này có 3 cột vì hàng có số phần tử con lớn nhất là 3
- Hàng 1 bỏ trống 2 cột cuối vì bên trong chỉ có 1 phần tử, tương tự hàng 2 bỏ trống cột 3
- Độ rộng của cột rộng bằng phần tử lớn nhất trong cột
- Các View trong TableRow không cần thiết lập chiều cao, chiều rộng vì nó sẽ tự động thiết lập rộng là match_parent, cao là wrap_content
5.GridLayout
GridLayout của Androidđơn giản chỉ là 1 layout dạng lưới và ta có thể chia các cột và dòng cho cái lưới đó, các view sẽ được dặt vào các ô trong cái lưới này.
<GridLayout
    xmlns:android1="http://schemas.android.com/apk/res/android"
    android1:layout_width="match_parent"
    android1:layout_height="match_parent"
    android1:columnCount="2"
    android1:rowCount="2"
    >
    <TextView
        android1:layout_width="80dp"
        android1:layout_height="80dp"
        android1:text="1"
        android1:textColor="#fff"
        android1:textSize="15pt"
        android1:textAlignment="center"
        android1:textStyle="bold"
        android1:background="@color/colorAccent" />

    <TextView
        android1:layout_width="80dp"
        android1:layout_height="80dp"
        android1:text="2"
        android1:textColor="#fff"
        android1:textSize="15pt"
        android1:textAlignment="center"
        android1:textStyle="bold"
        android1:background="@color/colorPrimary" />

    <TextView
        android1:layout_width="80dp"
        android1:layout_height="80dp"
        android1:text="3"
        android1:textColor="#fff"
        android1:textSize="15pt"
        android1:textAlignment="center"
        android1:textStyle="bold"
        android1:background="#8c0520" />

    <TextView
        android1:layout_width="80dp"
        android1:layout_height="80dp"
        android1:background="#efcd21"
        android1:text="4"
        android1:textAlignment="center"
        android1:textColor="#fff"
        android1:textSize="15pt"
        android1:textStyle="bold" />
</GridLayout>
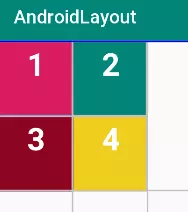
Đấy là GridLayout các view được đặt trong các ộ của Gridlayout và số cột cũng như dòng được qui định bằng hai thuộc tinh:
android:columnCount="2" // số hàng
android:rowCount="2" // số cột
Ngoài ra, Android còn có 1 layout nữa là ConstraintLayout. Tuy nhiên, mình sẽ giới thiệu riêng về layout này trong bài sau.
Cảm ơn các bạn đã theo dõi và hẹn gặp lại các bạn trong bài sau.
All rights reserved
