Tìm hiểu về angular
Bài đăng này đã không được cập nhật trong 5 năm
- Xin chào tất cả các mọi người, bài viết này mình xin trình bày về một số kiến thức về Angular
- Nêu mọi người ai đang và đã từng code với java hoặc C# mà giờ muốn tìm hiểu về một Framework font end thì không thể bỏ qua angular. Angular hiện tại nó được phát triển bởi Google với cú pháp sử dụng typescript
![]()

1) Angular là gì ?
- Angular là một Javascript Framework được tạo ra để xây dựng các ứng dụng web động (dynamic web app)
- Nó thường được sử dụng để tạo ra các ứng dụng một trang ( Single Page Application - SPA)
- Hoạt động dựa trên việc mở rộng thêm các thuộc tính (attribute) cho các thẻ của HTML
- Nó được phát triển lần đầu năm 2009 bởi Misko Hevery và Adam Abrons
- Hiện tại nó được duy trì bởi Google
2) Ưu điểm Angular
- Cung cấp khả năng tạo ra các Single Page Application một cách dễ dàng
- Cung cấp khả năng Data binding tới HTML do đó giúp người dùng cảm giác linh hoạt, thân thiện
- Dễ dàng Unit test
- Cung cấp khả năng tái sử dụng các component
- Lập trình viên sẽ viết ít code hơn, với nhiều chức năng hơn
3) cài đặt môi trường phát triển
3.1) Cài đặt nodejs
- tùy và hệ điều hành mà bạn đang sự dụng thì sẽ có các cách cài đặt nodejs khác nhau chi tiết về cài đặt các bạn có thể tham khảo tại đây
3.2) Cài đặt typescript
- sau khi cài đặt xong nodejs thì tiếp theo chúng ta cài đặt typescript
npm install -g typescript
3.3) Cài đặt angular cli
-
cài đặt angular cli:
- Giúp tạo nhanh một project angular
- Giúp tạo các thành phần trong angular
-
Cú pháp cài đặt
npm install -g @angular/cli
3.4) Khởi tạo project
- Để khởi tạo một project angular thì ta sử dụng câu lệnh sau
ng new project-name
3.5) chạy project
- Để chạy project angular ta sử dụng lệnh sau
ng serve --o
- sau khi chạy lên trên thì chúng ta sẽ có giao diện mặc định như sau
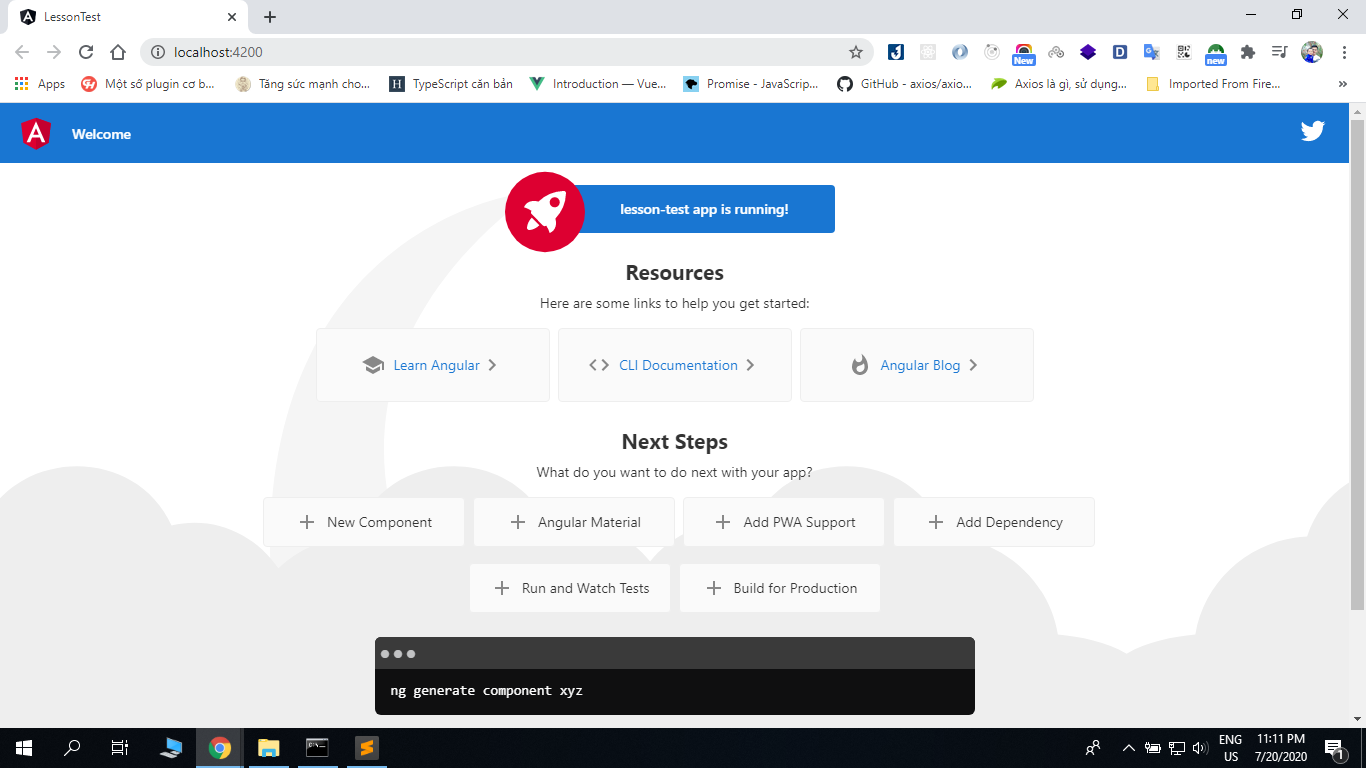
- Cổng mặc định khi chạy project angular là port 4200 giải sử port này ở trên máy tính của chúng ta đã bị một ứng dụng nào đó sử dụng thì ta có thể chạy lệnh sau để vừa chạy project vừa đổi port
ng serve --o --port 3000
4 ) Component trong angular
- Tiếp theo mình cùng tìm hiển một thành phần khá là quan trong trong angular đó là component
component là các khối lắp ghép xây dựng lên ứng dụng Angular , giúp tạo ra các thẻ html do mình định nghĩa
Một component thành lập bởi ít nhất một thành phần code html gọi là template, một class typescript dữ liệu, xử lý và tương tác với template , và selector (tên phần tử custom) + css
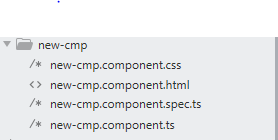
- Để tạo ra nhanh một component trong angular ta sử dụng lệnh sau
ng g c component-name
- Sau khi chạy lệnh trên thì ta sẽ tạo ra được một component có cấu trúc như sau :
-
trong đó :
- new-cmp.component.css − file css của component
- new-cmp.component.html − file html của component.
- new-cmp.component.spec.ts − file sử dụng cho unit test.
- new-cmp.component.ts − file định nghĩa các module, thuộc tính cho component
4.1) cấu trúc của component
- new-cmp.component.ts
import { Component, OnInit } from '@angular/core';

@Component({
  // Khai báo selector cho component new-cmp
   selector: 'new-cmp', //
   templateUrl: './new-cmp.component.html', // Khai báo file html mà component new-cmp "đại diện"
   styleUrls: ['./new-cmp.component.css'] // Khai báo file style sử dụng
})

export class NewCmpComponent implements OnInit {
   ngOnInit() {}
}
- new-cmp.component.html
<h1 class="text-large text-red">hello</h1>
- new-cmp.component.css
.text-large{
    font-size: 1.9rem;
}

.text-red{
    color:red;
}
5) Data binding
- Để hiển thị được dữ liệu từ component (source) sang template (view) ta có một số cách sau:
5.1) interpolation : {{value}}
- Sử dụng interpolation để hiển thị dữ liệu thì ta có thể hiển thị dữ liệu của một string, number, phép toán diều kiện 3 ngôi, 1 phương thức, 1 geter, 1 nullable, để hiển thị , hiển thị 1 hình ảnh, video, đường link
- Ví dụ
- file component-to-view.component.ts
import { Component, OnInit } from '@angular/core';

@Component({
    selector: 'component-to-view',
    templateUrl: './component-to-view.component.html',
    styleUrls: ['./component-to-view.component.css']
})
export class ComponentToViewComponent implements OnInit {
    public name: string = 'ahihi'; // dữ liệu muốn hiển thị sang view (file html)

    constructor() { }

    ngOnInit(): void {
    }
}
- file component-to-view.component.html
<h3>Họ Tên : {{ name }}</h3>
- sau đó ta qua file app.component.html gọi đến component vừa định nghĩa để nó được hiển thị ra ngoài trang web
<component-to-view></ component-to-view>
- Kết quả ta sẽ được

5.2) Property : [Property-name]="value"
- Ví dụ
file component-to-view.component.ts
import { Component, OnInit } from '@angular/core';

@Component({
    selector: 'component-to-view',
    templateUrl: './component-to-view.component.html',
    styleUrls: ['./component-to-view.component.css']
})
export class ComponentToViewComponent implements OnInit {
    public imgLink : string = "https://image.shutterstock.com/image-photo/bright-spring-view-cameo-island-260nw-1048185397.jpg"; // dữ liệu muốn hiển thị sang view (file html)

    constructor() { }

    ngOnInit(): void {
    }
}
- file component-to-view.component.html
<img [src]="imageLink" width="200" [alt]="'hinh anh'">
5.3) Attribute : [attr.attribute_name]="value"
- Ví dụ: file component-to-view.component.ts
import { Component, OnInit } from '@angular/core';

@Component({
    selector: 'component-to-view',
    templateUrl: './component-to-view.component.html',
    styleUrls: ['./component-to-view.component.css']
})
export class ComponentToViewComponent implements OnInit {
    public tbBorder : number = 1; // dữ liệu muốn hiển thị sang view

    constructor() { }

    ngOnInit(): void {
    }
}
file component-to-view.component.html
<table [attr.border]="tbBorder" [attr.width]="tbWidth">
    <tr>
        <td>ID</td>
        <td>Họ Tên</td>
        <td>SDT</td>
    </tr><tr>
        <td>1</td>
        <td>ahihi123</td>
        <td>123456789</td>
    </tr>
</table>
5.4) class binding : [class.class_name]="value"
- Ví dụ: file component-to-view.component.ts
import { Component, OnInit } from '@angular/core';

@Component({
    selector: 'component-to-view',
    templateUrl: './component-to-view.component.html',
    styleUrls: ['./component-to-view.component.css']
})
export class ComponentToViewComponent implements OnInit {
   public isBorder : boolean = true; // dữ liệu muốn hiển thị sang view

    constructor() { }

    ngOnInit(): void {
    }
}
file component-to-view.component.html
<table [class.table-bordered]="isBorder">
    <tr>
        <td>ID</td>
        <td>Họ Tên</td>
        <td>SDT</td>
    </tr><tr>
        <td>1</td>
        <td>ahihi123</td>
        <td>123456789</td>
    </tr>
</table>
5.5) Style binding : [style.style_name]="value"
- Ví dụ: file component-to-view.component.ts
import { Component, OnInit } from '@angular/core';

@Component({
    selector: 'component-to-view',
    templateUrl: './component-to-view.component.html',
    styleUrls: ['./component-to-view.component.css']
})
export class ComponentToViewComponent implements OnInit {
    public isSpecial : boolean = true; // dữ liệu muốn hiển thị sang view
    public size : number = 20; // dữ liệu muốn hiển thị sang view

    constructor() { }

    ngOnInit(): void {
    }
}
file component-to-view.component.html
<div
    [style.background-color]="isSpecial ? 'red' : 'yellow'"
    [style.color]="'white'"
    [style.font-size.px]="size"
>
    Angular
</div>
6) Event binding
-
Để lấy dữ liệu từ template (view) sang component (source) ta sử dụng Event binding
-
Event Binding
- Bắt các sự kiện của người dùng
- Ví dụ nhứ : click, keyup, dbclick, keyup.enter
-
Ví dụ :
file view-to-component.component.ts
import { Component, OnInit } from '@angular/core';

@Component({
    selector: 'view-to-component',
    templateUrl: './view-to-component.component.html',
    styleUrls: ['./view-to-component.component.css']
})
export class ViewToComponentComponent implements OnInit {
    public title: string = 'Event Binding';

    constructor() { }

    ngOnInit(): void {
    }

    onClickMe(event) {
        // code để xử lý sự kiện khi người dùng click vào button
        console.log(event.target.innerText)
    }
}
file view-to-component.component.html
<h1>{{title}}</h1>
<button type="button" class="btn btn-primary" (click)="onClickMe($event)">
	Click Me !!!
</button>
Kết bài
- Angular là một javascript Framework mạnh mẽ được rất là nhiều người sử dụng
- Phía trên là một số kiến thức mình tìm hiểu được liên quan cài đặt , khởi tạo project, component, data binding và event binding trong angular, Cám ơn mọi người đã theo dõi.
nguồn tham khảo
All rights reserved
