Tích hợp Kotlin vào ứng dụng iOS và Android
Bài đăng này đã không được cập nhật trong 6 năm
Ngày nay, Kotlin càng ngày càng phổ biến và đang dần thay thế cho Java trở thành ngôn ngữ chính cho phát triển ứng dụng Android. Tuy vậy, Kotlin được sinh ra còn có thể làm được nhiều hơn vậy - Kotlin là 1 ngôn ngữ có thể lập trình đa nền tảng. Làm việc trên tất cả các nền tảng là một mục tiêu rõ ràng được đưa ra bởi Kotlin. Với sự hỗ trợ cho JVM, Android, JavaScript, iOS, Linux, Windows, Mac và thậm chí các hệ thống nhúng như STM32, Kotlin có thể xử lý bất kỳ và tất cả các thành phần của một ứng dụng hiện đại. Và điều này mang lại lợi ích vô giá của việc tái sử dụng code, tiết kiệm công sức cho những công việc nhiều thách thức hơn. 
Triết lý của Kotlin là bạn không phải di chuyển toàn bộ ứng dụng. Bắt đầu với một module hoặc tính năng duy nhất, xem cách nó hoạt động, và sau đó dần dần di chuyển các phần khác khi bạn thấy phù hợp. Một hình dung cụ thể đó là bạn hoàn toàn có thể code song song giữa Java và Kotlin trong cùng 1 project. Bạn có thể thử convert 1 số class sang thử Kotlin, sau đó, nếu phù hợp có thể chuyển dần sang cả project...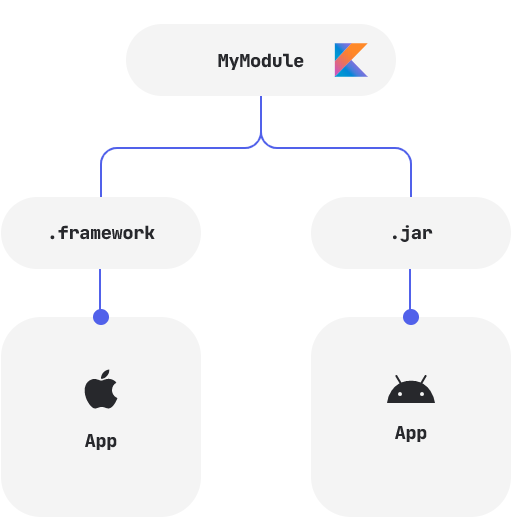
Trong bài viết này, mình sẽ giới thiệu cách tạo 1 ứng dụng cho cả Android và iOS, sử dụng khả năng chia sẻ mã của Kotlin. Đối với Android, chúng ta sẽ dùng Kotlin/JVM, còn iOS chúng ta sẽ dùng Kotlin/Native.
Yêu cầu cần sử dụng Kotlin 1.3.50 trở lên và macOS để build ứng dụng iOS
1. Khởi tạo Mobile Shared Library
Sau khi khởi tạo xong 1 project "Hello World" của Android, tiếp đến chúng ta sẽ khởi tạo 1 module chia sẻ dùng chung cho cả Android và iOS. Bạn có thể tạo nó với IntelliJ IDEA 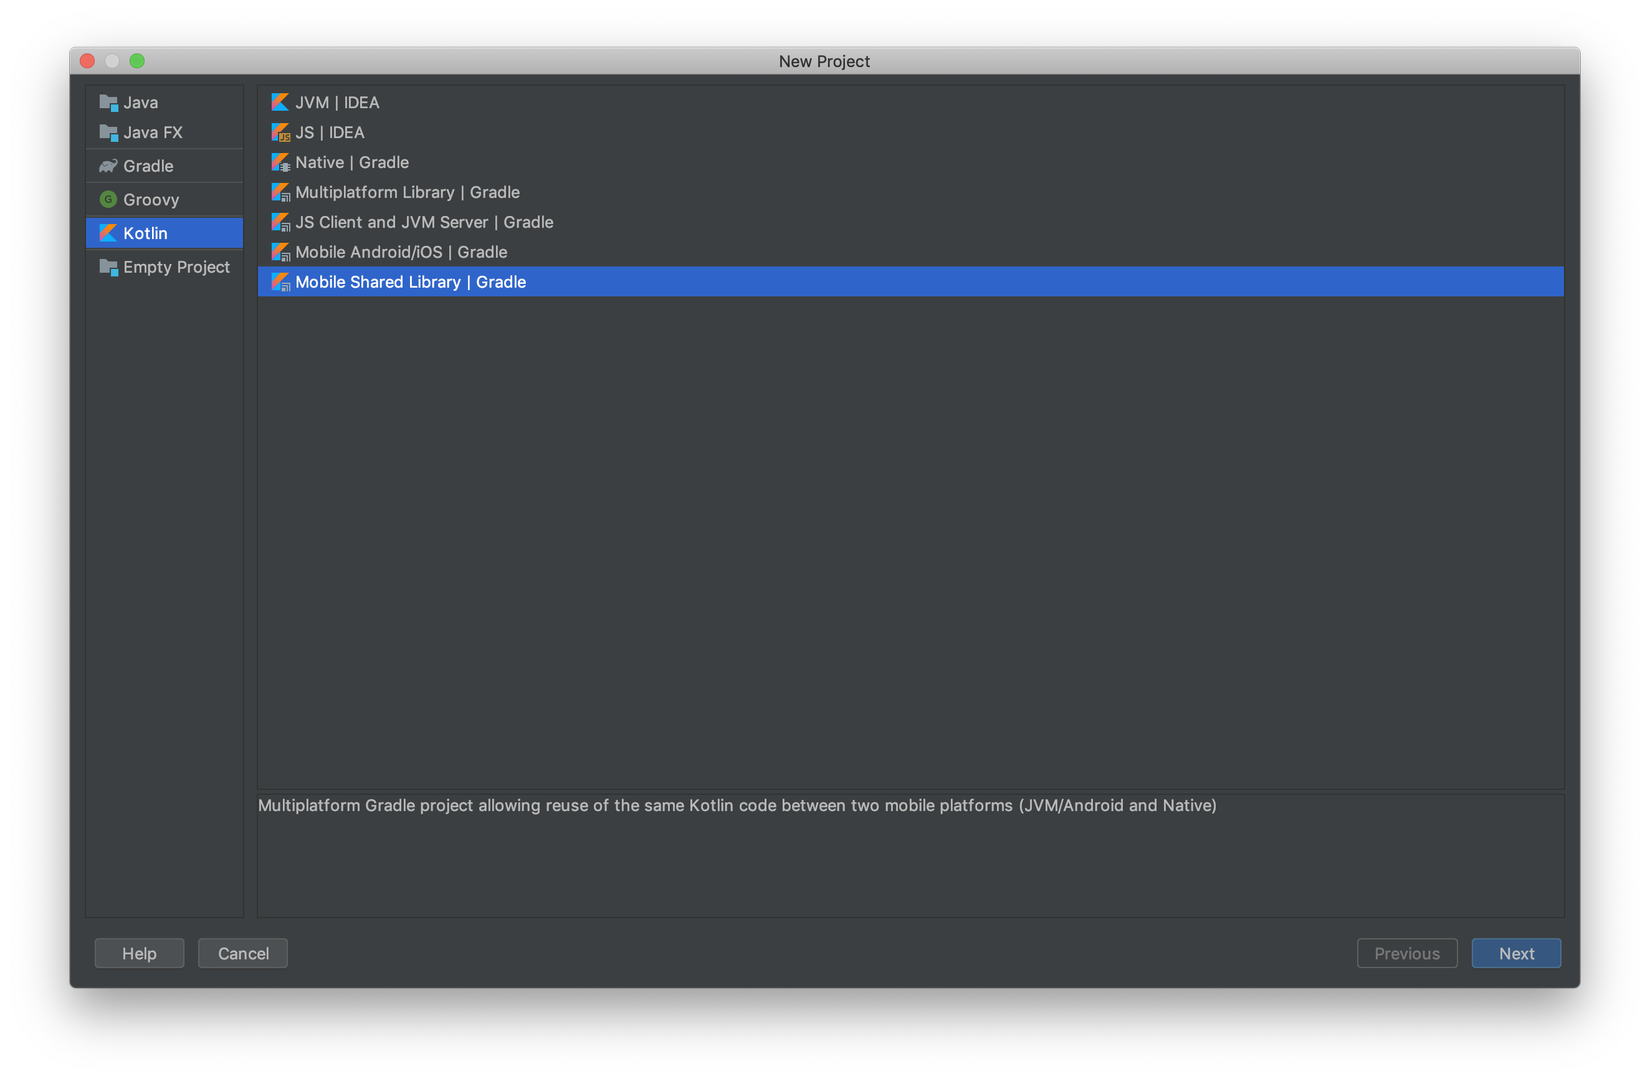
Hoặc 1 tips đơn giản là bạn có thể new module hoặc new library trong Android Studio rồi xoá hết các file đi, chúng ta sẽ cùng tạo lại mới 
Ở đây, mình sẽ tạo ra 1 module tên là "manhndmodule" -> Include vào settings.gradle
include ':app', ':manhndmodule'
1.1 Cấu hình build gradle
Tạo file manhndmodule/build.gradle.kts
import org.jetbrains.kotlin.gradle.plugin.mpp.KotlinNativeTarget

plugins {
    kotlin("multiplatform")
}

kotlin {
    //select iOS target platform depending on the Xcode environment variables
    val iOSTarget: (String, KotlinNativeTarget.() -> Unit) -> KotlinNativeTarget =
        if (System.getenv("SDK_NAME")?.startsWith("iphoneos") == true)
            ::iosArm64
        else
            ::iosX64

    iOSTarget("ios") {
        binaries {
            framework {
                baseName = "manhndModule"
            }
        }
    }

    jvm("android")

    sourceSets["commonMain"].dependencies {
        implementation("org.jetbrains.kotlin:kotlin-stdlib-common")
    }

    sourceSets["androidMain"].dependencies {
        implementation("org.jetbrains.kotlin:kotlin-stdlib")
    }
}


val packForXcode by tasks.creating(Sync::class) {
    group = "build"

    //selecting the right configuration for the iOS framework depending on the Xcode environment variables
    val mode = System.getenv("CONFIGURATION") ?: "DEBUG"
    val framework = kotlin.targets.getByName<KotlinNativeTarget>("ios").binaries.getFramework(mode)

    inputs.property("mode", mode)
    dependsOn(framework.linkTask)

    val targetDir = File(buildDir, "xcode-frameworks")
    from({ framework.outputDirectory })
    into(targetDir)

    doLast {
        val gradlew = File(targetDir, "gradlew")
        gradlew.writeText("#!/bin/bash\nexport 'JAVA_HOME=${System.getProperty("java.home")}'\ncd '${rootProject.rootDir}'\n./gradlew \$@\n")
        gradlew.setExecutable(true)
    }
}

tasks.getByName("build").dependsOn(packForXcode)
2.2 Thêm source code Kotlin
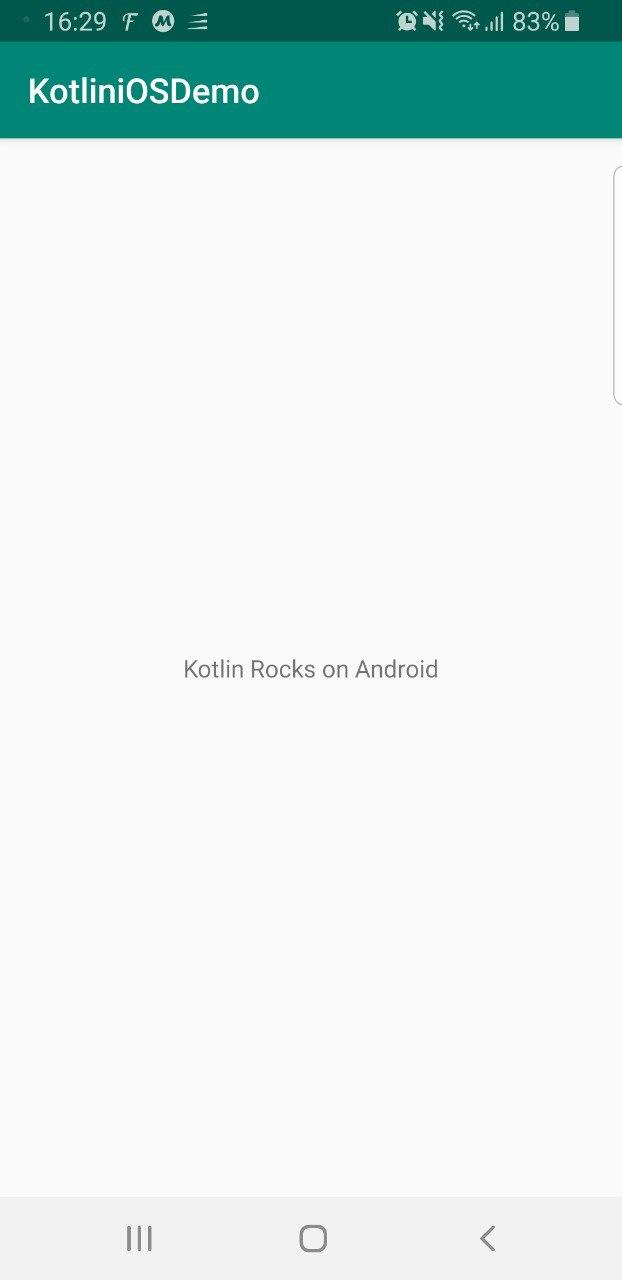
Ý tưởng của Project này là tạo ra 1 ứng dụng hiển thị text đơn giản: Kotlin Rocks on Android và Kotlin Rocks on iOS tương ứng với các nền tảng.
Hãy đảm bảo bạn đang có những folder tương ứng với cấu hình source set trong gradle của bạn
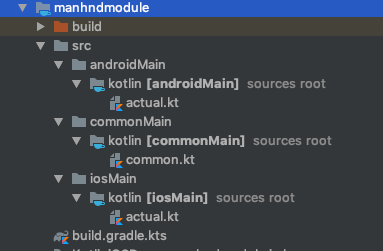
Tạo mới file manhndmodule/src/commonMain/kotlin/common.kt:
package com.manhnd.kotliniosdemo

expect fun platformName(): String

fun createApplicationScreenMessage(): String {
    return "Kotlin Rocks on ${platformName()}"
}
Đây chính là phần xử lý chung cho các nền tảng. Ta có thể thấy, ở đây chúng ta đang tạo ra 1 method của Kotlin là createApplicationScreenMessage có return về 1 String tương ứng với platformName. Nhìn vào đây chúng dễ dàng có thể đoán ra đc từ khoá expect chính là method xử lý riêng cho từng nền tảng, vậy nó đang return ra cái gì?
Bây giờ chúng ta cần thêm những file tương ứng vào các folder androidMain và iosMain
manhndmodule/src/androidMain/kotlin/actual.kt:
package com.manhnd.kotliniosdemo

actual fun platformName(): String {
    return "Android"
}
manhndmodule/src/iosMain/kotlin/actual.kt:
package com.manhnd.kotliniosdemo

import platform.UIKit.UIDevice

actual fun platformName(): String {
    return UIDevice.currentDevice.systemName() +
            " " +
            UIDevice.currentDevice.systemVersion
}
Ở đây chúng ta có thể sử dụng lớp UIDevice từ Apple UIKit Framework của Apple, không có sẵn trong Java, nó chỉ có thể sử dụng được trong Swift và Objective-C. Trình biên dịch Kotlin/Native đi kèm với một bộ framework được nhập trước, vì vậy chúng ta có thể sử dụng UIKit Framework mà không phải thực hiện thêm bước nào.
2. Tích hợp vào Android Project
Module Kotlin tích hợp vào project Android rất dễ dàng. Chúng ta chỉ cần implementation module vào app/build.gradle
implementation project(':manhndmodule')
Ở trong file activity_main.xml, chúng ta sẽ thêm 1 TextView để hiển thị
<?xml version="1.0" encoding="utf-8"?>
<androidx.constraintlayout.widget.ConstraintLayout xmlns:android="http://schemas.android.com/apk/res/android"
    xmlns:app="http://schemas.android.com/apk/res-auto"
    xmlns:tools="http://schemas.android.com/tools"
    android:layout_width="match_parent"
    android:layout_height="match_parent"
    tools:context=".MainActivity">

    <TextView
        android:id="@+id/main_text"
        android:layout_width="wrap_content"
        android:layout_height="wrap_content"
        android:text="Hello World by ManhND!"
        app:layout_constraintBottom_toBottomOf="parent"
        app:layout_constraintLeft_toLeftOf="parent"
        app:layout_constraintRight_toRightOf="parent"
        app:layout_constraintTop_toTopOf="parent" />

</androidx.constraintlayout.widget.ConstraintLayout>
Gọi Module Kotlin trong MainActivity.kt
package com.manhnd.kotliniosdemo

import android.os.Bundle
import android.widget.TextView
import androidx.appcompat.app.AppCompatActivity

class MainActivity : AppCompatActivity() {

    override fun onCreate(savedInstanceState: Bundle?) {
        super.onCreate(savedInstanceState)
        setContentView(R.layout.activity_main)
        findViewById<TextView>(R.id.main_text).text = createApplicationScreenMessage()
    }
}
Kết quả:
3. Tích hợp vào iOS Project
Chúng ta có thể bắt đầu bằng cách mở Xcode và chọn tùy chọn Tạo dự án Xcode mới
Chúng ta cần chạy lệnh ./gradlew :SharedCode:packForXcode trước. Nhiệm vụ này được thiết kế để giúp đơn giản hóa việc thiết lập iOS Framework trong Xcode project model.
3.1 Setting up Xcode
Chúng ta cần add "manhndmodule" framework vào Xcode Project

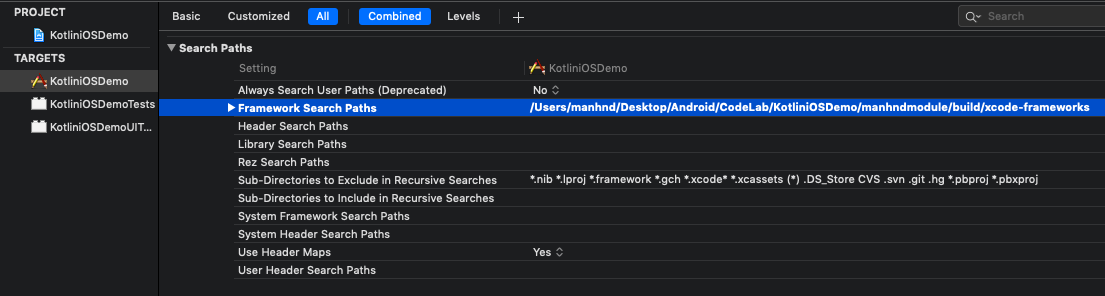
Bây giờ chúng ta cần "giải thích" cho XCode, nơi có thể tìm thấy framework. Tại Build Settings, tìm đến Framework Search Paths
Bước cuối cùng là gọi tới Gradle build để chuẩn bị trước "manhndmodule" framework trước mỗi lần chạy. Tại Build Phases, add New Run Script Phase và kéo thả nó tới vị trí đầu tiên và thêm đoạn script như sau:
cd /Users/manhnd/Desktop/Android/CodeLab/KotliniOSDemo/manhndmodule/build/xcode-frameworks
./gradlew :manhndModule:packForXcode

Bạn cũng có thể dùng đường dẫn tương đối là $SRCROOT/../.. để trỏ tới Gradle project
Bạn nên kéo Run Script lên đầu danh sách
3.2 Gọi Kotlin code từ Swift
Chúng ta sẽ tạo 1 UILabel ở ViewController.swift
import UIKit
import manhndModule
class ViewController: UIViewController {

    override func viewDidLoad() {
        super.viewDidLoad()
        // Do any additional setup after loading the view.
        let label = UILabel(frame: CGRect(x: 0, y: 0, width: 300, height: 21))
        label.center = CGPoint(x: 160, y: 285)
        label.textAlignment = .center
        label.font = label.font.withSize(25)
        label.text = CommonKt.createApplicationScreenMessage()
        view.addSubview(label)
    }
}
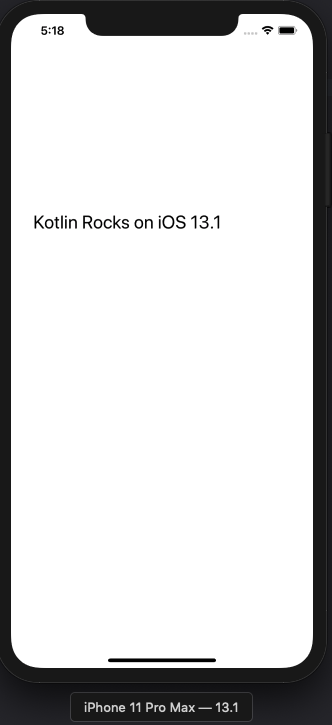
Kết quả:
4. Tham khảo
Bạn có thể tìm hiểu thêm tại https://play.kotlinlang.org/hands-on/Targeting iOS and Android with Kotlin Multiplatform/01_Introduction https://github.com/kotlin-hands-on/mpp-ios-android/tree/master https://kotlinlang.org/docs/reference/multiplatform.html
All rights reserved
