Terraform Series - Bài 4 - Terraform functional programming
Bài viết cập nhật mới
Giới thiệu
Chào các bạn tới với series về Terraform. Ở bài trước chúng ta đã nói về cách làm sao để khởi tạo workspace để provisioning một infrastructure và về life cycle của một resource trong terraform. Ở bài này chúng ta sẽ tìm hiểu về cách làm sao để lập trình trong terraform.
Terraform hỗ trợ ta lập trình theo cách functional programming, và ta sẽ nói qua cách sử dụng các function trong terraform, expressions xài ra sao, ...
Provisioning EC2
Ta sẽ làm ví dụ về EC2 để tìm hiểu về các khái niệm trên. Tạo một file tên là main.tf
provider "aws" {
  region = "us-west-2"
}

data "aws_ami" "ubuntu" {
  most_recent = true

  filter {
    name   = "name"
    values = ["ubuntu/images/hvm-ssd/ubuntu-focal-20.04-amd64-server-*"]
  }

  owners = ["099720109477"]
}

resource "aws_instance" "hello" {
  ami           = data.aws_ami.ubuntu.id
  instance_type = "t2.micro"
}
Chạy terraform init và terraform apply, sau đó lên AWS ta sẽ thấy EC2 của ta. Với đoạn code trên thì EC2 của ta luôn luôn có instance_type là t2.micro, và nếu ta muốn tạo lại EC2 mà sẽ có instance_type khác mạnh hơn thì làm sao? Ta sẽ sửa lại code trong file terraform? Vậy thì không linh hoạt cho lắm, mà thay vào đó ta sẽ sử dụng variable để làm việc này.
Input Variables
Ta có thể định nghĩa variable bên trong terraform, với cú pháp như sau.
Ta sẽ dùng variable block để khai báo variable, và theo sau nó là tên của variable đó. Ở ví dụ trên, ta tạo thêm một file nữa với tên là variable.tf (này bạn đặt tên gì cũng được nha) để khai báo biến của ta.
variable "instance_type" {
  type = string
  description = "Instance type of the EC2"
}
Thuộc tính là type để chỉ định type của biến đó, thuộc tính description dùng để ghi lại mô tả cho người đọc biến đó có ý nghĩa gì. Chỉ có thuộc tính type là bắt buộc phải khai báo. Trong terraform thì một biến sẽ có các type sau đây:
- Basic type: string, number, bool
- Complex type: list(), set(), map(), object(), tuple()
Trong terraform, type number và type bool sẽ được convert thành type string khi cần thiết. Nghĩa là 1 sẽ thành "1", true sẽ thành "true"
Để truy cập được giá trị của variable thì ta sẽ dùng theo cú pháp sau var.<VARIABLE_NAME>, cập nhật lại file main.tf
provider "aws" {
  region = "us-west-2"
}

data "aws_ami" "ubuntu" {
  most_recent = true

  filter {
    name   = "name"
    values = ["ubuntu/images/hvm-ssd/ubuntu-focal-20.04-amd64-server-*"]
  }

  owners = ["099720109477"]
}

resource "aws_instance" "hello" {
  ami           = data.aws_ami.ubuntu.id
  instance_type = var.instance_type # change here
}
Ở thuộc tính instance_type thay vì gán cứng thì bây giờ ta sẽ dùng biến var.instance_type.
Gán giá trị cho variable
Để gán giá trị cho biến, ta sẽ tạo một file tên là terraform.tfvars
instance_type = "t2.micro"
Khi ta chạy terraform apply thì file terraform.tfvars sẽ được terraform sử dụng mặc định để load giá trị cho biến, nếu ta không muốn dùng mặc định, thì khi chạy câu lệnh apply ta thêm vào option là -var-file nữa. Tạo một file tên là production.tfvars
instance_type = "t3.small"
Khi chạy CI/CD cho production, ta chỉ định file variable như sau:
terraform apply -var-file="production.tfvars"
Bây giờ thì giá trị instance_type của ta sẽ linh hoạt hơn nhiều.
Validating variables
Ta cũng có thể định nghĩa biến này chỉ có thể được gán những giá trị mà ta cho phép bằng cách sử dùng thuộc tính validating, như sau:
variable "instance_type" {
  type = string
  description = "Instance type of the EC2"

  validation {
    condition = contains(["t2.micro", "t3.small"], var.instance_type)
    error_message = "Value not allow."
  }
}
Ở file trên ta sẽ dùng function contains để kiểm tra giá trị của biến instance_type này chỉ được nằm trong mảng array ta cho phép, nếu không thì khi ta chạy câu lệnh apply bạn sẽ thấy lỗi là ở trường error_message được in ra. Sửa lại file terraform.tfvars
instance_type = "t3.micro"
Chạy terraform apply.
$ terraform apply
╷
│ Error: Invalid value for variable
│
│   on variable.tf line 1:
│    1: variable "instance_type" {
│
│ Value not allow.
│
│ This was checked by the validation rule at variable.tf:5,3-13.
╵
Sử dụng validating để kiểm soát giá trị của biến mà bạn muốn. Sửa lại file terraform.tfvars như cũ nhé. Thông thường khi tạo EC2 xong, ta sẽ muốn xem địa chỉ IP của nó, để làm được việc đó thì ta sử dụng output block.
Output
Giá trị của output block sẽ được in ra terminal, cú pháp của output như sau.

Để in được giá trị public IP của EC2, ta thêm vào file main.tf đoạn code sau:
...

output "ec2" {
  value = {
    public_ip = aws_instance.hello.public_ip
  }
}
Bạn chạy lại câu lệnh apply, ta sẽ thấy giá trị IP của EC2 được in ra terminal.
$ terraform apply -auto-approve
...

Apply complete! Resources: 1 added, 0 changed, 0 destroyed.

Outputs:

ec2 = {
  "public_ip" = "52.36.124.230"
}
Oke, bây giờ thì ta đã biết cách sử dụng varibale và output. Tiếp theo, nếu ta muốn thêm một EC2 nữa thì sao? Trong file main.tf ta sẽ copy ra thêm một EC2 nữa, như sau:
provider "aws" {
  region = "us-west-2"
}

data "aws_ami" "ubuntu" {
  most_recent = true

  filter {
    name   = "name"
    values = ["ubuntu/images/hvm-ssd/ubuntu-focal-20.04-amd64-server-*"]
  }

  owners = ["099720109477"]
}

resource "aws_instance" "hello1" {
  ami           = data.aws_ami.ubuntu.id
  instance_type = var.instance_type
}

resource "aws_instance" "hello2" {
  ami           = data.aws_ami.ubuntu.id
  instance_type = var.instance_type
}

output "ec2" {
  value = {
    public_ip1 = aws_instance.hello1.public_ip
    public_ip2 = aws_instance.hello2.public_ip
  }
}
Ta sẽ thêm một resource block cho EC2 thứ hai, và ở phần output, ta cập nhật lại để nó có thể in ra được IP của hai con EC2. Mọi thứ đều không có gì phức tạp hết, nhưng nếu giờ ta muốn 100 con EC2 thì sao? Ta có thể copy ra 100 resource block, nhưng không ai làm vậy 😂, mà ta sẽ sử dụng count parameter.
Count parameter
Count là một meta argument, là một thuộc tính trong terraform chứ không phải của resource type thuộc provider, ở bài 1 ta đã nói resource type block chỉ có chứa các thuộc tính mà provider cung cấp cho, còn meta argument là thuộc tính của terraform => nghĩa là ta có thể sử dụng nó ở bất kì resource block nào. Cập nhật lại file main.tf mà sẽ tạo ra 5 EC2 như sau:
provider "aws" {
  region = "us-west-2"
}

data "aws_ami" "ubuntu" {
  most_recent = true

  filter {
    name   = "name"
    values = ["ubuntu/images/hvm-ssd/ubuntu-focal-20.04-amd64-server-*"]
  }

  owners = ["099720109477"]
}

resource "aws_instance" "hello" {
  count         = 5
  ami           = data.aws_ami.ubuntu.id
  instance_type = var.instance_type
}

output "ec2" {
  value = {
    public_ip1 = aws_instance.hello[0].public_ip
    public_ip2 = aws_instance.hello[1].public_ip
    public_ip3 = aws_instance.hello[2].public_ip
    public_ip4 = aws_instance.hello[3].public_ip
    public_ip5 = aws_instance.hello[4].public_ip
  }
}
Bây giờ thì khi ta chạy apply, terraform sẽ tạo ra cho ta 5 EC2. Bạn sẽ để ý là ở phần output, để truy cập được resource, thì ta sẽ dùng thêm dấu [] và giá trị index của resource. Bình thường, để truy cập được resource, ta dùng theo cú pháp <RESOURCE TYPE>.<NAME>, nhưng khi ta dùng count thì ta sẽ truy cập resource theo cú pháp sau <RESOURCE TYPE>.<NAME>[index].
Bây giờ ta đã giải quyết được vấn đề copy resource ra khi cần tạo nó với số lượng nhiều hơn, nhưng ở phần output, ta vẫn phải ghi ra từng resource riêng lẻ. Ta sẽ giải quyết nó bằng cách sử dụng for expressions.
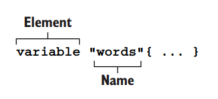
For expressions
For cho phép ta duyệt qua một list, cú pháp của lệnh for như sau:
for <value> in <list> : <return value>
Ví dụ dùng for:
- Tạo ra một array mới với giá trị của array mới sẽ được upper:
[for s in var.words : upper(s)] - Tạo ra một object mới với value của object được upper:
{ for k, v in var.words : k => upper(s) }
Ta sẽ dùng for để rút gọn phần output IP của EC2. Cập nhật lại file main.tf
...

resource "aws_instance" "hello" {
  count         = 5
  ami           = data.aws_ami.ubuntu.id
  instance_type = var.instance_type
}

output "ec2" {
  value = {
    public_ip = [ for v in aws_instance.hello : v.public_ip ]
  }
}
Phần output trên sẽ in ra cho ta giá trị public_ip là một mảng IP của tất cả EC2 được tạo ra. Còn nếu bạn muốn in output ra theo kiểu { public_ip1: <value>, public_ip2: <value> } thì ta có thể dùng format function.
Format function
Hàm format sẽ giúp ta nối chuỗi theo dạng ta muốn, cập nhật output lại như sau:
...

resource "aws_instance" "hello" {
  count         = 5
  ami           = data.aws_ami.ubuntu.id
  instance_type = var.instance_type
}

output "ec2" {
  value = { for i, v in aws_instance.hello : format("public_ip%d", i + 1) => v.public_ip }
}
Khi bạn terraform plan để kiểm tra, sẽ thấy output lúc này sẽ là dạng { public_ip1: <value>, public_ip2: <value> }.
$ terraform plan
...
Changes to Outputs:
  + ec2 = {
      + public_ip1 = (known after apply)
      + public_ip2 = (known after apply)
      + public_ip3 = (known after apply)
      + public_ip4 = (known after apply)
      + public_ip5 = (known after apply)
    }

────────────────────────────────────────────────────────────────────────────────────────────────────────────────────────────

Note: You didn't use the -out option to save this plan, so Terraform can't guarantee to take exactly these actions if you
run "terraform apply" now.
Tới đây thì ta đã biết được cách xài một số cú pháp đơn giản, tiếp theo mình sẽ chuyển sang ví dụ về S3 để nói thêm về một số function hay được sử dụng nữa.
Provisioning S3
Ở ví dụ này ta sẽ tạo một S3 bucket để host một static website.
Tạo folder mới và tạo một file main.tf
provider "aws" {
  region = "us-west-2"
}

resource "aws_s3_bucket" "static" {
  bucket = "terraform-series-bai3"
  acl    = "public-read"
  policy = <<POLICY
  {
    "Version": "2012-10-17",
    "Statement": [
      {
        "Sid": "PublicReadGetObject",
        "Effect": "Allow",
        "Principal": "*",
        "Action": [
          "s3:GetObject"
        ],
        "Resource": [
          "arn:aws:s3:::terraform-series-bai3/*"
        ]
      }
    ]
  }
  POLICY

  website {
    index_document = "index.html"
    error_document = "error.html"
  }
}
Chạy terraform init và terraform apply, sau đó bạn sẽ thấy S3 bucket của ta trên AWS.

Ở file trên bạn sẽ thấy là phần policy nó hơi dài, và nó là dạng chuỗi json, nên config file của ta hơi khó nhìn, ta có thể tách phần policy ra một file json riêng, và dùng function trong terrafrom để import file policy đó vào config file của ta.
File function
File function sẽ giúp ta tải nội dung của một file nào đó vào bên trong config file của terraform. Tạo một file tên là s3_static_policy.json và copy đoạn json trên vào.
{
  "Version": "2012-10-17",
  "Statement": [
    {
      "Sid": "PublicReadGetObject",
      "Effect": "Allow",
      "Principal": "*",
      "Action": [
        "s3:GetObject"
      ],
      "Resource": [
        "arn:aws:s3:::terraform-series-bai3/*"
      ]
    }
  ]
}
Cập nhật lại main.tf
provider "aws" {
  region = "us-west-2"
}

resource "aws_s3_bucket" "static" {
  bucket = "terraform-series-bai3"
  acl    = "public-read"
  policy = file("s3_static_policy.json")

  website {
    index_document = "index.html"
    error_document = "error.html"
  }
}
Như bạn thấy thì khi để policy vào một file khác và dùng file function import vào, thì file terraform của ta nhìn gọn hơn nhiều. Tiếp theo ta sẽ tiến hành upload file lên s3 bucket và truy vập vào URL thì ta sẽ thấy được trang web của ta. Trang web mà ta host sẽ có giao diện như sau.

Các bạn clone source code ở đây nhé https://github.com/hoalongnatsu/static-web.git, sau khi clone xong thì nhớ xóa file .git đi.
rm -rf static-web/.git
Thư mục của ta hiện tại sẽ như sau.
.
├── main.tf
├── s3_static_policy.json
├── static-web
│   ├── README.md
│   ├── article-details.html
...
├── terraform.tfstate
Để upload file lên s3 thì ta sẽ dùng resource type là aws_s3_bucket_object. Cập nhật lại file main.tf
provider "aws" {
  region = "us-west-2"
}

resource "aws_s3_bucket" "static" {
  bucket = "terraform-series-bai3"
  acl    = "public-read"
  policy = file("s3_static_policy.json")

  website {
    index_document = "index.html"
    error_document = "error.html"
  }
}

locals {
  mime_types = {
    html  = "text/html"
    css   = "text/css"
    ttf   = "font/ttf"
    woff  = "font/woff"
    woff2 = "font/woff2"
    js    = "application/javascript"
    map   = "application/javascript"
    json  = "application/json"
    jpg   = "image/jpeg"
    png   = "image/png"
    svg   = "image/svg+xml"
    eot   = "application/vnd.ms-fontobject"
  }
}

resource "aws_s3_bucket_object" "object" {
  for_each = fileset(path.module, "static-web/**/*")
  bucket = aws_s3_bucket.static.id
  key    = replace(each.value, "static-web", "")
  source = each.value
  etag         = filemd5("${each.value}")
  content_type = lookup(local.mime_types, split(".", each.value)[length(split(".", each.value)) - 1])
}
Tạm thời thì các bạn chưa cần hiểu code phần aws_s3_bucket_object, phần mình muốn giới thiệu ở đây là fileset function, thay vì chỉ tải một file, thì fileset sẽ tải toàn bộ file trong thư mục đó lên theo dạng set.
Fileset function
Ví dụ ta có thư mục như sau
.
├── index.html
├── index.css
Thì khi ta dùng hàm fileset(path.module, "*") ta sẽ có được data set như sau:
{
  "index.html": "index.html",
  "index.css" : "index.css"
}
Với giá trị key và value là tên của file.
Local values
Bạn sẽ thấy có một block nữa tên là locals, đây là block giúp ta khai báo một giá trị local trong file terraform và có thể sử dụng lại được nhiều lần. Cú pháp như sau:
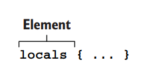
Không giống như variable block, ta cần khai báo type, thì locals block ta sẽ gán thẳng giá trị cho nó. Ví dụ như sau:
locals {
  one = 1
  two = 2
  name = "max"
  flag = true
}
Để truy cập giá trị local thì ta dùng cú pháp local.<KEY>. Oke, sau khi chạy câu lệnh terraform apply lại, bạn truy cập trang web với url là http://terraform-series-bai3.s3-website-us-west-2.amazonaws.com/ thì sẽ thấy được trang web của ta 😁. Nếu bạn đặt tên S3 bucket khác thì URL trên sẽ khác nhé.
Site Reliability Engineering
Đây là quyển sách mình viết với những gì học được ở Vikki Digital Bank: "On-Call In Action."
Trong quá trình xây dựng hệ thống thì ngoài việc thiết kế hệ thống có thể mở rộng, đáp ứng được lượng truy cập cao, luôn luôn sẵn sàng để đáp ứng người dùng. Thì vấn đề cũng quang trọng không kém là phát hiện được hệ thống đang gặp vấn đề gì. Để làm được này thì ta phải định nghĩa được hệ thống thế nào là ổn định bằng các chỉ số, sau đó nếu hệ thống vượt quá chỉ số này thì ta cần phải bắn cảnh cáo, đó là công việc của Site Reliability Engineering và DevOps. Đối với hệ thống ngân hàng thì việc này lại càng quan trọng, khách hàng luôn cần chuyển tiền và hệ thống phải luôn sẵn sàng để đáp ứng.
Việc định nghĩa hệ thống không ổn định không phải chỉ dựa vào các chỉ số như CPU và Memory, đây là cái sai mà mình thấy nhiều bạn mắc phải nhất. Trong quyển sách này mình có hướng dẫn làm thế nào để xây dựng một hệ thống luôn sẵn sàng cho người dùng, cuốn sách không nói về thiết kế hệ thống mà hướng dẫn cách phát hiện sự bất ổn trong hệ thống và sửa, đây là vấn đề thực tế hơn.
Banking Infrastructure on Cloud
Loạt bài viết ngắn chia sẻ về kiến trúc hạ tầng của hệ thống ngân hàng trên Cloud (AWS): Vikki Digital Bank
All rights reserved
