Tạo REST API với Serverless Framework, Lambda, và Node.js
Bài đăng này đã không được cập nhật trong 4 năm
Ý tưởng của Serverless là bạn không cần phải lo lắng về việc cấu hình server hay autoscale nữa. Việc đó đã được các nhà cung cấp điện toán đám mây lo rồi, và giờ bạn chỉ cần quan tâm đến việc code thôi. Trong bài này, chúng ta sẽ xây dựng một ứng dụng ghi chú đơn giản sử dụng framework là Serverless. Để tránh nhầm lẫn, bạn không cần framework serverless để xây dựng ứng dụng serverless nhưng nó sẽ giúp đỡ bạn rất nhiều thay vì tự tay làm từng chút một trên AWS.
Yêu cầu trước
Bạn cần những thứ sau để có thể đi theo tutorial này:
- Tài khoản AWS
- Node.js
- AWS-CLI đã được cấu hình
Bắt đầu với Serverless framework
$ npm install serverless -g
Đây là câu lệnh sẽ tải Serverless cli vào máy của bạn. Đây là một framework giúp bạn rất dễ dàng xây dựng các ứng dụng bằng AWS Lambda.
Bước 1: Tạo một project Node.js Serverless
Chúng ta sẽ tạo một ứng dụng Ghi chú (note). Tạo folder lambda-notes-app.
$ mkdir lambda-notes-app && cd lambda-notes-app
Chúng ta sẽ tạo một project serverless với template aws-nodejs:
$ serverless create --template aws-nodejs --path note-service --name note
Phần --path hay có thể viết tắt là -p sẽ là vị trí được tạo với service cùng với --name là tên service được khởi tạo. Ở đây, chúng ta sẽ được khởi tạo một folder là note-service có cấu trúc như sau:
.
├── .npmignore
├── handler.js
└── serverless.yml
Trong 3 file này:
- .npmignore: Đây là file dùng để chỉ npm những file nào không nên được cho thêm vào package.
- handle.js: Đây là file khai báo Lambda function.
- serverless.yml: Đây là file cấu hình mà Serverless Framework sẽ dùng để khởi tạo service của bạn. Một file serverless.yml có 3 phần - provider, function và resource
- provider: Đây là phần khai báo các cấu hình theo nhà cung cấp đám mây của bạn như là tên, vùng miền,...
- functions: Đây là phần sẽ khai báo tất cả các function trong service của bạn. Một service có hể có một hoặc nhiều function.
- resources: Đây là phần sẽ khai báo tất các tài nguyên mà function của bạn sẽ sử dụng. Tài nguyên sẽ được khai báo sử dụng AWS Cloudformation.
Bước 2: Tạo một tài nguyên REST để tạo ghi chú
Cập nhật file serverless.yml giống với bên dưới:
service: note # tên service

frameworkVersion: ">=1.1.0" # phiên bản framework được sử dụng

provider:
  name: aws # nhà cung cấp đám mây Amazon AWS
  runtime: nodejs14.x # sử dụng Node.js phiên bảo 14
  stage: dev # môi trường dev
  region: ap-southeast-1 # vùng đông nam á 1 Singapore
  lambdaHashingVersion: 20201221

functions:
  noteCreation: # tên function
    handler: api/notes.create # vị trí code handler
    memorySize: 128 # mặc định là 1024
    description: Create a note. # miêu tả cho function
    events: # sự kiện sẽ kích hoạt function
      - http: # REST API endpoint (API Gateway v1)
          path: notes # đường dẫn cho endpoint này
          method: post # HTTP method cho endpoint này
Tiếp theo, tạo một folder api, xóa file handler.js, tạo một file api/note.js và thêm đoạn code dưới dây:
"use strict";

module.exports.create = (event, context, callback) => {
  const response = {
    statusCode: 200,
    body: JSON.stringify({
      message: "Go Serverless v1.0! Your function executed successfully!",
      input: event,
    }),
  };

  callback(null, response);
};
Trước hết chúng ta sẽ deploy tạm để chạy thử function:
$ sls deploy
Serverless: Packaging service...
Serverless: Excluding development dependencies...
Serverless: Creating Stack...
Serverless: Checking Stack create progress...
........
Serverless: Stack create finished...
Serverless: Uploading CloudFormation file to S3...
Serverless: Uploading artifacts...
Serverless: Uploading service note.zip file to S3 (249.26 kB)...
Serverless: Validating template...
Serverless: Updating Stack...
Serverless: Checking Stack update progress...
..............................
Serverless: Stack update finished...
Service Information
service: note
stage: dev
region: ap-southeast-1
stack: note-dev
resources: 11
api keys:
  None
endpoints:
  POST - https://xxx.execute-api.ap-southeast-1.amazonaws.com/dev/notes
functions:
  noteCreation: note-dev-noteCreation
layers:
  None
Nếu deploy thành công bạn sẽ có thông báo như thế này, với endpoint sẽ có dạng:
https://xxx.execute-api.ap-southeast-1.amazonaws.com/dev/notes
Bạn có thể dùng Postman hay curl để tạo POST request:
curl -X POST https://xxx.execute-api.ap-southeast-1.amazonaws.com/dev/notes
sẽ trả về kết quả
{ "message": "Go Serverless v1.0! Your function executed successfully!", "input": {...} }
Bước 3: Sử dụng với DynamoDB
Chỉnh sửa thêm vào phần provider trong serverless.yml:
provider:
  name: aws
  runtime: nodejs14.x
  stage: dev
  region: ap-southeast-1
  lambdaHashingVersion: 20201221
  environment:
    NOTE_TABLE: ${self:service}-${opt:stage, self:provider.stage}
  iamRoleStatements:
    - Effect: Allow
      Action:
        - dynamodb:Query
        - dynamodb:Scan
        - dynamodb:GetItem
        - dynamodb:PutItem
      Resource: "*"
Ở đây mình sẽ tạo một biến môi trường NOTE_TABLE là dựa vào service và stage, với role có thể truy xuất cũng như cập nhật dữ liệu cho DynamoDB.
Tiếp theo, chúng ta sẽ tạo thêm một tài nguyên sẽ tạo bảng DynamoDB như dưới đây:
resources:
  Resources:
    NotesDynamoDbTable:
      Type: "AWS::DynamoDB::Table"
      DeletionPolicy: Retain
      Properties:
        AttributeDefinitions:
          - AttributeName: "id"
            AttributeType: "S"
        KeySchema:
          - AttributeName: "id"
            KeyType: "HASH"
        ProvisionedThroughput:
          ReadCapacityUnits: 1
          WriteCapacityUnits: 1
        StreamSpecification:
          StreamViewType: "NEW_AND_OLD_IMAGES"
        TableName: ${self:provider.environment.NOTE_TABLE}
Tiếp theo chúng ta sẽ tải thêm 2 dependency cho project:
$ npm install --save bluebird
$ npm install --save uuid
Chỉnh sửa file api/note.js như sau:
"use strict";

const uuid = require("uuid");
const AWS = require("aws-sdk");

AWS.config.setPromisesDependency(require("bluebird"));

const dynamoDb = new AWS.DynamoDB.DocumentClient();

module.exports.create = (event, context, callback) => {
  const requestBody = JSON.parse(event.body);
  const title = requestBody.title;
  const text = requestBody.text;

  if (typeof title !== "string" || typeof text !== "string") {
    console.error("Validation Failed");
    callback(new Error("Couldn't create note because of validation errors."));
    return;
  }

  createNote(noteInfo(title, text))
    .then((res) => {
      callback(null, {
        statusCode: 200,
        body: JSON.stringify({
          message: `Successfully created note with text ${text}`,
          noteId: res.id,
        }),
      });
    })
    .catch((err) => {
      console.log(err);
      callback(null, {
        statusCode: 500,
        body: JSON.stringify({
          message: `Unable to create note with text ${text}`,
        }),
      });
    });
};

const createNote = (note) => {
  console.log("Submitting note");
  const noteInfo = {
    TableName: process.env.NOTE_TABLE,
    Item: note,
  };
  return dynamoDb
    .put(noteInfo)
    .promise()
    .then((res) => note);
};

const noteInfo = (title, text) => {
  const timestamp = new Date().getTime();
  return {
    id: uuid.v1(),
    title: title,
    text: text,
    createdAt: timestamp,
    updatedAt: timestamp,
  };
};
Bây giờ, các bạn deploy lại:
$ sls deploy
Nó sẽ tạo thêm bảng DynamoDB. Để kiểm tra API, bạn có thể sử dụng lại bằng cURL:
$ curl -H "Content-Type: application/json" -X POST -d '{"title":"Write blog today","text": "About Serverless CRUD API"}' https://xxx.execute-api.ap-southeast-1.amazonaws.com/dev/notes
Nếu thành công sẽ trả về tin nhắn:
{"message":"Successfully created note with text About Serverless REST API","noteId":"abbb5460-46d2-11ec-a668-6bb284632c9a"}
Bước 4: Xem hết các bản ghi chú
Khai báo một function mới trong file serverless.yml như bên dưới:
  listNotes:
    handler: api/notes.list
    memorySize: 128
    description: List all notes
    events:
      - http:
          path: notes
          method: get
Tạo thêm function trong file api/notes.js như phía dưới:
module.exports.list = (event, context, callback) => {
  var params = {
    TableName: process.env.NOTE_TABLE,
    ProjectionExpression: "id, title",
  };

  console.log("Scanning Note table.");
  const onScan = (err, data) => {
    if (err) {
      console.log(
        "Scan failed to load data. Error JSON:",
        JSON.stringify(err, null, 2)
      );
      callback(err);
    } else {
      console.log("Scan succeeded.");
      return callback(null, {
        statusCode: 200,
        body: JSON.stringify({
          notes: data.Items,
        }),
      });
    }
  };

  dynamoDb.scan(params, onScan);
};
Tương tự bạn có thể kiểm tra bằng cách chạy thử cURL.
Bước 5: Lấy chi tiết từng ghi chú với ID
Khai báo một function mới trong file serverless.yml như bên dưới:
  noteDetails:
    handler: api/notes.get
    events:
      - http:
          path: notes/{id}
          method: get
Tạo thêm function trong file api/notes.js như phía dưới:
module.exports.get = (event, context, callback) => {
  const params = {
    TableName: process.env.NOTE_TABLE,
    Key: {
      id: event.pathParameters.id,
    },
  };

  dynamoDb
    .get(params)
    .promise()
    .then((result) => {
      const response = {
        statusCode: 200,
        body: JSON.stringify(result.Item),
      };
      callback(null, response);
    })
    .catch((error) => {
      console.error(error);
      callback(new Error("Couldn't fetch note."));
      return;
    });
};
Bây giờ, bạn có thể kiểm tra API bằng cURL:
$ curl -X GET https://xxx.execute-api.ap-southeast-1.amazonaws.com/dev/notes/abbb5460-46d2-11ec-a668-6bb284632c9a
{"createdAt":1637063117990,"text":"About Serverless REST API","id":"abbb5460-46d2-11ec-a668-6bb284632c9a","updatedAt":1637063117990,"title":"Write blog today"}
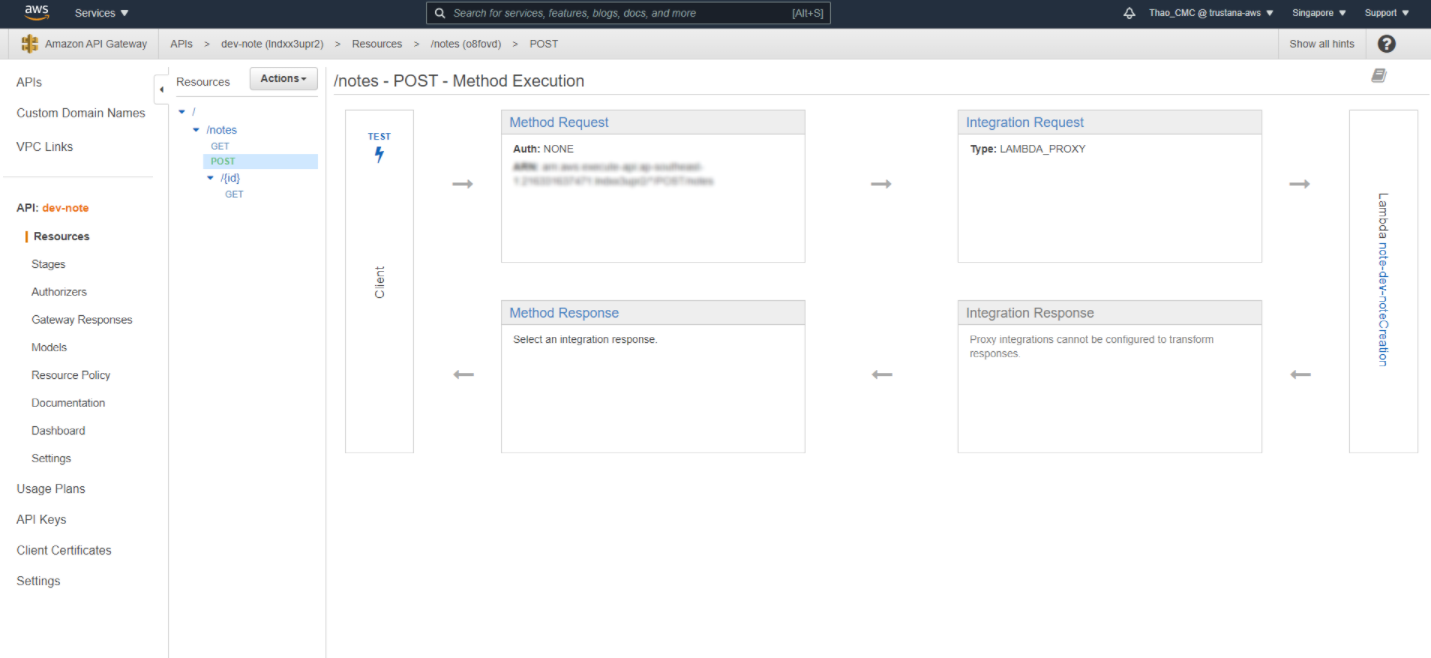
Kiểm tra trên AWS
Khi truy cập vào màn hình API Gateway, các bạn có thể thấy các endpoint cũng như kiểm tra các function đã được tạo.
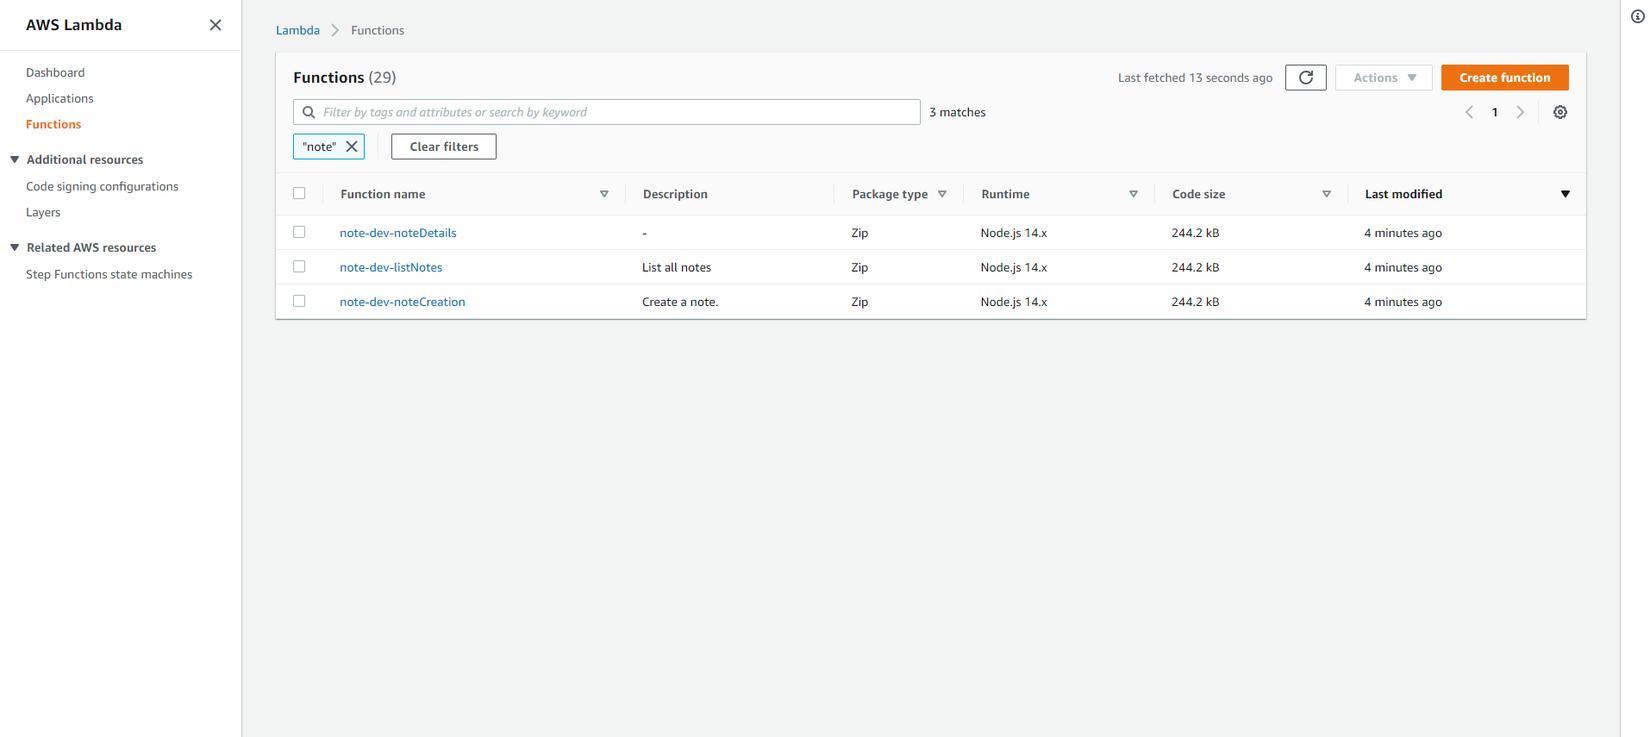
Cũng như màn hình hiển thị của AWS Lambda:
Kết luận
Chúng ta đã tạo ra một ứng dụng hoàn toàn chạy được trên AWS, và chúng ta không phải lo lắng tới việc cấu hình cơ sở hạ tầng - Serverless đã lo điều đó hộ chúng ta rồi. Với Serverless, bạn không cần phải tự tạo trên Web Console của AWS.
Tham khảo thêm
All rights reserved
