Tạo Chat Head Bubble giống Messenger
Bài đăng này đã không được cập nhật trong 7 năm
Mở đầu
 Chắc hẳn chúng ta đều không xa lạ gì với Chat Head (hay ChatBubble) trên ứng dụng Messenger. Nó
cho phép truy cập rất tiện dụng và dễ dàng vào màn hình trò chuyện bất kể bạn đang ở màn hình nào hay sứng dụng nào. Chat head cũng rất thuận tiện trong multitasking vì người dùng có thể làm việc và trog chuyện cùng lúc. Đơn giản như bạn vừa lướt facebook, xem video vừa nhắn tin, chuyện thường ngày đúng không nào.
Chắc hẳn chúng ta đều không xa lạ gì với Chat Head (hay ChatBubble) trên ứng dụng Messenger. Nó
cho phép truy cập rất tiện dụng và dễ dàng vào màn hình trò chuyện bất kể bạn đang ở màn hình nào hay sứng dụng nào. Chat head cũng rất thuận tiện trong multitasking vì người dùng có thể làm việc và trog chuyện cùng lúc. Đơn giản như bạn vừa lướt facebook, xem video vừa nhắn tin, chuyện thường ngày đúng không nào.
Trong bài viết này, mình sẽ hướng dẫn các bạn tạo một Chat head đơn giản, có thể click, di chuyển kéo thả trên màn hình.
Let's start.
Ý tưởng
- Chat head đơn giản chỉ là View của ứng dụng được vẽ trôi nổi nằm trên ứng dụng khác. Hệ thống Android cho phép ứng dụng làm điều đó nếu ứng dụng được cấp quyền android.permission.SYSTEM_ALERT_WINDOW.
- Chúng ta sẽ dùng Background Service để gắn View vào hệ thống phân cấp View(View hierarchy)trên màn hình. Khi đó View của chúng ta sẽ luôn nằm trên cùng hệ thống phân cấp View(vẫn nằm dưới một số thành phần như Status bar..) và luôn được hiển thị.
- Để di chuyển kéo thả trên màn hình, chúng ta sẽ override phương thức OnTouchListener() để lắng nghe và xử lý sự kiện thay đổi vị trí của View trên màn hình.
Thực hiện
Bước 1:
Thêm android.permission.SYSTEM_ALERT_WINDOW vào file AndroidManifest. Quyền này cho phép tạo của sổ (Window) dùng type WindowManager.LayoutParams.TYPE_APPLICATION_OVERLAY, hiển trị lên trên tất cả ứng dụng.
Khi sử dụng TYPE_APPLICATION_OVERLAY Hệ thống có thể thay đổi vị trí, kích thước hoặc khả năng hiển thị của các cửa sổ này bất cứ lúc nào để giảm sự lộn xộn các view cho người dùng và quản lý tài nguyên.
<uses-permission android:name="android.permission.SYSTEM_ALERT_WINDOW" />
Bước 2
Tạo file Layout của Chat head.
Bạn có thể tạo tùy thích, ở đây mình vẽ một ImageView tròn màu xanh.
- File chathead.xml
<?xml version="1.0" encoding="utf-8"?> <android.support.constraint.ConstraintLayout xmlns:android="http://schemas.android.com/apk/res/android" xmlns:app="http://schemas.android.com/apk/res-auto" android:layout_width="wrap_content" android:layout_height="wrap_content"> <ImageView android:id="@+id/image_bubble" android:layout_width="wrap_content" android:layout_height="wrap_content" android:background="@drawable/background_chat_head" app:layout_constraintBottom_toBottomOf="parent" app:layout_constraintEnd_toEndOf="parent" app:layout_constraintStart_toStartOf="parent" app:layout_constraintTop_toTopOf="parent" /> </android.support.constraint.ConstraintLayout> - File background_chat_head
<?xml version="1.0" encoding="utf-8"?>
<shape xmlns:android="http://schemas.android.com/apk/res/android"
    android:shape="oval">

    <size
        android:width="@dimen/dp_48"
        android:height="@dimen/dp_48" />

    <solid android:color="@color/color_light_green" />

</shape>
Bước 3
Tạo Background Service và liên kết Chat head với Service Bây giờ, chúng ta sẽ tạo file ChatHeadService. Bất cứ khi nào bạn muốn show Chat head chỉ cần gọi Context.startService(), nếu nó chưa hiển thị nó sẽ hiển thị lên. Trong phương thức onCreate(), khởi tạo view của Chat Head và thêm vào góc trên bên trái của màn hình.
class BubbleView(
    private val mContext: Context,
    private val mWindowManager: WindowManager,
    private val mListener: BubbleActionListener?
) {
    private lateinit var mBubbleView: View

    var lastAction: Int = -1
    var initialX = 0
    var initialY = 0
    var initialTouchX = 0f
    var initialTouchY = 0f

    init {
        initBubbleView()
    }

    private fun initBubbleView() {

        mBubbleView =
                LayoutInflater.from(mContext).inflate(R.layout.layout_floating_bubble, null)
        //Create Layout param
        val params = if (Build.VERSION.SDK_INT >= Build.VERSION_CODES.O) {
            WindowManager.LayoutParams(
                ViewGroup.LayoutParams.WRAP_CONTENT,
                ViewGroup.LayoutParams.WRAP_CONTENT,
                WindowManager.LayoutParams.TYPE_APPLICATION_OVERLAY,
                WindowManager.LayoutParams.FLAG_NOT_FOCUSABLE,
                PixelFormat.TRANSLUCENT
            )
        } else {
            WindowManager.LayoutParams(
                ViewGroup.LayoutParams.WRAP_CONTENT,
                ViewGroup.LayoutParams.WRAP_CONTENT,
                WindowManager.LayoutParams.TYPE_PHONE,
                WindowManager.LayoutParams.FLAG_NOT_FOCUSABLE,
                PixelFormat.TRANSLUCENT
            )
        }

        //Specify position bubble
        params.gravity = Gravity.TOP or Gravity.START
        //Initially view will be added to top-left corner
        params.x = 0
        params.y = 0

        //Add bubble view to window
        mWindowManager.addView(mBubbleView, params)
        initListener(params)
    }

    fun removeBubbleView() {
       //Remove chat head
        mWindowManager.removeView(mBubbleView)
    }

}
Chú thích:
- LayoutParams : được sử dụng bởi các View để cho các View cha của chúng biết chúng muốn được bố trí như thế nào.
- WRAP_CONTENT: có nghĩa là View chỉ muốn kích thước đủ lớn để bao quanh nội dung của nó (cộng với phần padding)
- FLAG_NOT_FOCUSABLE: cửa sổ này không được focus, nên sẽ không nhận được các key hoặc button event.
Bước 4
Xử lý sự kiện di chuyển Chat head
- Để Chat head có thể di chuyển khi người dùng kéo thả, chúng ta override onTouchListener(). Bất cứ khi nào người dùng chạm vào Chat head, chúng ta sẽ ghi lại tọa độ x và y ban đầu, và khi người dùng di chuyển ngón tay, ứng dụng sẽ tính toán tọa độ X và Y mới và di Chat head tới vị trí tương ứng.
- Cũng có thể implement OnClickListener để xử lý trường hợp khi người dùng nhấn vào Chat Head.
- Đối với Chat head của Messenger, khi người dùng đang di chuyển Chat head và thả ngón tay ở giữa màn hình thì Chat head sẽ chạy về 2 cạnh của màn hình. Ở đây chúng ta sẽ xét vị trí của Chat head so với vị trí chính giữa để làm như vậy.
@SuppressLint("ClickableViewAccessibility")
    private fun initListener(params: WindowManager.LayoutParams) {
        //Get screen width
        val display = mWindowManager.defaultDisplay
        val screenWith = display.width

        //implement click listener
        mBubbleView.setOnClickListener {
            //TODO  do something
        }

        //implement touch listener
        mBubbleView.setOnTouchListener { v, event ->
            when (event.action) {
                MotionEvent.ACTION_DOWN -> {
                    //save start position
                    initialX = params.x
                    initialY = params.y

                    initialTouchX = event.rawX
                    initialTouchY = event.rawY
                    lastAction = event.action
                    true
                }
                MotionEvent.ACTION_UP -> {
                    if (lastAction == MotionEvent.ACTION_DOWN) {
                        // todo show control button
                    }

                    lastAction = event.action
                    if (params.x < screenWith / 2) {
                        while (params.x > 0) {
                            params.x -= 10
                            mWindowManager.updateViewLayout(mBubbleView, params)
                        }
                    } else {
                        while (params.x < screenWith) {
                            params.x += 10
                            mWindowManager.updateViewLayout(mBubbleView, params)
                        }
                    }
                    true
                }
                MotionEvent.ACTION_MOVE -> {
                    params.x = initialX + (event.rawX - initialTouchX).toInt()
                    params.y = initialY + (event.rawY - initialTouchY).toInt()
                    mWindowManager.updateViewLayout(mBubbleView, params)
                    lastAction = event.action
                    true
                }

                else -> false
            }
        }
    }
Bước 5
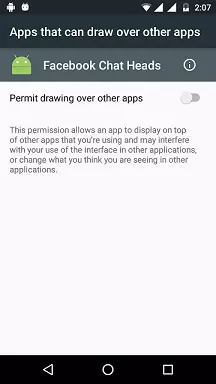
Quyền OverDraw trên thiết bị Android 6 trở lên
- Như đã nói, để hiển thị Chat head thì bạn phải start ChatHeatService.
- Nhưng trước hết, ta phải check ứng dụng đã có quyền android.permission.SYSTEM_ALERT_WINDOW hay chưa. Đối với Android API version < 23 thì quyền này mặc định đã được cho phép trên ứng dụng, nhưng từ API verson >=23 chúng ta phải check runtime permission. Nếu quyền này chưa được cho phép, chúng ta sẽ phải mở màn hình Quản lý quyền của ứng dụng để người dùng cho phép quyền này bằng cách startActivity sử dụng Intent với Action là Settings.ACTION_MANAGE_OVERLAY_PERMISSION. Màn hình dưới đây sẽ mở ra, người dùng cân nhắc có cho phép OverDraw hay không.
 Dưới đây là MainActivity
class MainActivity : AppCompatActivity() {

    override fun onCreate(savedInstanceState: Bundle?) {
        super.onCreate(savedInstanceState)
        setContentView(R.layout.activity_main)

        checkChatHeadPermission()
    }

    private fun checkChatHeadPermission() {
        if (Build.VERSION.SDK_INT >= Build.VERSION_CODES.M && !Settings.canDrawOverlays(this)) {
            val intent = Intent(
                Settings.ACTION_MANAGE_OVERLAY_PERMISSION,
                Uri.parse("package:$packageName")
            )
            startActivityForResult(intent, 218)
        }
    }

    override fun onActivityResult(requestCode: Int, resultCode: Int, data: Intent) {
        if (requestCode == 21) {

            //Check if the permission is granted or not.
            if (resultCode == Activity.RESULT_OK) {
                val intent = Intent(this, BubbleService::class.java)
                startService(intent)
            } else { //Permission is not available
                Toast.makeText(
                    this,
                    "Draw over other app permission not available. Closing the application",
                    Toast.LENGTH_SHORT
                ).show()

                finish()
            }
        } else {
            super.onActivityResult(requestCode, resultCode, data)
        }
    }

}
Cuối cùng
Hãy thử build project, cấp quyền và thử xem Chat Head có chạy không nhé!
Tài liệu tham khảo
https://medium.com/@kevalpatel2106/create-chat-heads-like-facebook-messenger-32f7f1a62064
All rights reserved
