Sử dụng thư viện ngoài (compact-calendar-view) và tạo todo list với Android
Bài đăng này đã không được cập nhật trong 4 năm
Như tiêu đề của bài viết đã đề cập, hôm nay mình xin giới thiệu tới các bạn cách sử dụng và thêm một thư viện ngoài vào để sử dụng với Android (AndroidStudio) như thế nào. Bài viết này minh sẽ sử dụng một thư viện có tên là compact-calendar-view để demo. Và mình sẽ sử dụng thư viện này để tạo một Todo List tương ứng với mỗi ngày.
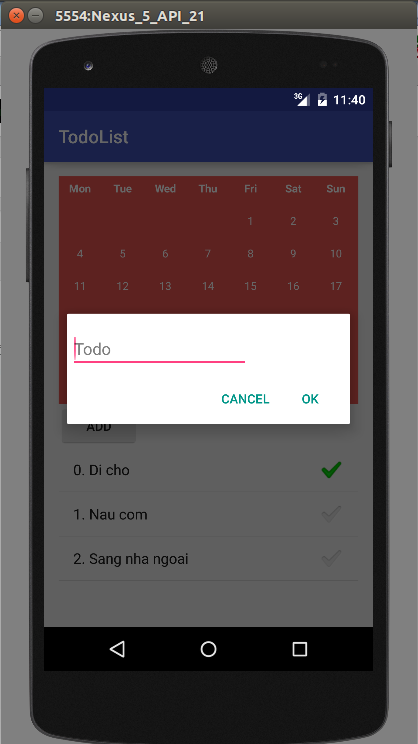
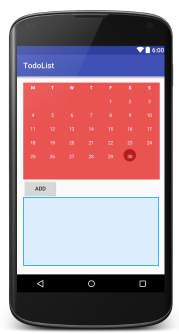
Như các bạn thấy ở trong ảnh bên trên, để làm được ứng dụng đó thì chúng ta phải xử lý 4 việc chính:
- View calendat
- View list todo
- Hiển thị dialog
- Lưu dữ liệu todo cho từng ngày
Ở đây, mình sử dụng 2 thư viện bên ngoài hỗ trợ cho việc hiển thị calendar và list view. Việc lưu dữ liệu thì mình sử dụng SharedPreferences, hiển thị dialog thì sử dụng Customer Dialog với layout riêng. Chúng ta sẽ lần lượt đi từng bước một.
I) Thêm các thư viện calendar và list view
Khi các bạn vào 2 link trên thì ta có thể thấy rất rõ các bước để thêm một thư viện mà mình muốn vào project của mình.
Khi sử dụng Compact calendar view thì bạn chỉ cần vào file buil.gradle (Module: App) và thêm vào phần dependencies dòng sau
compile 'com.github.sundeepk:compact-calendar-view:1.8.3'
Còn với với List view thì ngoài phần dependencies thì bạn cần phải thêm cả repositories vào file gradle nữa
repositories {
    maven {
        url  "http://dl.bintray.com/dodola/maven"
    }
}
dependencies {
    compile 'com.dodola:listviewext:1.0'
}
Sau khi thêm thì chúng ta phải Sync lại project để có thể sử dụng 2 thư viện này.
Sau đó ta sẽ vẽ layout để được các view cần thiết hiển thị và thao tác.
activity_main.xml
<?xml version="1.0" encoding="utf-8"?>
<RelativeLayout xmlns:android="http://schemas.android.com/apk/res/android"
xmlns:tools="http://schemas.android.com/tools"
android:layout_width="match_parent"
android:layout_height="match_parent"
android:paddingBottom="@dimen/activity_vertical_margin"
android:paddingLeft="@dimen/activity_horizontal_margin"
android:paddingRight="@dimen/activity_horizontal_margin"
android:paddingTop="@dimen/activity_vertical_margin"
tools:context="com.example.itachi.todolist.MainActivity">
<com.github.sundeepk.compactcalendarview.CompactCalendarView
xmlns:app="http://schemas.android.com/apk/res-auto"
android:id="@+id/compactcalendar_view"
android:layout_width="fill_parent"
android:paddingRight="10dp"
android:paddingLeft="10dp"
android:layout_height="250dp"
app:compactCalendarTextSize="12sp"
app:compactCalendarBackgroundColor="#ffe95451"
app:compactCalendarTextColor="#fff"
app:compactCalendarCurrentSelectedDayBackgroundColor="#E57373"
app:compactCalendarCurrentDayBackgroundColor="#B71C1C"
/>
<Button
android:layout_width="wrap_content"
android:layout_height="wrap_content"
android:text="Add"
android:id="@+id/btAdd"
android:layout_alignParentLeft="true"
android:layout_alignParentStart="true"
android:layout_below="@+id/compactcalendar_view" />
<com.dodola.listview.extlib.ListViewExt
android:id="@+id/view"
android:layout_width="match_parent"
android:layout_height="match_parent"
android:layout_below="@+id/btAdd" />
</RelativeLayout>
Như các bạn thấy ở trên, ta sử dụng 2 view từ thư viện ngoài là com.github.sundeepk.compactcalendarview.CompactCalendarView và com.dodola.listview.extlib.ListViewExt.
II) Build custom dialog
Việc tiếp theo của chúng ta là tạo layout cho dialog hiển thị để nhập nội dung của todo trong ngày.
dialog_todo.xml
<LinearLayout xmlns:android="http://schemas.android.com/apk/res/android"
    android:orientation="vertical"
    android:layout_width="wrap_content"
    android:layout_height="wrap_content">
    <EditText
        android:id="@+id/todoName"
        android:inputType="textEmailAddress"
        android:layout_width="195dp"
        android:layout_height="wrap_content"
        android:layout_marginTop="16dp"
        android:layout_marginLeft="4dp"
        android:layout_marginRight="4dp"
        android:layout_marginBottom="4dp"
        android:hint="Todo" />
</LinearLayout>
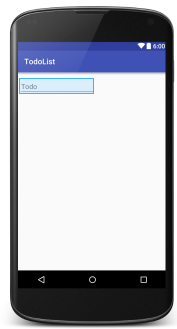
Việc tạo layout này khá là đơn giản phải ko, ta chỉ cần có một EditText trong layout là xong. Các button CANCEL và button OK là mặc định của dialog nên ta không cần thiểt phải vẽ trong layout này.
Việc tạo ra dialog, cài đặt layout và các button rất dễ dàng.
        final LayoutInflater inflater = MainActivity.this.getLayoutInflater();
        final View dialogView = inflater.inflate(R.layout.dialog_todo, null);
        AlertDialog.Builder builder = new AlertDialog.Builder(context);
        builder.setView(dialogView);
        builder.setPositiveButton(R.string.ok, new DialogInterface.OnClickListener() {
            public void onClick(DialogInterface dialog, int id) {
            }
        });
        builder.setNegativeButton(R.string.cancel, new DialogInterface.OnClickListener() {
            public void onClick(DialogInterface dialog, int id) {
                // User cancelled the dialog
            }
        });
        builder.show();
Như vậy, việc tạo view đã xong, việc còn lại của chúng ta là tạo các luồng xử lý cho chúng là ok.
III) Đọc, ghi dữ liệu và luồng xử lý chính
package com.example.itachi.todolist;

import android.content.Context;
import android.content.DialogInterface;
import android.content.SharedPreferences;
import android.os.Bundle;
import android.support.v7.app.AlertDialog;
import android.support.v7.app.AppCompatActivity;
import android.view.LayoutInflater;
import android.view.View;
import android.widget.AdapterView;
import android.widget.ArrayAdapter;
import android.widget.Button;
import android.widget.EditText;
import android.widget.ListView;
import android.widget.Toast;

import java.util.ArrayList;
import java.util.Calendar;
import java.util.Collections;
import java.util.Date;
import java.util.HashSet;
import java.util.Locale;
import java.util.Set;

import com.dodola.listview.extlib.ListViewExt;
import com.github.sundeepk.compactcalendarview.CompactCalendarView;

public class MainActivity extends AppCompatActivity {
    ListViewExt lv;
    ArrayAdapter arrAdapter;
    SharedPreferences sharedPref;
    Button add;
    String key = "";
    ArrayList<String> todoList = new ArrayList<>();
    ArrayList<String> checkedList = new ArrayList<>();

    @Override
    protected void onCreate(Bundle savedInstanceState) {
        super.onCreate(savedInstanceState);
        setContentView(R.layout.activity_main);

        lv = (ListViewExt) findViewById(R.id.view);
        lv.setChoiceMode(ListView.CHOICE_MODE_MULTIPLE);
        sharedPref = getPreferences(Context.MODE_PRIVATE);
        add = (Button) findViewById(R.id.btAdd);

        add.setOnClickListener(new View.OnClickListener() {
            @Override
            public void onClick(View view) {
                showCustomDialog(MainActivity.this);
            }
        });

        final CompactCalendarView compactCalendarView = (CompactCalendarView) findViewById(R.id.compactcalendar_view);
        compactCalendarView.drawSmallIndicatorForEvents(true);
        compactCalendarView.setLocale(Locale.ENGLISH);
        compactCalendarView.setUseThreeLetterAbbreviation(true);

        Calendar calendar = Calendar.getInstance(Locale.ENGLISH);
        calendar.setTime(new Date());
//      reset hour, minutes, seconds and millis
        calendar.set(Calendar.HOUR_OF_DAY, 0);
        calendar.set(Calendar.MINUTE, 0);
        calendar.set(Calendar.SECOND, 0);
        calendar.set(Calendar.MILLISECOND, 0);

        key = String.valueOf((int) calendar.getTimeInMillis());
        loadTodoList();

//        compactCalendarView.
        compactCalendarView.setListener(new CompactCalendarView.CompactCalendarViewListener() {
            @Override
            public void onDayClick(Date dateClicked) {
                key = String.valueOf((int) dateClicked.getTime());
                loadTodoList();
            }

            @Override
            public void onMonthScroll(Date firstDayOfNewMonth) {

            }
        });
    }

    public void showCustomDialog(Context context) {
        final LayoutInflater inflater = MainActivity.this.getLayoutInflater();
        final View dialogView = inflater.inflate(R.layout.dialog_todo, null);
        AlertDialog.Builder builder = new AlertDialog.Builder(context);
        builder.setView(dialogView);
        builder.setPositiveButton(R.string.ok, new DialogInterface.OnClickListener() {
            public void onClick(DialogInterface dialog, int id) {
                // User clicked OK button
                String todoName = ((EditText) dialogView.findViewById(R.id.todoName)).getText().toString();
                SharedPreferences.Editor editor = sharedPref.edit();
                Set<String> mySet = new HashSet<>();
                Set<String> myCheckedSet = new HashSet<>();
                mySet.addAll(todoList);
                myCheckedSet.addAll(checkedList);
                int old_leng = mySet.size();
                todoName = old_leng + ". " + todoName;
                mySet.add(todoName);
                if (mySet.size() != old_leng) {
                    todoList.add(todoName);
                    checkedList.add(old_leng + "false");
                    myCheckedSet.add(old_leng + "false");
                    editor.putStringSet(key, mySet);
                    editor.putStringSet(key + "_checked", myCheckedSet);
                    editor.commit();
                    arrAdapter.notifyDataSetChanged();
                }
            }
        });
        builder.setNegativeButton(R.string.cancel, new DialogInterface.OnClickListener() {
            public void onClick(DialogInterface dialog, int id) {
                // User cancelled the dialog
            }
        });
        builder.show();
    }

    public void loadTodoList() {
        Set<String> mySet = sharedPref.getStringSet(key, new HashSet<String>());
        Set<String> myarrCheckedSetSet = sharedPref.getStringSet(key + "_checked", new HashSet<String>());
        todoList = new ArrayList<String>(mySet);
        checkedList = new ArrayList<String>(myarrCheckedSetSet);
        Collections.sort(todoList);
        Collections.sort(checkedList);

        arrAdapter = new ArrayAdapter<>(MainActivity.this,
                android.R.layout.simple_list_item_checked, todoList);
        lv.setAdapter(arrAdapter);
        for (int i=0; i < checkedList.size(); i++) {
            lv.setItemChecked(i, (checkedList.get(i).contains("true")));
        }
        lv.setOnItemClickListener(new AdapterView.OnItemClickListener() {
            @Override
            public void onItemClick(AdapterView<?> adapterView, View view, int i, long l) {
                lv.setItemChecked(i, checkedList.get(i).contains("false"));
                String checked = checkedList.get(i).contains("false") ? "true" : "false";
                checkedList.set(i, i + checked);
                SharedPreferences.Editor editor = sharedPref.edit();
                Set<String> myCheckedSet = new HashSet<>();
                myCheckedSet.addAll(checkedList);
                editor.putStringSet(key + "_checked", myCheckedSet);
                editor.commit();
            }
        });
    }
}
Ở trên là toàn bộ code của mình, mình post luôn lên đây cho những bạn nào ngại vào github của mình lấy code  . Mình sẽ giải thích một số đoạn code chính cần xử lý và lưu ý...
1. Đọc và ghi dữ liệu
SharedPreferences thực chất chính là tạo ra một file của project để dọc và ghi lại dữ liệu dưới dạng key, hash. Có nghĩa là bạn sẽ truy xuất dữ liệu của mình thông qua key mà bạn định nghĩa trong file đó.
Đọc:
sharedPref = getPreferences(Context.MODE_PRIVATE);
Ghi:
SharedPreferences.Editor editor = sharedPref.edit();
Set<String> mySet = new HashSet<>();
editor.putStringSet(key, mySet);
editor.commit();
Dữ liệu mảng duy nhất có thể lưu được trong SharedPreferences chính là dạng Set<String>, còn lại là các kiểu biến String, Boolean, Float, int, long.
Các bạn sẽ thắc mắc tại sao mình lại sử dụng Collections để sắp xếp các mảng lấy ra ở đây:
        Set<String> mySet = sharedPref.getStringSet(key, new HashSet<String>());
        Set<String> myarrCheckedSetSet = sharedPref.getStringSet(key + "_checked", new HashSet<String>());
        todoList = new ArrayList<String>(mySet);
        checkedList = new ArrayList<String>(myarrCheckedSetSet);
        Collections.sort(todoList);
        Collections.sort(checkedList);
Lý do là dữ liệu được lưu lạị dưới dạng Set<String> và khi chuyển thành array thì nó sẽ sắp xếp không theo thứ tự nào cả (kể cả khi thứ tự được add hay dữ liệu).
todoList là danh sách các công việc đã tạo ra. checkedList là danh sách lưu lại trạng thái của công việc (true or false) và tất cả đều lưu dưới dạng String.
key ở đây chính là ngày khi ta click vào và key được chuyển sang dạnh unixtime rồi convert sang string để lưu lại trong sharedPref
Thư viện CompactCalendarView có cung cấp cho chúng ta 2 hàm để overidr lại chính là onDayClick và onMonthScroll
        compactCalendarView.setListener(new CompactCalendarView.CompactCalendarViewListener() {
            @Override
            public void onDayClick(Date dateClicked) {
                key = String.valueOf((int) dateClicked.getTime());
                loadTodoList();
            }

            @Override
            public void onMonthScroll(Date firstDayOfNewMonth) {

            }
        });
List view mình sử dụng layout default của android là simple_list_item_checked
arrAdapter = new ArrayAdapter<>(MainActivity.this,
                android.R.layout.simple_list_item_checked, todoList);
        lv.setAdapter(arrAdapter);
và để hiện thị xem todo đó có được check hay không ta chỉ việc gọi
lv.setItemChecked(i, (checkedList.get(i).contains("true")));
với i chính là index của item trong list (checkedList.get(i).contains("true")) trả ra true, false là trạng thái của chính item đó.
Ở trên là một số lưu ý chính mà mình đề cập, để hiểu rõ hơn về chương trình hay muốn tùy biến thì các bạn đọc source code và tham khảo thêm nhé.
Video demo
Source code: https://github.com/banlv54/TodoList
IV) Tài liệu tham khảo
All rights reserved
