Sử dụng Realtime bằng Signalr trong .NET Core
Bài đăng này đã không được cập nhật trong 6 năm
Trong bài viết này mình sẽ nói về lý do và lợi ích của việc sử dụng Signalr trong .NET Core và cách triển khai nó.
Nào bắt đầu
Lý do và khi nào sử dụng nó:
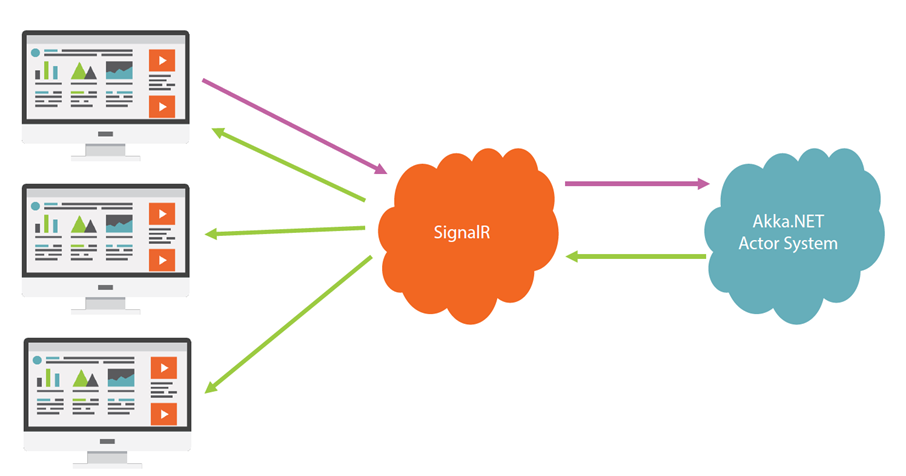
Về cơ bản, SignalR dễ sử dụng để triển khai và cung cấp để truyền thông tin giữa Backend và và Frontend(AngularJs,ReactJs...). Lợi ích của thư viện này có thể dễ dàng thấy trong các ứng dụng yêu cầu cập nhật tần số cao từ máy chủ, như trò chơi, bảng điều khiển thời gian thực, ứng dụng trò chuyện, v.v.
Làm sao để triển khai nó:
SignalR sử dụng kiến trúc observer pattern.Về cơ bản .Net sẽ là Hub và các client như angular sẽ lắng nghe những sự kiện khác biệt trên hub.Bất cứ khi nào một sự kiện diễn ra thì Backend nó sẽ thông báo cho tất cả các thuê bao của nó.
Triển khai ở Backend
- Cài đặt Nuget package:
Microsoft.AspNetCore.SignalR.MsgPack — 1.0.0-preview2-final
Microsoft.AspNet.SignalR.Client — 2.4.0-preview1–20180920–03
Microsoft.AspNetCore.SignalR — 1.0.0-preview2-final
- Khởi tạo Class Hub:
public interface IHubClient
{
    Task BroadcastMessage(MessageInstance msg);
}
public class SignalrHub : Hub<IHubClient>
{
    public async Task BroadcastMessage(MessageInstance msg)
    {
        await Clients.All.BroadcastMessage(msg);
    }
}
public class MessageInstance
{
    public string Timestamp { get; set; }
    public string From { get; set; }
    public string Message { get; set; }
}
3.Cập nhập ở file Startup.cs
public class Startup
{
    // This method gets called by the runtime. Use this method to add services to the container.
    // For more information on how to configure your application, visit https://go.microsoft.com/fwlink/?LinkID=398940
    public void ConfigureServices(IServiceCollection services)
    {
        services.AddMvc();

        services.AddCors(o => o.AddPolicy("CorsPolicy", b =>
        {
            b.AllowAnyMethod()
                .AllowAnyHeader()
                .AllowAnyOrigin()
                .AllowCredentials();
        }));

        services.AddSignalR(options => { options.KeepAliveInterval = TimeSpan.FromSeconds(5); }).AddMessagePackProtocol();
    }

    // This method gets called by the runtime. Use this method to configure the HTTP request pipeline.
    public void Configure(IApplicationBuilder app, IHostingEnvironment env)
    {
        if (env.IsDevelopment())
        {
            app.UseDeveloperExceptionPage();
        }

        app.UseCors("CorsPolicy");

        app.UseSignalR(routes =>
        {
            routes.MapHub<SignalrHub>("/signalr");
        });

        app.UseMvc();
    }
}
4.Thử nghiệm ở Controller để kích hoạt SignalR.Controller sẽ nhận Hub instance từ Services từ DI(Depedency Injection)
[Route("api/Test")]
public class TestController : Controller
{
    private IHubContext<SignalrHub, IHubClient> _signalrHub;

    public TestController(IHubContext<SignalrHub, IHubClient> signalrHub)
    {
        _signalrHub = signalrHub;
    }

    [HttpPost]
    public async Task<string> Post([FromBody]MessageInstance msg)
    {
        var retMessage = string.Empty;
        try
        {
            msg.Timestamp = Timestamp.UtcNow.ToString();
            await _signalrHub.Clients.All.BroadcastMessage(msg);
            retMessage = "Success";
        }
        catch (Exception e)
        {
            retMessage = e.ToString();
        }
        return retMessage;
    }
}
Triển khai Front end
1.Cài đặt npm
"@aspnet/signalr": "^1.0.0-preview1-update1"
2.Tạo model
export interface Message {
  from: string;
  timestamp: string;
  message: string;
}
- Cập nhập app.component.ts and lắng nghe từ backend SignalR hub
export class AppComponent implements OnInit {
  title = 'app';

  private _hubConnection: HubConnection;
  msgs: Message[] = [];

  constructor() {
  }

  ngOnInit(): void {
    this._hubConnection = new HubConnectionBuilder()
      .withUrl('http://localhost:5000/signalr')
      .configureLogging(LogLevel.Information)
      .build();
    this._hubConnection
      .start()
      .then(() => console.log('Connection started!'))
      .catch(err => console.log('Error while establishing connection :('));

    this._hubConnection.on('BroadcastMessage', (data: Message) => {
      this.msgs.push(data);
    });
  }
}

4.Trong app.component.html, sẽ biểu thị tin nhắn mà bạn nhận được
Ta sử dụng PostMan để gửi Request lên Controller
 Nếu mọi thứ hoàn tất, ta sẽ nhận được 1 tin nhắn được gửi cho những người đăng ký nó.
Tham khảo code ở đây:
https://github.com/chrisstephanrm/SignalRDemo?source=post_page-----ef49b5b0dc11----------------------
Nếu mọi thứ hoàn tất, ta sẽ nhận được 1 tin nhắn được gửi cho những người đăng ký nó.
Tham khảo code ở đây:
https://github.com/chrisstephanrm/SignalRDemo?source=post_page-----ef49b5b0dc11----------------------
Lần tới chúng ta sẽ tìm hiểu và viết 1 App Chat Realtime.Cám ơn mọi người đã đọc bài. Nguồn: https://medium.com/@chris.stephan1996/why-when-and-how-and-to-use-signalr-ef49b5b0dc11
All rights reserved
