Sử dụng Flow trong android, tạm biệt LinearLayout
Bài đăng này đã không được cập nhật trong 6 năm
ConstraintLayout:2.0.0-alpha5 mang đến một helper class mới đó là Flow với mong muốn thay thế cho một layout rất quen thuộc đó là LinearLayout.
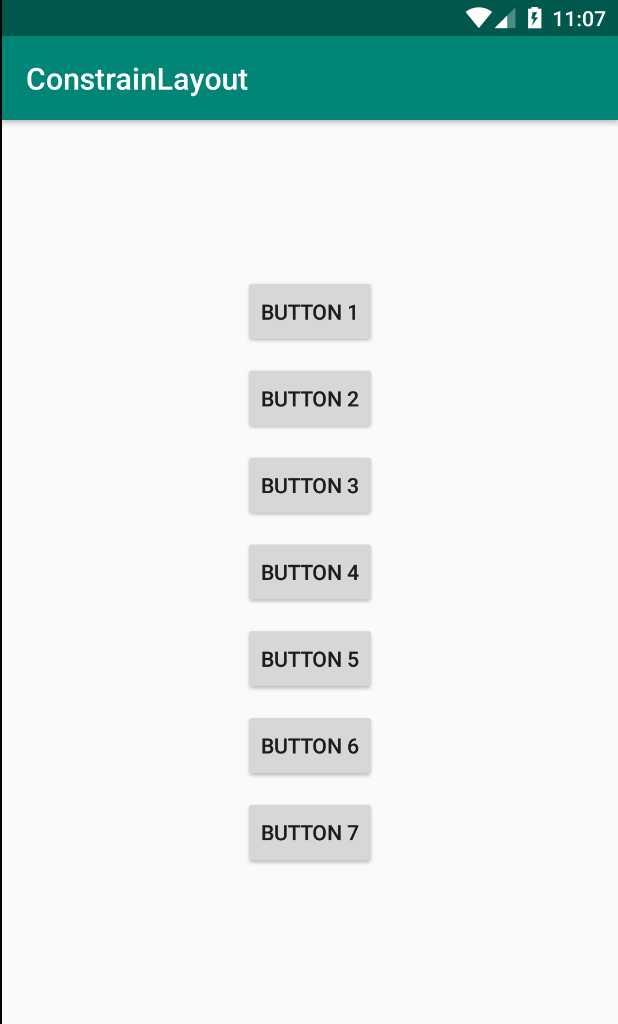
Đôi khi chúng ta chỉ muốn tạo ra một list với một vài item cố định theo chiều ngang hoặc chiều dọc. Đơn giản như layout sau đây
Cách tiếp cận trước đây
LinearLayout với vertical orientation có thể đơn giản tạo ra layout giống như trên. Tuy nhiên, nếu chúng ta muốn nhung trong một layout phức tạo được tạo ra bởi ConstrainLayout, layout file có thể dẫn tới một deep view hierarchy. Hơn nữa việc căn chỉnh layout_gravity theo orientation của LinearLayout sẽ gặp đôi chút khó khăn.
Đây là đoạn code theo cách này:
<?xml version="1.0" encoding="utf-8"?>
<LinearLayout xmlns:android="http://schemas.android.com/apk/res/android"
   android:layout_width="match_parent"
   android:layout_height="match_parent"
   android:gravity="center"
   android:orientation="vertical">

   <androidx.appcompat.widget.AppCompatButton
       android:id="@+id/button_1"
       android:layout_width="wrap_content"
       android:layout_height="wrap_content"
       android:layout_margin="5dp"
       android:text="Button 1" />

   <androidx.appcompat.widget.AppCompatButton
       android:id="@+id/button_2"
       android:layout_width="wrap_content"
       android:layout_height="wrap_content"
       android:layout_margin="5dp"
       android:text="Button 2" />

   <androidx.appcompat.widget.AppCompatButton
       android:id="@+id/button_3"
       android:layout_width="wrap_content"
       android:layout_height="wrap_content"
       android:layout_margin="5dp"
       android:text="Button 3" />

   <androidx.appcompat.widget.AppCompatButton
       android:id="@+id/button_4"
       android:layout_width="wrap_content"
       android:layout_height="wrap_content"
       android:layout_margin="5dp"
       android:text="Button 4" />

   <androidx.appcompat.widget.AppCompatButton
       android:id="@+id/button_5"
       android:layout_width="wrap_content"
       android:layout_height="wrap_content"
       android:layout_margin="5dp"
       android:text="Button 5" />

   <androidx.appcompat.widget.AppCompatButton
       android:id="@+id/button_6"
       android:layout_width="wrap_content"
       android:layout_height="wrap_content"
       android:layout_margin="5dp"
       android:text="Button 6" />

   <androidx.appcompat.widget.AppCompatButton
       android:id="@+id/button_7"
       android:layout_width="wrap_content"
       android:layout_height="wrap_content"
       android:layout_margin="5dp"
       android:text="Button 7" />
</LinearLayout>
Để tạo nên một flat view hierarchy, chúng ta có thể sử dụng ConstraintLayout và set constraint cho mỗi item view để có được kết quả tương tự:
 <androidx.constraintlayout.widget.ConstraintLayout xmlns:android="http://schemas.android.com/apk/res/android"
    xmlns:app="http://schemas.android.com/apk/res-auto"
    android:layout_width="match_parent"
    android:layout_height="match_parent"
    android:gravity="center"
    android:orientation="vertical">

    <androidx.appcompat.widget.AppCompatButton
        android:id="@+id/button_1"
        android:layout_width="wrap_content"
        android:layout_height="wrap_content"
        android:layout_margin="5dp"
        android:text="Button 1"
        app:layout_constraintBottom_toTopOf="@id/button_2"
        app:layout_constraintEnd_toEndOf="parent"
        app:layout_constraintStart_toStartOf="parent"
        app:layout_constraintTop_toTopOf="parent"
        app:layout_constraintVertical_chainStyle="packed" />

    <androidx.appcompat.widget.AppCompatButton
        android:id="@+id/button_2"
        android:layout_width="wrap_content"
        android:layout_height="wrap_content"
        android:layout_margin="5dp"
        android:text="Button 2"
        app:layout_constraintBottom_toTopOf="@id/button_3"
        app:layout_constraintEnd_toEndOf="parent"
        app:layout_constraintStart_toStartOf="parent"
        app:layout_constraintTop_toBottomOf="@id/button_1" />

    <androidx.appcompat.widget.AppCompatButton
        android:id="@+id/button_3"
        android:layout_width="wrap_content"
        android:layout_height="wrap_content"
        android:layout_margin="5dp"
        android:text="Button 3"
        app:layout_constraintBottom_toTopOf="@id/button_4"
        app:layout_constraintEnd_toEndOf="parent"
        app:layout_constraintStart_toStartOf="parent"
        app:layout_constraintTop_toBottomOf="@id/button_2" />

    <androidx.appcompat.widget.AppCompatButton
        android:id="@+id/button_4"
        android:layout_width="wrap_content"
        android:layout_height="wrap_content"
        android:layout_margin="5dp"
        android:text="Button 4"
        app:layout_constraintBottom_toTopOf="@id/button_5"
        app:layout_constraintEnd_toEndOf="parent"
        app:layout_constraintStart_toStartOf="parent"
        app:layout_constraintTop_toBottomOf="@id/button_3" />

    <androidx.appcompat.widget.AppCompatButton
        android:id="@+id/button_5"
        android:layout_width="wrap_content"
        android:layout_height="wrap_content"
        android:layout_margin="5dp"
        android:text="Button 5"
        app:layout_constraintBottom_toTopOf="@id/button_6"
        app:layout_constraintEnd_toEndOf="parent"
        app:layout_constraintStart_toStartOf="parent"
        app:layout_constraintTop_toBottomOf="@id/button_4" />

    <androidx.appcompat.widget.AppCompatButton
        android:id="@+id/button_6"
        android:layout_width="wrap_content"
        android:layout_height="wrap_content"
        android:layout_margin="5dp"
        android:text="Button 6"
        app:layout_constraintBottom_toTopOf="@id/button_7"
        app:layout_constraintEnd_toEndOf="parent"
        app:layout_constraintStart_toStartOf="parent"
        app:layout_constraintTop_toBottomOf="@id/button_5" />

    <androidx.appcompat.widget.AppCompatButton
        android:id="@+id/button_7"
        android:layout_width="wrap_content"
        android:layout_height="wrap_content"
        android:layout_margin="5dp"
        android:text="Button 7"
        app:layout_constraintBottom_toBottomOf="parent"
        app:layout_constraintEnd_toEndOf="parent"
        app:layout_constraintStart_toStartOf="parent"
        app:layout_constraintTop_toBottomOf="@id/button_6" />
</androidx.constraintlayout.widget.ConstraintLayout>
Tuy nhiên, cách tiếp cận này cũng có một vài vấn đề
-
Mỗi item cần neo với các view bên cách điều này làm việc thêm/xóa/thay đổi các view trở nên không thoải mãi khi chũng ta edit XML file.
-
Margin phải được set trên mỗi view làm cho view khá cồng kềnh mặc dù sử dụng GuideLine và style có thể giảm nhẹ vấn đề này
-
Tốn khá nhiều công sức để tạo nên các chain.
Cách tiếp cận mới với Flow.
Flow
Flow là một virtual layout, Nó có thể được sử dụng bên trong một ConstraintLayout và hỗ trợ nhiều cách bố trí các widget được tham chiếu (tạo ra một single chain hoăc multiple chains để bao quanh một số view). Lợi ích của virtaul layout so với các viewgroups bình thường là:
- Layout hierarchy vẫn phẳng, làm đơn giản các runtime manipulations và animations
- Bạn có thể constrain Flow widget như thường làm với bất kỳ view nào khác.
- Bạn có thể constrain các view khác với các view được sắp xếp bởi Flow
- Trong MotionLayout bạn có thể animate các view bên trong và bên ngoài một flow virtual layout, thay đổi orientation của nó,...
Cách tiếp cận với Flow
Đây là file layout sử dụng Flow:
<?xml version="1.0" encoding="utf-8"?>
<androidx.constraintlayout.widget.ConstraintLayout xmlns:android="http://schemas.android.com/apk/res/android"
    xmlns:app="http://schemas.android.com/apk/res-auto"
    android:layout_width="match_parent"
    android:layout_height="match_parent">

    <androidx.appcompat.widget.AppCompatButton
        android:id="@+id/button_1"
        android:layout_width="wrap_content"
        android:layout_height="wrap_content"
        android:text="Button 1" />

    <androidx.appcompat.widget.AppCompatButton
        android:id="@+id/button_2"
        android:layout_width="wrap_content"
        android:layout_height="wrap_content"
        android:text="Button 2" />

    <androidx.appcompat.widget.AppCompatButton
        android:id="@+id/button_3"
        android:layout_width="wrap_content"
        android:layout_height="wrap_content"
        android:text="Button 3" />

    <androidx.appcompat.widget.AppCompatButton
        android:id="@+id/button_4"
        android:layout_width="wrap_content"
        android:layout_height="wrap_content"
        android:text="Button 4" />

    <androidx.appcompat.widget.AppCompatButton
        android:id="@+id/button_5"
        android:layout_width="wrap_content"
        android:layout_height="wrap_content"
        android:text="Button 5" />

    <androidx.appcompat.widget.AppCompatButton
        android:id="@+id/button_6"
        android:layout_width="wrap_content"
        android:layout_height="wrap_content"
        android:text="Button 6" />

    <androidx.appcompat.widget.AppCompatButton
        android:id="@+id/button_7"
        android:layout_width="wrap_content"
        android:layout_height="wrap_content"
        android:text="Button 7" />

    <androidx.constraintlayout.helper.widget.Flow
        android:layout_width="wrap_content"
        android:layout_height="wrap_content"
        android:layout_margin="5dp"
        android:orientation="vertical"
   app:constraint_referenced_ids="button_1,button_2,button_3,button_4,button_5,button_6,button_7"
        app:layout_constraintBottom_toBottomOf="parent"
        app:layout_constraintEnd_toEndOf="parent"
        app:layout_constraintStart_toStartOf="parent"
        app:layout_constraintTop_toTopOf="parent" />
</androidx.constraintlayout.widget.ConstraintLayout>
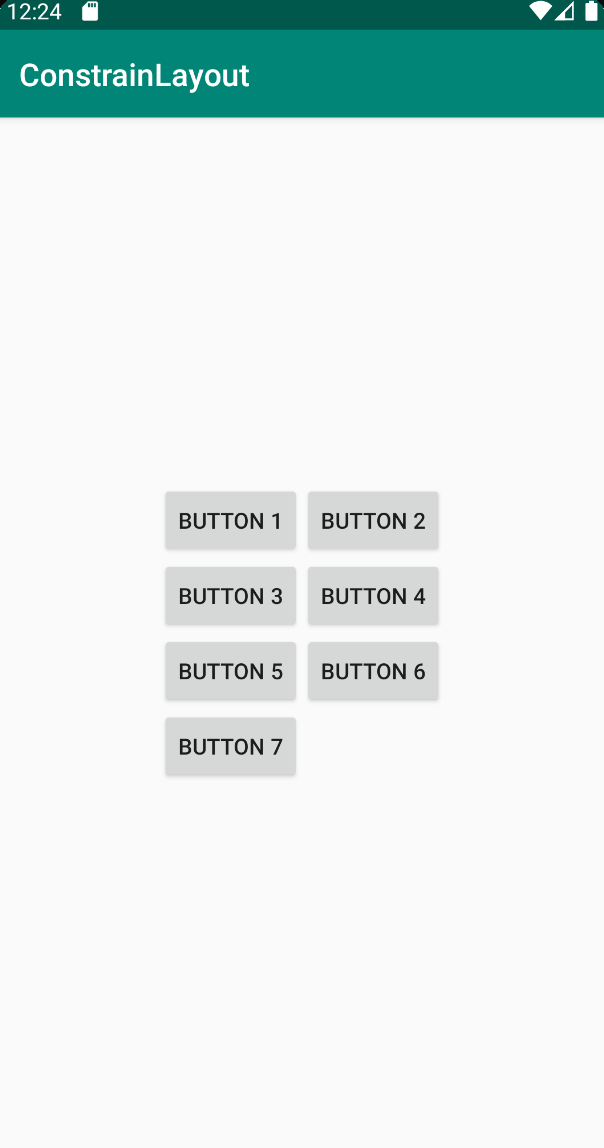
Bằng cách sử dụng vertical hoặc horizontal orientation như trong LinearLayout. Chúng ta có thể bố trí các layout theo chiều dọc hoặc chiều ngang.
Chú ý rằng mỗi item view không cần viết bất kỳ constraint nào. Bằng cách thiết lập app:constraint_referenced_ids="button_1,button_2,button_3,button_4,button_5,button_6,button_7", chúng ta có thể đơn giản kiểm soát được align style, margin và nhiều thuộc tính khác sẽ áp dụng cho mỗi view này.
Một vài thuộc tính cần thiết khi sử dụng Flow
Một thuộc tính mà mình đã tìm hiểu là flow_wrapMode. Nó giúp control cách các widget được bố trí theo hướng đã cho
-
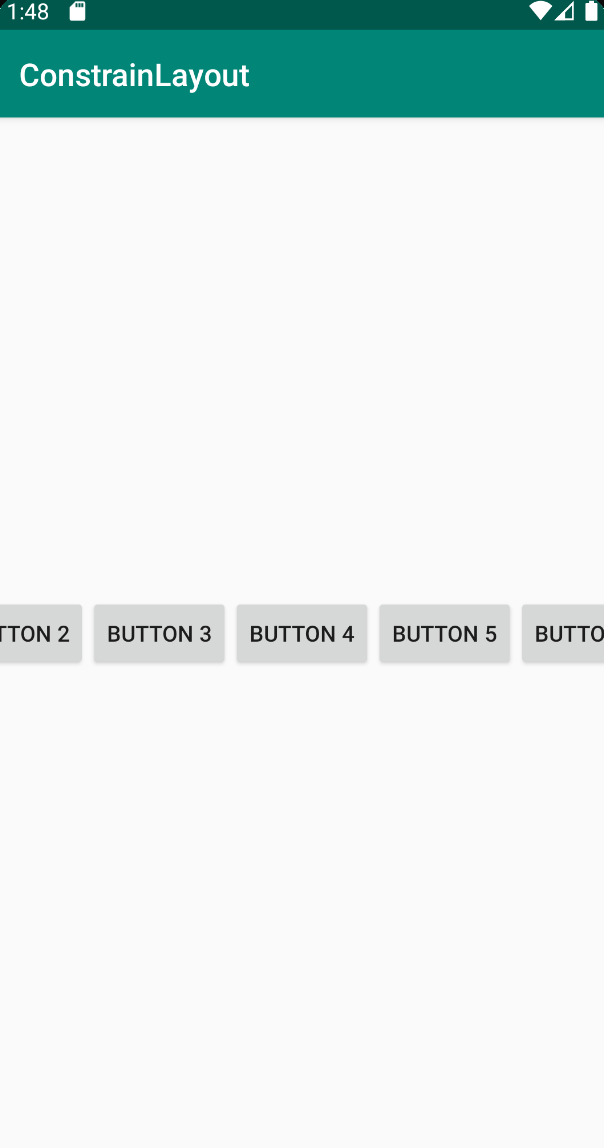
app:flow_wrapMode="none" sẽ tạo một single chain cho mỗi referenced elements khi nó lớn hơn không gian sẵn có.
![]()
-
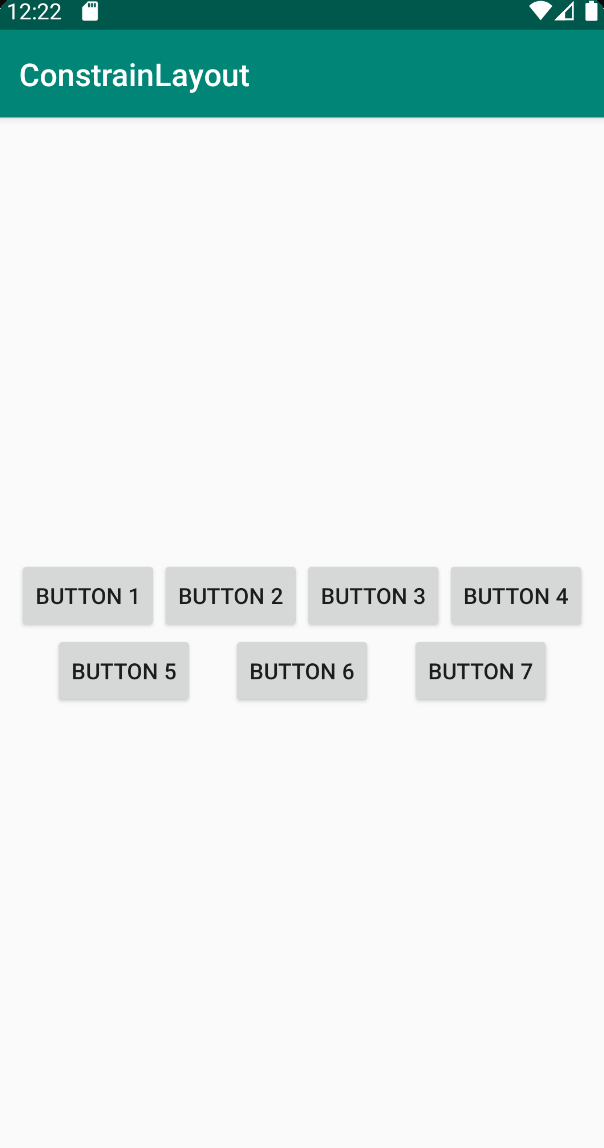
app:flow_wrapMode="chain" sẽ tạo ra multiple chains nếu các referenced elements lớn hơn không gian sẵn có.
![]()
-
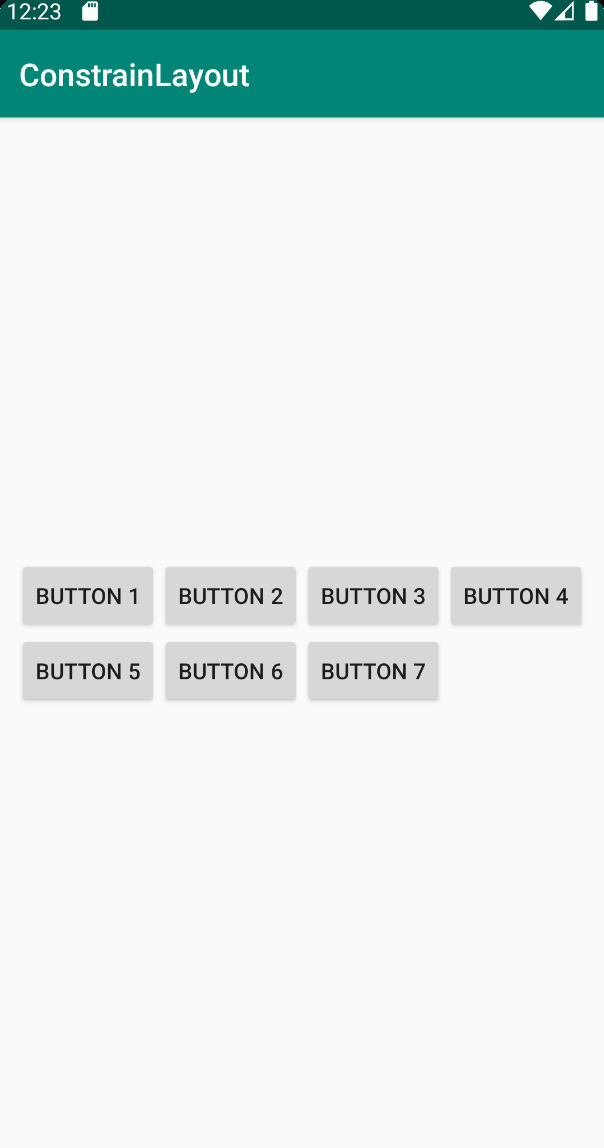
flow_wrapMode="aligned" tương tự chain, nhưng nó sẽ align các elements, về cơ bản tạo ra các rows và columns
![]()
Một thuộc tính quan trong khác là flow_maxElementsWrap sẽ chỉ định số lượng elements trước khi wrap, bất kể chúng có phù hợp với không gian có sẵn hay không.
Đây là ví dụ với flow_maxElementsWrap là 2:
Còn một vài thuộc tính nữa các bạn có thể tham khảo tại đây
Kết
Hi vọng bài viết này có thể giúp bạn có thêm một cách tiếp cận với việc sắp xếp các view theo hàng và theo cột để sử dụng trong các trường hợp cụ thể. Cảm ơn các bạn đã đọc bài viết. Hi vọng các bạn sẽ ủng hộ mình trong các bài viết tiếp theo
Tài liệu tham khảo:
https://medium.com/@glebkalinichenkousa/review-virtual-helpers-in-constraint-layout-2-0-beb5f9319693 https://medium.com/@lcdsmao/say-goodbye-to-linearlayout-with-flow-411f2f47c6c9 https://developer.android.com/reference/android/support/constraint/helper/Flow
All rights reserved
