Sử dụng Deep Learning để vẽ tranh
Bài đăng này đã không được cập nhật trong 7 năm
Tổng quát
Có bao giờ bạn từng nghĩ mình có thể vẽ một bức tranh nổi tiếng giống như Picasso hay Van Gogh chưa? Chắc bạn không thể làm được điều đó đâu. Nhưng với deeplearning thì không gì là không thể. Trong bài này mình sẽ hướng dẫn các bạn sử dụng deeplearning để tạo ra hình ảnh theo phong cách của một hình ảnh khác (bạn có thể vẽ giống như Picasso hay Van Gogh). Kỹ thuật này được gọi là Neural Style Transfer, nó được đề xuất lần đầu tiên trong bài báo A Neural Algorithm of Artistic Style của Leon A. Gatys. Bạn có thể xem chi tiết bài báo tại đây.
Neural style transfer sử dụng 3 ảnh: ảnh mang nội dung (content image), ảnh chứa phong cách (style reference image) và 1 ảnh input image. Nó sẽ biến ảnh input image của bạn thành 1 ảnh mang nội dung của content image và mang phong cách của style reference image.
Ví dụ có 1 ảnh content image và 1 ảnh style reference image dưới đây: 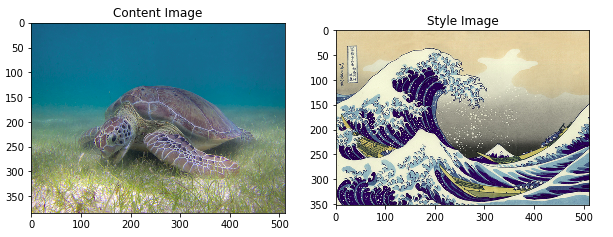
và kết quả của Neural style transfer là: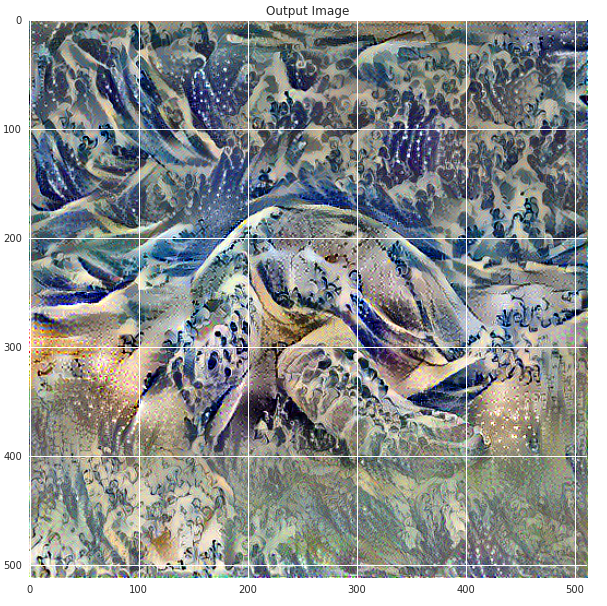 Bản chất của Neural style transfer là xác định hai hàm khoảng cách, một hàm mô tả mức độ khác nhau của nội dung của hai hình ảnh (gọi là 𝐿𝑐𝑜𝑛𝑡𝑒𝑛𝑡) và một hàm mô tả sự khác biệt phong cách giữa hai hình ảnh (gọi là 𝐿𝑠𝑡𝑦𝑙𝑒). Sau đó, cho ba hình ảnh, hình ảnh phong cách mong muốn, hình ảnh nội dung mong muốn và hình ảnh đầu vào (được khởi tạo bằng hình ảnh nội dung), Ta sẽ cố gắng biến đổi hình ảnh đầu vào để giảm thiểu khoảng cách nội dung với hình ảnh nội dung và khoảng cách theo phong cách hình ảnh phong cách. Cuối cùng sẽ tạo ra một hình ảnh phù hợp với nội dung của hình ảnh nội dung và phong cách của hình ảnh phong cách.
Coding
Đầu tiên chúng ta phải download content image và style reference image và import thư viện.
import os
img_dir = './tmp/nst'
if not os.path.exists(img_dir):
    os.makedirs(img_dir)
!wget --quiet -P ./tmp/nst/ https://upload.wikimedia.org/wikipedia/commons/d/d7/Green_Sea_Turtle_grazing_seagrass.jpg
!wget --quiet -P ./tmp/nst/ https://upload.wikimedia.org/wikipedia/commons/0/0a/The_Great_Wave_off_Kanagawa.jpg
!wget --quiet -P ./tmp/nst/ https://upload.wikimedia.org/wikipedia/commons/b/b4/Vassily_Kandinsky%2C_1913_-_Composition_7.jpg
!wget --quiet -P ./tmp/nst/ https://upload.wikimedia.org/wikipedia/commons/0/00/Tuebingen_Neckarfront.jpg
!wget --quiet -P ./tmp/nst/ https://upload.wikimedia.org/wikipedia/commons/6/68/Pillars_of_creation_2014_HST_WFC3-UVIS_full-res_denoised.jpg
!wget --quiet -P ./tmp/nst/ https://upload.wikimedia.org/wikipedia/commons/thumb/e/ea/Van_Gogh_-_Starry_Night_-_Google_Art_Project.jpg/1024px-Van_Gogh_-_Starry_Night_-_Google_Art_Project.jpg
import matplotlib.pyplot as plt
import matplotlib as mpl
mpl.rcParams['figure.figsize'] = (10,10)
mpl.rcParams['axes.grid'] = False

import numpy as np
from PIL import Image
import time
import functools
import tensorflow as tf
import tensorflow.contrib.eager as tfe

from tensorflow.python.keras.preprocessing import image as kp_image
from tensorflow.python.keras import models
from tensorflow.python.keras import losses
from tensorflow.python.keras import layers
from tensorflow.python.keras import backend as K
tf.enable_eager_execution()
print("Eager execution: {}".format(tf.executing_eagerly()))
# Set up some global values here
content_path = '/tmp/nst/Green_Sea_Turtle_grazing_seagrass.jpg'
style_path = '/tmp/nst/The_Great_Wave_off_Kanagawa.jpg'
Chúng ta sẽ viết 2 hàm để load và show ảnh đầu vào
def load_img(path_to_img):
  max_dim = 512
  img = Image.open(path_to_img)
  long = max(img.size)
  scale = max_dim/long
  img = img.resize((round(img.size[0]*scale), round(img.size[1]*scale)), Image.ANTIALIAS)

  img = kp_image.img_to_array(img)

  # We need to broadcast the image array such that it has a batch dimension
  img = np.expand_dims(img, axis=0)
  return img
def imshow(img, title=None):
  # Remove the batch dimension
  out = np.squeeze(img, axis=0)
  # Normalize for display
  out = out.astype('uint8')
  plt.imshow(out)
  if title is not None:
    plt.title(title)
  plt.imshow(out)
Chúng ta thử show ra content image và style reference image
plt.figure(figsize=(10,10))

content = load_img(content_path).astype('uint8')
style = load_img(style_path).astype('uint8')

plt.subplot(1, 2, 1)
imshow(content, 'Content Image')

plt.subplot(1, 2, 2)
imshow(style, 'Style Image')
plt.show()
Tiền xử lý dữ liệu
Bây giờ ta sẽ viết hàm load và xử lý dữ liệu để dữ liệu của chúng ta phù hợp với quy trình train của mạng VGG. Mạng VGG được train với hình ảnh có mỗi kênh được chuẩn hóa theo giá trị trung bình là [103.939, 116.779, 123.68] và với kênh BGR.
def load_and_process_img(path_to_img):
  img = load_img(path_to_img)
  img = tf.keras.applications.vgg19.preprocess_input(img)
  return img
Để xem kết quả output sau quá trình tối ưu, ta thực hiện bước tiền xử lý ngược. Hơn nữa, vì hình ảnh được tối ưu hóa của chúng ta có thể lấy giá trị của nó ở bất kỳ vị trí nào giữa −∞ và +∞, chúng ta phải kẹp để duy trì các giá trị của chúng ta từ trong khoảng 0-255.
def deprocess_img(processed_img):
  x = processed_img.copy()
  if len(x.shape) == 4:
    x = np.squeeze(x, 0)
  assert len(x.shape) == 3, ("Input to deprocess image must be an image of "
                             "dimension [1, height, width, channel] or [height, width, channel]")
  if len(x.shape) != 3:
    raise ValueError("Invalid input to deprocessing image")

  # perform the inverse of the preprocessiing step
  x[:, :, 0] += 103.939
  x[:, :, 1] += 116.779
  x[:, :, 2] += 123.68
  x = x[:, :, ::-1]

  x = np.clip(x, 0, 255).astype('uint8')
  return x
Xác định nội dung và style hình ảnh
Để có được cả nội dung và style của hình ảnh, ta sẽ xem xét một số layer trung gian trong mô hình của chúng ta. Khi chúng ta đi sâu hơn vào mô hình, các layer trung gian này đại diện cho các features bậc cao hơn. Trong trường hợp này, chúng ta đang sử dụng kiến trúc mạng VGG19, một mạng phân loại hình ảnh. Các layer trung gian này là cần thiết để xác định sự thể hiện của nội dung và style hình ảnh. Đối với hình ảnh đầu vào, ta sẽ cố gắng khớp style và nội dung với ảnh đích ở các lớp trung gian này.
# Content layer where will pull our feature maps
content_layers = ['block5_conv2']

# Style layer we are interested in
style_layers = ['block1_conv1',
                'block2_conv1',
                'block3_conv1',
                'block4_conv1',
                'block5_conv1'
               ]

num_content_layers = len(content_layers)
num_style_layers = len(style_layers)
Xây dựng model
Ở đây, chúng ta sẽ sử dụng mạng VGG19 để trích xuất các feature maps của content image, style reference image và ảnh được tạo ra. Sử dụng VGG19 vì như đề xuất trong bài báo. Ngoài ra, VGG19 là một mô hình tương đối đơn giản (so với ResNet, khởi động, vv) các feature maps thực sự làm việc tốt việc chuyển đổi style.
def get_model():
  """ Creates our model with access to intermediate layers.

  This function will load the VGG19 model and access the intermediate layers.
  These layers will then be used to create a new model that will take input image
  and return the outputs from these intermediate layers from the VGG model.

  Returns:
    returns a keras model that takes image inputs and outputs the style and
      content intermediate layers.
  """
  # Load our model. We load pretrained VGG, trained on imagenet data
  vgg = tf.keras.applications.vgg19.VGG19(include_top=False, weights='imagenet')
  vgg.trainable = False
  # Get output layers corresponding to style and content layers
  style_outputs = [vgg.get_layer(name).output for name in style_layers]
  content_outputs = [vgg.get_layer(name).output for name in content_layers]
  model_outputs = style_outputs + content_outputs
  # Build model
  return models.Model(vgg.input, model_outputs)
Như vậy, ta đã tạo ra một mô hình có input là một hình ảnh và output là các layer về nội dung và style.
Hàm tối ưu (loss functions)
Như đã nói ở trên, hàm cần tối ưu của chúng ta gồm có 2 hàm: là hàm khoảng cách giữa nội dung và hàm khoảng cách giữa style. Do trong phạm vi hẹp nên mình chỉ giới thiệu code của 2 hàm này. Còn về thuật toán xác định 2 hàm này, các bạn có thể xem tại đây.
Hàm khoảng cách về nội dung (content loss):
def get_content_loss(base_content, target):
  return tf.reduce_mean(tf.square(base_content - target))
Hàm khoảng cách về style (style loss):
def gram_matrix(input_tensor):
  # We make the image channels first
  channels = int(input_tensor.shape[-1])
  a = tf.reshape(input_tensor, [-1, channels])
  n = tf.shape(a)[0]
  gram = tf.matmul(a, a, transpose_a=True)
  return gram / tf.cast(n, tf.float32)

def get_style_loss(base_style, gram_target):
  """Expects two images of dimension h, w, c"""
  # height, width, num filters of each layer
  # We scale the loss at a given layer by the size of the feature map and the number of filters
  height, width, channels = base_style.get_shape().as_list()
  gram_style = gram_matrix(base_style)

  return tf.reduce_mean(tf.square(gram_style - gram_target))# / (4. * (channels ** 2) * (width * height) ** 2)
Tối ưu hàm mất mát
Chúng ta sẽ sử dụng thuật toán GD để tối ưu 2 hàm khoảng cách trên.
Trước tiên chúng ta viết 1 hàm để xác định content and style feature từ model của chúng ta.
def get_feature_representations(model, content_path, style_path):
  """Helper function to compute our content and style feature representations.

  This function will simply load and preprocess both the content and style
  images from their path. Then it will feed them through the network to obtain
  the outputs of the intermediate layers.

  Arguments:
    model: The model that we are using.
    content_path: The path to the content image.
    style_path: The path to the style image

  Returns:
    returns the style features and the content features.
  """
  # Load our images in
  content_image = load_and_process_img(content_path)
  style_image = load_and_process_img(style_path)

  # batch compute content and style features
  style_outputs = model(style_image)
  content_outputs = model(content_image)


  # Get the style and content feature representations from our model
  style_features = [style_layer[0] for style_layer in style_outputs[:num_style_layers]]
  content_features = [content_layer[0] for content_layer in content_outputs[num_style_layers:]]
  return style_features, content_features
Ở đây chúng ta sử dụng tf.GradientTape để tính toán gradient.
def compute_loss(model, loss_weights, init_image, gram_style_features, content_features):
  """This function will compute the loss total loss.

  Arguments:
    model: The model that will give us access to the intermediate layers
    loss_weights: The weights of each contribution of each loss function.
      (style weight, content weight, and total variation weight)
    init_image: Our initial base image. This image is what we are updating with
      our optimization process. We apply the gradients wrt the loss we are
      calculating to this image.
    gram_style_features: Precomputed gram matrices corresponding to the
      defined style layers of interest.
    content_features: Precomputed outputs from defined content layers of
      interest.

  Returns:
    returns the total loss, style loss, content loss, and total variational loss
  """
  style_weight, content_weight = loss_weights

  # Feed our init image through our model. This will give us the content and
  # style representations at our desired layers. Since we're using eager
  # our model is callable just like any other function!
  model_outputs = model(init_image)

  style_output_features = model_outputs[:num_style_layers]
  content_output_features = model_outputs[num_style_layers:]

  style_score = 0
  content_score = 0

  # Accumulate style losses from all layers
  # Here, we equally weight each contribution of each loss layer
  weight_per_style_layer = 1.0 / float(num_style_layers)
  for target_style, comb_style in zip(gram_style_features, style_output_features):
    style_score += weight_per_style_layer * get_style_loss(comb_style[0], target_style)

  # Accumulate content losses from all layers
  weight_per_content_layer = 1.0 / float(num_content_layers)
  for target_content, comb_content in zip(content_features, content_output_features):
    content_score += weight_per_content_layer* get_content_loss(comb_content[0], target_content)

  style_score *= style_weight
  content_score *= content_weight

  # Get total loss
  loss = style_score + content_score
  return loss, style_score, content_score
def compute_grads(cfg):
  with tf.GradientTape() as tape:
    all_loss = compute_loss(**cfg)
  # Compute gradients wrt input image
  total_loss = all_loss[0]
  return tape.gradient(total_loss, cfg['init_image']), all_loss
Lặp tối ưu
import IPython.display

def run_style_transfer(content_path,
                       style_path,
                       num_iterations=1000,
                       content_weight=1e3,
                       style_weight=1e-2):
  # We don't need to (or want to) train any layers of our model, so we set their
  # trainable to false.
  model = get_model()
  for layer in model.layers:
    layer.trainable = False

  # Get the style and content feature representations (from our specified intermediate layers)
  style_features, content_features = get_feature_representations(model, content_path, style_path)
  gram_style_features = [gram_matrix(style_feature) for style_feature in style_features]

  # Set initial image
  init_image = load_and_process_img(content_path)
  init_image = tfe.Variable(init_image, dtype=tf.float32)
  # Create our optimizer
  opt = tf.train.AdamOptimizer(learning_rate=5, beta1=0.99, epsilon=1e-1)

  # For displaying intermediate images
  iter_count = 1

  # Store our best result
  best_loss, best_img = float('inf'), None

  # Create a nice config
  loss_weights = (style_weight, content_weight)
  cfg = {
      'model': model,
      'loss_weights': loss_weights,
      'init_image': init_image,
      'gram_style_features': gram_style_features,
      'content_features': content_features
  }

  # For displaying
  num_rows = 2
  num_cols = 5
  display_interval = num_iterations/(num_rows*num_cols)
  start_time = time.time()
  global_start = time.time()

  norm_means = np.array([103.939, 116.779, 123.68])
  min_vals = -norm_means
  max_vals = 255 - norm_means

  imgs = []
  for i in range(num_iterations):
    grads, all_loss = compute_grads(cfg)
    loss, style_score, content_score = all_loss
    opt.apply_gradients([(grads, init_image)])
#     clipped = tf.clip_by_value(init_image, min_vals, max_vals)
#     init_image.assign(clipped)
    end_time = time.time()

    if loss < best_loss:
      # Update best loss and best image from total loss.
      best_loss = loss
      best_img = deprocess_img(init_image.numpy())

    if i % display_interval== 0:
      start_time = time.time()

      # Use the .numpy() method to get the concrete numpy array
      plot_img = init_image.numpy()
      plot_img = deprocess_img(plot_img)
      imgs.append(plot_img)
      IPython.display.clear_output(wait=True)
      IPython.display.display_png(Image.fromarray(plot_img))
      print('Iteration: {}'.format(i))
      print('Total loss: {:.4e}, '
            'style loss: {:.4e}, '
            'content loss: {:.4e}, '
            'time: {:.4f}s'.format(loss, style_score, content_score, time.time() - start_time))
  print('Total time: {:.4f}s'.format(time.time() - global_start))
  IPython.display.clear_output(wait=True)
  plt.figure(figsize=(14,4))
  for i,img in enumerate(imgs):
      plt.subplot(num_rows,num_cols,i+1)
      plt.imshow(img)
      plt.xticks([])
      plt.yticks([])

  return best_img, best_loss
best, best_loss = run_style_transfer(content_path,
                                     style_path, num_iterations=1000)
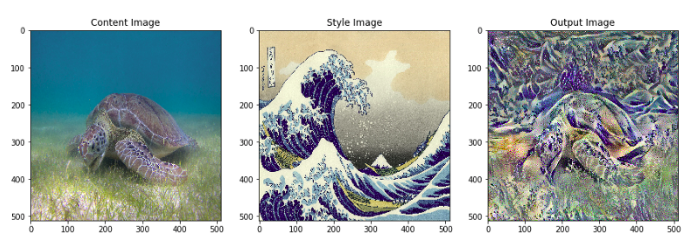
Đây là kết quả sau khi tối ưu.
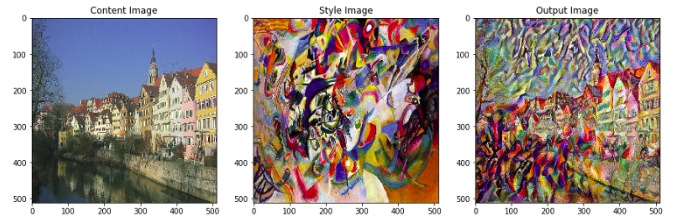
 Ngoài ra, nếu thay đổi
 content_path và style_path ta sẽ có các kết quả khác vô cùng ngạc nhiên sau: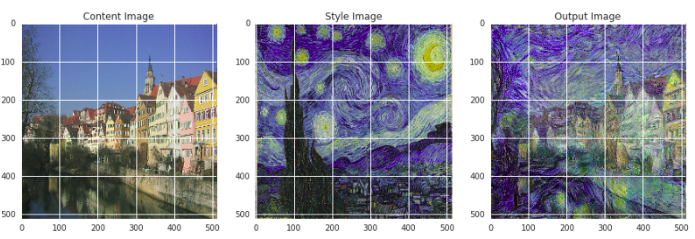
Tham khảo:
All rights reserved
