Sử dụng custom view làm MenuItem
Bài đăng này đã không được cập nhật trong 4 năm
Android framework giúp chúng ta rất nhiều trong việc tạo và tương tác với các menu item - những icon nhỏ ở phía bên phải của toolbar. Chỉ bằng việc gọi 1 vài hàm thiết lập, framework sẽ tự động giải quyết 3 vấn đề sau:
- Chèn 1 view vào Toolbar và đảm bảo là nó ở đúng vị trí, đúng hình ảnh và đúng padding với các view khác.
- Thêm 1 click listener cho view đó.
- Định nghĩa phản hồi trực quan khi được click (ví dụ như màu của background thay đổi hoặc hiệu ứng ripple).
Việc duy nhất chúng ta cần làm là định nghĩa tiêu đề và icon drawable trong file menu layout, inflate layout này trong onCreateOptionsMenu() và định nghĩa các action cho click listener trong onOptionsItemSelected(). Nếu bạn đã từng làm việc với menu từ trước rồi thì những thứ này không có gì mới.
R.menu.activity_main.xml
<?xml version="1.0" encoding="utf-8"?>
<menu xmlns:android="http://schemas.android.com/apk/res/android"
      xmlns:app="http://schemas.android.com/apk/res-auto">

    <item
        android:id="@+id/activity_main_update_menu_item"
        android:icon="@drawable/ic_refresh_white_24dp"
        android:title="Update"
        app:showAsAction="ifRoom"/>

</menu>
MainActivity.java
public class MainActivity extends AppCompatActivity {

    @Override
    protected void onCreate(Bundle savedInstanceState) {
        super.onCreate(savedInstanceState);
        setContentView(R.layout.activity_main);
    }

    @Override
    public boolean onCreateOptionsMenu(Menu menu) {
        super.onCreateOptionsMenu(menu);
        getMenuInflater().inflate(R.menu.activity_main, menu);
        return true;
    }

    @Override
    public boolean onOptionsItemSelected(MenuItem item) {
        switch (item.getItemId()) {
            case R.id.activity_main_update_menu_item:
                Toast.makeText(this, "update clicked", Toast.LENGTH_SHORT).show();
                return true;

            default:
                return super.onOptionsItemSelected(item);
        }

    }
}

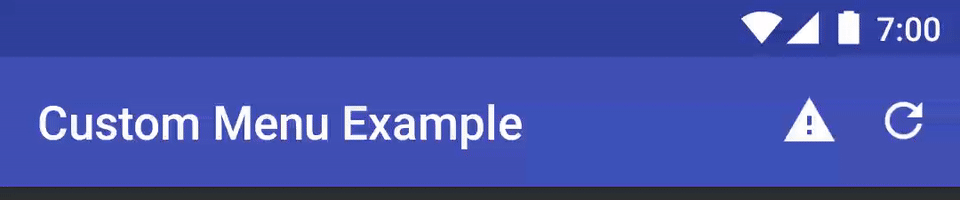
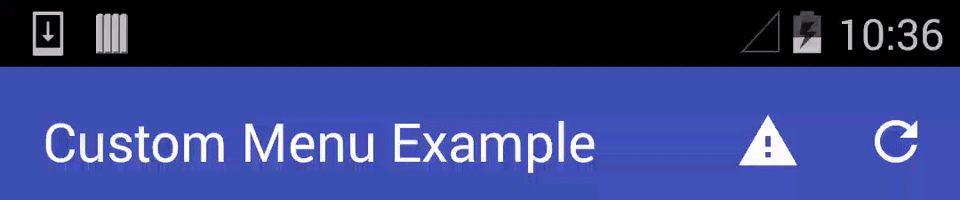
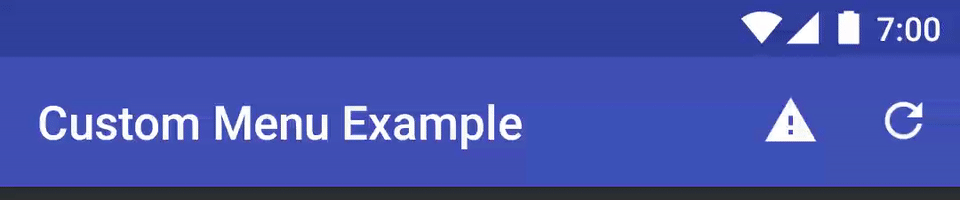
Nhưng chúng ta phải làm gì nếu muốn sử dụng custom view thay vì chỉ định nghĩa 1 icon drawable? Giả sử chúng ta có 1 view để hiển thị số thông báo mà ứng dụng của chúng ta nhận được. Chúng ta cần phải update icon để hiện hoặc ẩn 1 vòng tròn màu đỏ có 1 số nằm trong. Và giả sử là menu item "refresh" sẽ request số thông báo mới nhất và update menu item "alert". Kết quả cuối cùng mà chúng ta mong muốn sẽ như thế này:
Chúng ta có thể dễ dàng thay đổi icon được sử dụng trong 1 menu item. Chúng ta thậm chí có thể "gian lận" bằng cách cung cấp 11 icon khác nhau sau đó lần lượt thay chúng vào khi cần:
icon không có vòng tròn đỏ
icon với vòng tròn đỏ rỗng
icon với vòng tròn đỏ và số "1"
icon với vòng tròn đỏ và số "2"
...
icon với vòng tròn đỏ và số "9"
Trong khi việc này có thể dễ dàng hơn cho các lập trình viên chúng ta (nhưng lại nhiều việc hơn cho các designer), những icon đó không sớm thì muộn sẽ làm cho file apk bị tăng dung lượng. Thay vào đó, chúng ta có thể đối xử tốt hơn với người dùng bằng cách dựa vào custom view để đạt được kết quả mong muốn với ít resource cần thêm vào hơn.
Định nghĩa 1 Custom View
Chìa khóa để sử dụng 1 custom view để làm icon cho menu item là sử dụng app:actionLayout thay vì android:icon trong file menu.
R.menu.activity_main.xml
<?xml version="1.0" encoding="utf-8"?>
<menu xmlns:android="http://schemas.android.com/apk/res/android"
      xmlns:app="http://schemas.android.com/apk/res-auto">

    <item
        android:id="@+id/activity_main_alerts_menu_item"
        android:title="Alerts"
        app:actionLayout="@layout/view_alertsbadge" <!-- phần quan trọng -->
        app:showAsAction="ifRoom"/>

    <item
        android:id="@+id/activity_main_update_menu_item"
        android:icon="@drawable/ic_refresh_white_24dp"
        android:title="Update"
        app:showAsAction="ifRoom"/>

</menu>
Next we will layout our custom view in a normal layout file.
Tiếp theo chúng ta sẽ định nghĩa layout cho custom view
R.layout.view_alertsbadge.xml
<?xml version="1.0" encoding="utf-8"?>
<FrameLayout
    xmlns:android="http://schemas.android.com/apk/res/android"
    xmlns:tools="http://schemas.android.com/tools"
    android:layout_width="32dp"
    android:layout_height="32dp"
    android:layout_gravity="center">

    <ImageView
        android:layout_width="@dimen/menu_item_icon_size"
        android:layout_height="@dimen/menu_item_icon_size"
        android:layout_gravity="center"
        android:src="@drawable/ic_warning_white_24dp"/>

    <FrameLayout
        android:id="@+id/view_alert_red_circle"
        android:layout_width="14dp"
        android:layout_height="14dp"
        android:layout_gravity="top|end"
        android:background="@drawable/circle_red"
        android:visibility="gone"
        tools:visibility="visible">

        <TextView
            android:id="@+id/view_alert_count_textview"
            android:layout_width="wrap_content"
            android:layout_height="wrap_content"
            android:layout_gravity="center"
            android:textColor="@color/white"
            android:textSize="10sp"
            tools:text="3"/>

    </FrameLayout>

</FrameLayout>
Cuối cùng chúng ta định nghĩa kích thước cho icon bằng việc tham khảo Material Design guidelines:
dimens.xml
<resources>
    <!-- general dimensions for all custom menu items -->
    <dimen name="menu_item_icon_size">24dp</dimen>
</resources>
Giờ chúng ta đã có 1 vòng tròn đỏ FrameLayout có chứa 1 TextView để hiển thị số thông báo. Chúng ta cũng có 1 ImageView để làm icon cảnh báo. Sau cùng thì chúng ta gói tất cả lại vào trong 1 FrameLayout gốc. Cần chú ý là chúng ta cần phải hardcode kích thước của icon theo tiêu chuẩn của Material design.
Khi đã có layout cho menu rồi thì hãy cho nó vào activity
@Override
public boolean onOptionsItemSelected(MenuItem item) {
    switch (item.getItemId()) {
        case R.id.activity_main_update_menu_item:
            // TODO update alert menu icon
            Toast.makeText(this, "update clicked", Toast.LENGTH_SHORT).show();
            return true;

        ...
    }
}
Nếu chúng ta chạy ứng dụng ngay thì chúng ta sẽ thấy icon mới, nhưng lại có 2 vấn đề phát sinh:
onOptionsItemSelectedsẽ không được gọi khi ấn vào menu item chúng ta vừa tạo.- Icon không có phản hồi trực quan khi được click.
Chúng ta sẽ fix những vấn đề này sớm thôi, nhưng trước hết thì hãy viết đoạn code để làm cho icon hiển thị số thông báo khi được request.
Sử dụng Custom View
Chúng ta muốn config custom view trong menu item mỗi khi view được vẽ lên. Nên thay vì config nó trong onCreateOptionsMenu, chúng ta sẽ làm vài việc trong onPrepareOptionsMenu. Vì menu item của chúng ta chỉ là 1 layout đã được inflate, chúng ta có thể làm việc với nó như với bất kì layout nào khác, ví dụ chúng ta có thể tìm view bằng id.
public class MainActivity extends AppCompatActivity {

    private FrameLayout redCircle;
    private TextView countTextView;
    private int alertCount = 0;

    ...

    @Override
    public boolean onPrepareOptionsMenu(Menu menu) {
        final MenuItem alertMenuItem = menu.findItem(R.id.activity_main_alerts_menu_item);
        FrameLayout rootView = (FrameLayout) alertMenuItem.getActionView();

        redCircle = (FrameLayout) rootView.findViewById(R.id.view_alert_red_circle);
        countTextView = (TextView) rootView.findViewById(R.id.view_alert_count_textview);

        return super.onPrepareOptionsMenu(menu);
    }

    ...
}
Chúng ta có thể truy cập đến root view của menu item bằng cách tìm item đó trong menu và gọi hàm getActionView. Chúng ta sau đó có thể tìm thấy vòng tròn đỏ FrameLayout và số thông báo TextView.
Chúng ta sẽ update icon thông báo mỗi khi user click vào nút "refresh" trên thanh menu:
public class MainActivity extends AppCompatActivity {

    private FrameLayout redCircle;
    private TextView countTextView;
    private int alertCount = 0;

    ...

    @Override
    public boolean onOptionsItemSelected(MenuItem item) {
        switch (item.getItemId()) {
            case R.id.activity_main_update_menu_item:
                alertCount = (alertCount + 1) % 11; // cycle through 0 - 10
                updateAlertIcon()
                return true;

            case R.id.activity_main_alerts_menu_item:
                // TODO update alert menu icon
                Toast.makeText(this, "count cleared", Toast.LENGTH_SHORT).show();

            default:
                return super.onOptionsItemSelected(item);
        }
    }

    private void updateAlertIcon() {
        // if alert count extends into two digits, just show the red circle
        if (0 < alertCount && alertCount < 10) {
            countTextView.setText(String.valueOf(alertCount));
        } else {
            countTextView.setText("");
        }

        redCircle.setVisibility((alertCount > 0) ? VISIBLE : GONE);
    }
}
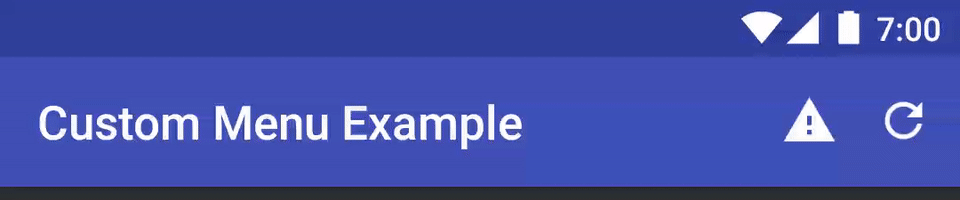
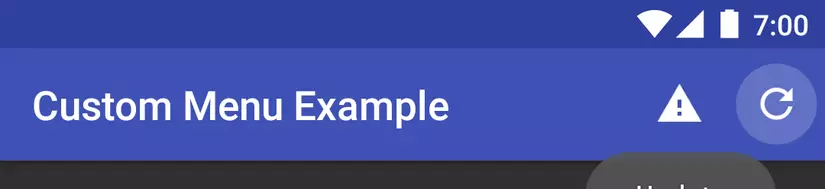
Giờ thì chúng ta đã update được menu item này:

Fix các vấn đề AKA làm nó trở nên hoàn hảo
Như đã nói ở trên thì chúng ta vẫn còn 2 vấn đề:
onOptionsItemSelectedsẽ không được gọi khi ấn vào menu item chúng ta vừa tạo.- Icon không có phản hồi trực quan khi được click.
Hãy cùng xử lý cái đầu tiên trước. Vì 1 vài lí do, khi menu item của chúng ta phụ thuộc vào app:actionLayout thay vì android:icon, onOptionsItemSelected sẽ không được gọi cho menu item đó. Đây là 1 vấn đề đã được biết đến. Giải pháp cho vấn đề này đơn giản là chúng ta tự thêm click listener cho root view và gọi tự gọi onOptionsItemSelected. Hãy cùng reset số thông báo khi người dùng click vào item "alert":
    @Override
    public boolean onPrepareOptionsMenu(Menu menu) {
        final MenuItem alertMenuItem = menu.findItem(R.id.activity_main_alerts_menu_item);
        FrameLayout rootView = (FrameLayout) alertMenuItem.getActionView();

        redCircle = (FrameLayout) rootView.findViewById(R.id.view_alert_red_circle);
        countTextView = (TextView) rootView.findViewById(R.id.view_alert_count_textview);

        rootView.setOnClickListener(new View.OnClickListener() {
            @Override
            public void onClick(View v) {
                onOptionsItemSelected(alertMenuItem);
            }
        });

        return super.onPrepareOptionsMenu(menu);
    }

    @Override
    public boolean onOptionsItemSelected(MenuItem item) {
        switch (item.getItemId()) {
            case R.id.activity_main_update_menu_item:
                alertCount = (alertCount + 1) % 11; // rotate through 0 - 10
                updateAlertIcon();
                return true;

            case R.id.activity_main_alerts_menu_item:
                alertCount = 0;
                updateAlertIcon();
                return true;

            default:
                return super.onOptionsItemSelected(item);
        }
    }
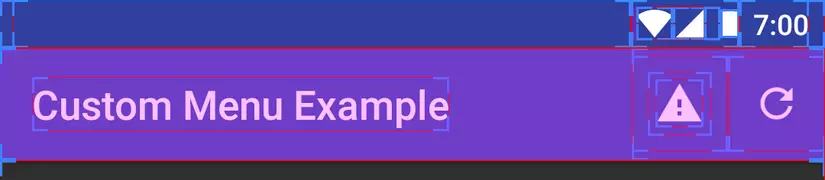
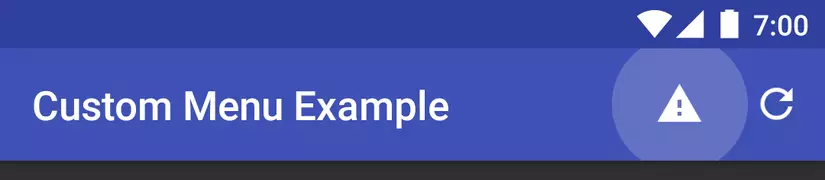
Bây giờ nếu người dùng sử dụng app, họ sẽ thấy 1 số thứ không đúng. Nó sẽ mất 1 chút thời gian để tìm ra cái không đúng ở đây là gì. Họ sẽ thấy phải click vào icon alert nhiều lần trước khi nó hoạt động. Như vậy với những lập trình viên tỉ mỉ như chúng ta thì chúng ta sẽ bật "show layout bounds" trong developer options và sẽ phát hiện ra vấn đề:
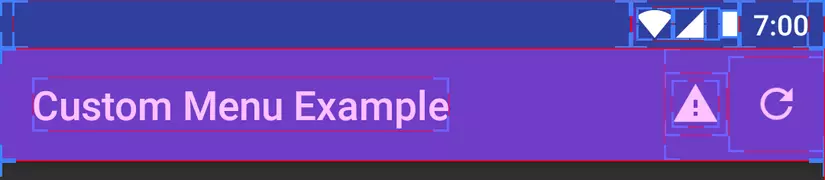
Custom menu item của chúng ta không được tự động cung cấp padding giống như những menu item thường khác. Bởi vậy thì vùng nhận được các touch event sẽ bị giảm đáng kể. Người dùng của chúng ta sẽ phải thử rất nhiều lần để tìm ra vùng đúng để click. Chúng ta có thể fix lỗi này bằng cách thêm 1 FrameLayout cho custom view:
R.layout.view_alertsbadge.xml
<?xml version="1.0" encoding="utf-8"?>
<FrameLayout
    xmlns:android="http://schemas.android.com/apk/res/android"
    xmlns:tools="http://schemas.android.com/tools"
    android:layout_width="@dimen/menu_item_size"
    android:layout_height="@dimen/menu_item_size">

    <FrameLayout
        android:layout_width="32dp"
        android:layout_height="32dp"
        android:layout_gravity="center">

        <ImageView
            android:layout_width="@dimen/menu_item_icon_size"
            android:layout_height="@dimen/menu_item_icon_size"
            android:layout_gravity="center"
            android:src="@drawable/ic_warning_white_24dp"/>

        <FrameLayout
            android:id="@+id/view_alert_red_circle"
            android:layout_width="14dp"
            android:layout_height="14dp"
            android:layout_gravity="top|end"
            android:background="@drawable/circle_red"
            android:visibility="gone"
            tools:visibility="visible">

            <TextView
                android:id="@+id/view_alert_count_textview"
                android:layout_width="wrap_content"
                android:layout_height="wrap_content"
                android:layout_gravity="center"
                android:textColor="@color/white"
                android:textSize="10sp"
                tools:text="3"/>

        </FrameLayout>

    </FrameLayout>

</FrameLayout>
Chúng ta cần phải set root view mới này có kích thước 48dp cả chiều rộng và chiều cao theo tiêu chuẩn của Material design.
dimens.xml
<resources>
    <!-- general dimensions for all custom menu items -->
    <dimen name="menu_item_icon_size">24dp</dimen>
    <dimen name="menu_item_size">48dp</dimen>
</resources>
Điều này sẽ làm tăng kích thước vùng click của chúng ta.
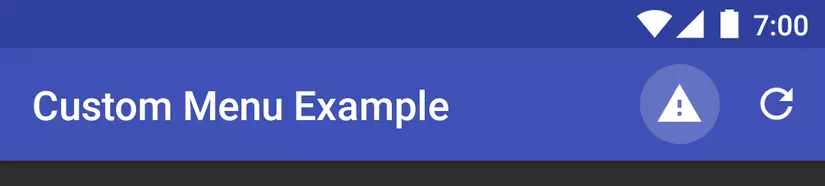
Điều cuối cùng chúng ta phải làm là kích hoạt vài phản hồi hình ảnh khi menu item được click. Đối với các máy từ Lollipop trở lên thì hiệu ứng ở đây là ripple, còn với những máy đời cũ hơn thì màu background sẽ thay đổi. May mắn cho chúng ta là chức năng này đã có sẵn trong attr/selectableItemBackgroundBorderless. Nên tất cả những gì chúng ta cần là 1 view trong file layout để có thể set thuộc tính này vào nó.
R.layout.view_alertsbadge.xml
<?xml version="1.0" encoding="utf-8"?>

<FrameLayout
    xmlns:android="http://schemas.android.com/apk/res/android"
    xmlns:tools="http://schemas.android.com/tools"
    android:layout_width="@dimen/menu_item_size"
    android:layout_height="@dimen/menu_item_size">

    <!-- View riêng lẻ để hiển thị hiệu ứng ripple/màu thay đổi khi menu item được click -->
    <FrameLayout
        android:layout_width="match_parent"
        android:layout_height="match_parent"
        android:layout_gravity="center"
        android:background="?attr/selectableItemBackgroundBorderless"/>

    ...

</FrameLayout>
Hoàn hảo. Mọi thứ nhìn khá là ổn. Hiệu ứng ripple nhìn rất chân thật trên Android 22 và màu background thay đổi cũng hoạt động tốt trên Android 19.
Android 19

Android 22
Điều cuối cùng
Trước khi chúng tôi đưa đoạn code này vào production, chúng tôi đã chạy phần thay đổi này trên device farm và nhận ra 1 số thứ không đúng trên các device chạy Android 23 trở lên. Kích thước của hiệu ứng ripple trên menu item của chúng ta trở nên lớn hơn rất nhiều so với menu item thường:
Hiệu ứng ripple của menu item thường
Hiệu ứng ripple của menu item của chúng ta
Để fix lỗi này chúng tôi đã phải thử nghiệm khá nhiều để tìm ra kích thước chuẩn của ripple. Sau đó ta cần cung cấp 1 dimen riêng cho những device chạy API 23 trở lên. Sau cùng thì chúng ta sẽ update file layout để sử dụng kích thước mới thay vì để cho view chứa ripple là match_parent. Bạn có thể không tin tôi nhưng kích thước của ripple trên API 23+ nên là 28dp.
values/dimens.xml
<resources>
    <!-- general dimensions for all custom menu items -->
    <dimen name="menu_item_icon_size">24dp</dimen>
    <dimen name="menu_item_size">48dp</dimen>
    <dimen name="menu_item_ripple_size">48dp</dimen>
</resources>
values-v23/dimens.xml
<resources>
    <dimen name="menu_item_ripple_size">28dp</dimen>
</resources>
R.layout.view_alertsbadge.xml
<?xml version="1.0" encoding="utf-8"?>

<FrameLayout
    xmlns:android="http://schemas.android.com/apk/res/android"
    xmlns:tools="http://schemas.android.com/tools"
    android:layout_width="@dimen/menu_item_size"
    android:layout_height="@dimen/menu_item_size">

     <!-- separate view to display ripple/color change when menu item is clicked -->
    <FrameLayout
        android:layout_width="@dimen/menu_item_ripple_size"
        android:layout_height="@dimen/menu_item_ripple_size"
        android:layout_gravity="center"
        android:background="?attr/selectableItemBackgroundBorderless"/>

    ...

</FrameLayout>
Chúng ta giờ đã có hiệu ứng ripple với kích thước giống như menu item thường.
Đó là tất cả. Cách giải quyết của chúng ta giờ đã hoạt động trên tất cả các version của Android. Bạn có thể download source code tại đây.

API 19

API 22
API 24
Bài viết được dịch từ USING CUSTOM VIEWS AS MENU ITEMS của tác giả Jason Atwood. Cảm ơn các bạn đã theo dõi.
All rights reserved
