Self-sizing Table View Cells part III
Bài đăng này đã không được cập nhật trong 4 năm
Theo hướng dẫn từ: https://www.raywenderlich.com/129059/self-sizing-table-view-cells
Và tiếp theo từ phần trước: https://viblo.asia/thevinh92/posts/ZDEvLYZrGJb
Show me the Art!
Nếu bạn nhớ lại từ phần I, thì khi bạn nhấn chọn 1 nghệ sĩ sẽ present ra 1 view controller có các tác phẩm của nghệ sĩ đó. Cells trong tableview này sẽ cần phải có chiều cao động bởi mỗi 1 tác phẩm sẽ có 1 ảnh riêng cùng với dữ liệu đi kèm khác nhau. Tương tự như lúc đầu, chúng ta cũng sẽ phải subclass UITableViewCell.
Trong project navigator, chọn Views group và ấn Command-N để tạo file mới trong group. Tạo 1 class của Cocoa Touch và đặt tên WorkTableViewCell (nó phải là subclass của UITableViewCell). Mở file WorkTableViewCell.swift ra, xoá hết các methods tự động sinh và thêm các properties sau:
@IBOutlet weak var workImageView: UIImageView!
@IBOutlet weak var workTitleLabel: UILabel!
@IBOutlet weak var moreInfoTextView: UITextView!
Trong Scene ArtistDetailViewController, chọn cell và set custom class thành WorkTableViewCell, chuyển row height thành 200 để có thêm không gian làm việc. Tiếp theo, drag 1 imageview, 1 label và 1 textview vào, đặt chúng như sau:
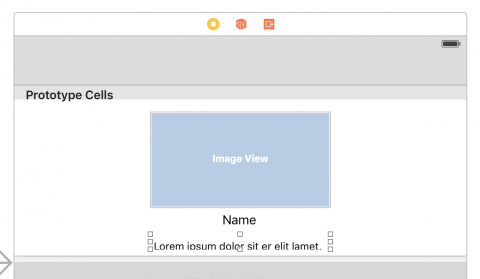
Đổi text của textView thành "Select For More Info" và label thành "Name". Đổi kiểu của Image view thành Aspect Fit. Sửa 1 số inspector của Text View như sau:
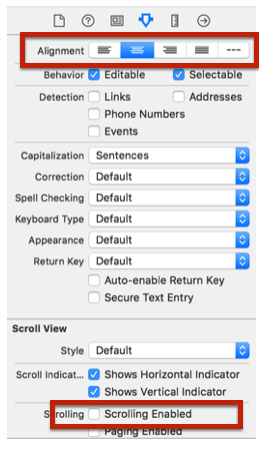
Disabling scrolling của textView tương tự như setting label với 0 lines. Khi scrolling bị disabled, textview sẽ tự biết để grow size của nó lên để fit với content bên trong, khi người sử dụng ko thể scroll qua đoạn text đó. Một chút nữa, khi ta remove check ở User Interaction Enabled - phần mà cho phép chạm vào phần text view và trigger việc select cell chứa text view đó.
Connect cả 3 phần tử với outlet tương ứng của nó ở code như đã làm trước đó. Bây giờ chúng ta sẽ phải add Constraints cho chúng:
- Ghim cạnh dưới text view với bottom margin của the content view: 0 point.
- Ghim leading & trailing edges của text view với leading & trailing margins của the content view: 8 points.
- Ghim top edge của the text view 8 points tới bottom của label.
- Ghim top edge của the label 8 points tới the bottom của image view.
- Cố định label ở giữa bằng cách chọn Horizontally in Container trong Align menu.
- Set label and image view Equal Widths.
- Ghim top edge của the image view 0 points với top margin của content view.
- Ghim leading & trailing edges của image view 8 points tới the leading & trailing margins của content view.
Update frames nếu như Auto Layout lại hiện ra warning như trước. Và thế là bạn đã xong việc với storyboard. Tiếp theo, mở file ArtistDetailViewController.swift và thay thế tableView(_:cellForRowAtIndexPath:) với đoạn code sau:
func tableView(tableView: UITableView, cellForRowAtIndexPath indexPath: NSIndexPath) -> UITableViewCell {
  let cell = tableView.dequeueReusableCellWithIdentifier("Cell", forIndexPath: indexPath) as! WorkTableViewCell

  let work = selectedArtist.works[indexPath.row]

  cell.workTitleLabel.text = work.title
  cell.workImageView.image = work.image

  cell.workTitleLabel.backgroundColor = UIColor(white: 204/255, alpha: 1)
  cell.workTitleLabel.textAlignment = .center
  cell.moreInfoTextView.textColor = UIColor(white: 114 / 255, alpha: 1)
  cell.selectionStyle = .none

  return cell
}
Cuối cùng, trong viewDidLoad() ta set dynamic cho row height:
tableView.rowHeight = UITableViewAutomaticDimension
tableView.estimatedRowHeight = 300
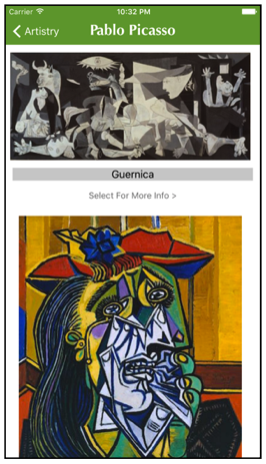
Run the app, chọn Picasso và ta sẽ thấy:
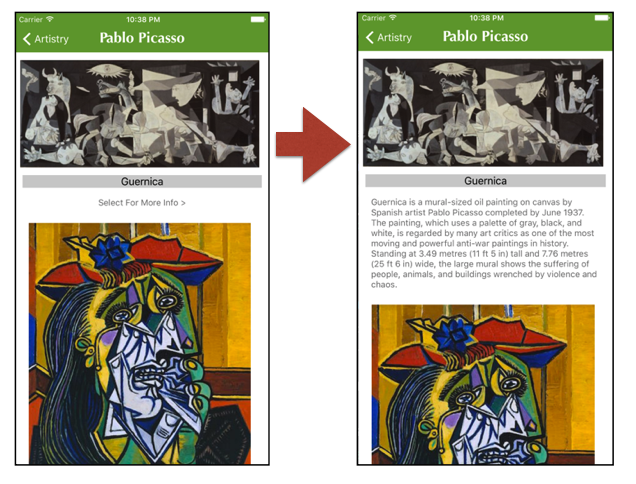
Khá ngon rồi, nhưng ta muốn cell có khả năng mở rộng (expanding) để lộ thêm thông tin về từng tác phẩm.
Expanding Cells
Khi độ cao của cell được định hướng bởi Auto Layout và nội dung của các phần tử giao diện, mở rộng chiều cao của cell sẽ đơn gainr như add thêm text vào textview khi user tap vào cell.
Mở file ArtistDetailViewController.swift và ađ thêm phần sau:
extension ArtistDetailViewController: UITableViewDelegate {
  func tableView(_ tableView: UITableView, didSelectRowAt indexPath: IndexPath) {
    // 1
    guard let cell = tableView.cellForRow(at: indexPath) as? WorkTableViewCell else { return }

    var work = selectedArtist.works[indexPath.row]

    // 2
    work.isExpanded = !work.isExpanded
    selectedArtist.works[indexPath.row] = work

    // 3
    cell.moreInfoTextView.text = work.isExpanded ? work.info : moreInfoText
    cell.moreInfoTextView.textAlignment = work.isExpanded ? .left : .center

    // 4
    tableView.beginUpdates()
    tableView.endUpdates()

    // 5
    tableView.scrollToRow(at: indexPath, at: .top, animated: true)
  }
}
- Bạn lấy được cell tại vị trí indexPath và sau đó lấy được work object tương ứng.
- Thay đổi trạng thái isExpanded của Work object, sau đó lưu lại work object đó vào array selectedArtist.work (vì structs được truyền theo bản sao).
- Tiếp theo, thay ddổi text view ủa cell, tùy thuộc vào nếu công việc được mở rộng hay không: Nếu có, bạn đặt chế độ xem văn bản để hiển thị property thông tin của công việc và thay đổi text alignment thành .left. Nếu nó không được mở rộng, bạn đang thiết lập các văn bản trở lại "Select to See More>" và alignment trở lại .center.
- Table View sẽ phải refresh cell height ngay lúc ddó. Gọi beginUpdates() và endUpdates() sẽ bắt buộc tableview refresh height "in an animated fashion".
- Cuối cùng bạn scroll selected row lên top của tableview.
Trong tableView(_:cellForRowAt:),thêm 2 dòng code sau vào dưới cùng trước khi bạn return cell:
cell.moreInfoTextView.text = work.isExpanded ? work.info : moreInfoText
cell.moreInfoTextView.textAlignment = work.isExpanded ? .left : .center
Đoạn code này sẽ khiến 1 cell mà đang bị reused sẽ nhớ lại được chính xác trạng thái expanded của nó lúc trước. Build&Run app, khi bạn chạm vào 1 cell, bạn sẽ thấy nó expand để chứa đầy đủ các text. Tuy nhiên animate của ImageView hơi dị 1 chút. Để fix, bạn càn chỉnh lại Content Hugging Priority và Content Compression Resistance Priority của WorkTableViewCell như sau:
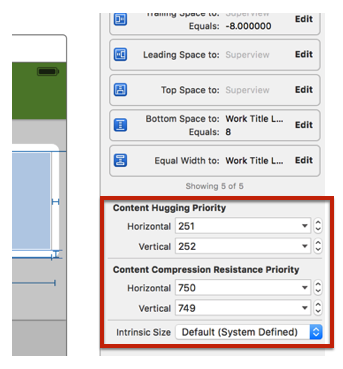
Set Vertical Content Hugging Priority thành 252 sẽ khiến cho Image View giữ nội dung của nó lại và ko bị kéo dài ra trong lúc ddang có animation. Setting Vertical Compression Resistance Priority thành 749 sẽ cho phép Image bị nén lại nếu như các element xung quanh nó phóng to lên. Nhưng điều này chỉ giúp cho animation của cell expanding smooth hơn 1 chút. Images sẽ không bị nén lại vì height của cell ddã tăng lên néu các item bên trong nó bị grow.
Build&Run app bạn sẽ thấy khi chọn công việc cụ thể của 1 artist, cell expansion rất smooth:
All rights reserved
