Nhận dạng ảnh cơ bản với Python
Bài đăng này đã không được cập nhật trong 7 năm
Tổng quan
Ngày nay, xử lý ảnh đang là một lĩnh vực mà rất nhiều người quan tâm, nghiên cứu. Nhờ vào sự phát triển mạnh mẽ của Machine Learning - một lĩnh vực nhỏ của Khoa Học Máy Tính, nó có khả năng tự học hỏi dựa trên dữ liệu đưa vào mà không cần phải được lập trình cụ thể, xử lý ảnh đã và đang được ứng dụng vào nhiều lĩnh vực trong cuộc sống: y tế (X Ray Imaging, PET scan,...), thị giác máy tính (giúp máy tính có thể hiểu, nhận biết đồ vật như con người), các cộng nghệ nhận dạng (vân tay, khuôn mặt,..),... Trong bài viết này, mình sẽ giới thiệu đến các bạn một chương trình nhận dạng đơn giản với mong muốn giúp cho mọi người hiểu rõ hơn về ứng dụng của xử lý ảnh cũng như Machine Learning.
Các bước cơ bản của quá trình nhận dạng ảnh
Bước 1: Chuẩn bị tập dữ liệu và rút trích đặc trưng
Đây là công đoạn được xem là quan trọng nhất trong các bài toán về Machine Learning. Vì dữ liệu này được dùng cho quá trình học để tìm ra mô hình của bài toán. Nếu chúng ta xây dựng được một mô hình tốt thì kết quả sẽ cho độ chính xác cao hơn, vì vậy cần phải chọn ra được những đặc trưng tốt của dữ liệu, và loại bỏ những đặc trưng không tốt, gây nhiễu ở dữ liệu.
Bước 2: Xây dựng mô hình
Mục đích của mô hình huấn luyện là tìm ra hàm f(x), thông qua nó dán nhãn cho dữ liệu. Bước này thường được gọi là học hay training. Thông thường để xây dựng mô hình phân lớp cho bài toán này, chúng ta sử dụng các thuật toán học giám sát như KNN, Neural Network, SVM, Decision Tree, Navie Bayers,Random Forest...
Bước 3: Đánh giá mô hình
Ở bước này chúng ta sẽ đánh giá mô hình bằng cách đánh giá độ chính xác của dữ liệu test thông qua mô hình vừa xây dựng. Nếu không đạt được kết quả mong muốn của chúng ta thì phải thay đổi các tham số của các thuật toán học để tìm ra các mô hình tốt hơn và kiểm tra, đánh giá lại mô hình. Và cuối cùng chọn ra mô hình phân lớp cho bài toán đã đưa ra.
Bài toán phân loại trái cây dựa vào hình ảnh
Chuẩn bị dữ liệu:
Dữ liệu train và test được lấy từ đây.
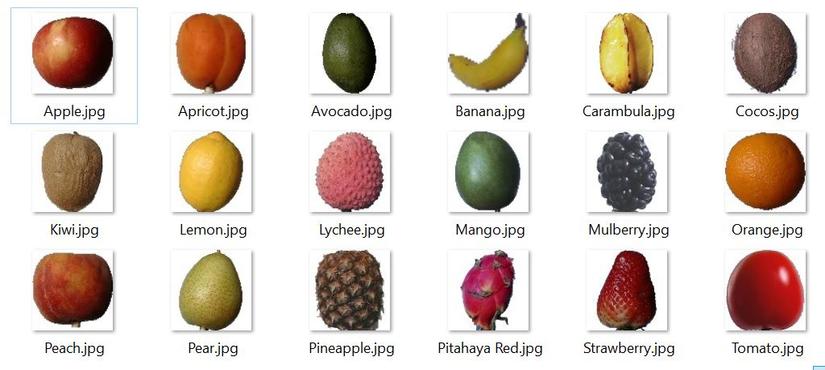
Trong chương trình này, mình chỉ sử dụng 18 loại trái cây dưới đây.
Xác định bộ mô tả hình ảnh
Như đã nói ở trên, bước đầu tiên của quá trình nhận dạng ảnh đó là xây dựng được các bộ mô tả hình ảnh (để trích xuất ra được đặc trưng quan trọng của dữ liệu). Để có thể xây dựng được một bộ mô tả hình ảnh phù hợp, chúng ta cần xác định rõ đặc điểm nào của các bức ảnh sẽ được sử dụng để phân biệt chúng, có thể là màu sắc chủ đạo, hình dạng của đối tượng trong bức ảnh, kết cấu, hoa văn hoặc là kết hợp các đặc điểm này lại. Ở đây chúng ta phân tích 1 bức ảnh dựa trên 3 chỉ số: 1, Color histogram (màu sắc) Color histogram là một dạng đặc trung toàn cục biểu diễn phân phối của các màu trên ảnh. Color histogram thống kê số lượng các pixel có giá trị nằm trong một khoảng màu nhất định cho trước. Color histogram có thể tính trên các dạng ảnh RGB hoặc HSV, thông dụng là HSV (Hue – vùng màu, Saturation – độ bão hòa màu, Value – độ sáng). Cài đặt trên Python:
def fd_histogram(image, mask=None):
    # chuyển về không gian màu HSV
    image = cv2.cvtColor(image, cv2.COLOR_BGR2HSV)
    hist  = cv2.calcHist([image], [0, 1, 2], None, [bins, bins, bins], [0, 256, 0, 256, 0, 256])
    # normalize histogram
    cv2.normalize(hist, hist)
    return hist.flatten()
2, Hu Monents (hình dạng) Hu Monents là một Image Descriptor sử dụng các phép thống kê để mô tả hình dạng của một đối tượng có trong bức ảnh nhị phân hoặc edged-image. Hu Moments Image Descriptor trả về một Feature Vector gồm 7 giá trị. Feature Vector này sẽ được so sánh với nhau để xác định sự tương đồng giữa hai vật thể. Cài đặt trên Python:
def fd_hu_moments(image):
    # chuyển về ảnh gray
    image = cv2.cvtColor(image, cv2.COLOR_BGR2GRAY)
    feature = cv2.HuMoments(cv2.moments(image)).flatten()
    return feature
3, Haralick Texture (kết cấu – hoa văn) Haralick được dùng để mô tả kết cấu (texture) và hoa văn (pattern) của một bức ảnh, đối tượng, bao gồm vẻ bề ngoài (appearance), sự nhất quán (consistency) và cảm giác về bề mặt (“feeling of surface”) có trong bức ảnh. Cài đặt trên Python:
def fd_haralick(image):
    # chuyển về ảnh gray
    gray = cv2.cvtColor(image, cv2.COLOR_BGR2GRAY)
    haralick = mahotas.features.haralick(gray).mean(axis=0)
    return haralick
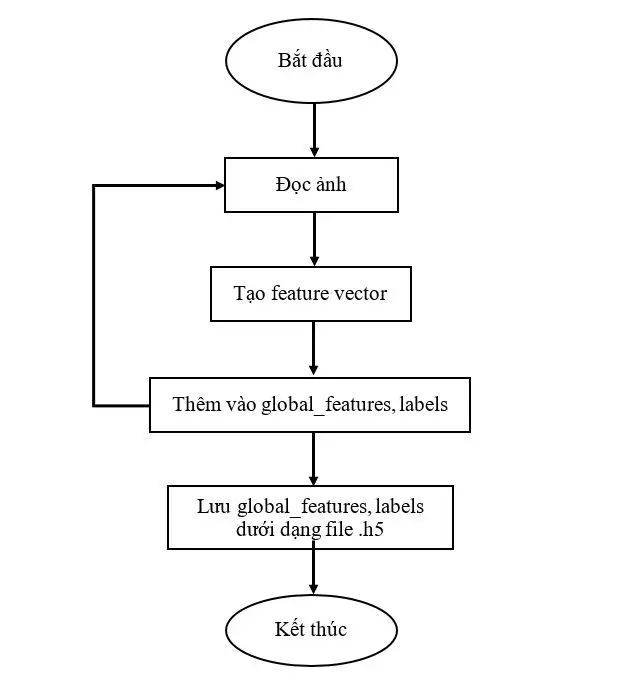
Chương trình huấn luyện
# path to output
output_path = "D:\\project\\fruit-classification\\output\\"

# path to training data
train_path = "D:\\project\\fruit-classification\\dataset\\train\\"

# get the training labels
train_labels = os.listdir(train_path)
train_labels.sort()

# num of images per class
images_per_class = 400

# fixed-sizes for image
fixed_size = tuple((100, 100))

# bins for histogram
bins = 8

# empty lists to hold feature vectors and labels
global_features = []
labels = []

# feature-descriptor-1: Hu Moments
def fd_hu_moments(image):
    image = cv2.cvtColor(image, cv2.COLOR_BGR2GRAY)
    feature = cv2.HuMoments(cv2.moments(image)).flatten()
    return feature

# feature-descriptor-2: Haralick Texture
def fd_haralick(image):
    # convert the image to grayscale
    gray = cv2.cvtColor(image, cv2.COLOR_BGR2GRAY)
    # compute the haralick texture feature vector
    haralick = mahotas.features.haralick(gray).mean(axis=0)
    # return the result
    return haralick

# feature-descriptor-3: Color Histogram
def fd_histogram(image, mask=None):
    # convert the image to HSV color-space
    image = cv2.cvtColor(image, cv2.COLOR_BGR2HSV)
    # compute the color histogram
    hist  = cv2.calcHist([image], [0, 1, 2], None, [bins, bins, bins], [0, 256, 0, 256, 0, 256])
    # normalize the histogram
    cv2.normalize(hist, hist)
    # return the histogram
    return hist.flatten()

# read image form each folder

# loop over the training data sub-folders
for training_name in train_labels:
    # join the training data path and each species training folder
    dir = os.path.join(train_path, training_name)

    # get the current training label
    current_label = training_name
    # loop over the images in each sub-folder
    for x in range(1,images_per_class+1):
        # get the image file name
        file = dir + "\\" + "Image ("+str(x) + ").jpg"

        print(file)
        # read the image and resize it oto a fixed-size
        image = cv2.imread(file)
        image = cv2.resize(image, fixed_size)

        ####################################
        # Global Feature extraction
        ####################################
        fv_hu_moments = fd_hu_moments(image)
        fv_haralick   = fd_haralick(image)
        fv_histogram  = fd_histogram(image)

        ###################################
        # Concatenate global features
        ###################################
        global_feature = np.hstack([fv_histogram, fv_hu_moments, fv_haralick])

        # update the list of labels and feature vectors
        labels.append(current_label)
        global_features.append(global_feature)

    print("[STATUS] processed folder: {}".format(current_label))

print("[STATUS] completed Global Feature Extraction...")


# get the overall feature vector size
print ("[STATUS] feature vector size {}".format(np.array(global_features).shape))

# get the overall training label size
print ("[STATUS] training Labels {}".format(np.array(labels).shape))

# encode the target labels
le = LabelEncoder()
target = le.fit_transform(labels)

# normalize the feature vector in the range (0-1)
scaler = MinMaxScaler(feature_range=(0, 1))
rescaled_features = scaler.fit_transform(global_features)

# save the feature vector using HDF5
h5f_data = h5py.File(output_path+'data.h5', 'w')
h5f_data.create_dataset('dataset_1', data=np.array(rescaled_features))

h5f_label = h5py.File(output_path+'labels.h5', 'w')
h5f_label.create_dataset('dataset_1', data=np.array(target))

h5f_data.close()
h5f_label.close()

print("[STATUS] end of training..")
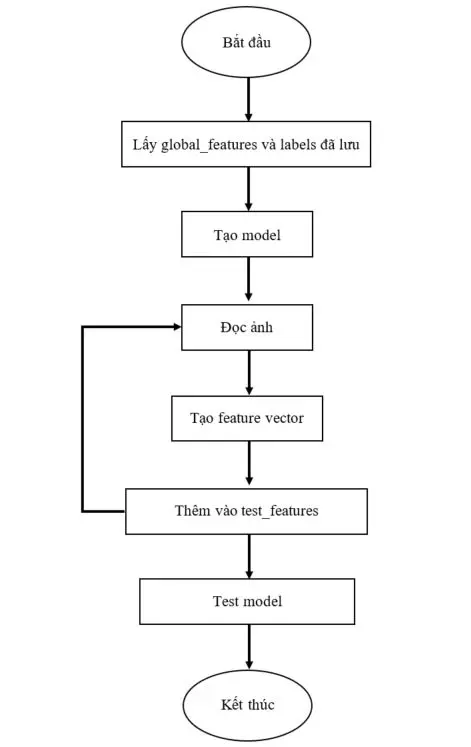
Chương trình đánh giá
# path to output
output_path = "D:\\project\\fruit-classification\\output\\"

# fixed-sizes for image
fixed_size = tuple((100, 100))

# no.of.trees for Random Forests
num_trees = 300

# bins for histogram
bins = 8

# num of images per class
images_per_class = 10;

# import the feature vector and trained labels
h5f_data = h5py.File(output_path+'data.h5', 'r')
h5f_label = h5py.File(output_path+'labels.h5', 'r')

global_features_string = h5f_data['dataset_1']
global_labels_string = h5f_label['dataset_1']

global_features = np.array(global_features_string)
global_labels = np.array(global_labels_string)

h5f_data.close()
h5f_label.close()


# feature-descriptor-1: Hu Moments
def fd_hu_moments(image):
    image = cv2.cvtColor(image, cv2.COLOR_BGR2GRAY)
    feature = cv2.HuMoments(cv2.moments(image)).flatten()
    return feature

# feature-descriptor-2: Haralick Texture
def fd_haralick(image):
    # convert the image to grayscale
    gray = cv2.cvtColor(image, cv2.COLOR_BGR2GRAY)
    # compute the haralick texture feature vector
    haralick = mahotas.features.haralick(gray).mean(axis=0)
    # return the result
    return haralick

# feature-descriptor-3: Color Histogram
def fd_histogram(image, mask=None):
    # convert the image to HSV color-space
    image = cv2.cvtColor(image, cv2.COLOR_BGR2HSV)
    # compute the color histogram
    hist  = cv2.calcHist([image], [0, 1, 2], None, [bins, bins, bins], [0, 256, 0, 256, 0, 256])
    # normalize the histogram
    cv2.normalize(hist, hist)
    # return the histogram
    return hist.flatten()


# # create the model - Random Forests
clf  = RandomForestClassifier(n_estimators=num_trees)
clf.fit(global_features, global_labels)

# path to test data
test_path = "D:\\project\\fruit-classification\\dataset\\test"
# get the training labels
test_labels = os.listdir(test_path)

# sort the training labels
test_labels.sort()
print(test_labels)
# loop through the test images
test_features = []
test_results = []
for testing_name in test_labels:
    # join the training data path and each species training folder
    dir = os.path.join(test_path, testing_name)

    # get the current training label
    current_label = testing_name
    # loop over the images in each sub-folder
    for x in range(1,images_per_class+1):
        # get the image file name
        index = random.randint(1,150);
        file = dir + "\\" + "Image ("+str(index) + ").jpg"
        print(file)
        image = cv2.imread(file)
        image = cv2.resize(image, fixed_size)
        ####################################
        fv_hu_moments = fd_hu_moments(image)
        fv_haralick   = fd_haralick(image)
        fv_histogram  = fd_histogram(image)

        ###################################
        test_results.append(current_label)
        test_features.append(np.hstack([fv_histogram, fv_hu_moments, fv_haralick]))

# predict label of test image
le = LabelEncoder()
y_result = le.fit_transform(test_results)
y_pred = clf.predict(test_features)
print(y_pred)
print("Result: ", (y_pred == y_result).tolist().count(True)/len(y_result))
Kết luận
Hi vọng qua chương trình trên mọi người có thể nắm được một trong những ứng dụng của xử lý ảnh cũng như Machine Learning.
Tài liệu tham khảo
Bài viết có tham khảo từ các nguồn sau đây: Image Classification using Python and Scikit-learn Color Channel Statistics and Color Histograms Hu Moments Haralick Texture Features
All rights reserved
