Lưu trữ dữ liệu với iCloud
Bài đăng này đã không được cập nhật trong 8 năm
Trong bài viết này chúng ta sẽ nói tới iCloud - một trong những feature mới mà Apple giới thiệu từ iOS 5. Về phía quan điểm của người dùng thì iCloud là một feature đơn giản cho phép người dùng truy cập các thông tin cá nhân trên tất cả các thiết bị không dây và hoạt động tự động theo AppleID.
1. iCloud là gì?
- Đơn giản, nó là một service của Apple cho phép đồng bộ dữ liệu của người dùng trên tất cả các thiết bị của Apple thông qua AppleID. Mục đích chính là cho phép người dùng có nơi đặt dữ liệu và truy cập trên tất cả thiết bị của họ, dù là dữ liệu cài đặt, tệp, ... Trong khi sử dụng người dùng chỉ cần quan tâm tới việc thay đổi dữ liệu của họ, còn việc đồng bộ sẽ được thực hiện tự động.

2. Các kiểu lưu trữ
-
iCloud đưa ra 3 kiểu lưu trữ
- Key-value storage: Các kiểu dữ liệu rời rạc như tuỳ chọn, cài đặt, thiết lập hay trạng thái ứng dụng.
- Document storage: Thông tin dạng tệp như các file văn bản, tài liệu, ... có thể nhìn thấy
- Core Data storage: Giải pháp dữ liệu trên nhiều thiết bị, lưu trữ tài liệu trên nhiều thiết bị cùng một iCloud.
-
Note: Tuỳ thuộc vào dữ liệu bạn cần lưu trữ mà lựa chọn đúng kiểu lưu trữ. Trong bài viết này mình sẽ hướng dẫn các bạn cách sử dụng kiểu Key-value storage
3. Enable iCloud
- Để sử dụng iCloud, trước tiên bạn cần có tài khoản Apple. Nếu bạn không có, hãy mua vì đó là điều kiện tiên quyết để sử dụng iCloud
- Giả sử bạn đã có tài khoản, đầu tiên bạn cần tại AppID và enable iCloud
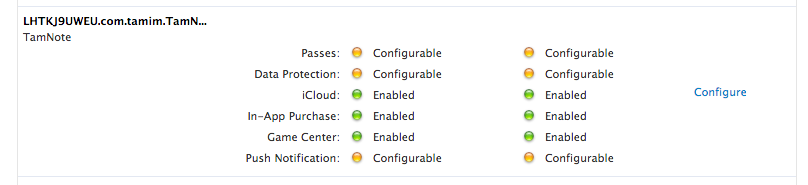
- Mình sẽ không đi sâu về vấn đề tài khoản. Các bạn cố gắng tạo app id và enable icloud, kết quả như hình bên trên nhé.
4. Tạo một ứng dụng đơn giản sử dụng iCloud
- Sau khi có app id > mở XCode > New Project > Empty Application

5. Enabling Entitlements for key-value Storage
- Khi hệ thống cấp quyền cho ứng dụng của bạn thì tức là ứng dụng của bạn có quyền truy cập iCloud.
- Để sử dụng iCloud key-value storage đầu tiên bạn phải enable entitlements từ XCode. Các bạn có thể tham khảo

6. Tạo giao diện người dùng
- Các bạn sau khi tạo project đừng quên implement
- (BOOL)application:(UIApplication *)application didFinishLaunchingWithOptions:(NSDictionary *)launchOptions
{
    return YES;
}
- Hãy tạo 1 file storyboard và kéo thả các view controller như hình vẽ sau:
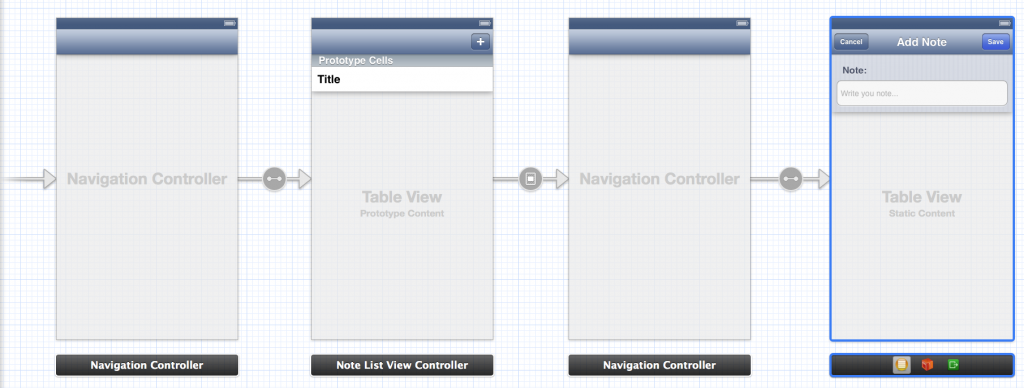
- Đầu tiên các bạn kéo 1 tableview và nhúng 1 navigation controller - chứa danh sách các note sẽ được lưu trữ.
- Kéo 1 bar button item vào góc trên bên phải và đặt nó là Add button.

- Bước tiếp theo kéo thả một tableview và nhúng một navigation controller, kéo một button cancel vào góc trên bên trái và một save button vào góc trên bên phải như hình vẽ dưới.

7. Tạo View Controller Classes
Tạo 2 class tương ứng với 2 view controller
- NoteListViewController là subclass của UITableViewController và set class vào storyboard như hình vẽ sau:
-
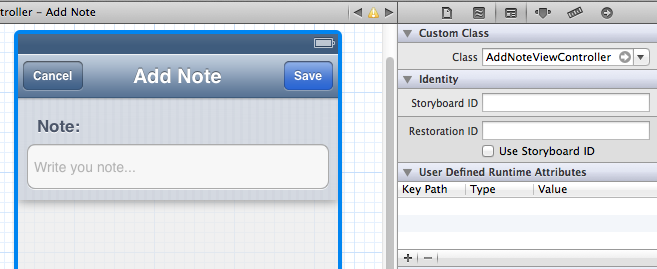
AddNoteViewController là subclass của UITableViewController và set vào storryboard tương tự class bên trên
-
Trong file AddNoteViewController.h ta thêm đoạn code sau:
// Khi bạn huỷ không thêm note
- (IBAction)cancelNote:(id)sender;

// Khi bạn muốn lưu note
- (IBAction)saveNote:(id)sender;

@property (weak, nonatomic) IBOutlet UITextField *noteTextField;
Note: Hai method trên tương ứng với 2 action trong màn hình add note.
8. Làm việc với iCloud
Các công việc chúng ta sẽ làm bao gồm:
- Lấy tất cả các note có sẵn ở iCloud và hiển thị lên tableview
- Xoá note có sẵn ở iCloud
- Thêm note mới và lưu nó ở iCloud
8.1. Lấy các note có sẵn trên iCloud
- Bắt đầu với NoteListViewController. Tạo một mảng để lưu trữ danh sách các note ta lấy về được từ iCloud
// Khai báo notes
@property (strong, nonatomic) NSMutableArray *notes;
- Implement trong file .m khởi tạo notes
// Khởi tạo notes
_notes = [[[NSUbiquitousKeyValueStore defaultStore] arrayForKey:@"AVAILABLE_NOTES"] mutableCopy];
-
Đoạn code trên sử dụng class NSUbiquitousKeyValueStore để lấy toàn bộ các note từ icloud, với từ khoá AVAILABLE_NOTE - chính là khoá để lưu trữ mảng các note trong iCloud.
-
Việc lưu trữ sử dụng key này rất giống với NSUserDefault (lưu trữ cục bộ)
-
Tiếp theo tại viewDidLoad
// Add observer icloud and local change
- (void)viewDidLoad
{
    [super viewDidLoad];
    NSUbiquitousKeyValueStore *store = [NSUbiquitousKeyValueStore defaultStore];
    [[NSNotificationCenter defaultCenter] addObserver:self selector:@selector(storeDidChange:) name:NSUbiquitousKeyValueStoreDidChangeExternallyNotification object:store];

    [[NSUbiquitousKeyValueStore defaultStore] synchronize];
    [[NSNotificationCenter defaultCenter] addObserver:self selector:@selector(didAddNewNote:) name:@"New Note" object:nil];
}
- Nhìn vào đoạn code trên ta sẽ thấy nổi bật lên là sự giám sát thay đổi trạng thái của iCloud và Local
- Kiểm tra thay đổi iCloud bằng cách sử dụng key NSUbiquitousKeyValueStoreDidChangeExternallyNotification
- Kiểm tra thay đổi phía local bằng cách add observer khi màn hình add new note thông báo về.
// New note
- (void)didAddNewNote:(NSNotification *)notification
{
    NSDictionary *userInfo = [notification userInfo];
    NSString *noteStr = [userInfo valueForKey:@"Note"];
    [self.notes addObject:noteStr];
    [[NSUbiquitousKeyValueStore defaultStore] setArray:self.notes forKey:@"AVAILABLE_NOTES"];
    [self.tableView reloadData];
}

// did change note notification
- (void)storeDidChange:(NSNotification *)notification
{
    _notes = [[[NSUbiquitousKeyValueStore defaultStore] arrayForKey:@"AVAILABLE_NOTES"] mutableCopy];
    [self.tableView reloadData];
}
- Phương thức didAddNote sẽ được gọi khi người dùng lưu một note mới. Đầu tiên chúng ta lấy note mới được tạo bởi người dùng và thêm nó vào mảng, sau đó tải mảng lên iCloud. Cuối cùng, chúng tôi tải lại chế độ xem bảng để hiển thị ghi chú mới.
- Phương thức storeDidChange sẽ được gọi khi dữ liệu được thay đổi trong iCloud. Giả sử, khi người dùng thêm note mới bằng iPhone, ứng dụng trong các thiết bị khác (ví dụ: iPad) sẽ được thông báo và gọi phương thức này. Khi có bất kỳ bản cập nhật nào, chúng tôi chỉ cần truy xuất note mới nhất có sẵn từ iCloud một lần nữa, lưu nó và tải lại chế độ xem bảng để hiển thị note.
- Hiển thị lên tableview. Mình sẽ không đi sâu vào việc hiển thị trên tableview
// Display note
- (UITableViewCell *)tableView:(UITableView *)tableView cellForRowAtIndexPath:(NSIndexPath *)indexPath
{
    static NSString *CellIdentifier = @"Cell";
    UITableViewCell *cell = [tableView dequeueReusableCellWithIdentifier:CellIdentifier forIndexPath:indexPath];
    NSString *note = [self.notes objectAtIndex:indexPath.row];
    [cell.textLabel setText:note];
    return cell;
}
8.2 Xoá một note có sẵn trên iCloud
        // remove note
        [self.notes removeObjectAtIndex:indexPath.row];
        [self.tableView deleteRowsAtIndexPaths:[NSArray arrayWithObject:indexPath] withRowAnimation:UITableViewRowAnimationLeft];
        [[NSUbiquitousKeyValueStore defaultStore] setArray:self.notes forKey:@"AVAILABLE_NOTES"];
8.3 Thêm một note mới
    // new note
    [[NSNotificationCenter defaultCenter] postNotificationName:@"New Note" object:self userInfo:[NSDictionary dictionaryWithObject:self.noteTextField.text forKey:@"Note"]];
    [self dismissViewControllerAnimated:YES completion:nil];
Tổng kết:
- Trên đây là một số kiến thức cơ bản cho bạn bắt đầu làm quen với iCloud. Cám ơn các bạn đã đọc.
- Tham khảo tại https://www.appcoda.com/icloud-programming-ios-intro-tutorial/
All rights reserved
