Làm quen với React Native với game Simon Says color
Bài đăng này đã không được cập nhật trong 7 năm
Introduction
React Native hiện đang là một từ khoá rất hot trên các trang báo công nghệ cũng như trong giới lập trình mobile. React Native là framework xây dựng ứng dụng di động native sử dụng Javascript do Facebook phát hành. Sử dụng React Native để xây dựng ứng dụng iOS và AndroidAndroid chỉ cần 1 ngôn ngữ javascript duy nhất.
Với bài viết này mình mong muốn đem lại một phần góc nhìn và kiến thức cho nhưng người đang bắt đầu muốn tìm hiểu React Native. Demo này sẽ chỉ sử dụng những phần cơ bản nhất của React Native để xây dựng một mini game và sẽ không có redux hay react-navigation.
Về phần cài đặt môi trường mình sẽ bỏ qua vì có khá nhiều bài viết về nội dung này rồi nên mọi người có thể tự tham khảo
Description
Nếu ai chưa biết về game Simon Says thì nó sẽ như thế này : https://www.youtube.com/watch?v=vLi1qnRmpe4
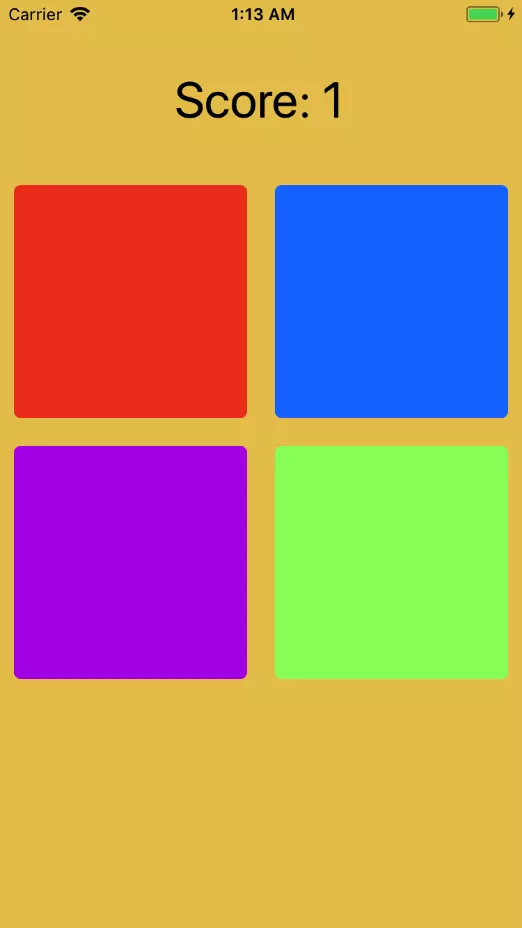
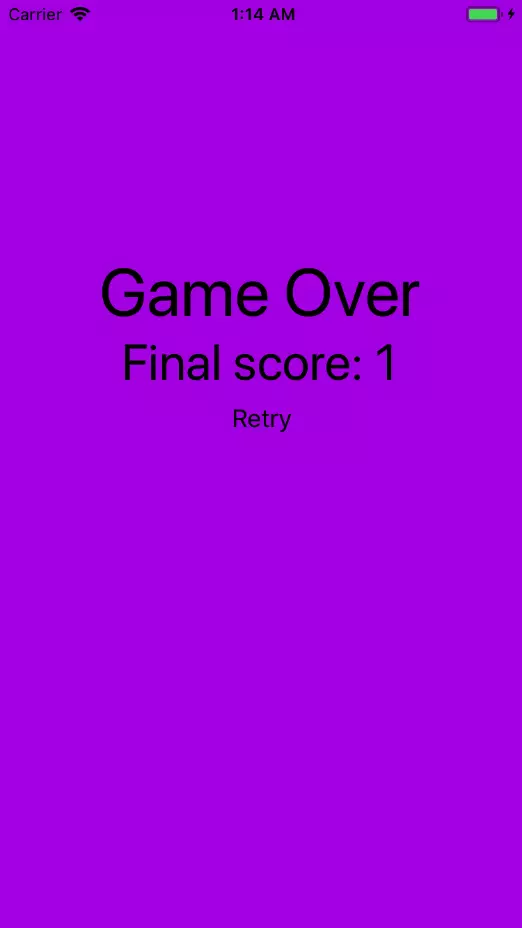
Vậy app SimonSay sẽ có 2 trạng thái là Playing và GameOver như sau :
Let start
Đầu tiên chúng ta cần tạo project SimonSay với lệnh:
react-native init SimonSay
Tiếp theo ta mở project SimonSay với Visual Studio Code.
 Mở tab console và tiếp túc cài đặt react-native-sound với lệnh:
react-native install react-native-sound
Phần dependencies trong file package.json sẽ như này:
"dependencies": {
"react": "16.4.2",
"react-native": "0.56.0",
"react-native-sound": "^0.10.9"
},
Tiếp theo chúng ta sửa file App.js:
import React, { PureComponent } from 'react';
import {
  StyleSheet,
  Text,
  View,
  Button,
  Platform
} from 'react-native';

import GamePlay from './containers/GamePlay';
import GameOver from './containers/GameOver';

const GAME_STATE = {
  PLAYING: "PLAYING",
  GAMEOVER: "GAMEOVER"
}

export default class App extends PureComponent {
  state = {
    score: 0,
    gameState: GAME_STATE.PLAYING
  }

  _changeGameState(gameState, score) {
    this.setState({
      gameState,
      score
    });
  }

  render() {
    return this.state.gameState === GAME_STATE.PLAYING
      ? <GamePlay onGameOver={(score) => this._changeGameState(
        GAME_STATE.GAMEOVER,
        score
      )} />
      : <GameOver score={this.state.score} onRetry={() => this._changeGameState(
        GAME_STATE.PLAYING,
        0
      )} />;
  }
}
Ở đây chúng ta có component App với 2 giá trị state là score và gameState. Với score là số điểm người chơi đã đạt được và gameState là trạng thái của game là PLAYING hay GAMEOVER tưởng ứng với 2 component là GamePlay và GameOver. Hàm changeGameState(gameState, score) dùng để update state cho component App. Và khi state được update thì app sẽ được render lại.
Hiện nay chúng ta chưa có 2 component là GamePlay và GameOver. Vì vậy ta sẽ tạo ra nó với cấu trúc thư mục như sau:
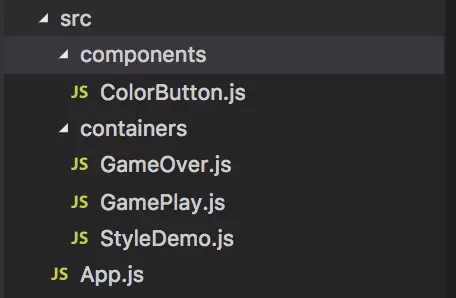
lưu ý chuyển file App.js vèo thư mục src
Đầu tiên là component GameOver vì nó chỉ hiện thị một vài text thông báo và một nút replay. Ta băt đầu với file GameOver.js đã tạo.
import React, { PureComponent } from 'react';
import {
  StyleSheet,
  Text,
  View,
  Button
} from 'react-native';

class GameOver extends PureComponent {
  state = {}
  render() {
    return (
      <View style={{ flex: 1, paddingBottom: "25%", backgroundColor: "#B417E8", alignItems: "center", justifyContent: "center" }}>
        <Text style={{ fontSize: 48, color: "#000000" }}>Game Over</Text>
        <Text style={{ fontSize: 36, color: "#000000" }}>{`Final score: ${this.props.score}`}</Text>
        <Button color="#000000" onPress={this.props.onRetry} title="Retry" />
      </View>
    );
  }
}

export default GameOver;
Bạn có thể thấy action onPress() được trỏ tới hàm this.props.onRetry() tức là _changeGameState(gameState, score) được ta truyền qua từ component App.
Tiếp theo là file GamePlay.js.
import React, { PureComponent } from 'react';
import {
  StyleSheet,
  Text,
  View,
  Button,
  Dimensions,
  Platform
} from 'react-native';

import ColorButton from "../components/ColorButton";
import Sound from 'react-native-sound';

const PlayState = {
  HINTING: "HINTING",
  PLAYING: "PLAYING"
}

export default class GamePlay extends PureComponent {
  state = {
    score: 0,
    targetInput: [],
    userInputIndex: 0,
    gameBoardSize: 0,
    flashIndex: -1,
    playState: PlayState.HINTING,
    buttonColors: [
      "#EE4220",
      "#B417E8",
      "#197AFF",
      "#95FF67"
    ]
  }

  _onPress = (input) => {
    const { targetInput, userInputIndex, score } = this.state;
    this._sound(input)
    input !== targetInput[userInputIndex]
      ? this.props.onGameOver(this.state.score)
      : userInputIndex === targetInput.length - 1
        ? this._toNextLevel(this.state.score + 1)
        : this.setState({
          userInputIndex: userInputIndex + 1
        });
  }

  _randomInt = (min, max) => {
    return Math.floor(Math.random() * (max - min)) + min;
  }

  _toNextLevel = (score) => {
    this.setState({
      score,
      userInputIndex: 0,
      targetInput: this._nextLevel(this.state.targetInput)
    }, () => {
      this.setState({
        playState: PlayState.HINTING
      });
      setTimeout(this._onButtonFlashCompleted, 1000);
    });
  }

  _onButtonFlashCompleted = () => {
    const { flashIndex, targetInput } = this.state;

    this.setState({
      flashIndex: -1
    }, () => {
      this.setState(
        flashIndex < targetInput.length - 1
          ? {
            playState: PlayState.HINTING,
            flashIndex: flashIndex + 1
          }
          : {
            playState: PlayState.PLAYING
          }
      );
    });
  }

  _nextLevel = (targetInput) => {
    return targetInput.concat(this._randomInt(0, 4));
  }

  _onLayout = (event) => {
    const { width, height } = event.nativeEvent.layout;

    this.setState({
      gameBoardSize: Math.min(width, height)
    });
  }

  _sound = (index) => {
    Sound.setCategory('Playback');
    var whoosh = new Sound(`pling${index + 1}.mp3`, Sound.MAIN_BUNDLE, (error) => {
      if (error) {
        console.log('failed to load the sound', error);
        return;
      }
      whoosh.play();
    });
  }

  componentDidMount() {
    this._toNextLevel(0);
  }

  _propsForButtonIndex = (index) => {
    return {
      onPress: () => this._onPress(index),
      onSound: () => this._sound(index),
      isFlashing: this.state.targetInput[this.state.flashIndex] === index,
      onFlashCompleted: this._onButtonFlashCompleted,
      disabled: this.state.playState === PlayState.HINTING,
      background: this.state.buttonColors[index]
    }
  }

  render() {
    return (
      <View style={[styles.container, styles.wrapper]}>
        <Text style={styles.scoreText}>{`Score: ${this.state.score}`}</Text>
        <View style={styles.boardContainer} onLayout={this._onLayout}>
          <View style={[
            styles.gameBoard,
            {
              width: this.state.gameBoardSize,
              height: this.state.gameBoardSize
            }
          ]}>
            <ColorButton {...this._propsForButtonIndex(0) } />
            <ColorButton {...this._propsForButtonIndex(1) } />
            <ColorButton {...this._propsForButtonIndex(2) } />
            <ColorButton {...this._propsForButtonIndex(3) } />
          </View>
        </View>
      </View>
    );
  }
}
const styles = StyleSheet.create({
  wrapper: {
    paddingTop: 20,
    alignItems: "center",
    backgroundColor: "#E8C65A"
  },
  container: {
    flex: 1
  },
  scoreText: {
    paddingVertical: 30,
    fontSize: 36
  },
  boardContainer: {
    flex: 1,
    width: "100%",
    alignItems: "center"
  },
  gameBoard: {
    flexWrap: "wrap"
  }
});
Ở đây ta có component GamePlay với các giá trị state là : score: 0 //điểm số mà người chơi đath được
targetInput: [], // một mảng chứa các số từ 0 đến 3 tương ứng với index của 4 ô màu trong game
userInputIndex: 0, // index mà người chơi đang chơi đến
gameBoardSize: 0, // dùng để tính size cho 4 ô màu.
flashIndex: -1, // index của luợt đi mẫu đan chơi đến
playState: PlayState.HINTING, // khi playState==PlayState.HINTING thì 4 ô màu sẽ bị disable (trong lượt đi mẫu thì ngươig chơi không thể bấm được)
buttonColors: ["#EE4220","#B417E8","#197AFF","#95FF67"] // mảng màu cho 4 ô màu
Trên ta thấy có xuất hiện component ColorButton chưa được định nghĩa. Sau đây sẽ là file ColorButton.js:
import React, { PureComponent } from 'react';
import {
  View,
  TouchableOpacity,
  StyleSheet,
  Animated,
  Easing
} from 'react-native';

class ColorButton extends PureComponent {
  state = {
    buttonOpacity: new Animated.Value(1)
  }

  _flash = () => {
    Animated.sequence([
      Animated.timing(this.state.buttonOpacity, {
        toValue: 0.3,
        duration: 150,
        easing: Easing.ease.in
      }),
      Animated.delay(200),
      Animated.timing(this.state.buttonOpacity, {
        toValue: 1,
        duration: 150,
        easing: Easing.ease.out
      })
    ]).start(this.props.onFlashCompleted);
    this.props.onSound()
  }

  componentWillReceiveProps(nextProps) {
    if (
      nextProps.isFlashing !== this.props.isFlashing
      && nextProps.isFlashing
    ) {
      this._flash();
    }
  }

  render() {
    return (
      <TouchableOpacity disabled={this.props.disabled} style={styles.touchable} onPress={this.props.onPress}>
        <Animated.View style={[styles.colorView, {
          opacity: this.state.buttonOpacity,
          backgroundColor: this.props.background
        }]}></Animated.View>
      </TouchableOpacity>
    );
  }
}

const styles = StyleSheet.create({
  touchable: {
    width: "50%",
    height: "50%",
    padding: 10
  },
  colorView: {
    borderRadius: 5,
    flex: 1
  }
})

export default ColorButton;
Tiếp theo ta tạo thư mục ./sounds với 4 file âm thanh tại đây:
https://github.com/anhvmz/SimonSay/tree/master/sounds
Cuối cùng ta sửa một chút về trong file index.js
import { AppRegistry } from 'react-native';
import App from './src/App';

AppRegistry.registerComponent('SimonSay', () => App);
Hiện tại ta có thể chạy lệnh react-native run-ios để build app lên simulator và react-native run-android để build app lên emulator thưởng thức game SimonSay.
Overview
Trên là một demo cuả một ứng dụng react-native đơn giản. Trong những bài tiếp theo chúng ta sẽ tiếp tục tìm hiểu về react-native với những phức tạp hơn một chút như navigation và redux.
Bạn có thể tham khảo source code ở đây
All rights reserved
