Làm chức năng quét QR từ ảnh trong React Native
1 ngày đẹp trời, sếp giao cho mình làm 1 cái tính năng thanh toán bằng QR code, ngoài việc quét QR bằng camera thì 1 số người có thể có thanh toán bằng việc quét QR qua ảnh. Cái này thì các bạn thấy quá quen với 1 cái ứng dụng ví điện tử hay ngân hàng hiện nay rồi
Vụ quét bằng camera thì dễ tại thằng react-native-vision-camera có sẵn. Chỉ chức năng còn quét QR qua ảnh, lạ 1 điều là vision-camera lại không hỗ trợ, rồi lại tìm mấy cái thư viện thì thấy đa số không còn bảo trì hay cập nhật gì nữa.
Mình xem qua code phần xử lí quét QR ở dưới native các thư viện đó và bên vision-camera hoá ra cũng khá dễ hiểu. Nên mình quyết định tự viết cho nhanh, có 1 chút code mà cũng sử dụng thư viện thì mang tiếng quá, dễ bảo trì do code mình tự viết ra 😄
Ở đây mình sẽ hướng dẫn implement vào code project có sẵn, nếu bạn nào chưa có thì hãy tạo 1 project mới hoàn toàn làm example cũng được
Sử dụng thư viện nào ở phía Android và iOS
Ở vision-camera thì tác giả sử dụng Google MLKit cho Android và AVCaptureMetadataOutput cho iOS. Lúc đầu mình định dùng Google MLKit cho cả iOS luôn nhưng sau 1 hồi research thì nhận ra bên iOS cũng có 1 thư viện built-in do Apple biết là Vision cũng tương tự nên mình dùng nó cho khỏi tăng thêm kích thước app bên iOS ( thêm thư viện này sẽ tăng thêm ít nhất là 2.4MB cho phần model nhận diện 🥲)
Về ngôn ngữ thì mình sẽ viết bằng Kotlin và Swift cho mới
Thiết lập module native vào ứng dụng hiện tại
Tài liệu chính thức của React Native thì cũng đã hướng dẫn có 2 cách, nhưng mình khuyên nên đi theo cách sử dụng tool create-react-native-library. Tool sẽ tạo giúp mình 1 cái package riêng sử dụng ở trong project của bạn (tương tự monorepo), từ đó dễ quản lí do phần code này tách biệt ra hẳn.
Ở thư mục gốc của ứng dụng, gõ lệnh sau :
npx create-react-native-library@latest <Tên package>
ví dụ tên package mình muốn đặt là qr-code-image-scan thì câu lệnh sẽ là:
npx create-react-native-library@latest qr-code-image-scan
Tool sẽ hỏi bạn 1 số câu hỏi, bạn sẽ chọn như ở dưới, riêng description thì bạn gõ gì cũng được, có 1 số cái tool gợi ý tên thì cũng enter luôn cho nhanh:
✔ Looks like you're under a project folder. Do you want to create a local library? … yes
✔ Where do you want to create the library? … modules/qr-code-image-scan
✔ What is the name of the npm package? … react-native-qr-code-image-scan
✔ What is the description for the package? … a
✔ What type of library do you want to develop? › Native module
✔ Which languages do you want to use? › Kotlin & Swift
✔ Project created successfully at modules/qr-code-image-scan!
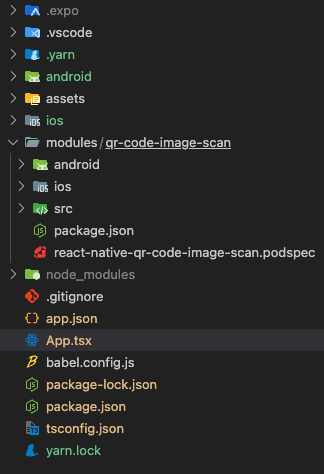
Nếu tạo xong thì bạn sẽ có thêm 1 thư mục modules ở project của bạn:

Chạy ứng dụng của bạn trên thiết bị hoặc máy ảo (nếu là iOS thì hãy pod install trước nha), bạn để ý thấy code của package vừa tạo có ví dụ viết 1 function gọi code từ native lên tên là multiply, nếu bạn import (import { multiply } from "react-native-qr-code-image-scan") và sử dụng được thì bạn đã thiết lập module native vào ứng dụng hiện tại thành công
Từ đây thì mình sẽ dùng tên package là react-native-qr-code-image-scan để cho dễ hình dung
Phần ở trên giao diện (JS/TS)
Đầu tiên, bạn phải viết 1 phương thức ở nền js/ts để giao tiếp giữa native code và js code, ở đây hàm quét QR của chúng ta sẽ nhận 1 đường dẫn hình ảnh được truyền, có thể lấy từ kho ảnh của máy thông qua cái thư viện react-native-image-picker và trả kết quả danh sách cách chuỗi giá trị của các QR code sau khi nhận diện được từ ảnh
Vào file modules/react-native-qr-code-image-scan/index.tsx
Thêm hàm như ở dưới:
export function scanFromPath(path: string): Promise<string[]> {
  return QrCodeImageScan.scanFromPath(path);
}
Viết phần code quét QR cho ở dưới native
Android
Để viết code cho phần Android thì bạn hãy bật folder của android của project chính bằng Android Studio lên, mục đích là để có code completion và ta cần thiết lập lại gradle khi thêm MLKit
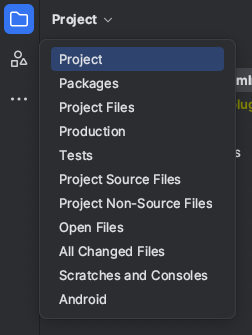
Chọn Project View thành Project

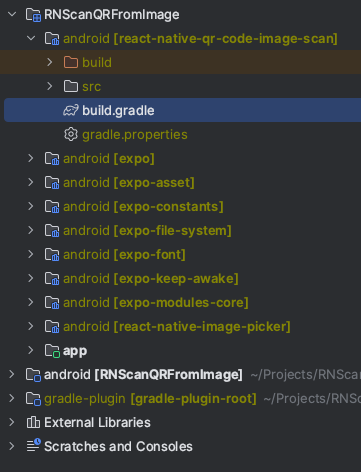
Vào react-native-qr-code-image-scan/android/build.gradle

Thêm dòngimplementation 'com.google.mlkit:barcode-scanning:17.3.0' ở phần dependencies ở cuối file, phiên bản của mlkit mình sẽ lấy theo recommend của tài liệu hướng dẫn của mlkit

Đồng bộ lại Gradle bên Android (IDE sẽ nhắc bạn)
Ở react-native-qr-code-image-scan/android//android/QrCodeImageScanModule, đây là chỗ bạn sẽ viết native code cho Android, bạn có thể thấy phần code hàm multiply ở native mình đã nêu ở trên, tương tự như nó, chúng ta sẽ tạo 1 hàm tương tự để quét QR code từ 1 đường dẫn ảnh nhận vào
@ReactMethod
 fun scanFromPath(path: String, promise: Promise) {
   // 1
   val options = BarcodeScannerOptions.Builder()
     .setBarcodeFormats(Barcode.FORMAT_QR_CODE)
     .build()

   // 2
   val rPath = path.replace("file:", "")
   val imgFile = File(rPath)
   if (!imgFile.exists()) {
     promise.reject("", "cannot get image from path: $path")
     return
   }

   // 3
   val bitmap = BitmapFactory.decodeFile(imgFile.absolutePath)
   val image = InputImage.fromBitmap(bitmap, 0)

   // 4
   val scanner = BarcodeScanning.getClient(options)
   scanner.process(image)
     .addOnSuccessListener { barcodes ->
       val codes = barcodes.map { it.displayValue }
       val arr = Arguments.fromList(codes)
       promise.resolve(arr)
     }
     .addOnFailureListener {
       promise.reject("", it.localizedMessage, it)
     }
 }
Giải thích:
1: Tạo option để scan QR code, phần Barcode của ML Kit không chỉ scan QR mà còn scan được nhiều loại code khác, nhưng trong trường hợp này mình sẽ giới hạn lại chỉ cho nhận QR code
2: Tạo File từ chuỗi string truyền vào và check xem đường dẫn có tồn tại không
3: Tạo 1 InputImage của file được tạo
4: Quét QR code từ InputImage vừa tạo
iOS
Ở thư mục ios của project, nhấp vào file RNScanQRFromImage.xcworkspace để mở phần native code của dự án ở iOS bằng XCode
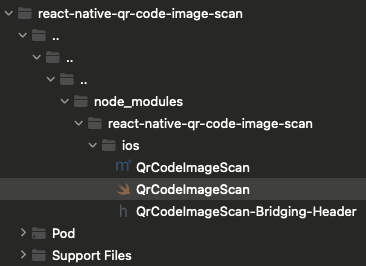
Ở phần thư mụcPods/Development Pods, ta tìm thư mục react-native-qr-code-image-scan, các bạn có thể sử tính năng filter ở dưới cây thư mục nếu như nhiều package, sau khi tìm được rồi thì bạn mở file QrCodeImageScan.swift, đây là file sẽ viết phần code native ở bên phía iOS

Đầu tiên ta import thư viện Vision ở đầu file trước: import Vision
Sau đó ta bổ sung thêm hàm dưới đây:
 @objc(scanFromPath:withResolver:withRejecter:)
  func scanFromPath(path: String, resolve:@escaping RCTPromiseResolveBlock,reject:@escaping RCTPromiseRejectBlock) -> Void {

    // 1
    guard let url = URL(string: path),
          let data = try? Data(contentsOf: url),
          let image = UIImage(data: data) else {
        reject("", "Cannot get image from path: \(path)", nil)
        return
    }
    guard let cgImage = image.cgImage else {
      reject("", "Cannot get cgImage from image", nil)
      return
    }

    // 2
    let request = VNDetectBarcodesRequest { request, error in
      guard let results = request.results as? [VNBarcodeObservation], error == nil else {
        reject("", "Cannot get result from VNDetectBarcodesRequest", nil)
        return
      }

      let qrCodes = results.compactMap { $0.payloadStringValue }
      resolve(qrCodes)
    }
    request.symbologies = [.qr]

    // 3
#if targetEnvironment(simulator)
    request.revision = VNDetectBarcodesRequestRevision1
#endif


    // 4
    let handler = VNImageRequestHandler(cgImage: cgImage, options: [:])
    do {
        try handler.perform([request])
    } catch {
      reject("", "Error when perform request on VNImageRequestHandler: \(error.localizedDescription)", nil)
    }
  }
Giải thích:
- Lấy ảnh dưới dạng UIImage từ đường dẫn truyền vào, sau đó convert thành cgImage
- Tạo request VNDetectBarcodesRequest có closure là phần ta xử lí phần kết quả cũng như lỗi về,
request.symbologieslà phần chúng ta sẽ chỉ diện mã QR mà không nhận diện các loại code khác - Để test được trên simulator thì ta phải hạ phiên bản của Model nhận diện xuống v1, cái này là "tính năng" của nhà Apple 😂
- Chạy request vừa tạo kèm theo xử lí lỗi
Sau đó ở file QrCodeImageScan.mm, bạn phải thêm phần định nghĩa phương vừa mới tạo để phần native code có thể liên kết được với phần JS code bằng cách thêm RCT_EXTERN_METHOD :
@interface RCT_EXTERN_MODULE(QrCodeImageScan, NSObject)
...

RCT_EXTERN_METHOD(scanFromPath:(NSString*)path
                 withResolver:(RCTPromiseResolveBlock)resolve
                 withRejecter:(RCTPromiseRejectBlock)reject)
Kiểm tra phương thức vừa tạo
Vậy là ta đã hoàn thành xong các bước để implement 1 hàm quét QR từ hình ảnh rồi, bây giờ để kiểm tra thì chỉ cần lấy đường dẫn từ trong máy ra rồi truyền vào phương thức scanFromPath. Ở đây mình sẽ dùng react-native-image-picker
import {
  launchImageLibrary,
  type ImageLibraryOptions,
} from "react-native-image-picker";
import { scanFromPath } from "react-native-qr-code-image-scan";

...

  const onPress = useCallback(async () => {
    const option: ImageLibraryOptions = {
      mediaType: "photo",
    };
    const result = await launchImageLibrary(option);
    const uri = result?.assets?.[0]?.uri;
    if (!uri) {
      return;
    }

    const codes = await scanFromPath(uri);
    setQrCodes(codes);
  }, []);
Đối với bạn tạo implement trên project example thì ở phần App.tsx thì sẽ như thế này:
import { StatusBar } from "expo-status-bar";
import { Button, StyleSheet, Text, View } from "react-native";
import {
  launchImageLibrary,
  type ImageLibraryOptions,
} from "react-native-image-picker";
import { useState, useCallback } from "react";
import { scanFromPath } from "react-native-qr-code-image-scan";

export default function App() {
  const [qrCodes, setQrCodes] = useState<string[]>([]);

  const onPress = useCallback(async () => {
    const option: ImageLibraryOptions = {
      mediaType: "photo",
    };
    const result = await launchImageLibrary(option);
    const uri = result?.assets?.[0]?.uri;
    if (!uri) {
      return;
    }

    const codes = await scanFromPath(uri);
    setQrCodes(codes);
  }, []);

  return (
    <View style={styles.container}>
      <StatusBar style="dark" />
      <View style={styles.container}>
        <Text>Result: {qrCodes}</Text>
        <Button onPress={onPress} title="Open Picker" />
      </View>
    </View>
  );
}

const styles = StyleSheet.create({
  container: {
    flex: 1,
    backgroundColor: "#fff",
    alignItems: "center",
    justifyContent: "center",
  },
});
Vậy là xong, chạy ứng dụng lên thì ta sẽ được:
Tham khảo
Bạn có thể tham khảo example mình làm ở đây:
https://github.com/LeXuanKhanh/RNScanQRFromImage
Nếu lười thì đã có thư viện mình viết 😂
All rights reserved