Kubernetes: An Intro to Scalable Deployment in Production - Part 1
Bài đăng này đã không được cập nhật trong 7 năm
In the application development lifecycle, development and deployment goes hand in hand (especially in the agile development strategy).
Although the development cycle is encountered frequently, the initial deployment phase can sometimes turn into a ritual. And, this
often happens just because of misconfiguration or lack of proper decision making in the deployment tooling selection. Since the
deployment strategy often varies a lot from stack to stack, it also often becomes very difficult to find a tool that just works
between stacks and without much hassle. Kubernetes, can be considered as a single deployment tool that just satisfies the demand of
a vast majority of the applications, without much extra effort on stack dependent configuration. Let's have a soft intro to Kubernetes. 
Application Deployment
While developing an application ensures the customer receives the desired feature, deployment ensures that the application becomes available without interruption. The latter one although may seem trivial to some, actually draws a lot of engineering time and resources. Cause, deployment itself is composed of many essential part of the application lifecycle, including but not limited to, release, environment specific configuration management, installation and activation, deactivation, uninstallation, update management, system upgrade, adaptation and more.
Usually an application contains several environment on which it runs during its lifecycle, primarily, development, test, staging and production. Deployment environment is the most important and tricky one, since customer access the application through the production deployment pipeline.
Deployment in Production
Production deployment primarily concerns on decoupled software components which can be scaled up or down independently.
In order to ease the production deployment and management over time, the twelve-factor app strategy is widely recognized. This strategy assists in developing an application in a way so that it is ready to be deployed on a wide range of application deployment platforms and clouds without much effort on platform specific configuration itself. The twelve concerning factors are,
- Codebase
- Dependencies
- Config
- Backing Services
- Build, release, run
- Processes
- Port binding
- Concurrency
- Disposability
- Dev/prod parity
- Logs
- Admin process
Often, deployment platforms expect that applications comply with the above mentioned strategy.
Tooling Options
When considering deployment tooling options, the ecosystem is quite huge. The following are some of the major tools in the ecosystem.
- Kubernetes
- Ansible
- Chef
- Docker swarm
- Openshift
- Heroku
- Apache Mesos
- ...
It can often be very difficult when choosing between the tools and considering metrics like development stack, scaling, complexity, human resource and more. To make things simpler, Kubernetes can be utilized as a stack agnostic single deployment tool that just works without much effort.
Kubernetes
Kubernetes is an open source container orchestration system for automating application deployment, scaling and management. It aims at providing a platform for automating deployment, scaling and operations of application containers across clusters of hosts. It supports container tools like Docker as its backend. Kubernetes makes the application deployment and management easier and faster. Let's have a brief look at a demo application deployment.
An Application Deployment
Let's go through the process of an application deployment on Google Cloud.
Primary Configurations
First, we need to sign up for the google cloud console (at: https://console.cloud.google.com ) and add a payment method by registering a credit card (cause, we can not run more than one instance of compute engine using the free account).
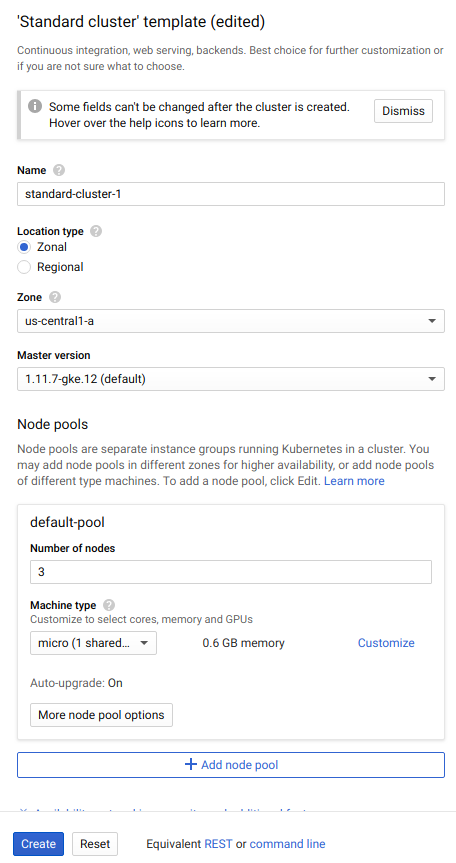
Once the payment method is registered, head to "Dashboard > Products > Kubernetes Engine > Clusters > Create Cluster". Now create a cluster with the default settings and three nodes. Although you may want to change the machine type to "micro", since we do not need much computing and memory resources (and the default instance is "n1-standard-1", which is more expensive).
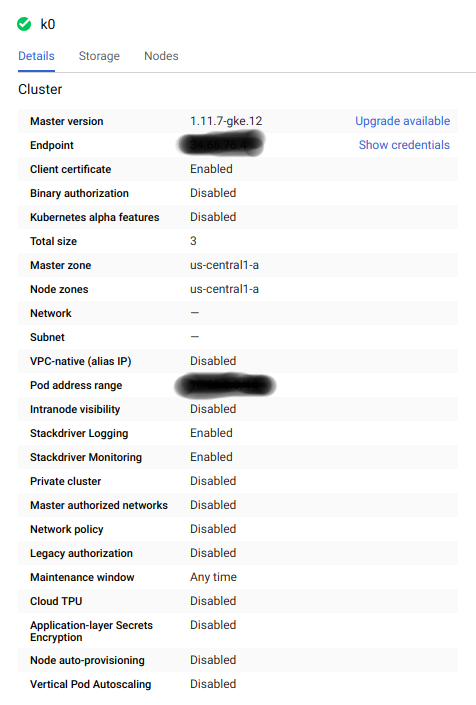
The cluster creation and associated node (VM) deployment will take some time. You may check the cluster detail which will look as follows.
The compute engine VM deployment progress can be tracked from "Dashboard > Products > Compute Engine > VM Instances"
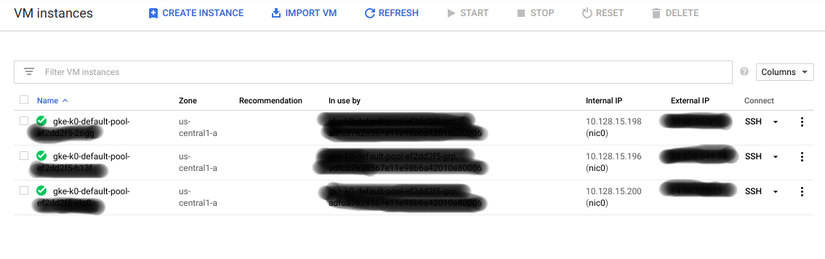
When all the instances are marked as running, you are ready to go.
Now, we wanna interact with the cluster we just created. We are going to use Google "Cloud Shell" for this, cause this magic box has all
the necessary tools readily available for us to begin with. Just a heads up, it can be a bit time consuming and tricky to install and
configure Kubernetes from scratch. So, let's skip that part altogether!
Log in the "Cloud Shell" by clicking on the "console icon" from the top panel on the Google Cloud console. Once we are shelled in the
console, we need to set up our cluster configuration for the kubectl tool (which communicates with the Kubernetes daemon through API,
and the configuration contains all the required credentials). To configure, from the shell, run,
gcloud container clusters get-credentials <CLUSTER_NAME> --zone <ZONE>
This will populate the $HOME/.kube/config with the credentials. To check that we have a successful contact with the Kubernetes cluster, run,
kubectl cluster-info
If you receive an output mentioning several parameters like "Kubernetes master", "GLBCDefaultBackend", ... with associated endpoint, you are
good to go. Yey! 
In kubernetes, all the containers run in what is called a Pod. A pod is a virtual application which contains one or more tightly coupled containers and their dependencies (e.g. Volumes). A pod runs in a specific node (VM) throughout its lifecycle. When a pod is destroyed, all the associated resources also gets destroyed. A pod shares network namespace between it's containers. That implies that all the containers in a pod can communicate with each other without the necessity of using service discovery.
In order to deploy a pod, we have to create a configuration file (often called, pod configuration file, which is usually YAML. Learn more about pods here). Here's what it looks like.
apiVersion: v1
kind: Pod
metadata:
  name: nginx
  labels:
    app: nginx
spec:
  containers:
    - name: nginx
      image: nginx:1.15.11
      ports:
        - name: http
          containerPort: 80
Once we have a pod configuration file, we can simply deploy the pod to our cluster using,
kubectl create -f nginx_pod_config.yml
Now let's check the status of the pod on the cluster using,
kubectl get pods nginx
Once it is in "Running" state, we're all set.
All the logs sent to stdout from a container, can be checked by using,
kubectl logs <CONTAINER_ID>
Or,
kubectl logs -f <CONTAINER_ID>
to follow the realtime log updates.
Now that we have a running pod, can we access it right away? No. That's because, every pod has it's own network namespace. So, if we want to access container ports inside of the pod, we have two different ways.
-
Port forwarding
- Port forwarding, as the name implies, forwards the pod container port to the host port.
- Example:
kubectl port-portforward <POD_NAME> <HOST_PORT>:<CONTAINER_PORT>
-
Service
- Service is a more persistent solution to access the pod container port, which is independent of specific containers.
- Example:
kubectl expose deployments <DEPLOYMENT_NAME> --port <PORT> --type LoadBalancer
So, which one to choose when it comes to deployment. Well, port forwarding option is suitable for debugging or temporary port binding. But, it's not a good choice for production level deployment. For production level port exposing we need to use Service, which binds by pod selector (which we'll go through in another article).
And, now, we can access our deployment from outside of the pod, since we bound the port.
Test that the server is accessible, by running,
curl http://127.0.0.1:80
It should show the Nginx template message. Voila! We just deployed our first pod.
But, there's a catch! The pod may die for various reasons (e.g. the app may crash, resource exhaustion, ...). For production level deployment, we need a more robust way to deploy the application so that the application automatically reboots when certain kinds of failure occurs (e.g. node dies, pod crashed, app in deadlock, ...).
To handle all these issues, Kubernetes offers a solution known as deployment. Deployment automatically reboot a pod if it fails, or creates a new pod on a new node if one of the available nodes become unavailable.
To create a deployment, we have to create a deployment configuration file as follows.
apiVersion: extensions/v1beta1
kind: Deployment
metadata:
  name: nginx
spec:
  replicas: 1
  template:
    metadata:
      labels:
        app: nginx
    spec:
      containers:
        - name: nginx
          image: "nginx:1.15.11"
          ports:
            - name: http
              containerPort: 80
Once we have a deployment configuration file, we can create the deployment using,
kubectl create -f nginx_deployment_config.yml
The final step is to create a service to expose the container port in the deployment, so that it remains available throughout the lifecycle of the application.
kubectl expose deployments <DEPLOYMENT_NAME> --port <PORT> --type LoadBalancer
Finally, verify that the service creation was successful by running,
kubectl get services
And, now we have a production ready deployment on Kubernetes.
This article covers the basics of Kubernetes based deployment. We went through pod, deployment, port-forwarding, logging and services, which
are the fundamental building blocks of Kubernetes based deployment. But, we still haven't covered a lot of topics including configuration
parameters like configmaps, secrets, and certainly scaling. In the next article, we'll go through the up and downscaling of
a Kubernetes based deployment. Hope you enjoyed. Happy deploying!
References
- Kubernetes: https://kubernetes.io/docs/home/
- Twelve-factor app: https://12factor.net
- Pods: https://kubernetes.io/docs/concepts/workloads/pods/pod-overview/
- Deployments: https://kubernetes.io/docs/concepts/workloads/controllers/deployment/
- Services: https://kubernetes.io/docs/concepts/services-networking/service/
- NGINX: https://www.nginx.com/
- Cartoon: https://jvns.ca/teach-tech-with-cartoons/
All rights reserved
